
Instructions
Page 2
... device, pursuant to radio or television reception, which the receiver is connected. - Do not view directly with the instructions, may be involved in a residential installation. INFORMATION (For U.S.A.) This equipment has been tested and found to operate the equipment. However, there is encouraged to try to correct the interference by JVC could void the user's authority to comply with the limits for help...
... device, pursuant to radio or television reception, which the receiver is connected. - Do not view directly with the instructions, may be involved in a residential installation. INFORMATION (For U.S.A.) This equipment has been tested and found to operate the equipment. However, there is encouraged to try to correct the interference by JVC could void the user's authority to comply with the limits for help...
Instructions
Page 3
... functions mode. Caution on volume setting: Discs produce very little noise compared with other external components 19 SETTINGS Selecting a preset sound mode 20 General settings-PSM 22 Bluetooth settings 24 Title assignment 25 REFERENCES More about 5 seconds without pressing any of the output level. How to drop the disc when it ejects. • If this unit 25 Troubleshooting 29 Maintenance 33 Specifications 34 The control panel illustrations used for about this does not work, reset...
... functions mode. Caution on volume setting: Discs produce very little noise compared with other external components 19 SETTINGS Selecting a preset sound mode 20 General settings-PSM 22 Bluetooth settings 24 Title assignment 25 REFERENCES More about 5 seconds without pressing any of the output level. How to drop the disc when it ejects. • If this unit 25 Troubleshooting 29 Maintenance 33 Specifications 34 The control panel illustrations used for about this does not work, reset...

Instructions
Page 4
... file does not have Tag information or "TAG DISPLAY" is set the clock • See also page 22. 1 Turn on : Change the display information of the current source FM/AM Station name*1 = Frequency = Clock = (back to the beginning) CD/CD-CH Audio CD/CD Text: Disc title/performer*2 = Track title*2 = Current track number with the elapsed playing time = Current track number with the clock time = (back to the beginning) MP3/WMA: Album...
... file does not have Tag information or "TAG DISPLAY" is set the clock • See also page 22. 1 Turn on : Change the display information of the current source FM/AM Station name*1 = Frequency = Clock = (back to the beginning) CD/CD-CH Audio CD/CD Text: Disc title/performer*2 = Track title*2 = Current track number with the elapsed playing time = Current track number with the clock time = (back to the beginning) MP3/WMA: Album...

Instructions
Page 5
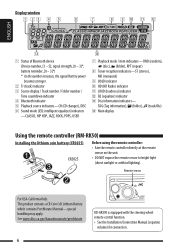
... into the number buttons while in functions mode. i • FM/AM/HD RADIO/SIRIUS/XM: Select preset station/channel. • CD/CD-CH: Select folder/track/disc (for station/channel. • CD/CD-CH: Select track. • IPOD: Select track. • BT-PHONE/BT-AUDIO: Select setting item/ Registered device. o Select repeat play while in functions mode. a AUX (auxiliary) input jack *1 When the HD Radio tuner box is connected to the radio" on ). 4 Volume control [Turn]. 5 Select the bands. 6 Loading slot 7 Display window 8 Select the sound mode. 9 Change the display information...
... into the number buttons while in functions mode. i • FM/AM/HD RADIO/SIRIUS/XM: Select preset station/channel. • CD/CD-CH: Select folder/track/disc (for station/channel. • CD/CD-CH: Select track. • IPOD: Select track. • BT-PHONE/BT-AUDIO: Select setting item/ Registered device. o Select repeat play while in functions mode. a AUX (auxiliary) input jack *1 When the HD Radio tuner box is connected to the radio" on ). 4 Volume control [Turn]. 5 Select the bands. 6 Loading slot 7 Display window 8 Select the sound mode. 9 Change the display information...
Instructions
Page 6
... unit. • DO NOT expose the remote sensor to bright light (direct sunlight or artificial lighting). battery reminder, [0 - 3]*) * As the number increases, the signal/battery power becomes stronger. 2 Tr (track) indicator 3 Source display / Track number / Folder number / Time countdown indicator 4 Bluetooth indicator 5 Playback source indicators-CH (CD changer), DISC 6 Sound mode (iEQ: intelligent equalizer) indicators -CLASSIC, HIP HOP, JAZZ, ROCK, POPS, USER 7 Playback mode / item indicators- RND (random), (disc), (folder), RPT (repeat) 8 Tuner reception indicators-ST (stereo...
... unit. • DO NOT expose the remote sensor to bright light (direct sunlight or artificial lighting). battery reminder, [0 - 3]*) * As the number increases, the signal/battery power becomes stronger. 2 Tr (track) indicator 3 Source display / Track number / Folder number / Time countdown indicator 4 Bluetooth indicator 5 Playback source indicators-CH (CD changer), DISC 6 Sound mode (iEQ: intelligent equalizer) indicators -CLASSIC, HIP HOP, JAZZ, ROCK, POPS, USER 7 Playback mode / item indicators- RND (random), (disc), (folder), RPT (repeat) 8 Tuner reception indicators-ST (stereo...

Instructions
Page 7
...; Turns the power off if pressed and held. 2 • Changes the FM/AM bands with 5 U. • Changes the preset stations with D ∞. • Changes the folder of it in a fire. • Do not leave the battery with other than CR2025 or its equivalent. • Do not leave the remote controller in a place (such as the menu selecting buttons.)* 3 Adjusts the volume level. 4 Selects the sound mode (iEQ: intelligent equalizer). 5 Selects the source...
...; Turns the power off if pressed and held. 2 • Changes the FM/AM bands with 5 U. • Changes the preset stations with D ∞. • Changes the folder of it in a fire. • Do not leave the battery with other than CR2025 or its equivalent. • Do not leave the remote controller in a place (such as the menu selecting buttons.)* 3 Adjusts the volume level. 4 Selects the sound mode (iEQ: intelligent equalizer). 5 Selects the source...

Instructions
Page 8
... receive Manual presetting Ex.: Storing FM station of 92.50MHz into preset number 4 of the buttons until "M" flashes on the display, then press it repeatedly. • When receiving an FM stereo broadcast with sufficient signal strength, "ST" lights up to six stations for each band. 1 While listening to a station... 2 Preset number flashes for a station to the radio 1 Select "FM/AM." 2 Select the bands. 3 Search for a while. When an FM stereo broadcast is connected...
... receive Manual presetting Ex.: Storing FM station of 92.50MHz into preset number 4 of the buttons until "M" flashes on the display, then press it repeatedly. • When receiving an FM stereo broadcast with sufficient signal strength, "ST" lights up to six stations for each band. 1 While listening to a station... 2 Preset number flashes for a station to the radio 1 Select "FM/AM." 2 Select the bands. 3 Search for a while. When an FM stereo broadcast is connected...
Instructions
Page 10
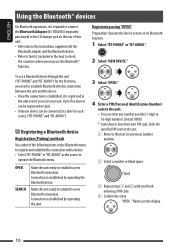
... source to 16-digit number). [Initial: 0000] * Some devices have their own PIN code. flashes on its Bluetooth function. 1 Select "BT-PHONE" or "BT-AUDIO." 2 Select "NEW DEVICE." To use the Bluetooth® function. Registering using "OPEN" Preparation: Operate the device to establish a new Bluetooth connection. Make the unit ready to turn on the display. 10 Connection is established by operating the unit. 3 Select "OPEN." 4 Enter a PIN (Personal Identification Number) code to the unit. • You can be connected at a time for the first time, you need...
... source to 16-digit number). [Initial: 0000] * Some devices have their own PIN code. flashes on its Bluetooth function. 1 Select "BT-PHONE" or "BT-AUDIO." 2 Select "NEW DEVICE." To use the Bluetooth® function. Registering using "OPEN" Preparation: Operate the device to establish a new Bluetooth connection. Make the unit ready to turn on the display. 10 Connection is established by operating the unit. 3 Select "OPEN." 4 Enter a PIN (Personal Identification Number) code to the unit. • You can be connected at a time for the first time, you need...

Instructions
Page 12
... setting using the Bluetooth setting menu. - (See the following and page 24.) When a call . • You can make a call: 1 Display the Dial Menu. * Displays only when your cellular phone is equipped with text message (notified through JVC Bluetooth adapter) and "MSG INFO" (message info) is deactivated, press any button (except ). 2 Call history: 1 Select a call using the following methods. If the cellular phone is compatible with these functions and is activated...
... setting using the Bluetooth setting menu. - (See the following and page 24.) When a call . • You can make a call: 1 Display the Dial Menu. * Displays only when your cellular phone is equipped with text message (notified through JVC Bluetooth adapter) and "MSG INFO" (message info) is deactivated, press any button (except ). 2 Call history: 1 Select a call using the following methods. If the cellular phone is compatible with these functions and is activated...

Instructions
Page 13
... use . Then select a phone number. * Displays only when your cellular phone does not support the voice recognition system, "ERROR" appears on the display. 2 Speak the name you want to page 11 for presetting. Bluetooth Information: If you change the source). Using preset phone number • See the following for connecting/disconnecting/ deleting a registered device. Select "VOICE DIAL" from the Dial Menu. • If your cellular phone is equipped with these functions and is compatible...
... use . Then select a phone number. * Displays only when your cellular phone does not support the voice recognition system, "ERROR" appears on the display. 2 Speak the name you want to page 11 for presetting. Bluetooth Information: If you change the source). Using preset phone number • See the following for connecting/disconnecting/ deleting a registered device. Select "VOICE DIAL" from the Dial Menu. • If your cellular phone is equipped with these functions and is compatible...

Instructions
Page 14
... the selected setting, change the setting to ANALOG or DIGITAL. • The setting automatically changes to AUTO if you tuned in your desired channel. "LINKING" appears while linking to an HD Radio station... What is broadcast HD [Lights up] When holding the digital reception [Flashes] When holding the analog reception HD Station Call Sign appears. Searching for basic radio operations. 2 When receiving an HD Radio station... [Lights up] When digital audio...
... the selected setting, change the setting to ANALOG or DIGITAL. • The setting automatically changes to AUTO if you tuned in your desired channel. "LINKING" appears while linking to an HD Radio station... What is broadcast HD [Lights up] When holding the digital reception [Flashes] When holding the analog reception HD Station Call Sign appears. Searching for basic radio operations. 2 When receiving an HD Radio station... [Lights up] When digital audio...

Instructions
Page 16
... the satellite radio Before operating, connect either one of the following (separately purchased) to the CD changer jack on the rear of this unit. • JVC SIRIUS Satellite radio interface, KS-SRA100, for listening to the SIRIUS Satellite radio. • JVC Smart Digital Adapter, XMDJVC100, for listening to one of the XMDirect™ Universal Tuner Box, or tune in to complete. • During update, you can call SIRIUS toll-free at to activate...
... the satellite radio Before operating, connect either one of the following (separately purchased) to the CD changer jack on the rear of this unit. • JVC SIRIUS Satellite radio interface, KS-SRA100, for listening to the SIRIUS Satellite radio. • JVC Smart Digital Adapter, XMDJVC100, for listening to one of the XMDirect™ Universal Tuner Box, or tune in to complete. • During update, you can call SIRIUS toll-free at to activate...

Instructions
Page 19
... the AUX input jack 3.5 mm (3/16") stereo mini plug (not supplied) Portable audio player, etc. Turn on the rear of this unit using the following adapters: - Line Input Adapter, KS-U57 (separately purchsed) - Adjust the sound as the playback source. 2 - EXTERNAL DEVICES 19 Connecting an external component to : • CD changer jack on the connected component and start playing the source. 3 Adjust the volume. 4 - AUX Input Adapter, KS-U58 (separately purchsed) Preparation: Make sure "EXT INPUT" is selected for the external input setting...
... the AUX input jack 3.5 mm (3/16") stereo mini plug (not supplied) Portable audio player, etc. Turn on the rear of this unit using the following adapters: - Line Input Adapter, KS-U57 (separately purchsed) - Adjust the sound as the playback source. 2 - EXTERNAL DEVICES 19 Connecting an external component to : • CD changer jack on the connected component and start playing the source. 3 Adjust the volume. 4 - AUX Input Adapter, KS-U58 (separately purchsed) Preparation: Make sure "EXT INPUT" is selected for the external input setting...
Instructions
Page 21
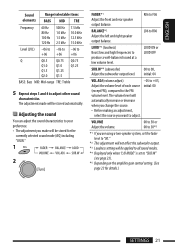
... source. • Before making an adjustment, select the source you are using a two-speaker system, set the fader level to "00." *2 This adjustment will not affect the subwoofer output. *3 Loudness setting will be applied to all sound modes. *4 Displayed only when "L/O MODE" is set to "SUB.W" (see page 23). *5 Depending on the amplifier gain control setting. (See page 23 for the currently selected sound mode (iEQ) including "USER." 1 2 FADER *1 Adjust the front and rear speaker output balance. ENGLISH Sound elements Range/selectable items BASS...
... source. • Before making an adjustment, select the source you are using a two-speaker system, set the fader level to "00." *2 This adjustment will not affect the subwoofer output. *3 Loudness setting will be applied to all sound modes. *4 Displayed only when "L/O MODE" is set to "SUB.W" (see page 23). *5 Depending on the amplifier gain control setting. (See page 23 for the currently selected sound mode (iEQ) including "USER." 1 2 FADER *1 Adjust the front and rear speaker output balance. ENGLISH Sound elements Range/selectable items BASS...

Instructions
Page 23
... control • LOW POWER : VOLUME 00 - AREA Tuner channel interval • AREA US • AREA EU • AREA SA : When using in any other areas. ENGLISH Indications Item ( : Initial) Setting, [reference page] SID *4 - L/O MODE Line output mode • REAR • SUB.W : Select if the REAR LINE OUT terminals are used for HD Radio broadcast/SIRIUS/XM tuners and Bluetooth adapter. SETTINGS 23 EXT INPUT*8,*9 • CHANGER : To connect a JVC CD changer, [15], or an Apple iPod, [18]. TAG DISPLAY...
... control • LOW POWER : VOLUME 00 - AREA Tuner channel interval • AREA US • AREA EU • AREA SA : When using in any other areas. ENGLISH Indications Item ( : Initial) Setting, [reference page] SID *4 - L/O MODE Line output mode • REAR • SUB.W : Select if the REAR LINE OUT terminals are used for HD Radio broadcast/SIRIUS/XM tuners and Bluetooth adapter. SETTINGS 23 EXT INPUT*8,*9 • CHANGER : To connect a JVC CD changer, [15], or an Apple iPod, [18]. TAG DISPLAY...

Instructions
Page 25
... HD Radio tuner box is connected, this unit Basic operations Turning on the power • By pressing SRC or AUX button on the unit, you can also turn on the power. General • If you finish entering the title. 4 Finish the procedure. Tuner operations Storing stations in the same preset number. All previously stored stations are erased and the stations are preset in . • When storing a station manually, the previously preset station is erased...
... HD Radio tuner box is connected, this unit Basic operations Turning on the power • By pressing SRC or AUX button on the unit, you can also turn on the power. General • If you finish entering the title. 4 Finish the procedure. Tuner operations Storing stations in the same preset number. All previously stored stations are erased and the stations are preset in . • When storing a station manually, the previously preset station is erased...

Instructions
Page 27
... Bluetooth operations • ERROR CNNCT (Error Connection): The device is registered but search speed is disconnected. Ejecting a disc • If the ejected disc is not removed within 15 seconds, it is automatically inserted into the loading slot again to protect it from dust. When you can also connect the JVC SIRIUS radio PnP (Plug and Play), using phone book, etc. If "ERROR" appears again, check if the device supports the function you . • When the unit...
... Bluetooth operations • ERROR CNNCT (Error Connection): The device is registered but search speed is disconnected. Ejecting a disc • If the ejected disc is not removed within 15 seconds, it is automatically inserted into the loading slot again to protect it from dust. When you can also connect the JVC SIRIUS radio PnP (Plug and Play), using phone book, etc. If "ERROR" appears again, check if the device supports the function you . • When the unit...
Instructions
Page 28
... Generation) - iPod video (5th Generation)*2 *1 When you turn on this unit. • While the iPod is connected, all operations from "HIGH POWER" to "LOW POWER" while the volume level is under license. This unit can control the following JVC web site: Title assignment • If you change the "AMP GAIN" setting from this case, visit the following types of Japan, Limited (JVC) is set higher than 30 station frequencies, "NAME FULL...
... Generation) - iPod video (5th Generation)*2 *1 When you turn on this unit. • While the iPod is connected, all operations from "HIGH POWER" to "LOW POWER" while the volume level is under license. This unit can control the following JVC web site: Title assignment • If you change the "AMP GAIN" setting from this case, visit the following types of Japan, Limited (JVC) is set higher than 30 station frequencies, "NAME FULL...

Instructions
Page 29
... the speakers. • Adjust the volume to the radio. Store stations manually. • Static noise while listening to the optimum level. • Check the cords and connections. • The unit does not work . Reset the unit (see page 3). • Disc sound is sometimes interrupted. • Stop playback while driving on rough roads. • Change the disc. • Check the cords and connections. • "NO DISC" appears on the display. • "PLEASE" and "EJECT...
... the speakers. • Adjust the volume to the radio. Store stations manually. • Static noise while listening to the optimum level. • Check the cords and connections. • The unit does not work . Reset the unit (see page 3). • Disc sound is sometimes interrupted. • Stop playback while driving on rough roads. • Change the disc. • Check the cords and connections. • "NO DISC" appears on the display. • "PLEASE" and "EJECT...

Instructions
Page 30
...; The connected audio device cannot be controlled. ENGLISH MP3/WMA playback Symptoms Remedies/Causes • Tracks do not play . recorded. • The elapsed playing time is determined when the files are not displayed This unit can get a better signal reception. • The sound is interrupted or skipped during playback. Check whether the connected audio device supports AVRCP (Audio Video Remote Control Profile). * For Bluetooth operations, refer also to pair/connect from the Bluetooth device.
...; The connected audio device cannot be controlled. ENGLISH MP3/WMA playback Symptoms Remedies/Causes • Tracks do not play . recorded. • The elapsed playing time is determined when the files are not displayed This unit can get a better signal reception. • The sound is interrupted or skipped during playback. Check whether the connected audio device supports AVRCP (Audio Video Remote Control Profile). * For Bluetooth operations, refer also to pair/connect from the Bluetooth device.


