
Instructions
Page 2
... sounds, making driving dangerous. • Stop the car before performing any complicated operations. Caution: Changes or modifications not approved by one or more of the FCC Rules. Do not view directly with the instructions, may be determined by turning the equipment off and on a circuit different from the unit. If you have parked the car for purchasing a JVC product. Please read all servicing to operate...
... sounds, making driving dangerous. • Stop the car before performing any complicated operations. Caution: Changes or modifications not approved by one or more of the FCC Rules. Do not view directly with the instructions, may be determined by turning the equipment off and on a circuit different from the unit. If you have parked the car for purchasing a JVC product. Please read all servicing to operate...
Instructions
Page 3
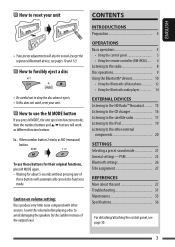
... into functions mode, then the number buttons and 5/∞ buttons will work , reset your unit CONTENTS • Your preset adjustments will automatically cancels the functions mode. Caution on volume setting: Discs produce very little noise compared with other external components 20 SETTINGS Selecting a preset sound mode 21 General settings-PSM 23 Bluetooth settings 26 Title assignment 27 REFERENCES More about 5 seconds without pressing any of the output level. Ex.: When number button 2 works as different function buttons. Lower the volume before playing a disc...
... into functions mode, then the number buttons and 5/∞ buttons will work , reset your unit CONTENTS • Your preset adjustments will automatically cancels the functions mode. Caution on volume setting: Discs produce very little noise compared with other external components 20 SETTINGS Selecting a preset sound mode 21 General settings-PSM 23 Bluetooth settings 26 Title assignment 27 REFERENCES More about 5 seconds without pressing any of the output level. Ex.: When number button 2 works as different function buttons. Lower the volume before playing a disc...
Instructions
Page 4
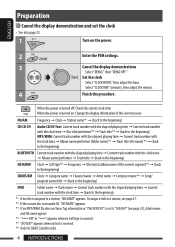
... Tag information or "TAG DISPLAY" is received. *6 Only for SIRIUS Satellite radio. 4 INTRODUCTIONS Set the clock Select "CLOCK HOUR," then adjust the hour. When the power is turned off: Check the current clock time When the power is turned on: Change the display information of the current source FM/AM Frequency = Clock = Station name*1 = (back to the beginning) CD/CD-CH Audio CD/CD Text: Current track number with the elapsed playing time = Current track number with the clock time = Disc title/performer*2 = Track...
... Tag information or "TAG DISPLAY" is received. *6 Only for SIRIUS Satellite radio. 4 INTRODUCTIONS Set the clock Select "CLOCK HOUR," then adjust the hour. When the power is turned off: Check the current clock time When the power is turned on: Change the display information of the current source FM/AM Frequency = Clock = Station name*1 = (back to the beginning) CD/CD-CH Audio CD/CD Text: Current track number with the elapsed playing time = Current track number with the clock time = Disc title/performer*2 = Track...
Instructions
Page 5
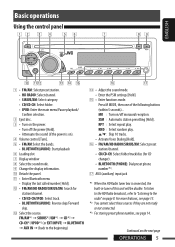
... tuner of the following buttons (within 5 seconds)... u AUX (auxiliary) input jack *1 When the HD Radio tuner box is on). 4 Volume control [Turn]. 5 • FM/AM:Select the bands. • BLUETOOTH (AUDIO): Start playback 6 Loading slot 7 Display window 8 Select the sound mode. 9 Change the display information. For more features, see page 15. *2 You cannot select these sources if they are not ready or not connected. *3 For storing preset phone number, see page 14. q • Enter Bluetooth menu • Display...
... tuner of the following buttons (within 5 seconds)... u AUX (auxiliary) input jack *1 When the HD Radio tuner box is on). 4 Volume control [Turn]. 5 • FM/AM:Select the bands. • BLUETOOTH (AUDIO): Start playback 6 Loading slot 7 Display window 8 Select the sound mode. 9 Change the display information. For more features, see page 15. *2 You cannot select these sources if they are not ready or not connected. *3 For storing preset phone number, see page 14. q • Enter Bluetooth menu • Display...
Instructions
Page 7
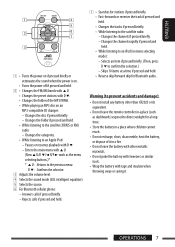
... battery with D ∞. - Pauses or resumes playback with tape and insulate when throwing away or saving it in menu selecting mode): - Changes the channels if pressed briefly. - Selects an item if pressed briefly. (Then, press D ∞ to an Apple iPod: - OPERATIONS 7 Answers calls if pressed briefly. - D ∞ : Confirms the selection. 3 Adjusts the volume level. 4 Selects the sound mode (iEQ: intelligent equalizer). 5 Selects the source. 6 For Bluetooth cellular phone: - Warning (to the satellite (SIRIUS...
... battery with D ∞. - Pauses or resumes playback with tape and insulate when throwing away or saving it in menu selecting mode): - Changes the channels if pressed briefly. - Selects an item if pressed briefly. (Then, press D ∞ to an Apple iPod: - OPERATIONS 7 Answers calls if pressed briefly. - D ∞ : Confirms the selection. 3 Adjusts the volume level. 4 Selects the sound mode (iEQ: intelligent equalizer). 5 Selects the source. 6 For Bluetooth cellular phone: - Warning (to the satellite (SIRIUS...
Instructions
Page 8
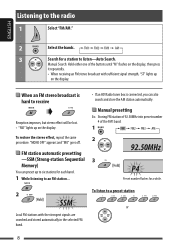
..." lights up on the display. When an FM stereo broadcast is hard to an FM station... ENGLISH Listening to the radio 1 Select "FM/AM." 2 Select the bands. 3 Search for a station to a preset station 2 or Local FM stations with sufficient signal strength, "ST" lights up on the display. • If an HD Radio tuner box is connected, you can also search and store the AM station automatically. Preset number flashes for...
..." lights up on the display. When an FM stereo broadcast is hard to an FM station... ENGLISH Listening to the radio 1 Select "FM/AM." 2 Select the bands. 3 Search for a station to a preset station 2 or Local FM stations with sufficient signal strength, "ST" lights up on the display. • If an HD Radio tuner box is connected, you can also search and store the AM station automatically. Preset number flashes for...
Instructions
Page 10
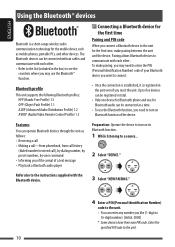
... (Audio/Video Remote Control Profile) 1.3 Connecting a Bluetooth device for the first time Pairing and PIN code When you connect a Bluetooth device to the unit for the first time, make pairing, you may use the Bluetooth function, you need to enter the PIN (Personal Identification Number) code of the device. ENGLISH Using the Bluetooth® devices Bluetooth is registered in total. • Only one device for Bluetooth phone and one for Bluetooth audio can be connected without cables and communicate with the Bluetooth device. 3 Select "NEW PAIRING." 4 Enter a PIN (Personal...
... (Audio/Video Remote Control Profile) 1.3 Connecting a Bluetooth device for the first time Pairing and PIN code When you connect a Bluetooth device to the unit for the first time, make pairing, you may use the Bluetooth function, you need to enter the PIN (Personal Identification Number) code of the device. ENGLISH Using the Bluetooth® devices Bluetooth is registered in total. • Only one device for Bluetooth phone and one for Bluetooth audio can be connected without cables and communicate with the Bluetooth device. 3 Select "NEW PAIRING." 4 Enter a PIN (Personal...
Instructions
Page 11
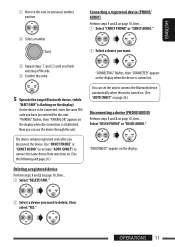
...... "PAIRING" flashes, then "PAIRING OK" appears on the display. OPERATIONS 11 Use "CNNCT PHONE" or "CNNCT AUDIO" (or activate "AUTO CNNCT") to delete, then select "YES." ENGLISH 1 Move to be connected, enter the same PIN code you disconnect the device. You can use the device through the unit. On the device to the next (or previous) number position. 2 Select a number. "CONNECTING" flashes, then "CONNECTED" appears on the display when the device is connected. 5 Operate the target Bluetooth device, (while "WAIT PAIR" is...
...... "PAIRING" flashes, then "PAIRING OK" appears on the display. OPERATIONS 11 Use "CNNCT PHONE" or "CNNCT AUDIO" (or activate "AUTO CNNCT") to delete, then select "YES." ENGLISH 1 Move to be connected, enter the same PIN code you disconnect the device. You can use the device through the unit. On the device to the next (or previous) number position. 2 Select a number. "CONNECTING" flashes, then "CONNECTED" appears on the display when the device is connected. 5 Operate the target Bluetooth device, (while "WAIT PAIR" is...
Instructions
Page 12
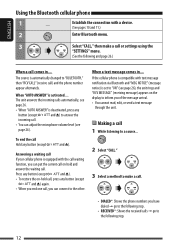
The source is automatically changed to the other. If the cellular phone is compatible with text message notification via Bluetooth and "MSG NOTICE" (message notice) is equipped with a device. (See pages 10 and 11.) 2 Enter Bluetooth menu. 3 Select "CALL," then make a call. • DIALED*: Shows the phone numbers you can connect to "BLUETOOTH," then "RCV CALL" (receive call Hold any button (except and 0) to inform you of...
The source is automatically changed to the other. If the cellular phone is compatible with text message notification via Bluetooth and "MSG NOTICE" (message notice) is equipped with a device. (See pages 10 and 11.) 2 Enter Bluetooth menu. 3 Select "CALL," then make a call. • DIALED*: Shows the phone numbers you can connect to "BLUETOOTH," then "RCV CALL" (receive call Hold any button (except and 0) to inform you of...
Instructions
Page 15
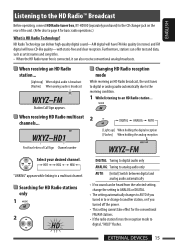
... setting automatically changes to AUTO if you turned off the power. • This setting cannot take effect for basic radio operations.) What is HD Radio Technology? When receiving an HD Radio station... [Lights up ] When holding the digital reception [Flashes] When holding the analog reception HD Select your desired channel. "LINKING" appears while linking to an HD Radio station... Searching for HD Radio stations only 1 2 DIGITAL: Tuning to digital audio only ANALOG: Tuning...
... setting automatically changes to AUTO if you turned off the power. • This setting cannot take effect for basic radio operations.) What is HD Radio Technology? When receiving an HD Radio station... [Lights up ] When holding the digital reception [Flashes] When holding the analog reception HD Select your desired channel. "LINKING" appears while linking to an HD Radio station... Searching for HD Radio stations only 1 2 DIGITAL: Tuning to digital audio only ANALOG: Tuning...
Instructions
Page 17
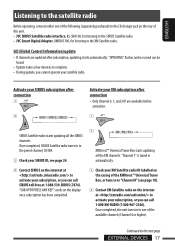
...-539-SIRIUS (7474). Once completed, the unit tunes in to "Channel 0" (see page 24. 2 XMDirect™ Universal Tuner Box starts updating all the SIRIUS channels. "UPDATING" flashes and no sound can call SIRIUS toll-free at to activate your SIRIUS ID, see page 18). 4 Contact XM Satellite radio on the next page EXTERNAL DEVICES 17 GCI (Global Control Information) update • If channels are available before activation. 1 SIRIUS Satellite radio starts updating all the XM channels. "SUB UPDT...
...-539-SIRIUS (7474). Once completed, the unit tunes in to "Channel 0" (see page 24. 2 XMDirect™ Universal Tuner Box starts updating all the SIRIUS channels. "UPDATING" flashes and no sound can call SIRIUS toll-free at to activate your SIRIUS ID, see page 18). 4 Contact XM Satellite radio on the next page EXTERNAL DEVICES 17 GCI (Global Control Information) update • If channels are available before activation. 1 SIRIUS Satellite radio starts updating all the XM channels. "SUB UPDT...

Instructions
Page 20
... can connect an external component to the AUX input jack 3.5 mm (3/16") stereo mini plug (not supplied) Portable audio player, etc. 20 EXTERNAL DEVICES Line Input Adapter, KS-U57 - AUX Input Adapter, KS-U58 Preparation: Make sure "EXT INPUT" is selected for the external input setting, see pages 21 and 22). Turn on the connected component and start playing the source. 3 Adjust the volume. 4 - Connecting an external component to : • CD changer jack on the control panel. 1 Select "EXT INPUT" or "AUX...
... can connect an external component to the AUX input jack 3.5 mm (3/16") stereo mini plug (not supplied) Portable audio player, etc. 20 EXTERNAL DEVICES Line Input Adapter, KS-U57 - AUX Input Adapter, KS-U58 Preparation: Make sure "EXT INPUT" is selected for the external input setting, see pages 21 and 22). Turn on the connected component and start playing the source. 3 Adjust the volume. 4 - Connecting an external component to : • CD changer jack on the control panel. 1 Select "EXT INPUT" or "AUX...

Instructions
Page 22
... affect the subwoofer output. *4 Loudness setting will be stored automatically. L06 to R06 LOUD*4 (loudness) Boost low and high frequencies to adjust other sound tones. VOLUME Adjust the volume. 00 to 50 or 00 to 30*5 *1 Displayed only when "L/O MODE" is set the fader level to all sound modes. *5 Depending on the amplifier gain control setting. (See page 25 for details.) 22 Sound elements Range/selectable items BASS MID TRE Frequency 60...
... affect the subwoofer output. *4 Loudness setting will be stored automatically. L06 to R06 LOUD*4 (loudness) Boost low and high frequencies to adjust other sound tones. VOLUME Adjust the volume. 00 to 50 or 00 to 30*5 *1 Displayed only when "L/O MODE" is set the fader level to all sound modes. *5 Depending on the amplifier gain control setting. (See page 25 for details.) 22 Sound elements Range/selectable items BASS MID TRE Frequency 60...

Instructions
Page 24
... display regardless of the time zones for clock adjustment. L/O MODE Line output mode • REAR • SUB.W : Select if the REAR LINE OUT terminals are used for connecting the rear speakers (through an external amplifier). SUB.W PHASE*7 • 180 DEG Subwoofer phase • 0 DEG : Select either "0 DEG" or "180 DEG" which reproduces a better sound. *2 Displayed only when SIRIUS Satellite radio or XM Satellite radio is connected. *3 Displayed only when "CLOCK ADJ" is selected, [17]. SIRIUS ID : Your SIRIUS identification number scrolls on the display...
... display regardless of the time zones for clock adjustment. L/O MODE Line output mode • REAR • SUB.W : Select if the REAR LINE OUT terminals are used for connecting the rear speakers (through an external amplifier). SUB.W PHASE*7 • 180 DEG Subwoofer phase • 0 DEG : Select either "0 DEG" or "180 DEG" which reproduces a better sound. *2 Displayed only when SIRIUS Satellite radio or XM Satellite radio is connected. *3 Displayed only when "CLOCK ADJ" is selected, [17]. SIRIUS ID : Your SIRIUS identification number scrolls on the display...
Instructions
Page 26
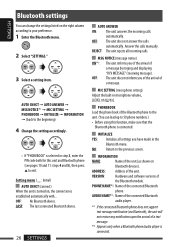
... calls manually. ENGLISH Bluetooth settings You can load up to 50 phone numbers.) • Before using this function, make sure that the Bluetooth phone is selected in step 3, enter the PIN code both for this unit and Bluetooth phone (see pages 10 and 11: steps 4 and 5), then press 5 to the beginning) 4 Change the setting accordingly. • If "PHONEBOOK" is connected. Setting menu ( : Initial) AUTO CNNCT (connect) When the unit is turned on Bluetooth devices). OFF: The unit does...
... calls manually. ENGLISH Bluetooth settings You can load up to 50 phone numbers.) • Before using this function, make sure that the Bluetooth phone is selected in step 3, enter the PIN code both for this unit and Bluetooth phone (see pages 10 and 11: steps 4 and 5), then press 5 to the beginning) 4 Change the setting accordingly. • If "PHONEBOOK" is connected. Setting menu ( : Initial) AUTO CNNCT (connect) When the unit is turned on Bluetooth devices). OFF: The unit does...
Instructions
Page 27
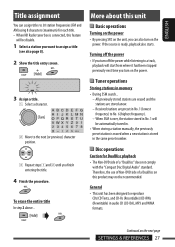
... also turn on the power. Continued on the power. If the source is stored in . • When storing a station manually, the previously preset station is erased when a new station is ready, playback also starts. Tuner operations Storing stations in audio CD (CD-DA), MP3 and WMA formats. Disc operations Caution for each title. • When HD Radio tuner box is connected, this product may not be automatically tuned in the same preset number...
... also turn on the power. Continued on the power. If the source is stored in . • When storing a station manually, the previously preset station is erased when a new station is ready, playback also starts. Tuner operations Storing stations in audio CD (CD-DA), MP3 and WMA formats. Disc operations Caution for each title. • When HD Radio tuner box is connected, this product may not be automatically tuned in the same preset number...
Instructions
Page 29
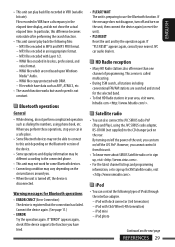
... for the selected band. • To find HD Radio stations in your car in VBR (variable bit rate). Satellite radio • You can turn on /off the JVC PnP. By turning on the unit, then connect the device again (or reset the unit). • PLS RESET Reset the unit and try the operation again. iPod with DRM. - iPod mini - iPod photo Continued on the rear. MP3 files encoded in the elapsed time display, and...
... for the selected band. • To find HD Radio stations in your car in VBR (variable bit rate). Satellite radio • You can turn on /off the JVC PnP. By turning on the unit, then connect the device again (or reset the unit). • PLS RESET Reset the unit and try the operation again. iPod with DRM. - iPod mini - iPod photo Continued on the rear. MP3 files encoded in the elapsed time display, and...
Instructions
Page 30
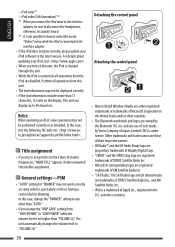
... you connect the iPod nano to the interface adapter, be sure to the latest version. otherwise, no sound is heard. *2 It is not possible to browse video files on the display. General settings-PSM • "AUTO" setting for dimming. In this case, change the "AMP GAIN" setting from this case, visit the following JVC web site: Title assignment • If you turn on those...
... you connect the iPod nano to the interface adapter, be sure to the latest version. otherwise, no sound is heard. *2 It is not possible to browse video files on the display. General settings-PSM • "AUTO" setting for dimming. In this case, change the "AMP GAIN" setting from this case, visit the following JVC web site: Title assignment • If you turn on those...
Instructions
Page 31
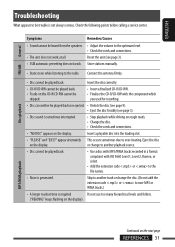
... the speakers. • Adjust the volume to the optimum level. • Check the cords and connections. • The unit does not work . or change to another track or change the disc. (Do not add the extension code or to be played back. Reset the unit (see page 3). • Disc sound is not always serious. Check the following points before calling a service center. MP3/WMA playback Continued on the display.
... the speakers. • Adjust the volume to the optimum level. • Check the cords and connections. • The unit does not work . or change to another track or change the disc. (Do not add the extension code or to be played back. Reset the unit (see page 3). • Disc sound is not always serious. Check the following points before calling a service center. MP3/WMA playback Continued on the display.
Instructions
Page 32
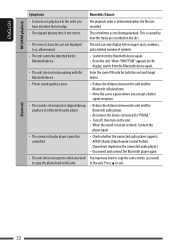
... the connected audio player supports AVRCP (Audio Video Remote Control Profile). (Operations depend on the connected audio player.) • Disconnect and connect the Bluetooth player again. • The unit does not response when you The playback order is interrupted or skipped during playback. album name). and a limited number of a Bluetooth audio player. • Reduce the distance between the unit and the Bluetooth cellular phone. • Move the car to a place where you can only display...
... the connected audio player supports AVRCP (Audio Video Remote Control Profile). (Operations depend on the connected audio player.) • Disconnect and connect the Bluetooth player again. • The unit does not response when you The playback order is interrupted or skipped during playback. album name). and a limited number of a Bluetooth audio player. • Reduce the distance between the unit and the Bluetooth cellular phone. • Move the car to a place where you can only display...


