Instructions
Page 2
...generates, uses and can be of sufficient magnitude to constitute a risk of electric shock to comply with Part 15 of Conformity Model Number: HX-C6 Trade Name: JVC Responsible Party: JVC Americas Corp. Consult the dealer or an experienced radio/TV technician for a Class B digital device, ...pursuant to part 15 of the FCC Rules.These limits are designed to radio or television reception, which...
...generates, uses and can be of sufficient magnitude to constitute a risk of electric shock to comply with Part 15 of Conformity Model Number: HX-C6 Trade Name: JVC Responsible Party: JVC Americas Corp. Consult the dealer or an experienced radio/TV technician for a Class B digital device, ...pursuant to part 15 of the FCC Rules.These limits are designed to radio or television reception, which...
Instructions
Page 4
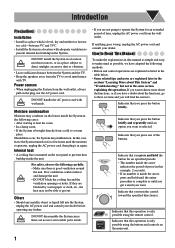
...using the buttons and controls on the lenses inside . • If you turn the control toward the specified direction(s). DO NOT disassemble the System since there are blocked by a newspaper or cloth, etc., the heat may malfunction. Moisture condensation Moisture may condense on the main unit.... your dealer. How to Read This Manual To make the explanations in this example, 2 seconds). • If no user serviceable parts inside the System in the following cases: • After starting to prevent internal heat buildup in a location with wet hands. Indicate that you press...
...using the buttons and controls on the lenses inside . • If you turn the control toward the specified direction(s). DO NOT disassemble the System since there are blocked by a newspaper or cloth, etc., the heat may malfunction. Moisture condensation Moisture may condense on the main unit.... your dealer. How to Read This Manual To make the explanations in this example, 2 seconds). • If no user serviceable parts inside the System in the following cases: • After starting to prevent internal heat buildup in a location with wet hands. Indicate that you press...

Instructions
Page 5
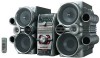
Contents Introduction 1 Precautions 1 How to Read This Manual 1 Getting Started 3 Step 1: Unpack 3 Step 2: Prepare the Remote Control 3 Step 3: Hook Up 4 Before Operating the System 6 Parts Index 6 Daily Operations-Playback 8 Listening to the Radio 9 Playing Back a Disc 10 Playing Back from the PC 12 Daily Operations-Sound and Other Adjustments 13 ... Ejection-Tray Lock 17 Timer Operations 18 Turning Off the Power Automatically 18 Setting the Daily Timer 18 Additional Information 20 Learning More about This System 20 Maintenance 21 Troubleshooting 21 Specifications 22 2
Contents Introduction 1 Precautions 1 How to Read This Manual 1 Getting Started 3 Step 1: Unpack 3 Step 2: Prepare the Remote Control 3 Step 3: Hook Up 4 Before Operating the System 6 Parts Index 6 Daily Operations-Playback 8 Listening to the Radio 9 Playing Back a Disc 10 Playing Back from the PC 12 Daily Operations-Sound and Other Adjustments 13 ... Ejection-Tray Lock 17 Timer Operations 18 Turning Off the Power Automatically 18 Setting the Daily Timer 18 Additional Information 20 Learning More about This System 20 Maintenance 21 Troubleshooting 21 Specifications 22 2
Instructions
Page 8
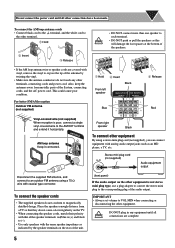
...twisting the vinyl. • Make sure the antenna conductors do not conform to magnetically shielded design. Place the speakers enough distance from metallic parts of the audio output. Do not connect the power cord until all other connections have been made. AM loop antenna Keep it horizontally. To connect the ...) When reception is not stereo mini plug type, use a plug adapter to convert the stereo mini plug to the corresponding plug of the System, connecting cords, and the AC power cord. From right speaker Black To connect other equipment. This could cause poor condition.
...twisting the vinyl. • Make sure the antenna conductors do not conform to magnetically shielded design. Place the speakers enough distance from metallic parts of the audio output. Do not connect the power cord until all other connections have been made. AM loop antenna Keep it horizontally. To connect the ...) When reception is not stereo mini plug type, use a plug adapter to convert the stereo mini plug to the corresponding plug of the System, connecting cords, and the AC power cord. From right speaker Black To connect other equipment. This could cause poor condition.

Instructions
Page 9
Before Operating the System Parts Index Refer to the pages to see how to use the buttons and controls. Remote control 14, 18 18 9, 11, 15 14, 16, 18, 19 9, 11, 14, 16, 19 13 13 14 11, 15 10, 17 10, 15 8, 12, 19 9, 11 8, 13 9, 14, 19 10, 16 14 8, 13 13 8 - 10, 12 16 14 Main unit Remote sensor 8, 10 8, 19 Standby lamp 10, 14, 16, 17 10 10, 17 10 8, 13 14 9 13, 21 8 7 9 8, 9 8, 12 11 13 8 12 5 6
Before Operating the System Parts Index Refer to the pages to see how to use the buttons and controls. Remote control 14, 18 18 9, 11, 15 14, 16, 18, 19 9, 11, 14, 16, 19 13 13 14 11, 15 10, 17 10, 15 8, 12, 19 9, 11 8, 13 9, 14, 19 10, 16 14 8, 13 13 8 - 10, 12 16 14 Main unit Remote sensor 8, 10 8, 19 Standby lamp 10, 14, 16, 17 10 10, 17 10 8, 13 14 9 13, 21 8 7 9 8, 9 8, 12 11 13 8 12 5 6