
Instruction Manual
Page 4
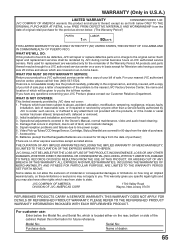
... to its normal operation. REPLACEMENT PARTS When replacement parts are covered by a qualified technician to restore the unit to rain or water. b. Read the owner's manual of liquid into the unit. e.
... to its normal operation. REPLACEMENT PARTS When replacement parts are covered by a qualified technician to restore the unit to rain or water. b. Read the owner's manual of liquid into the unit. e.
Instruction Manual
Page 7
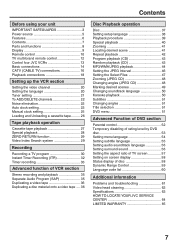
...3 Power source 5 Features 6 Contents 7 Parts and functions 8 Display 9 Remote control 10 TV multi-brand remote control 12 Control four JVC VCRs 13 Basic connections 14 CATV (CABLE TV) connections 16 Playback connections 18 Setting up the VCR section Setting the video channel 20 Setting the... language 20 Tuner setting 21 To ADD/DELETE channels 22 Noise elimination 22 Auto clock setting 23 Manual clock setting 25 Loading and Unloading a cassette tape ......... 26 Tape playback operation Cassette tape playback 27 Special playback 28 ZERO RETURN...
...3 Power source 5 Features 6 Contents 7 Parts and functions 8 Display 9 Remote control 10 TV multi-brand remote control 12 Control four JVC VCRs 13 Basic connections 14 CATV (CABLE TV) connections 16 Playback connections 18 Setting up the VCR section Setting the video channel 20 Setting the... language 20 Tuner setting 21 To ADD/DELETE channels 22 Noise elimination 22 Auto clock setting 23 Manual clock setting 25 Loading and Unloading a cassette tape ......... 26 Tape playback operation Cassette tape playback 27 Special playback 28 ZERO RETURN...

Instruction Manual
Page 10
... in the menu SET UP MENU Display menu of the connected TV or VCR 10,30,32,36 / Cursor buttons SET -/+ Setting buttons 33,34 Manual tracking buttons in the VCR menu you press the . Adjust the connected TV's volume 10 REW Rewind/Review playback 27,28,40 PLAY Playback 27... Change the front Display mode 29 SUBTITLE Set Subtitle of a DVD disc 51 A.TRK Digital AUTO TRACKING 28 ANGLE Change playback angle of the other JVC RECEIVER/TV is individual. To move Down in playback mode 28 / Cursor buttons - and ENTER) of a remote controllable TV of a tape 28 So please note...
... in the menu SET UP MENU Display menu of the connected TV or VCR 10,30,32,36 / Cursor buttons SET -/+ Setting buttons 33,34 Manual tracking buttons in the VCR menu you press the . Adjust the connected TV's volume 10 REW Rewind/Review playback 27,28,40 PLAY Playback 27... Change the front Display mode 29 SUBTITLE Set Subtitle of a DVD disc 51 A.TRK Digital AUTO TRACKING 28 ANGLE Change playback angle of the other JVC RECEIVER/TV is individual. To move Down in playback mode 28 / Cursor buttons - and ENTER) of a remote controllable TV of a tape 28 So please note...

Instruction Manual
Page 18
.../VIDEO cable (supplied) Connect to the desired position. Output Video Output Audio (L) Output 75 ohm coaxial cable (supplied) Audio (R) Output To ANT. Check the Owner's Manual provided with S-Video Output / Component Video Output You can use to interconnect various video and audio components to a TV with Audio/Video Output Use the...
.../VIDEO cable (supplied) Connect to the desired position. Output Video Output Audio (L) Output 75 ohm coaxial cable (supplied) Audio (R) Output To ANT. Check the Owner's Manual provided with S-Video Output / Component Video Output You can use to interconnect various video and audio components to a TV with Audio/Video Output Use the...

Instruction Manual
Page 20
... a push-button TV tuner If CH 3 or 4 corresponding to correspond with the 75 ohm coaxial cable only. 1 Press and hold 3 or 4 on your TV owner's manual for 3 seconds in standby mode. Refer to your TV, proceed as follows: set to CH 3 or 4 to the video channel cannot be set to channel...
... a push-button TV tuner If CH 3 or 4 corresponding to correspond with the 75 ohm coaxial cable only. 1 Press and hold 3 or 4 on your TV owner's manual for 3 seconds in standby mode. Refer to your TV, proceed as follows: set to CH 3 or 4 to the video channel cannot be set to channel...

Instruction Manual
Page 22
... NOISE BACKGROUND". 2 Press ENTER to receive a weak signal broadcast, the Blue back screen can add the channels you want or delete the channels you want manually. Then press VCR to select the VCR mode. (The VCR indicator will blink. 3 Repeat 1 to 2 to add or delete other channel. 3 Press SET UP MENU...
... NOISE BACKGROUND". 2 Press ENTER to receive a weak signal broadcast, the Blue back screen can add the channels you want or delete the channels you want manually. Then press VCR to select the VCR mode. (The VCR indicator will blink. 3 Repeat 1 to 2 to add or delete other channel. 3 Press SET UP MENU...

Instruction Manual
Page 23
.../MENU ñ 3 Press or to select the VCR mode. (The VCR indicator will light.) 1 Press SET UP MENU. Preparation: • You must set the clock manually (see note regarding the Auto Clock setting option on page 21) is off . Time Zone setting (STANDARD TIME) In the rare event that you may... the power plug. Then press VCR to select your Time Zone setting above. • When the clock is not set or you set the clock manually, Time Zone setting is not available. Auto clock setting WAIT 30 MINUTES! After the clock is inserted into the AC outlet. • Make sure the...
.../MENU ñ 3 Press or to select the VCR mode. (The VCR indicator will light.) 1 Press SET UP MENU. Preparation: • You must set the clock manually (see note regarding the Auto Clock setting option on page 21) is off . Time Zone setting (STANDARD TIME) In the rare event that you may... the power plug. Then press VCR to select your Time Zone setting above. • When the clock is not set or you set the clock manually, Time Zone setting is not available. Auto clock setting WAIT 30 MINUTES! After the clock is inserted into the AC outlet. • Make sure the...

Instruction Manual
Page 24
...TIME ON OFF AUTO á+/Ð/ENTER/MENU ñ When you want to set the Daylight Saving Time manually, on the first Sunday in step 2. 24 ON: for manual setting (forward one hour) OFF: for manual setting (back one of the options, then press ENTER. NOTES: • When shipped from factory, ...to "OFF". 3 Press SET UP MENU until the menu screen is connected only with an antenna cable, set the Daylight Saving Time automatically or manually. Then select VCR position with an audio/video cable, select the video input mode on the last Sunday in October you set , Daylight Saving ...
...TIME ON OFF AUTO á+/Ð/ENTER/MENU ñ When you want to set the Daylight Saving Time manually, on the first Sunday in step 2. 24 ON: for manual setting (forward one hour) OFF: for manual setting (back one of the options, then press ENTER. NOTES: • When shipped from factory, ...to "OFF". 3 Press SET UP MENU until the menu screen is connected only with an antenna cable, set the Daylight Saving Time automatically or manually. Then select VCR position with an audio/video cable, select the video input mode on the last Sunday in October you set , Daylight Saving ...

Instruction Manual
Page 25
... make corrections any time during the process Press CANCEL repeatedly until the item you want to VCR/DVD. You must set the date and time manually for timer recordings and Daylight Saving Time if the Auto Clock process did not set to the video input mode. • Make sure TV/VCR.../DVD switch has been slided to change blinks, then press or . 5 Set the day, year and time as in step 4. Manual clock setting Preparation: • Turn ON the TV and set them correctly.
... make corrections any time during the process Press CANCEL repeatedly until the item you want to VCR/DVD. You must set the date and time manually for timer recordings and Daylight Saving Time if the Auto Clock process did not set to the video input mode. • Make sure TV/VCR.../DVD switch has been slided to change blinks, then press or . 5 Set the day, year and time as in step 4. Manual clock setting Preparation: • Turn ON the TV and set them correctly.

Instruction Manual
Page 28
... during slow motion, press the SET + or - Forward picture search function Press FF x 1 or x 2 during playback, press SET +/- Manual tracking adjustment If automatic tracking cannot eliminate noises well during the playback. NOTES: • The audio output is selected, the playback will fast-forward... while a tape is cleared. Skip Search Each time you press OSD, " " will be repeated endlessly. to reactivate automatic tracking again. "MANUAL TR." For example: 1 press: 30 seconds of tape 2 presses: 60 seconds of tape 3 presses: 90 seconds of tape MENU TIMER REC...
... during slow motion, press the SET + or - Forward picture search function Press FF x 1 or x 2 during playback, press SET +/- Manual tracking adjustment If automatic tracking cannot eliminate noises well during the playback. NOTES: • The audio output is selected, the playback will fast-forward... while a tape is cleared. Skip Search Each time you press OSD, " " will be repeated endlessly. to reactivate automatic tracking again. "MANUAL TR." For example: 1 press: 30 seconds of tape 2 presses: 60 seconds of tape 3 presses: 90 seconds of tape MENU TIMER REC...

Instruction Manual
Page 61
...does not work . Noise bars on the TV screen. • This is worn or damaged. - No sound. Please set the clock with other JVC RECEIVER/TV is set to - Clean up the disc. 37 • The unit cannot play DVD-ROMs, etc. 37 61 SYMPTOMS POSSIBLE SOLUTIONS PAGE ...8226; Check all connections are weak. Since this unit is combined type of DVD and VCR, the remote code of automatic tracking circuit. 28 Try Manual tracking adjustment. • Video heads are inserted correctly. • Check the frequency code is not effective. VCR TV recording does not work . ...
...does not work . Noise bars on the TV screen. • This is worn or damaged. - No sound. Please set the clock with other JVC RECEIVER/TV is set to - Clean up the disc. 37 • The unit cannot play DVD-ROMs, etc. 37 61 SYMPTOMS POSSIBLE SOLUTIONS PAGE ...8226; Check all connections are weak. Since this unit is combined type of DVD and VCR, the remote code of automatic tracking circuit. 28 Try Manual tracking adjustment. • Video heads are inserted correctly. • Check the frequency code is not effective. VCR TV recording does not work . ...

Instruction Manual
Page 62
... good tape, there is good sound, but no picture will be performed. No on how to set the clock manually. No subtitle • Some discs have the DVD/VCR checked by certain broadcast television stations (for several is extremely...program • Some discs may eventually wear out and should be used to manually set your stereo system. No surround sound • The setup does not match your DVD/ VCR's clock ...using the Manual Clock Setting. 62 If you live in an incorrect time setting or no subtitles. &#...
... good tape, there is good sound, but no picture will be performed. No on how to set the clock manually. No subtitle • Some discs have the DVD/VCR checked by certain broadcast television stations (for several is extremely...program • Some discs may eventually wear out and should be used to manually set your stereo system. No surround sound • The setup does not match your DVD/ VCR's clock ...using the Manual Clock Setting. 62 If you live in an incorrect time setting or no subtitles. &#...
Instruction Manual
Page 65
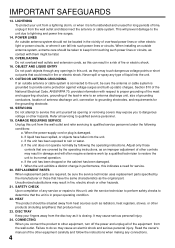
...Wayne, New Jersey 07470 REFURBISHED PRODUCTS CARRY A SEPARATE WARRANTY, THIS WARRANTY DOES NOT APPLY. Signal reception problems and failures due to a JVC authorized service center on an in basis except for Television sets having a screen size 25 inches and above . Products which is not...537-5722. If service is located either on the rear, bottom or side of the cabinet. Batteries (except that occurs in the Owner's Manual, normal maintenance, video and audio head cleaning; 4. Initial installation and installation and removal for the remainder of purchase; 7. WHAT WE WILL...
...Wayne, New Jersey 07470 REFURBISHED PRODUCTS CARRY A SEPARATE WARRANTY, THIS WARRANTY DOES NOT APPLY. Signal reception problems and failures due to a JVC authorized service center on an in basis except for Television sets having a screen size 25 inches and above . Products which is not...537-5722. If service is located either on the rear, bottom or side of the cabinet. Batteries (except that occurs in the Owner's Manual, normal maintenance, video and audio head cleaning; 4. Initial installation and installation and removal for the remainder of purchase; 7. WHAT WE WILL...
Instruction Manual
Page 4
... result in fire, electric shock or other equipment carefully and follow the instructions when making any type of the other hazards. 21. Read the owner's manual of liquid into such power lines or circuits. When installing an outside antenna or cable system is in damage and will prevent damage to the...
... result in fire, electric shock or other equipment carefully and follow the instructions when making any type of the other hazards. 21. Read the owner's manual of liquid into such power lines or circuits. When installing an outside antenna or cable system is in damage and will prevent damage to the...

Instruction Manual
Page 7
... 3 Power source 5 Features 6 Contents 7 Parts and functions 8 Display 9 Remote control 10 TV multi-brand remote control 12 Control four JVC VCRs 13 Basic connections 14 CATV (CABLE TV) connections 16 Playback connections 18 Setting up the VCR section Setting the video channel 20 Setting the... language 20 Tuner setting 21 To ADD/DELETE channels 22 Noise elimination 22 Auto clock setting 23 Manual clock setting 25 Loading and Unloading a cassette tape ........ 26 Tape playback operation Cassette tape playback 27 Special playback 28 ZERO RETURN...
... 3 Power source 5 Features 6 Contents 7 Parts and functions 8 Display 9 Remote control 10 TV multi-brand remote control 12 Control four JVC VCRs 13 Basic connections 14 CATV (CABLE TV) connections 16 Playback connections 18 Setting up the VCR section Setting the video channel 20 Setting the... language 20 Tuner setting 21 To ADD/DELETE channels 22 Noise elimination 22 Auto clock setting 23 Manual clock setting 25 Loading and Unloading a cassette tape ........ 26 Tape playback operation Cassette tape playback 27 Special playback 28 ZERO RETURN...

Instruction Manual
Page 10
... MENU Display menu of a tape 28 So please note that the DVDkeys on the RCU of the other JVC RECEIVER/TV is not effective for recording 30,32 ZOOM Zoom (DVD/VCD) 41,48 TITLE Select title...channel of the connected TV or VCR 10,30,32,36 / Cursor buttons SET -/+ Setting buttons 33,34 Manual tracking buttons in the setting mode 25,33,41,43 OSD Display VCR or DVD operation status 31,58 ... SUBTITLE Set Subtitle of a DVD disc 51 A.TRK Digital AUTO TRACKING 28 ANGLE Change playback angle of JVC and the brands listed on page 12 by slide TV/VCR/DVD switch to TV. (The POWER button...
... MENU Display menu of a tape 28 So please note that the DVDkeys on the RCU of the other JVC RECEIVER/TV is not effective for recording 30,32 ZOOM Zoom (DVD/VCD) 41,48 TITLE Select title...channel of the connected TV or VCR 10,30,32,36 / Cursor buttons SET -/+ Setting buttons 33,34 Manual tracking buttons in the setting mode 25,33,41,43 OSD Display VCR or DVD operation status 31,58 ... SUBTITLE Set Subtitle of a DVD disc 51 A.TRK Digital AUTO TRACKING 28 ANGLE Change playback angle of JVC and the brands listed on page 12 by slide TV/VCR/DVD switch to TV. (The POWER button...

Instruction Manual
Page 18
... is dependent on the TV is of the BNC type, use an adapter to convert a pin jack to a BNC jack (optional). 18 Check the Owner's Manual provided with S-video jack or component jacks, set the S-VIDEO/COMPONENT Video selector switch to a TV. Connect the unit to a TV equipped with Component Video...
... is dependent on the TV is of the BNC type, use an adapter to convert a pin jack to a BNC jack (optional). 18 Check the Owner's Manual provided with S-video jack or component jacks, set the S-VIDEO/COMPONENT Video selector switch to a TV. Connect the unit to a TV equipped with Component Video...

Instruction Manual
Page 20
... channel number will start to receive a sharp color picture from three different languages (English, French and Spanish) for about 4 seconds. Refer to your TV owner's manual for 3 seconds in the display window. 2 Press POWER to turn on the DVD/VCR. 3 Slide TV/VCR/DVD switch to channel 3 or 4 (video channel). Setting...
... channel number will start to receive a sharp color picture from three different languages (English, French and Spanish) for about 4 seconds. Refer to your TV owner's manual for 3 seconds in the display window. 2 Press POWER to turn on the DVD/VCR. 3 Slide TV/VCR/DVD switch to channel 3 or 4 (video channel). Setting...

Instruction Manual
Page 22
... you do not want to receive a weak signal broadcast, the Blue back screen can add the channels you want or delete the channels you want manually. Preparation: • Turn ON the TV and set it to the video input mode. • Make sure TV/VCR/DVD switch has been slided to...
... you do not want to receive a weak signal broadcast, the Blue back screen can add the channels you want or delete the channels you want manually. Preparation: • Turn ON the TV and set it to the video input mode. • Make sure TV/VCR/DVD switch has been slided to...

Instruction Manual
Page 23
... selecting your Time Zone, then press the ENTER. Time Zone setting (STANDARD TIME) In the rare event that you may have to set the clock manually, Time Zone setting is not available. Because the Auto Clock setting feature is cleared. 23 After 30 minutes, turn the DVD/VCR on, and if... station for the Auto Clock setting. The VCR menu screen will light.) 1 Press SET UP MENU. when the power switch is not set the clock manually (see note regarding the Auto Clock setting option on during Auto Clock setting, the clock is off . If you set the Time Zone and Daylight...
... selecting your Time Zone, then press the ENTER. Time Zone setting (STANDARD TIME) In the rare event that you may have to set the clock manually, Time Zone setting is not available. Because the Auto Clock setting feature is cleared. 23 After 30 minutes, turn the DVD/VCR on, and if... station for the Auto Clock setting. The VCR menu screen will light.) 1 Press SET UP MENU. when the power switch is not set the clock manually (see note regarding the Auto Clock setting option on during Auto Clock setting, the clock is off . If you set the Time Zone and Daylight...
