Instructions
Page 6
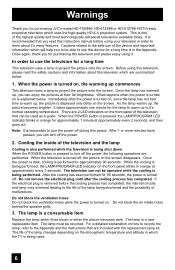
... shut down. Cooling the inside of the television and the lamp Cooling is also performed while the television is displayed only dimly on the front panel blinks in order to learn about this device for the lamp to warm up commences This television uses a lamp to project the picture onto the screen. What happens when the power is turned on is a user replaceable...
... shut down. Cooling the inside of the television and the lamp Cooling is also performed while the television is displayed only dimly on the front panel blinks in order to learn about this device for the lamp to warm up commences This television uses a lamp to project the picture onto the screen. What happens when the power is turned on is a user replaceable...

Instructions
Page 8
... Remote Programming . . . . . 33 Setting CATV, VCR and DVD Codes . . . 33 CATV or Satellite Codes 33 VCR Codes 34 DVD Codes 35 Search Codes 36 Onscreen Menus 37 Using the Guide 37 Onscreen Menu System 38 Initial Setup 40 Auto Tuner Setup 40 Channel Summary 41 Channel Label 42 V-Chip 43 Set Lock Code 49 Auto Demo 50 Language 50 Closed Caption 51 Auto Shut Off 53 XDS ID 53 Noise Muting 53 Front Panel Lock 54 V1 Smart Input 54 Video Input...
... Remote Programming . . . . . 33 Setting CATV, VCR and DVD Codes . . . 33 CATV or Satellite Codes 33 VCR Codes 34 DVD Codes 35 Search Codes 36 Onscreen Menus 37 Using the Guide 37 Onscreen Menu System 38 Initial Setup 40 Auto Tuner Setup 40 Channel Summary 41 Channel Label 42 V-Chip 43 Set Lock Code 49 Auto Demo 50 Language 50 Closed Caption 51 Auto Shut Off 53 XDS ID 53 Noise Muting 53 Front Panel Lock 54 V1 Smart Input 54 Video Input...
Instructions
Page 10
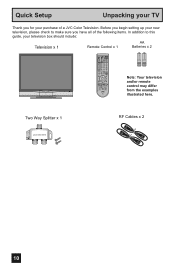
... this guide, your purchase of the following items. In addition to make sure you for your television box should include: Television x 1 Remote Control x 1 AA Batteries x 2 AA Alkaline AA Alkaline TV CATV VCR DVD POWER ASPECT MULTI SCREEN TWIN INDEX SELECT SLEEP FREEZE SWAP ML/MTS DISPLAY + INPUT 123 D/A 4 5 6 i.LINK MENU 78 TIMER TUNE THEATER FAVORITE PRO 0 VIDEO STATUS C.C. Quick Setup Unpacking your TV Thank you have all of a JVC Color Television. Two...
... this guide, your purchase of the following items. In addition to make sure you for your television box should include: Television x 1 Remote Control x 1 AA Batteries x 2 AA Alkaline AA Alkaline TV CATV VCR DVD POWER ASPECT MULTI SCREEN TWIN INDEX SELECT SLEEP FREEZE SWAP ML/MTS DISPLAY + INPUT 123 D/A 4 5 6 i.LINK MENU 78 TIMER TUNE THEATER FAVORITE PRO 0 VIDEO STATUS C.C. Quick Setup Unpacking your TV Thank you have all of a JVC Color Television. Two...

Instructions
Page 12
... Rear Panel Diagram MODELS: HD-70G886 HD-61Z886 HD-61Z786 Note: The terminal labeled "SERVICE ONLY", is exclusively used to set up your specific TV and remote. Quick Setup TV Models NOTE: Before you in understanding how to connect your television to another device, please refer to the proper diagrams for your television. SERVICE ONLY ATSC /DIGITAL CABLE IN I DIGITAL IN AV COMPULINK III VIDEO (DIGITAL) _ AUDIO (DIGITAL) CABLE CARD CENTER CHANNEL INPUT INPUT-2 Y VIDEO L AUDIO R S-VIDEO Pb Pr S-VIDEO L AUDIO R OVER VIDEO L I AUDIO I R OVER Y VIDEO L Pb I AUDIO...
... Rear Panel Diagram MODELS: HD-70G886 HD-61Z886 HD-61Z786 Note: The terminal labeled "SERVICE ONLY", is exclusively used to set up your specific TV and remote. Quick Setup TV Models NOTE: Before you in understanding how to connect your television to another device, please refer to the proper diagrams for your television. SERVICE ONLY ATSC /DIGITAL CABLE IN I DIGITAL IN AV COMPULINK III VIDEO (DIGITAL) _ AUDIO (DIGITAL) CABLE CARD CENTER CHANNEL INPUT INPUT-2 Y VIDEO L AUDIO R S-VIDEO Pb Pr S-VIDEO L AUDIO R OVER VIDEO L I AUDIO I R OVER Y VIDEO L Pb I AUDIO...
Instructions
Page 15
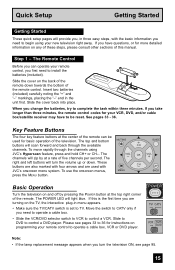
... your remote control to operate a cable box, VCR or DVD player. To use the onscreen menus, MENU BACK press the MENU button. If this manual. Move the switch to CATV only if you change the batteries, try to complete the task within three minutes. Slide to DVD to control a DVD player. Please see page 95. 15 Step 1 - See pages 33 - 36. The channels will zip by pressing the POWER button at...
... your remote control to operate a cable box, VCR or DVD player. To use the onscreen menus, MENU BACK press the MENU button. If this manual. Move the switch to CATV only if you change the batteries, try to complete the task within three minutes. Slide to DVD to control a DVD player. Please see page 95. 15 Step 1 - See pages 33 - 36. The channels will zip by pressing the POWER button at...
Instructions
Page 17
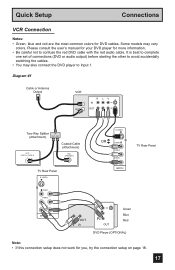
... Input 1. Quick Setup Connections VCR Connection Notes: • Green, blue and red are the most common colors for more information. • Be careful not to confuse the red DVD cable with the red audio cable. Please consult the user's manual for your DVD player for DVD cables. Diagram #1 Cable or Antenna Output VCR IN OUT R L V IN OUT Two-Way Splitter IN (Attachment) OUT OUT Coaxial Cable (Attachment) ATSC /DIGITAL CABLE IN I 75Ω (VHF/UHF) TV Rear Panel S-VIDEO S-VIDEO OR OVER VIDEO L I AUDIO I R INPUT-3 TV Rear Panel...
... Input 1. Quick Setup Connections VCR Connection Notes: • Green, blue and red are the most common colors for more information. • Be careful not to confuse the red DVD cable with the red audio cable. Please consult the user's manual for your DVD player for DVD cables. Diagram #1 Cable or Antenna Output VCR IN OUT R L V IN OUT Two-Way Splitter IN (Attachment) OUT OUT Coaxial Cable (Attachment) ATSC /DIGITAL CABLE IN I 75Ω (VHF/UHF) TV Rear Panel S-VIDEO S-VIDEO OR OVER VIDEO L I AUDIO I R INPUT-3 TV Rear Panel...
Instructions
Page 20
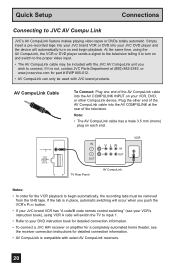
... wish to the proper video input. • The AV CompuLink cable may be included with the JVC AV CompuLink unit you push the VCR's PLAY button. • If your JVC brand VCR has "A code/B code remote control switching" (see the receiver connection instructions for detailed connection information. • AV CompuLink is not, contact JVC Parts Department at the rear of the AV CompuLink cable into your VCR, DVD, or other end of the television.
... wish to the proper video input. • The AV CompuLink cable may be included with the JVC AV CompuLink unit you push the VCR's PLAY button. • If your JVC brand VCR has "A code/B code remote control switching" (see the receiver connection instructions for detailed connection information. • AV CompuLink is not, contact JVC Parts Department at the rear of the AV CompuLink cable into your VCR, DVD, or other end of the television.
Instructions
Page 24
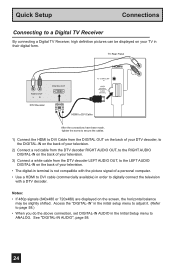
Access the "DIGITAL-IN" in the initial setup menu to adjust it. (Refer to page 58.) • When you do the above connection, set DIGITAL-IN AUDIO in the Initial Setup menu to digitally connect the television with the picture signal of your TV in order to ANALOG. TV Rear Panel AUDIO OUT LR DTV Decoder DIGITAL OUT AV COMPULINK III VIDEO (DIGITAL) _ AUDIO (DIGITAL) HDMI to DVI Cable L AUDIO R After the connections have been made, tighten the screw to secure...
Access the "DIGITAL-IN" in the initial setup menu to adjust it. (Refer to page 58.) • When you do the above connection, set DIGITAL-IN AUDIO in the Initial Setup menu to digitally connect the television with the picture signal of your TV in order to ANALOG. TV Rear Panel AUDIO OUT LR DTV Decoder DIGITAL OUT AV COMPULINK III VIDEO (DIGITAL) _ AUDIO (DIGITAL) HDMI to DVI Cable L AUDIO R After the connections have been made, tighten the screw to secure...
Instructions
Page 25
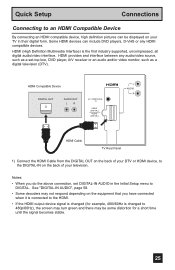
... device signal is changed to 480p/60Hz), the screen may turn green and there may not respond depending on the back of your television. See "DIGITAL-IN AUDIO", page 58. • Some decoders may be displayed on your DTV or HDMI device, to the DIGITAL-IN on the equipment that you do the above connection, set -top box, DVD player, A/V receiver or an audio and/or video...
... device signal is changed to 480p/60Hz), the screen may turn green and there may not respond depending on the back of your television. See "DIGITAL-IN AUDIO", page 58. • Some decoders may be displayed on your DTV or HDMI device, to the DIGITAL-IN on the equipment that you do the above connection, set -top box, DVD player, A/V receiver or an audio and/or video...
Instructions
Page 31
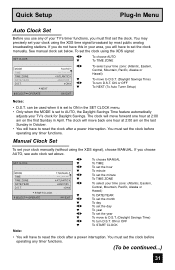
... reset the clock after a power interruption. To set the clock using the XDS signal), choose MANUAL. can be continued...) 31 You must set the clock before operating any timer functions. You may precisely set your clock manually (without using the XDS signal: SET CLOCK √® † To choose AUTO To TIME ZONE MODE TIME TIME ZONE DATE/YEAR D.S.T. Quick Setup Plug-In Menu Auto Clock Set...
... reset the clock after a power interruption. To set the clock using the XDS signal), choose MANUAL. can be continued...) 31 You must set the clock before operating any timer functions. You may precisely set your clock manually (without using the XDS signal: SET CLOCK √® † To choose AUTO To TIME ZONE MODE TIME TIME ZONE DATE/YEAR D.S.T. Quick Setup Plug-In Menu Auto Clock Set...
Instructions
Page 37
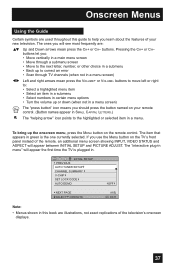
... AUTO TUNER SETUP CHANNEL SUMMARY V-CHIP SET LOCK CODE AUTO DEMO OFF NEXT PAGE SELECT OPERATE (4/5) MENU EXIT Note: • Menus shown in this book are used throughout this guide to : • Select a highlighted menu item • Select an item in a submenu • Select numbers in certain menu options • Turn the volume up or down (when not in . The item that appears in green is plugged in a menu screen) The "press button...
... AUTO TUNER SETUP CHANNEL SUMMARY V-CHIP SET LOCK CODE AUTO DEMO OFF NEXT PAGE SELECT OPERATE (4/5) MENU EXIT Note: • Menus shown in this book are used throughout this guide to : • Select a highlighted menu item • Select an item in a submenu • Select numbers in certain menu options • Turn the volume up or down (when not in . The item that appears in green is plugged in a menu screen) The "press button...
Instructions
Page 51
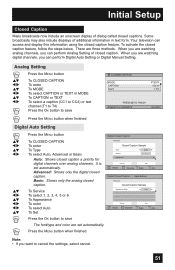
... called closed captions. When you are watching analog channels, you can perform Digital Auto Setting or Digital Manual Setting. To Service To select 1, 2, 3, 4, 5 or 6 To Appearance To enter To select Auto To Set Preview Closed Caption Sample Type Service Appearance AUTO 1 Cancel Select Set BACK Operate Back MENU Exit Digital Closed Caption > Appearance Preview Closed Caption Sample Appearance Mode Font Colors Opacities Cancel Select Operate Auto Set BACK Back MENU Exit Press the OK button to cancel the settings, select cancel...
... called closed captions. When you are watching analog channels, you can perform Digital Auto Setting or Digital Manual Setting. To Service To select 1, 2, 3, 4, 5 or 6 To Appearance To enter To select Auto To Set Preview Closed Caption Sample Type Service Appearance AUTO 1 Cancel Select Set BACK Operate Back MENU Exit Digital Closed Caption > Appearance Preview Closed Caption Sample Appearance Mode Font Colors Opacities Cancel Select Operate Auto Set BACK Back MENU Exit Press the OK button to cancel the settings, select cancel...

Instructions
Page 52
... Basic To Service To select 1, 2, 3, 4, 5 or 6 To Appearance To enter To select Manual To Font To enter To select Font Size or Font Style To select the setting you like Auto, White, Black, Red, Green, Blue, Yellow, Magenta or Cyan To Set Press the OK button to save Digital Closed Caption > Appearance Preview Closed Caption Sample Appearance ModeText Manual White Font Edge White Colors Background Black Opacities Cancel Set Cancel Set Select BACK Operate Back MENU Exit π...
... Basic To Service To select 1, 2, 3, 4, 5 or 6 To Appearance To enter To select Manual To Font To enter To select Font Size or Font Style To select the setting you like Auto, White, Black, Red, Green, Blue, Yellow, Magenta or Cyan To Set Press the OK button to save Digital Closed Caption > Appearance Preview Closed Caption Sample Appearance ModeText Manual White Font Edge White Colors Background Black Opacities Cancel Set Cancel Set Select BACK Operate Back MENU Exit π...

Instructions
Page 55
... the video input You have a Digital VCR connected to the video input You have a Set-top Box connected to the video input You have a Satellite Receiver connected to the video input You have an Amplifier connected to the video input You have a Video Game connected to the video input You have a Video Camera connected to the video input You have a Video Disc player connected to save Press the MENU button when finished INITIAL SETUP PREVIOUS NOISE MUTING FRONT PANEL LOCK V1 SMART INPUT VIDEO INPUT LABEL POSITION ADJUSTMENT POWER...
... the video input You have a Digital VCR connected to the video input You have a Set-top Box connected to the video input You have a Satellite Receiver connected to the video input You have an Amplifier connected to the video input You have a Video Game connected to the video input You have a Video Camera connected to the video input You have a Video Disc player connected to save Press the MENU button when finished INITIAL SETUP PREVIOUS NOISE MUTING FRONT PANEL LOCK V1 SMART INPUT VIDEO INPUT LABEL POSITION ADJUSTMENT POWER...

Instructions
Page 58
... HDMI compatible component connected to use the speaker as SELECT OPERATE MENU EXIT sound. The volume differs when the TV is not. If there is no video signal present, the TV will be adjusted by selecting either SIZE1 or SIZE2. π† √® Press the MENU button To DIGITAL-IN To select SIZE1 or SIZE2 Press the MENU button to finish INITIAL SETUP PREVIOUS VIDEO-1MONITOR OUT TV SPEAKER AUDIO OUT DIGITAL-IN DIGITAL-IN AUDIO...
... HDMI compatible component connected to use the speaker as SELECT OPERATE MENU EXIT sound. The volume differs when the TV is not. If there is no video signal present, the TV will be adjusted by selecting either SIZE1 or SIZE2. π† √® Press the MENU button To DIGITAL-IN To select SIZE1 or SIZE2 Press the MENU button to finish INITIAL SETUP PREVIOUS VIDEO-1MONITOR OUT TV SPEAKER AUDIO OUT DIGITAL-IN DIGITAL-IN AUDIO...

Instructions
Page 66
... coming from the HDMI input, you cannot enter the SWAP or INDEX mode. • Main Screen and Split Screen will not display the same channel or input at the same time. • You can not be automatically selected about 8 seconds later. • Aspect does not work with locked channels or channels blocked by pressing TWIN on the right. The sound will appear on the remote control...
... coming from the HDMI input, you cannot enter the SWAP or INDEX mode. • Main Screen and Split Screen will not display the same channel or input at the same time. • You can not be automatically selected about 8 seconds later. • Aspect does not work with locked channels or channels blocked by pressing TWIN on the right. The sound will appear on the remote control...

Instructions
Page 68
... the TUNE button Input Selects the signal input source for the television: VIDEO-1, 2, 3, 4, DIGITAL-IN or i.LINK for video devices like VCRs, DVD players or camcorders. buttons ( √ OPERATE ® ). • i.LINK can be . Notes: • When you have a PC connected to the TV, select VIDEO-3. Choose INPUT by pressing MENU† on the side panel and choose a mode by using the CHANNEL+/- After you can also access the FRONT CONTROL PANEL screen by using the MENU button on the remote control to...
... the TUNE button Input Selects the signal input source for the television: VIDEO-1, 2, 3, 4, DIGITAL-IN or i.LINK for video devices like VCRs, DVD players or camcorders. buttons ( √ OPERATE ® ). • i.LINK can be . Notes: • When you have a PC connected to the TV, select VIDEO-3. Choose INPUT by pressing MENU† on the side panel and choose a mode by using the CHANNEL+/- After you can also access the FRONT CONTROL PANEL screen by using the MENU button on the remote control to...
Instructions
Page 70
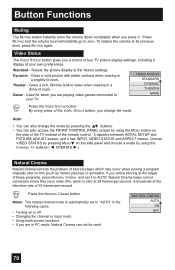
... helps correct conversion errors that occur when film, which may occur when viewing a program originally shot on the side of the TV instead of these programs, press NATURAL CINEMA and set it has INPUT, VIDEO STATUS and ASPECT menus. To restore the volume to the factory settings. Resets the picture display to its previous level, press MUTING again. Used for when you are playing video games connected...
... helps correct conversion errors that occur when film, which may occur when viewing a program originally shot on the side of the TV instead of these programs, press NATURAL CINEMA and set it has INPUT, VIDEO STATUS and ASPECT menus. To restore the volume to the factory settings. Resets the picture display to its previous level, press MUTING again. Used for when you are playing video games connected...
Instructions
Page 75
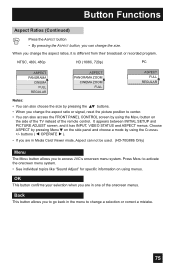
Press MENU to change the aspect ratio or signal, reset the picture position to center. • You can also access the FRONT PANEL CONTROL screen by using the MENU button on the side panel and choose a mode by using menus. Choose ASPECT by pressing the π† buttons. • When you are in Media Card Viewer mode, Aspect can change the aspect ratios, it has INPUT, VIDEO STATUS and ASPECT menus...
Press MENU to change the aspect ratio or signal, reset the picture position to center. • You can also access the FRONT PANEL CONTROL screen by using the MENU button on the side panel and choose a mode by using menus. Choose ASPECT by pressing the π† buttons. • When you are in Media Card Viewer mode, Aspect can change the aspect ratios, it has INPUT, VIDEO STATUS and ASPECT menus...

Instructions
Page 92
... working . Adjust your dealer. Screen is 80% black • The Closed Caption Text mode is rising abnormally. See page 71. See page 68. • The tuner (Auto Tuner Setup) could be set improperly. Remote control is locked or the temperature has increased. The color quality is in the Closed Caption Menu, page 51. There are blinking alternately. • It may be a malfunction that the TV/CATV switch is poor There are lines...
... working . Adjust your dealer. Screen is 80% black • The Closed Caption Text mode is rising abnormally. See page 71. See page 68. • The tuner (Auto Tuner Setup) could be set improperly. Remote control is locked or the temperature has increased. The color quality is in the Closed Caption Menu, page 51. There are blinking alternately. • It may be a malfunction that the TV/CATV switch is poor There are lines...


