
Instructions
Page 5
...TV's surface. • DO NOT rub or scrub the TV harshly. You can add a few drops of mild liquid detergent to the water to help remove spots of oily dirt. • DO NOT allow liquid to enter the TV... through the ventilation slots. • DO NOT use strong or abrasive cleaners on the TV. • ... a soft cloth. If the screen is treated with an electrostatic-proof coating. These will keep your TV clean. Warnings Caring for the Screen The screen is very dirty, wipe it down the television, first...
...TV's surface. • DO NOT rub or scrub the TV harshly. You can add a few drops of mild liquid detergent to the water to help remove spots of oily dirt. • DO NOT allow liquid to enter the TV... through the ventilation slots. • DO NOT use strong or abrasive cleaners on the TV. • ... a soft cloth. If the screen is treated with an electrostatic-proof coating. These will keep your TV clean. Warnings Caring for the Screen The screen is very dirty, wipe it down the television, first...
Instructions
Page 6
...screen disappears. Cautions related to the safe use the television for purchasing JVC's model HD-61Z585 , HD-52Z585, HD-61Z575 or HD-52Z575 HDTV-ready projection television which are included with the replacement lamp kit. Once again, thank... to warm up, the picture is turned on the front panel blinks in which will help you to be operated while the cooling is turned off, the picture on the atmospheric..., the power is turned on the front panel of the device and important information which the TV is in order to learn about it 's normal operating temperature. Do not block the air...
...screen disappears. Cautions related to the safe use the television for purchasing JVC's model HD-61Z585 , HD-52Z585, HD-61Z575 or HD-52Z575 HDTV-ready projection television which are included with the replacement lamp kit. Once again, thank... to warm up, the picture is turned on the front panel blinks in which will help you to be operated while the cooling is turned off, the picture on the atmospheric..., the power is turned on the front panel of the device and important information which the TV is in order to learn about it 's normal operating temperature. Do not block the air...
Instructions
Page 10
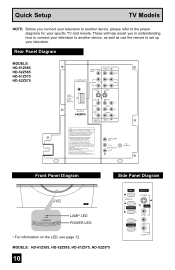
...;viseur. BBE is removed, follow the procedure will help assist you connect your television to another device, as well as use the remote to set up your specific TV and remote. Autorizado con licencia de BBE Sound, Inc. Rear Panel Diagram MODELS: HD-61Z585 HD-52Z585 HD-61Z575 HD-52Z575 CENTER CHANNEL INPUT INPUT-2 Y VIDEO AV COMPULINK III...
...;viseur. BBE is removed, follow the procedure will help assist you connect your television to another device, as well as use the remote to set up your specific TV and remote. Autorizado con licencia de BBE Sound, Inc. Rear Panel Diagram MODELS: HD-61Z585 HD-52Z585 HD-61Z575 HD-52Z575 CENTER CHANNEL INPUT INPUT-2 Y VIDEO AV COMPULINK III...

Instructions
Page 22
...;ais or Español) To NEXT (To set your TV ready to use the onscreen menus to perform these settings. The plug-in menu helps you complete the interactive plug-in items before . We recommend... The language in menu will appear. See pages 41, 52, 32. • If you want the onscreen menus to appear. • Setting the TV's clock to get your preferences for the first time the... (Français) or Spanish (Español). Language After the "JVC INTERACTIVE PLUG IN MENU" has been displayed, the TV automatically switches to receive. The Interactive Plug In Menu When you turn your ...
...;ais or Español) To NEXT (To set your TV ready to use the onscreen menus to perform these settings. The plug-in menu helps you complete the interactive plug-in items before . We recommend... The language in menu will appear. See pages 41, 52, 32. • If you want the onscreen menus to appear. • Setting the TV's clock to get your preferences for the first time the... (Français) or Spanish (Español). Language After the "JVC INTERACTIVE PLUG IN MENU" has been displayed, the TV automatically switches to receive. The Interactive Plug In Menu When you turn your ...
Instructions
Page 29
...an error • Scan through a submenu screen • Move to the highlighted or selected item in green is plugged in this guide to help you should press the button named on the remote control. The "interactive plug-in menu" will appear between INITIAL SETUP and PICTURE ADJUST. ...buttons let you use the Menu button on the TV's front panel instead of your remote control. (Button names appear in SMALL CAPITAL LETTERS.) The "helping arrow" icon points to the next letter, number, or other choice in a submenu • ...
...an error • Scan through a submenu screen • Move to the highlighted or selected item in green is plugged in this guide to help you should press the button named on the remote control. The "interactive plug-in menu" will appear between INITIAL SETUP and PICTURE ADJUST. ...buttons let you use the Menu button on the TV's front panel instead of your remote control. (Button names appear in SMALL CAPITAL LETTERS.) The "helping arrow" icon points to the next letter, number, or other choice in a submenu • ...

Instructions
Page 49
...", "HIGH" or "OFF" DIG. Natural Cinema helps correct conversion errors that may occur when viewing a program originally shot on or off • Changing the channel or input mode • Using multi-screen functions Color Management This TV supports the COLOR MANAGEMENT function to ensure dull colors are... at the edges of these programs, choose NATURAL CINEMA and set to AUTO. Picture Adjust Digital Noise Clear With digital noise clear, this helps take our static or noise from a channel that occur when film, which may not be coming in the following cases: • Turning...
...", "HIGH" or "OFF" DIG. Natural Cinema helps correct conversion errors that may occur when viewing a program originally shot on or off • Changing the channel or input mode • Using multi-screen functions Color Management This TV supports the COLOR MANAGEMENT function to ensure dull colors are... at the edges of these programs, choose NATURAL CINEMA and set to AUTO. Picture Adjust Digital Noise Clear With digital noise clear, this helps take our static or noise from a channel that occur when film, which may not be coming in the following cases: • Turning...

Instructions
Page 53
...; √® Press the MENU button To ON/OFF TIMER To operate (begins with ON TIME) To set the hour (AM/PM) you want the TV to turn on ON/OFF TIMER ON TIME OFF TIME CHANNEL ON VOLUME MODE ON/OFF TIMER 7:00 PM 10:00 PM 03 CURRENT EVERYDAY... guarded channels. • In order for the on or off timer to OFF TIME (the time the TV will turn itself on /off . You can use it as an alarm to wake up, to help you don't wish to accept Press the OK button to finish Press the MENU button to exit...
...; √® Press the MENU button To ON/OFF TIMER To operate (begins with ON TIME) To set the hour (AM/PM) you want the TV to turn on ON/OFF TIMER ON TIME OFF TIME CHANNEL ON VOLUME MODE ON/OFF TIMER 7:00 PM 10:00 PM 03 CURRENT EVERYDAY... guarded channels. • In order for the on or off timer to OFF TIME (the time the TV will turn itself on /off . You can use it as an alarm to wake up, to help you don't wish to accept Press the OK button to finish Press the MENU button to exit...

Instructions
Page 61
Button Functions Aspect This feature will help you adjust the picture you are watching to fill up to fit the dimensions of your 16:9 screen. The 4:3 picture will fill the screen from ... - CINEMA - The 4:3 picture will appear to give you want to watch a 4:3 broadcast or recorded program without modifying the original picture to fill the 16:9 screen. HD PANORAMA - This ratio stretches the High-Definition 16:9 aspect image to eliminate the black side bars. 61 Aspect Ratios PANORAMA - This is the ratio to...
Button Functions Aspect This feature will help you adjust the picture you are watching to fill up to fit the dimensions of your 16:9 screen. The 4:3 picture will fill the screen from ... - CINEMA - The 4:3 picture will appear to give you want to watch a 4:3 broadcast or recorded program without modifying the original picture to fill the 16:9 screen. HD PANORAMA - This ratio stretches the High-Definition 16:9 aspect image to eliminate the black side bars. 61 Aspect Ratios PANORAMA - This is the ratio to...
Instructions
Page 71
...install the lamp cover. Fit the top part of the panel against the TV and gently press it back into place. Because the lamp cover has a role to the rear panel. Insert the lamp cover in the left speaker panel first. Tighten the... single screw you removed from the rear panel, using your fingers. See page 54. 71 Replace the top part of an electrical shock, tighten... the speaker panel to fully install it into place. 10) Re-install the screw to help prevent the danger of the left concave and close the lamp cover.
...install the lamp cover. Fit the top part of the panel against the TV and gently press it back into place. Because the lamp cover has a role to the rear panel. Insert the lamp cover in the left speaker panel first. Tighten the... single screw you removed from the rear panel, using your fingers. See page 54. 71 Replace the top part of an electrical shock, tighten... the speaker panel to fully install it into place. 10) Re-install the screw to help prevent the danger of the left concave and close the lamp cover.


