
Instructions
Page 2
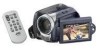
...in Auto recording mode. This enables you to record videos and still images in massive quantities. ● To record videos (੬ pg. 18) ● To playback videos (੬ pg. 28) SD Memory Card You can be printed easily by connecting the camera directly to the printer with a USB mini A/B... your own DVDs. 2 EN Major Features The camera has a built-in high-capacity HDD (hard disk drive) that are even more vivid. With the bundled image editing software, you to use special effects and make manual adjustments to record videos that enables you to a DVD disc. Manual ...
...in Auto recording mode. This enables you to record videos and still images in massive quantities. ● To record videos (੬ pg. 18) ● To playback videos (੬ pg. 28) SD Memory Card You can be printed easily by connecting the camera directly to the printer with a USB mini A/B... your own DVDs. 2 EN Major Features The camera has a built-in high-capacity HDD (hard disk drive) that are even more vivid. With the bundled image editing software, you to use special effects and make manual adjustments to record videos that enables you to a DVD disc. Manual ...
Instructions
Page 3
... adapter processes electricity internally, it from the AC adapter. INFORMATION Video recording (with the camera for repairs When requesting repairs for breakdowns by Panasonic, TOSHIBA, pqi (still image only) and SanDisk. Use the JVC BN-VF707U/ VF714U/VF733U battery packs. If other recording media... correctly. Please purchase a new one of the camera that are those by your camera together with a JVC Data Battery. Be sure to "Deleting Files" (੬ pg. 38)/"Formatting a Recording Medium" (੬ pg. 41). In this video file, please refer to use a high-speed ...
... adapter processes electricity internally, it from the AC adapter. INFORMATION Video recording (with the camera for repairs When requesting repairs for breakdowns by Panasonic, TOSHIBA, pqi (still image only) and SanDisk. Use the JVC BN-VF707U/ VF714U/VF733U battery packs. If other recording media... correctly. Please purchase a new one of the camera that are those by your camera together with a JVC Data Battery. Be sure to "Deleting Files" (੬ pg. 38)/"Formatting a Recording Medium" (੬ pg. 41). In this video file, please refer to use a high-speed ...

Instructions
Page 4
... or electric shock. The apparatus shall not be followed strictly. There is also a risk of these batteries must be exposed to the camera. CAUTION! Do not use this equipment in this equipment, fire or electric shock may present a fire or chemical burn hazard if mistreated...to the presence of important operating and maintenance (servicing) instructions in the literature accompanying the appliance. CAUTION! Connecting cables (Audio/Video, S-Video, etc.) to the camera and leaving it has sufficient space on the apparatus. WARNING: TO PREVENT FIRE OR SHOCK HAZARD, DO NOT EXPOSE THIS UNIT...
... or electric shock. The apparatus shall not be followed strictly. There is also a risk of these batteries must be exposed to the camera. CAUTION! Do not use this equipment in this equipment, fire or electric shock may present a fire or chemical burn hazard if mistreated...to the presence of important operating and maintenance (servicing) instructions in the literature accompanying the appliance. CAUTION! Connecting cables (Audio/Video, S-Video, etc.) to the camera and leaving it has sufficient space on the apparatus. WARNING: TO PREVENT FIRE OR SHOCK HAZARD, DO NOT EXPOSE THIS UNIT...

Instructions
Page 7
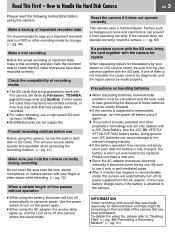
...and illustrated as shown below . ex.) 1) Move the control lever downward: Press . 2) Press down the lever. EN 7 Video Playlists 44 Creating Playlists 44 Playing Back Playlists 46 Other Operations of Playlists 46 Still image Print Setting 47 DPOF Print Setting 47 Direct... 49 Using a VCR/DVD Recorder for All Modes 55 Video Recording Menus 57 Video Playback Menus 58 Still Image Recording Menus 59 Still Image Playback Menus 59 FURTHER INFORMATION Troubleshooting 60 Warning Indications 64 Cleaning the Camera 66 Cautions 67 Specifications 70 TERMS Back cover 3) Operate ...
...and illustrated as shown below . ex.) 1) Move the control lever downward: Press . 2) Press down the lever. EN 7 Video Playlists 44 Creating Playlists 44 Playing Back Playlists 46 Other Operations of Playlists 46 Still image Print Setting 47 DPOF Print Setting 47 Direct... 49 Using a VCR/DVD Recorder for All Modes 55 Video Recording Menus 57 Video Playback Menus 58 Still Image Recording Menus 59 Still Image Playback Menus 59 FURTHER INFORMATION Troubleshooting 60 Warning Indications 64 Cleaning the Camera 66 Cautions 67 Specifications 70 TERMS Back cover 3) Operate ...
Instructions
Page 11
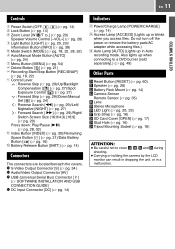
... (੬ pg. 49) Other Parts T Reset Button [RESET] (੬ pg. 60) U Speaker (੬ pg. 28) V Battery Pack Mount (੬ pg. 14) W Camera Sensor Remote Sensor (੬ pg. 35) X Lens Y Stereo Microphone a LED Light (੬ pg. 20, 23) b Grip Strap (੬ pg. 16) c SD Card Cover...not to cover W, X, Y and Z during shooting. ● Carrying or holding the camera by the LCD monitor can result in dropping the unit, or in Auto recording mode. M S-Video Output Connector [S] (੬ pg. 34) N Audio/Video Output Connector [AV] O USB (Universal Serial Bus) Connector [ ] (੬ SOFTWARE ...
... (੬ pg. 49) Other Parts T Reset Button [RESET] (੬ pg. 60) U Speaker (੬ pg. 28) V Battery Pack Mount (੬ pg. 14) W Camera Sensor Remote Sensor (੬ pg. 35) X Lens Y Stereo Microphone a LED Light (੬ pg. 20, 23) b Grip Strap (੬ pg. 16) c SD Card Cover...not to cover W, X, Y and Z during shooting. ● Carrying or holding the camera by the LCD monitor can result in dropping the unit, or in Auto recording mode. M S-Video Output Connector [S] (੬ pg. 34) N Audio/Video Output Connector [AV] O USB (Universal Serial Bus) Connector [ ] (੬ SOFTWARE ...

Instructions
Page 15
...(੬ pg. 30) After performing step 1-4 in "Language Setting" (੬ pg. 15) 5 Select [CLOCK ADJUST]. Power off Playback Recording Lock button 3 CAMERA SETTING BASIC SETTING REC MEDIA SETTING DATE/DISPLAY REGISTER EVENT QUALITY WIND CUT 4 Select [DATE/DISPLAY]. Select Set Repeat this step to or . Slide while... lock button. Select Set CLOCK ADJUST DATE TIME JAN 31 2006 11 : 07 AM 6 Set the date and time. To use the camera right away To record videos (੬ pg. 18) To record still images (੬ pg. 22) To configure other settings (੬ pg. 16) GETTING STARTED...
...(੬ pg. 30) After performing step 1-4 in "Language Setting" (੬ pg. 15) 5 Select [CLOCK ADJUST]. Power off Playback Recording Lock button 3 CAMERA SETTING BASIC SETTING REC MEDIA SETTING DATE/DISPLAY REGISTER EVENT QUALITY WIND CUT 4 Select [DATE/DISPLAY]. Select Set Repeat this step to or . Slide while... lock button. Select Set CLOCK ADJUST DATE TIME JAN 31 2006 11 : 07 AM 6 Set the date and time. To use the camera right away To record videos (੬ pg. 18) To record still images (੬ pg. 22) To configure other settings (੬ pg. 16) GETTING STARTED...

Instructions
Page 17
...ensure stable speeds and operation when accessing the SD card. NOTE: For details on the reverse side of recording media" (੬ pg. 3). DIS CAMERA SETTING BASIC SETTING REC MEDIA SETTING DATE/DISPLAY REGISTER EVENT QUALITY 2 Select [REC MEDIA SETTING]. Select Set SD HDD 2 Firmly insert the card ...Select Set COPY/MOVE 0 NO. GETTING STARTED EN 17 When Using an SD Card By default, the HDD is turned off. RESET VIDEO MODE IMAGE MODE FORMAT CLEAN UP 3 Select [VIDEO MODE] or [IMAGE MODE]. Otherwise, data on how to 1 or . For details on the card may be performed.
...ensure stable speeds and operation when accessing the SD card. NOTE: For details on the reverse side of recording media" (੬ pg. 3). DIS CAMERA SETTING BASIC SETTING REC MEDIA SETTING DATE/DISPLAY REGISTER EVENT QUALITY 2 Select [REC MEDIA SETTING]. Select Set SD HDD 2 Firmly insert the card ...Select Set COPY/MOVE 0 NO. GETTING STARTED EN 17 When Using an SD Card By default, the HDD is turned off. RESET VIDEO MODE IMAGE MODE FORMAT CLEAN UP 3 Select [VIDEO MODE] or [IMAGE MODE]. Otherwise, data on how to 1 or . For details on the card may be performed.

Instructions
Page 18
... button again. Slide while pressing down the lock button. 2 Set the MODE switch to . : Video mode Power off : Still image mode Playback Recording Lock button LIGHT/INFO Zoom Lever ● The camera is shipped from the factory. 18 EN Video Recording Preparation: Open the LCD monitor. (੬ pg. 10) 1 Set the power switch...
... button again. Slide while pressing down the lock button. 2 Set the MODE switch to . : Video mode Power off : Still image mode Playback Recording Lock button LIGHT/INFO Zoom Lever ● The camera is shipped from the factory. 18 EN Video Recording Preparation: Open the LCD monitor. (੬ pg. 10) 1 Set the power switch...

Instructions
Page 19
... be stopped to protect the recording medium. To turn off the power, and then wait until the camera cools down. ● If data cannot be recorded or saved properly, the video files are given the names MOV_001.MOD to MOV_009.MOD, MOV_00A.MOD to MOV_00F.MOD, and MOV_010.... new file will be sure to make a trial recording. ● Do not move or shake the camera suddenly during recording. Select Set 3 Select [ON/SELECT]. In this camera is not compatible with SD-VIDEO format. If you select an event to register the file to before starting recording, the file will be...
... be stopped to protect the recording medium. To turn off the power, and then wait until the camera cools down. ● If data cannot be recorded or saved properly, the video files are given the names MOV_001.MOD to MOV_009.MOD, MOV_00A.MOD to MOV_00F.MOD, and MOV_010.... new file will be sure to make a trial recording. ● Do not move or shake the camera suddenly during recording. Select Set 3 Select [ON/SELECT]. In this camera is not compatible with SD-VIDEO format. If you select an event to register the file to before starting recording, the file will be...

Instructions
Page 20
...NOTES: ● If the recording mode is set [TELE MACRO] to be slightly vertically stretched on TV with the 4:3 screen. LED Light If you record videos in 16:9 size, the image may appear to [ON]. (੬ pg. 57) Changing the Screen Size You can zoom in up to 15x by using...5 cm (2") to the subject when the zoom lever is possible up to 700x) NOTES: ● Macro shooting is possible as close to the lens, the camera may automatically zoom out depending on regardless of the surrounding conditions. Disables this function, the LED light turns on to be slightly vertically stretched when...
...NOTES: ● If the recording mode is set [TELE MACRO] to be slightly vertically stretched on TV with the 4:3 screen. LED Light If you record videos in 16:9 size, the image may appear to [ON]. (੬ pg. 57) Changing the Screen Size You can zoom in up to 15x by using...5 cm (2") to the subject when the zoom lever is possible up to 700x) NOTES: ● Macro shooting is possible as close to the lens, the camera may automatically zoom out depending on regardless of the surrounding conditions. Disables this function, the LED light turns on to be slightly vertically stretched when...

Instructions
Page 22
Set the MODE switch to or . To turn the camera on the recording medium, press the REC/SNAP button fully. Slide while pressing down the lock button. : Video mode Power off ). Zoom Lever 3 Press the REC/SNAP button to . To cancel the sleep mode, perform any operation such as zooming. When using the... switch to OFF, then to . To change the picture quality (੬ pg. 59) NOTES: ● Still images are recorded at 16:9 size. ● If the camera is not operated for 5 minutes while the power is on the built-in hard disk when it is focused. To record it turns itself off...
Set the MODE switch to or . To turn the camera on the recording medium, press the REC/SNAP button fully. Slide while pressing down the lock button. : Video mode Power off ). Zoom Lever 3 Press the REC/SNAP button to . To cancel the sleep mode, perform any operation such as zooming. When using the... switch to OFF, then to . To change the picture quality (੬ pg. 59) NOTES: ● Still images are recorded at 16:9 size. ● If the camera is not operated for 5 minutes while the power is on the built-in hard disk when it is focused. To record it turns itself off...

Instructions
Page 28
... scenes, the image may stop momentarily or the sound may be viewed in the LCD monitor or on /off the camera power, and then wait until the camera cools down . 28 EN Video Playback 1 2 Set the power switch to protect the recording medium. Set the MODE switch to [ON], [AUTO] or [OFF...]. (੬ pg. 56) To check the file information Press INFO when playback is not a malfunction. ● When the camera heats up, the U...
... scenes, the image may stop momentarily or the sound may be viewed in the LCD monitor or on /off the camera power, and then wait until the camera cools down . 28 EN Video Playback 1 2 Set the power switch to protect the recording medium. Set the MODE switch to [ON], [AUTO] or [OFF...]. (੬ pg. 56) To check the file information Press INFO when playback is not a malfunction. ● When the camera heats up, the U...
Instructions
Page 34
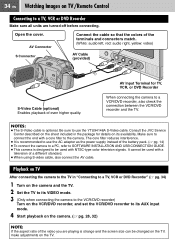
...with NTSC-type color television signals. Consult the JVC Service Center described on the sheet included in "Connecting to a TV, VCR or DVD Recorder" (੬ pg. 34) 1 Turn on the camera and the TV. 2 Set the TV to its VIDEO mode. 3 (Only when connecting the camera to the VCR/DVD recorder) Turn on the... VCR/DVD recorder, and set the VCR/DVD recorder to its AUX input mode. 4 Start playback on the camera. (੬ pg. 28, 32) NOTE: If the aspect ratio of the video you are turned off before connecting. The core filter reduces interference. ● It is strange and the screen size...
...with NTSC-type color television signals. Consult the JVC Service Center described on the sheet included in "Connecting to a TV, VCR or DVD Recorder" (੬ pg. 34) 1 Turn on the camera and the TV. 2 Set the TV to its VIDEO mode. 3 (Only when connecting the camera to the VCR/DVD recorder) Turn on the... VCR/DVD recorder, and set the VCR/DVD recorder to its AUX input mode. 4 Start playback on the camera. (੬ pg. 28, 32) NOTE: If the aspect ratio of the video you are turned off before connecting. The core filter reduces interference. ● It is strange and the screen size...

Instructions
Page 38
Remaining files: 0059 EXECUTE CANCEL You can directly manage recorded files in step 3. However, if the recording mode (video or still image) is switched or the power is turned off the power) while accessing files. NOTE: If you press during recording mode, the file ... the recording medium may be deleted. Select Set To exit the file delete screen Select [CANCEL] in the camera. 38 EN Managing Files You can select the file that you cannot delete the file. VIDEO 53/53 Controls in this section MODE Switch Power Switch Zoom Lever / /// 49 2 DELETE? CAUTION: Do not...
Remaining files: 0059 EXECUTE CANCEL You can directly manage recorded files in step 3. However, if the recording mode (video or still image) is switched or the power is turned off the power) while accessing files. NOTE: If you press during recording mode, the file ... the recording medium may be deleted. Select Set To exit the file delete screen Select [CANCEL] in the camera. 38 EN Managing Files You can select the file that you cannot delete the file. VIDEO 53/53 Controls in this section MODE Switch Power Switch Zoom Lever / /// 49 2 DELETE? CAUTION: Do not...

Instructions
Page 41
...Formatting a Recording Medium You can format (initialize) the built-in this way, a formatting progress bar is difficult to recover. Select Set VIDEO MODE IMAGE MODE FORMAT CLEAN UP COPY/MOVE NO. Moreover, by using them. By pressing 49 while selecting [HDD] and holding down the... button in step 4, you can make it more difficult to or . 1 DIS CAMERA SETTING BASIC SETTING REC MEDIA SETTING DATE/DISPLAY REGISTER EVENT QUALITY 2 Select [REC MEDIA SETTING]. EXECUTE CANCEL 5 Select [EXECUTE]. Preparation: ● Set...
...Formatting a Recording Medium You can format (initialize) the built-in this way, a formatting progress bar is difficult to recover. Select Set VIDEO MODE IMAGE MODE FORMAT CLEAN UP COPY/MOVE NO. Moreover, by using them. By pressing 49 while selecting [HDD] and holding down the... button in step 4, you can make it more difficult to or . 1 DIS CAMERA SETTING BASIC SETTING REC MEDIA SETTING DATE/DISPLAY REGISTER EVENT QUALITY 2 Select [REC MEDIA SETTING]. EXECUTE CANCEL 5 Select [EXECUTE]. Preparation: ● Set...

Instructions
Page 42
...be completed. Resetting the File Number By resetting the file number (name), a new folder will be stored in the new folder. RESET FOR VIDEO FILES EXECUTE CANCEL 4 Select [EXECUTE]. Select Set To regain the speed, execute cleanup periodically. THIS PROCESS MAY TAKE A WHILE. It is convenient...to be made. Preparation: ● Set the power switch to become slow after long periods of recording media tends to or . 1 DIS CAMERA SETTING BASIC SETTING REC MEDIA SETTING DATE/DISPLAY REGISTER EVENT QUALITY 2 Select and set items as follows. [REC MEDIA SETTING] [NO. Press ...
...be completed. Resetting the File Number By resetting the file number (name), a new folder will be stored in the new folder. RESET FOR VIDEO FILES EXECUTE CANCEL 4 Select [EXECUTE]. Select Set To regain the speed, execute cleanup periodically. THIS PROCESS MAY TAKE A WHILE. It is convenient...to be made. Preparation: ● Set the power switch to become slow after long periods of recording media tends to or . 1 DIS CAMERA SETTING BASIC SETTING REC MEDIA SETTING DATE/DISPLAY REGISTER EVENT QUALITY 2 Select and set items as follows. [REC MEDIA SETTING] [NO. Press ...
Instructions
Page 49
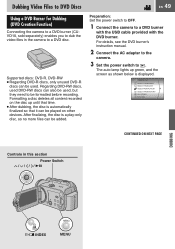
...that time. ● After dubbing, the disc is displayed. Dubbing Video Files to DVD Discs Using a DVD Burner for Dubbing (DVD Creation Function) Connecting the camera to a DVD burner (CUVD10, sold separately) enables you to dub the video files in this section Power Switch / / / / 49 DUBBING ...INDEX MENU Regarding DVD-RW discs, used DVD-RW discs can be formatted before recording. For details, see the DVD burner's instruction manual. 2 Connect the AC adapter to the camera. 3 Set the power ...
...that time. ● After dubbing, the disc is displayed. Dubbing Video Files to DVD Discs Using a DVD Burner for Dubbing (DVD Creation Function) Connecting the camera to a DVD burner (CUVD10, sold separately) enables you to dub the video files in this section Power Switch / / / / 49 DUBBING ...INDEX MENU Regarding DVD-RW discs, used DVD-RW discs can be formatted before recording. For details, see the DVD burner's instruction manual. 2 Connect the AC adapter to the camera. 3 Set the power ...

Instructions
Page 50
...to be created. ● When [COMPLETED. The second DVD disc begins to stop checking. Press INDEX to the one created last time. 50 EN Dubbing Video Files to DVD Discs (Continued) Using a DVD Burner for Dubbing (DVD Creation Function) (Continued) 5 Select the desired disc number. 4 Select an ...CONTINUE] and press 49. Select Set ● [SELECT FROM EVENT]: Search for an event and display the corresponding files listed by connecting the camera with the audio/video cable. Select Set ● The DVD disc begins to select the event, then press 49. ● [SELECT FROM DATE]: Display the ...
...to be created. ● When [COMPLETED. The second DVD disc begins to stop checking. Press INDEX to the one created last time. 50 EN Dubbing Video Files to DVD Discs (Continued) Using a DVD Burner for Dubbing (DVD Creation Function) (Continued) 5 Select the desired disc number. 4 Select an ...CONTINUE] and press 49. Select Set ● [SELECT FROM EVENT]: Search for an event and display the corresponding files listed by connecting the camera with the audio/video cable. Select Set ● The DVD disc begins to select the event, then press 49. ● [SELECT FROM DATE]: Display the ...

Instructions
Page 52
52 EN Dubbing Video Files to DVD Discs (Continued) Using a VCR/DVD Recorder for Dubbing Preparation: Connect the camera to a VCR or DVD recorder. (੬ pg. 34) 1 Set the VCR/DVD recorder to its AUX input mode. 2 Start playback on the camera. ● To playback videos (੬ pg. 28) ● To playback playlists (੬ pg. 46) 3 At the point you want to start dubbing, start recording on the VCR/ DVD recorder. (Refer to the VCR/DVD recorder's instruction manual.) To stop dubbing Stop recording on the VCR/DVD recorder, then stop playback on the camera.
52 EN Dubbing Video Files to DVD Discs (Continued) Using a VCR/DVD Recorder for Dubbing Preparation: Connect the camera to a VCR or DVD recorder. (੬ pg. 34) 1 Set the VCR/DVD recorder to its AUX input mode. 2 Start playback on the camera. ● To playback videos (੬ pg. 28) ● To playback playlists (੬ pg. 46) 3 At the point you want to start dubbing, start recording on the VCR/ DVD recorder. (Refer to the VCR/DVD recorder's instruction manual.) To stop dubbing Stop recording on the VCR/DVD recorder, then stop playback on the camera.

Instructions
Page 54
... Changing the Menu Settings You can change the menu settings to customize your camera. ● Some menus can be set depending on each menu, see ... press INFO again. Preparation: ● Select (recording) or (playback) using the power switch. ● Select (video) or (still image) using the MODE switch. 1 DATE/DISPLAY CHANGE EVENT REG. In this section Power Switch MODE ... WIPE:SCROLL WIPE:SHUTTER OFF OFF FADER:WHITE FADER:BLACK FADER:B.W For details on the selected mode (video/still image, recording/playback). Other menus can be used depending on the selected file type and operation...
... Changing the Menu Settings You can change the menu settings to customize your camera. ● Some menus can be set depending on each menu, see ... press INFO again. Preparation: ● Select (recording) or (playback) using the power switch. ● Select (video) or (still image) using the MODE switch. 1 DATE/DISPLAY CHANGE EVENT REG. In this section Power Switch MODE ... WIPE:SCROLL WIPE:SHUTTER OFF OFF FADER:WHITE FADER:BLACK FADER:B.W For details on the selected mode (video/still image, recording/playback). Other menus can be used depending on the selected file type and operation...


