
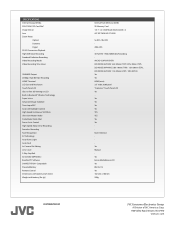
Printer Friendly Specs
Page 2
...Smile Shot Focus Assist Control High-Speed Motor Drive Recording Seamless Recording Face Recognition K2 Technology Auto Illumi. Light Auto Flash In-Camera File Editing Lens Cover 2-Way Grip Belt 3D SOUND (BIPHONIC) Bundled PC Software SHARE STATION® Compatible Provided Battery Remote Control Dimensions with battery ...(inch (mm)) Weight with battery (lbs (g)) DISTRIBUTED BY Internal Flash Memory (64GB) SD Memory Card 1/4.1" x 2 3.32M (back-illuminated) x 2 JVC 3D TWIN HD GT LENS 5x (3D), 10x (2D) 200x (2D) 3D Full HD 1920x1080 Video Recording AVCHD (UXP/XP/SP/EP) [3D MODE (AVCHD...
...Smile Shot Focus Assist Control High-Speed Motor Drive Recording Seamless Recording Face Recognition K2 Technology Auto Illumi. Light Auto Flash In-Camera File Editing Lens Cover 2-Way Grip Belt 3D SOUND (BIPHONIC) Bundled PC Software SHARE STATION® Compatible Provided Battery Remote Control Dimensions with battery ...(inch (mm)) Weight with battery (lbs (g)) DISTRIBUTED BY Internal Flash Memory (64GB) SD Memory Card 1/4.1" x 2 3.32M (back-illuminated) x 2 JVC 3D TWIN HD GT LENS 5x (3D), 10x (2D) 200x (2D) 3D Full HD 1920x1080 Video Recording AVCHD (UXP/XP/SP/EP) [3D MODE (AVCHD...
Catalog
Page 5
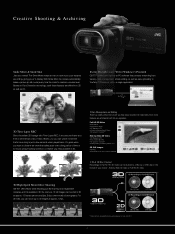
... SLR cameras, and it's available in the Full HD 3D mode can watch movement that provides everything from viewing, data management, simple editing, as well as 2D. It's great when you want to observe an event that takes place over a long period of photography. ..., Combining, Effects, etc.) 3D Still Images • Viewing • Editing (Various re-touch functions available) • 3D & 2D Disc Creation* Recordings in 3D! Everio MediaBrowser 3D (for Windows®) Provided GS-TD1 comes with Time-Lapse REC. Creative Shooting & Archiving Smile Meter & Smile Shot Just say cheese...
... SLR cameras, and it's available in the Full HD 3D mode can watch movement that provides everything from viewing, data management, simple editing, as well as 2D. It's great when you want to observe an event that takes place over a long period of photography. ..., Combining, Effects, etc.) 3D Still Images • Viewing • Editing (Various re-touch functions available) • 3D & 2D Disc Creation* Recordings in 3D! Everio MediaBrowser 3D (for Windows®) Provided GS-TD1 comes with Time-Lapse REC. Creative Shooting & Archiving Smile Meter & Smile Shot Just say cheese...
Catalog
Page 6
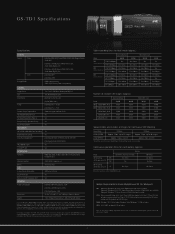
...using other media may become slower depending on LCD) XP Battery BN-VF815 (Same as 3D monitor (polarizing filter system) and special glasses are required. 5 GS-TD1 Specifications Specifications SYSTEM Format Video Stills Storage Media [3D Mode (MP4 MVC)] Video: MPEG-4 MVC/H.264 (Original format), Audio: AAC [3D Mode (AVCHD... 3D Mode 2D Mode HIGH SPEED Approx. 12fps, up to 12 images Approx. 12fps, up to 64GB) have been tested for HD video editing and 3D playback of memory cards, please consult an authorized JVC dealer. *2 Footage recorded in recording failure or data loss.
...using other media may become slower depending on LCD) XP Battery BN-VF815 (Same as 3D monitor (polarizing filter system) and special glasses are required. 5 GS-TD1 Specifications Specifications SYSTEM Format Video Stills Storage Media [3D Mode (MP4 MVC)] Video: MPEG-4 MVC/H.264 (Original format), Audio: AAC [3D Mode (AVCHD... 3D Mode 2D Mode HIGH SPEED Approx. 12fps, up to 12 images Approx. 12fps, up to 64GB) have been tested for HD video editing and 3D playback of memory cards, please consult an authorized JVC dealer. *2 Footage recorded in recording failure or data loss.

Basic User Guide
Page 26
... 0 For more information, contact your PC does not meet the above recommended) Graphic: Intel G965 or higher recommended o Video editing/AVCHD (3D) playback Intel Core i7, CPU 2.53 GHz or higher recommended NOTE 0 If your PC's manufacturer. 26 For...Still images cannot be used. o Windows XP Memory: At least 2 GB System type: 32-bit / 64-bit Windows XP Home Edition or Professional (Pre-installed versions only) Service Pack 3 Processor Intel Core Duo, CPU 1.66 GHz or higher (Intel Core 2 Duo...provided software cannot be recorded to the Detailed User Guide http://manual.jvc.co.jp/index.html/
... 0 For more information, contact your PC does not meet the above recommended) Graphic: Intel G965 or higher recommended o Video editing/AVCHD (3D) playback Intel Core i7, CPU 2.53 GHz or higher recommended NOTE 0 If your PC's manufacturer. 26 For...Still images cannot be used. o Windows XP Memory: At least 2 GB System type: 32-bit / 64-bit Windows XP Home Edition or Professional (Pre-installed versions only) Service Pack 3 Processor Intel Core Duo, CPU 1.66 GHz or higher (Intel Core 2 Duo...provided software cannot be recorded to the Detailed User Guide http://manual.jvc.co.jp/index.html/
Basic User Guide
Page 27
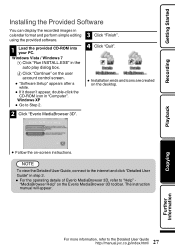
The instruction manual will appear. Windows Vista / Windows 7 A Click "Run INSTALL.EXE" in calendar format and perform simple editing using the provided software. 1 Load the provided CD-ROM into your PC. Getting Started Recording Installing the Provided Software You can ...display the recorded images in the auto play dialog box. Windows XP 0 Go to the Detailed User Guide http://manual.jvc.co.jp/index.html/ "MediaBrowser Help" on -screen instructions. B Click "Continue" on the user account control screen. 0 "Software Setup" appears after a while. ...
The instruction manual will appear. Windows Vista / Windows 7 A Click "Run INSTALL.EXE" in calendar format and perform simple editing using the provided software. 1 Load the provided CD-ROM into your PC. Getting Started Recording Installing the Provided Software You can ...display the recorded images in the auto play dialog box. Windows XP 0 Go to the Detailed User Guide http://manual.jvc.co.jp/index.html/ "MediaBrowser Help" on -screen instructions. B Click "Continue" on the user account control screen. 0 "Software Setup" appears after a while. ...
Easy Start Guide
Page 1
...48 GB to 64 GB) (When recording with image quality "THR", Class 10 is recommended. (Class 6 or higher is the easiest way to edit unneeded material later. Press the "3D/2D" button on the touch screen to using a tripod or a monopod to objects in AVCHD format to improve... Guide This easy start your recording: - B Drag the thumbnails on the touch screen to 64 GB) • Using cards other battery packs besides JVC battery packs, safety and performance cannot be displayed on the subject first, then begin recording. - D Press the A/B button on operating this unit. The...
...48 GB to 64 GB) (When recording with image quality "THR", Class 10 is recommended. (Class 6 or higher is the easiest way to edit unneeded material later. Press the "3D/2D" button on the touch screen to using a tripod or a monopod to objects in AVCHD format to improve... Guide This easy start your recording: - B Drag the thumbnails on the touch screen to 64 GB) • Using cards other battery packs besides JVC battery packs, safety and performance cannot be displayed on the subject first, then begin recording. - D Press the A/B button on operating this unit. The...
Detailed User Guide
Page 2
...Images 60 Playing Back a DVD or Blu-ray Disc Created on this Unit 63 Digest Playback on a Blu-ray or DVD Player 64 Editing Deleting Unwanted Files 65 Deleting the Currently Displayed File 65 Deleting Selected Files 65 Protecting Files 66 Protecting/Releasing Protection of the Currently Displayed File...Files 93 Organizing Files 94 Recording Videos to Discs 95 Backing Up Files Without Using Provided Software 96 List of Files and Folders 97 JVC Software Licence Agreement 98 Menu Settings Operating the Menu 99 Operating the Main Menu 99 Operating the Common Menu 99 Main Menu for ...
...Images 60 Playing Back a DVD or Blu-ray Disc Created on this Unit 63 Digest Playback on a Blu-ray or DVD Player 64 Editing Deleting Unwanted Files 65 Deleting the Currently Displayed File 65 Deleting Selected Files 65 Protecting Files 66 Protecting/Releasing Protection of the Currently Displayed File...Files 93 Organizing Files 94 Recording Videos to Discs 95 Backing Up Files Without Using Provided Software 96 List of Files and Folders 97 JVC Software Licence Agreement 98 Menu Settings Operating the Menu 99 Operating the Main Menu 99 Operating the Common Menu 99 Main Menu for ...
Detailed User Guide
Page 3
... 134 Video Recording 134 Still Image Recording 135 Video Playback 135 Still Image Playback 136 Troubleshooting Battery Pack 137 Recording 137 Card 138 Playback 138 Editing/Copying 139 Computer 139 Screen/Image 140 Other Problems 140 Error Message 141 Maintenance 142 Specifications 143 3 SHOOTING SPEED 114 IMAGE SIZE 115 USER BUTTON...
... 134 Video Recording 134 Still Image Recording 135 Video Playback 135 Still Image Playback 136 Troubleshooting Battery Pack 137 Recording 137 Card 138 Playback 138 Editing/Copying 139 Computer 139 Screen/Image 140 Other Problems 140 Error Message 141 Maintenance 142 Specifications 143 3 SHOOTING SPEED 114 IMAGE SIZE 115 USER BUTTON...

Detailed User Guide
Page 6
... are changing, or during the toast, speech, entertainment programs, and other scenes, enabling an interesting video with Two Camcorders If video-editing is to be done, record using zoom. Record their expressions clearly during the entertainment programs. 6 Advanced Operation with changing scenes to... chest level You can be created through editing and compilation. This can record comments from eye level to be done at the back Closing Up on the bride's face using...
... are changing, or during the toast, speech, entertainment programs, and other scenes, enabling an interesting video with Two Camcorders If video-editing is to be done, record using zoom. Record their expressions clearly during the entertainment programs. 6 Advanced Operation with changing scenes to... chest level You can be created through editing and compilation. This can record comments from eye level to be done at the back Closing Up on the bride's face using...

Detailed User Guide
Page 65
... not remove the recording medium or perform any other operation (such as turning off the power) while accessing files. 0 Be sure to use the supplied JVC AC adapter. 0 If the data on the files to delete, then tap "J". 5 Tap "SET". 6 Tap "EXECUTE" to confirm the deletion. 65 Memo : ... "SEL ALL" to select all files. 0 Tap "REL ALL" to the index screen. "Protecting Files" (A p. 66) Deleting Selected Files Deletes the selected files. Editing Deleting Unwanted Files Delete unwanted videos and still images when the space in the image, the same operations apply for the still image mode. 3 Tap...
... not remove the recording medium or perform any other operation (such as turning off the power) while accessing files. 0 Be sure to use the supplied JVC AC adapter. 0 If the data on the files to delete, then tap "J". 5 Tap "SET". 6 Tap "EXECUTE" to confirm the deletion. 65 Memo : ... "SEL ALL" to select all files. 0 Tap "REL ALL" to the index screen. "Protecting Files" (A p. 66) Deleting Selected Files Deletes the selected files. Editing Deleting Unwanted Files Delete unwanted videos and still images when the space in the image, the same operations apply for the still image mode. 3 Tap...

Detailed User Guide
Page 66
... Displayed File" (A p. 66) "Protecting/Releasing Protection of Selected Files" (A p. 66) Caution : 0 When the recording media is complete, tap "OK". 0 To cancel the deletion, tap "QUIT". Editing 0 After deleting is formatted, even the protected files will be deleted. "Protecting Files" (A p. 66) 66 .... Protecting Files Prevent important videos/still images from being deleted...
... Displayed File" (A p. 66) "Protecting/Releasing Protection of Selected Files" (A p. 66) Caution : 0 When the recording media is complete, tap "OK". 0 To cancel the deletion, tap "QUIT". Editing 0 After deleting is formatted, even the protected files will be deleted. "Protecting Files" (A p. 66) 66 .... Protecting Files Prevent important videos/still images from being deleted...

Detailed User Guide
Page 67
... from the deselected files. Only the first recorded file is shown and the group is being played back from a file, tap on the selected files. Editing Capturing a Still Image in the recorded videos. 1 Select video mode. 2 Tap q to select the playback mode. 4 Tap "PROTECT/CANCEL". 3 Tap on the desired video. 5 Tap...
... from the deselected files. Only the first recorded file is shown and the group is being played back from a file, tap on the selected files. Editing Capturing a Still Image in the recorded videos. 1 Select video mode. 2 Tap q to select the playback mode. 4 Tap "PROTECT/CANCEL". 3 Tap on the desired video. 5 Tap...

Detailed User Guide
Page 68
Editing Capturing a Required Part in the Video (TRIMMING) Select the required part of a video and save it as a new video file. 0 The original video remains in ... point may deviate slightly from the selected scene. 0 Tap ∧ or ∨ to move upward or downward for more selection. 5 Tap on the video to edit. 6 Tap e to the index screen. 0 After copying, tap "OK". ... ......
Editing Capturing a Required Part in the Video (TRIMMING) Select the required part of a video and save it as a new video file. 0 The original video remains in ... point may deviate slightly from the selected scene. 0 Tap ∧ or ∨ to move upward or downward for more selection. 5 Tap on the video to edit. 6 Tap e to the index screen. 0 After copying, tap "OK". ... ......
Detailed User Guide
Page 69
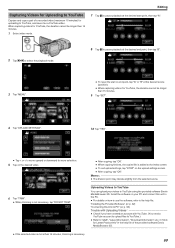
Editing Capturing Videos for Uploading to YouTube Capture and copy a part of the provided software Everio MediaBrowser 3D. 0 If the selected video is more selection. 5 Tap ...
Editing Capturing Videos for Uploading to YouTube Capture and copy a part of the provided software Everio MediaBrowser 3D. 0 If the selected video is more selection. 5 Tap ...
Detailed User Guide
Page 84
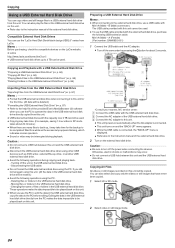
... Turning off the camcorder by pressing the M button for the backup to be played back on this unit and the USB external hard disk drive. Editing the data in XP mode takes about 2 seconds. Otherwise, electric shocks or malfunctions may occur. 0 Do not connect a USB hub between this unit...this unit. 0 When you did, format again using the PC. - Caution : 0 Do not connect a USB hub between this unit. *Consult your nearest JVC service center. Copying All Files All videos or still images recorded on this unit and the USB external hard disk drive. 0 Disconnect the USB external...
... Turning off the camcorder by pressing the M button for the backup to be played back on this unit and the USB external hard disk drive. Editing the data in XP mode takes about 2 seconds. Otherwise, electric shocks or malfunctions may occur. 0 Do not connect a USB hub between this unit...this unit. 0 When you did, format again using the PC. - Caution : 0 Do not connect a USB hub between this unit. *Consult your nearest JVC service center. Copying All Files All videos or still images recorded on this unit and the USB external hard disk drive. 0 Disconnect the USB external...

Detailed User Guide
Page 92
...bit Home Basic or Home Premium (Pre-installed versions only) Service Pack 2 Windows 7 32/64-bit Home Premium (Pre-installed versions only) Windows XP Home Edition or Professional (Pre-installed versions only) Service Pack 3 CPU Intel Core Duo CPU 1.66 GHz or higher (Intel Core 2 Duo CPU 2.13 GHz or ... i7 CPU 2.53 GHz or higher recommended) Intel Core Duo CPU 1.66 GHz or higher (Intel Core 2 Duo CPU 2.13 GHz or higher recommended) (Video editing/AVCHD(3D) playback: Intel Core i7 CPU 2.53 GHz or higher recommended) RAM At least 2 GB At least 1 GB o Other requirements 0 Display: 1024&#...
...bit Home Basic or Home Premium (Pre-installed versions only) Service Pack 2 Windows 7 32/64-bit Home Premium (Pre-installed versions only) Windows XP Home Edition or Professional (Pre-installed versions only) Service Pack 3 CPU Intel Core Duo CPU 1.66 GHz or higher (Intel Core 2 Duo CPU 2.13 GHz or ... i7 CPU 2.53 GHz or higher recommended) Intel Core Duo CPU 1.66 GHz or higher (Intel Core 2 Duo CPU 2.13 GHz or higher recommended) (Video editing/AVCHD(3D) playback: Intel Core i7 CPU 2.53 GHz or higher recommended) RAM At least 2 GB At least 1 GB o Other requirements 0 Display: 1024&#...

Detailed User Guide
Page 96
... Vista) / "My Computer" (Windows XP) / "Computer" (Windows 7) from Computer 1 Click "Safely Remove Hardware and Eject Media". Disconnecting this unit anymore. Memo : 0 To edit/view the files, use the supplied JVC AC adapter. 0 The "SELECT DEVICE" menu appears. 2 Tap "CONNECT TO PC". 2 Click "Safely Remove USB Mass Storage Device". 3 (For Windows Vista) Click...
... Vista) / "My Computer" (Windows XP) / "Computer" (Windows 7) from Computer 1 Click "Safely Remove Hardware and Eject Media". Disconnecting this unit anymore. Memo : 0 To edit/view the files, use the supplied JVC AC adapter. 0 The "SELECT DEVICE" menu appears. 2 Tap "CONNECT TO PC". 2 Click "Safely Remove USB Mass Storage Device". 3 (For Windows Vista) Click...

Detailed User Guide
Page 139
... the AC adapter. While the USB cable is connected, the "BACK-UP" menu is displayed. Files (videos/still images) that are protected cannot be deleted. Editing/Copying Computer Troubleshooting Unable to discs, a recordable DVD drive is required for the PC in use. 139 Turn off the BACK-UP menu. To record...
... the AC adapter. While the USB cable is connected, the "BACK-UP" menu is displayed. Files (videos/still images) that are protected cannot be deleted. Editing/Copying Computer Troubleshooting Unable to discs, a recordable DVD drive is required for the PC in use. 139 Turn off the BACK-UP menu. To record...

Detailed User Guide
Page 141
... unit again. Protect the unit from the SD card terminals. UNABLE TO RECORD PROPERLY IN 3D PLEASE SWITCH TO 2D FOR RECORDING Consult your nearest JVC dealer.) "Clock Setting" (A p. 19) COMMUNICATION ERROR Reconnect the USB cable. TOO MUCH PARALLAX BETWEEN LEFT & RIGHT IMAGES. FORMAT ERROR! Remove..."COMMON" menu. (All data will be able to a PC or other device. (Back up your files and execute "FORMAT SD CARD" in the "EDIT" menu. PLAYBACK FAILED Remove and re-insert the SD card. "Protecting Files" (A p. 66) CHECK CARD'S WRITE PROTECTION SWITCH Set the write protect switch...
... unit again. Protect the unit from the SD card terminals. UNABLE TO RECORD PROPERLY IN 3D PLEASE SWITCH TO 2D FOR RECORDING Consult your nearest JVC dealer.) "Clock Setting" (A p. 19) COMMUNICATION ERROR Reconnect the USB cable. TOO MUCH PARALLAX BETWEEN LEFT & RIGHT IMAGES. FORMAT ERROR! Remove..."COMMON" menu. (All data will be able to a PC or other device. (Back up your files and execute "FORMAT SD CARD" in the "EDIT" menu. PLAYBACK FAILED Remove and re-insert the SD card. "Protecting Files" (A p. 66) CHECK CARD'S WRITE PROTECTION SWITCH Set the write protect switch...


