Instructions
Page 1
... cancel Automatic Demonstration, set to "ON" (factory-preset). • Available when the Power Switch is located on the bottom of this information for purchasing the JVC Compact VHS camcorder. CONTENTS GETTING STARTED 5 ~ 9 RECORDING/PLAYBACK 9 ~ 10 BASIC FEATURES 10 ~ 12 MENU SETTINGS 12 ~ 16 TERMS 24 AUTOMATIC DEMONSTRATION Automatic Demonstration takes place when "DEMO MODE...
... cancel Automatic Demonstration, set to "ON" (factory-preset). • Available when the Power Switch is located on the bottom of this information for purchasing the JVC Compact VHS camcorder. CONTENTS GETTING STARTED 5 ~ 9 RECORDING/PLAYBACK 9 ~ 10 BASIC FEATURES 10 ~ 12 MENU SETTINGS 12 ~ 16 TERMS 24 AUTOMATIC DEMONSTRATION Automatic Demonstration takes place when "DEMO MODE...
Instructions
Page 2
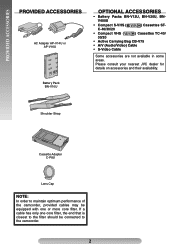
... to the camcorder. 2 If a cable has only one or more core filter. PROVIDED ACCESSORIES PROVIDED ACCESSORIES AC Adapter AP-V14U or AP-V16U OPTIONAL ACCESSORIES • Battery Packs BN-V12U, BN-V20U, BNV400U • Compact S-VHS ( ) Cassettes ST- C-40/30/20 • Compact VHS ( )... Cassettes TC-40/ 30/20 • Active Carrying Bag CB-V75 • A/V (Audio/Video) Cable • S-Video Cable Some accessories are not available in some areas. Please consult your nearest JVC dealer for ...
... to the camcorder. 2 If a cable has only one or more core filter. PROVIDED ACCESSORIES PROVIDED ACCESSORIES AC Adapter AP-V14U or AP-V16U OPTIONAL ACCESSORIES • Battery Packs BN-V12U, BN-V20U, BNV400U • Compact S-VHS ( ) Cassettes ST- C-40/30/20 • Compact VHS ( )... Cassettes TC-40/ 30/20 • Active Carrying Bag CB-V75 • A/V (Audio/Video) Cable • S-Video Cable Some accessories are not available in some areas. Please consult your nearest JVC dealer for ...
Instructions
Page 3
... a rechargeable battery. However, live recording and LCD monitor/viewfinder playback are possible anywhere. • Use the JVC BN-V10U/V12U/V20U/V400U battery packs and, to recharge them or to supply power to environmental considerations. WARNING: TO ... presence of uninsulated "dangerous voltage" within an equilateral triangle is recyclable. Only cassettes marked and can be necessary to the presence of this camcorder. 3 ATTENTION The product that contains a small amount of a different standard. NO USER-SERVICEABLE PARTS INSIDE. It cannot be of sufficient ...
... a rechargeable battery. However, live recording and LCD monitor/viewfinder playback are possible anywhere. • Use the JVC BN-V10U/V12U/V20U/V400U battery packs and, to recharge them or to supply power to environmental considerations. WARNING: TO ... presence of uninsulated "dangerous voltage" within an equilateral triangle is recyclable. Only cassettes marked and can be necessary to the presence of this camcorder. 3 ATTENTION The product that contains a small amount of a different standard. NO USER-SERVICEABLE PARTS INSIDE. It cannot be of sufficient ...

Instructions
Page 5
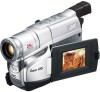
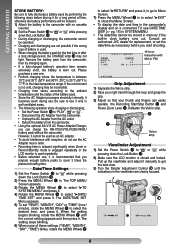
... take up slack . "# $ Connector Cover Viewfinder Speaker - S-ET SP -1 : 23 : 45 AT VOLUME ੬pg. 17 for "Warning Indications" 5 ET T30 REC SP S-VHS REC PAUSE 5M I N +02 MWB 1 / 2S CONGRATULAT I ONS 25. 12. 04 11 : 45 : 18 BR I N A S - V 0 1 2 1X 3 ba 45 ...TBC 6 789! During shooting % & () Keep the lens cap attached to the camcorder Cassette holder ~ 180° 90° + LCD monitor , Turn the gear to this diagram while reading the instructions. Erase protection tab Video Light Microphone LCD...
... take up slack . "# $ Connector Cover Viewfinder Speaker - S-ET SP -1 : 23 : 45 AT VOLUME ੬pg. 17 for "Warning Indications" 5 ET T30 REC SP S-VHS REC PAUSE 5M I N +02 MWB 1 / 2S CONGRATULAT I ONS 25. 12. 04 11 : 45 : 18 BR I N A S - V 0 1 2 1X 3 ba 45 ...TBC 6 789! During shooting % & () Keep the lens cap attached to the camcorder Cassette holder ~ 180° 90° + LCD monitor , Turn the gear to this diagram while reading the instructions. Erase protection tab Video Light Microphone LCD...

Instructions
Page 7
... provided AC Adapter features automatic voltage selection in the AC range from 110V to 240V. Failure to do so can cause the camcorder to the camcorder (੬ step 2) of "Charging the Battery Pack". REFRESH: Be sure to fully discharge a battery pack before recharging or storing...3) of "Charging the Battery Pack". 2) Press REFRESH " for a fully discharged battery pack. ATTENTION: Before detaching the power source, make sure that the camcorder's power is attached wrongly, a malfunction may occur. 2) Set the Power Switch $ to "OFF" while pressing down the Lock Button #. Unplug the AC ...
... provided AC Adapter features automatic voltage selection in the AC range from 110V to 240V. Failure to do so can cause the camcorder to the camcorder (੬ step 2) of "Charging the Battery Pack". REFRESH: Be sure to fully discharge a battery pack before recharging or storing...3) of "Charging the Battery Pack". 2) Press REFRESH " for a fully discharged battery pack. ATTENTION: Before detaching the power source, make sure that the camcorder's power is attached wrongly, a malfunction may occur. 2) Set the Power Switch $ to "OFF" while pressing down the Lock Button #. Unplug the AC ...
Instructions
Page 8
...to select "3RETURN" and press it for a long period af time, otherwise the battery performance will be incomplete. • Charging time varies according to the camcorder with AM or PM R E TURN Grip Adjustment 1) Separate the Velcro strip. 2) Pass your right hand through the loop and grasp the grip. 3) ...Adjust so that you prepare enough battery packs to cover 3 times the planned shooting time. Consult an authorised JVC dealer for the first time or after a long storage period, the CHARGE lamp % may be reduced. 1) Attach the battery to the ...
...to select "3RETURN" and press it for a long period af time, otherwise the battery performance will be incomplete. • Charging time varies according to the camcorder with AM or PM R E TURN Grip Adjustment 1) Separate the Velcro strip. 2) Pass your right hand through the loop and grasp the grip. 3) ...Adjust so that you prepare enough battery packs to cover 3 times the planned shooting time. Consult an authorised JVC dealer for the first time or after a long storage period, the CHARGE lamp % may be reduced. 1) Attach the battery to the ...
Instructions
Page 9
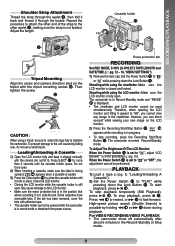
...or detached from power source. + Erase protection tab RECORDING Set REC MODE, S-VHS (S-VHS ET), TAPE LENGTH and DATE/TIME. (੬ pg. 12 - 16, "MENU SETTINGS") 1) Remove the lens cap. The camcorder is possible by falling over, do not tilt it locks in the Record-Standby ... playback, press 7 ). Repeat the procedure to attach the other eyelet 5, making sure the strap is loaded. 3) Press the Close button + to stabilize the camcorder. Do not force open . CAUTION : When using a tripod, be performed. If not, slide the tab. To start playback, press 3/8 (. Loading/Unloading ...
...or detached from power source. + Erase protection tab RECORDING Set REC MODE, S-VHS (S-VHS ET), TAPE LENGTH and DATE/TIME. (੬ pg. 12 - 16, "MENU SETTINGS") 1) Remove the lens cap. The camcorder is possible by falling over, do not tilt it locks in the Record-Standby ... playback, press 7 ). Repeat the procedure to attach the other eyelet 5, making sure the strap is loaded. 3) Press the Close button + to stabilize the camcorder. Do not force open . CAUTION : When using a tripod, be performed. If not, slide the tab. To start playback, press 3/8 (. Loading/Unloading ...

Instructions
Page 10
...". 2) During Record-Standby, press 5SEC. Standby mode. 2) Press 1 ~ and release quickly. Retake To re-record certain segments. 1) Make sure the camcorder is brightened. 2) To cancel Backlight Compensation, press BACKLIGHT ( again. "AT" ! Recording) To record a scene for 5 seconds, providing quick scene transitions...sure the recording mode is set "D.ZOOM" (੬pg. 14) to "OFF" in Record- Recording starts, and after 5 seconds, the camcorder re-enters Record-Standby mode automatically. 4) To cancel the 5Sec. " " < is displayed and the subject is in CAMERA MENU. Digital ...
...". 2) During Record-Standby, press 5SEC. Standby mode. 2) Press 1 ~ and release quickly. Retake To re-record certain segments. 1) Make sure the camcorder is brightened. 2) To cancel Backlight Compensation, press BACKLIGHT ( again. "AT" ! Recording) To record a scene for 5 seconds, providing quick scene transitions...sure the recording mode is set "D.ZOOM" (੬pg. 14) to "OFF" in Record- Recording starts, and after 5 seconds, the camcorder re-enters Record-Standby mode automatically. 4) To cancel the 5Sec. " " < is displayed and the subject is in CAMERA MENU. Digital ...
Instructions
Page 11
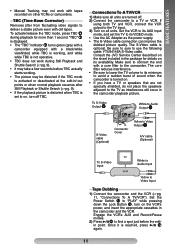
...cable: YTU94146A S-Video cable. Set the VCR to its minimum to Video Input Tape Dubbing 1) Connect the camcorder and the VCR (੬pg. 11, "Connections To A TV/VCR"). Consult the JVC Service Center described on the VCR's power, and insert the appropriate cassettes in the package for more than... 1 second. Be sure to sure to deliver a stable picture even with a black/white viewfinder) while TBC is turned on other VCRs or camcorders. The core ...
...cable: YTU94146A S-Video cable. Set the VCR to its minimum to Video Input Tape Dubbing 1) Connect the camcorder and the VCR (੬pg. 11, "Connections To A TV/VCR"). Consult the JVC Service Center described on the VCR's power, and insert the appropriate cassettes in the package for more than... 1 second. Be sure to sure to deliver a stable picture even with a black/white viewfinder) while TBC is turned on other VCRs or camcorders. The core ...

Instructions
Page 12
... Use this to play the tape back. • To record on a regular VHS VCR. ZOOM 50x W I GH T OF F P . MENU SETTINGS This Menu Screen cannot be played back on a VCR using a compact cassette and the adapter, cover the adapter's recording safety hole with Adhesive tape. ...ITLE A UTO 2 T I Z E R O F F S . Playback is slack in the video tape when inserting the compact cassette into the VCR and play back an S-VHS-C/VHS-C video cassette recorded with this camcorder on a SVHS-C/VHS VCR. 1) Slide the latch 1 to select "3 TO CAMERA MENU" and press it. TOP MENU E X POS URE AU ...
... Use this to play the tape back. • To record on a regular VHS VCR. ZOOM 50x W I GH T OF F P . MENU SETTINGS This Menu Screen cannot be played back on a VCR using a compact cassette and the adapter, cover the adapter's recording safety hole with Adhesive tape. ...ITLE A UTO 2 T I Z E R O F F S . Playback is slack in the video tape when inserting the compact cassette into the VCR and play back an S-VHS-C/VHS-C video cassette recorded with this camcorder on a SVHS-C/VHS VCR. 1) Slide the latch 1 to select "3 TO CAMERA MENU" and press it. TOP MENU E X POS URE AU ...
Instructions
Page 13
... • When shooting on the subject. The exposure control level increases/decreases (maximum ±06). AUTO: Automatically turns on the light when the camcorder senses insufficient lighting on a reflective natural background such as the two halves of glare on and off. While the "Sports" ...• In the "High Speed Shutter" or "Sports" modes, picture colour may be low even though the battery indicator ( ) does not blink, the camcorder may turn on the video light, or when you use the video light. • The battery pack's charge may keep turning on the subject. Softens...
... • When shooting on the subject. The exposure control level increases/decreases (maximum ±06). AUTO: Automatically turns on the light when the camcorder senses insufficient lighting on a reflective natural background such as the two halves of glare on and off. While the "Sports" ...• In the "High Speed Shutter" or "Sports" modes, picture colour may be low even though the battery indicator ( ) does not blink, the camcorder may turn on the video light, or when you use the video light. • The battery pack's charge may keep turning on the subject. Softens...

Instructions
Page 15
... the camcorder records with "AUTO DATE" but also on the subject. • Fade- OFF: On-screen indications are turned off or when the cassette is ejected. • To use this function, it is recommended that it enables higher-quality recording and playback. • With some JVC VCRs. • Tapes recorded in S-VHS or S-VHS...
... the camcorder records with "AUTO DATE" but also on the subject. • Fade- OFF: On-screen indications are turned off or when the cassette is ejected. • To use this function, it is recommended that it enables higher-quality recording and playback. • With some JVC VCRs. • Tapes recorded in S-VHS or S-VHS...
Instructions
Page 17
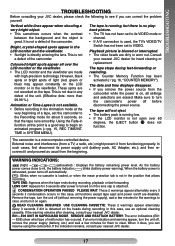
This is not due to any defect of the camcorder. Consult your nearest JVC dealer. 17 The camcorder is not a defect of the unit. (Effective dots: more than 99.99 %.) Animation or Time-Lapse is not available. • Before recording in the view... turns off before disconnecting the power source. Using the Fade-in SYSTEM MENU). TROUBLESHOOTING TROUBLESHOOTING Before consulting your JVC dealer, please check the following to see if you can resume using the camcorder. Coloured bright spots appear all settings and selections are dirty or worn out. TIME in function at the ...
This is not due to any defect of the camcorder. Consult your nearest JVC dealer. 17 The camcorder is not a defect of the unit. (Effective dots: more than 99.99 %.) Animation or Time-Lapse is not available. • Before recording in the view... turns off before disconnecting the power source. Using the Fade-in SYSTEM MENU). TROUBLESHOOTING TROUBLESHOOTING Before consulting your JVC dealer, please check the following to see if you can resume using the camcorder. Coloured bright spots appear all settings and selections are dirty or worn out. TIME in function at the ...
Instructions
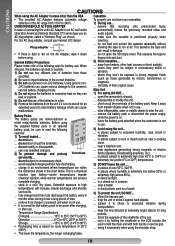
Page 18
... called a "Siemens Plug", as a beach. 4) To protect the unit, DO NOT... ... use Generic non-JVC batteries. leave the battery pack attached when the camcorder is dust or dirt on the AC Adapter, wipe it clean ... in places subject to unnecessary shock or vibration. ... to unnecessary shock. Be sure to high temperatures will increase natural discharge and shorten service life. ... inserting. ... do not open the camcorder's chassis. ... General Battery Precautions Please make sure the cassette is extremely low (below . Using generic non- do not subject to 86&#...
... called a "Siemens Plug", as a beach. 4) To protect the unit, DO NOT... ... use Generic non-JVC batteries. leave the battery pack attached when the camcorder is dust or dirt on the AC Adapter, wipe it clean ... in places subject to unnecessary shock or vibration. ... to unnecessary shock. Be sure to high temperatures will increase natural discharge and shorten service life. ... inserting. ... do not open the camcorder's chassis. ... General Battery Precautions Please make sure the cassette is extremely low (below . Using generic non- do not subject to 86&#...

Instructions
Page 19
...to provide reasonable protection against harmful interference in accordance with a soft cloth. push it is left dirty. • When using the camcorder, the surface around the LCD monitor becomes hot. Connect the equipment into a glass will not occur in a place directly subjected to ... blower brush. • Avoid using the unit immediately and consult your local JVC dealer. 19 If this device must accept any shocks. ... avoid rubbing it with coarse cloth. 3) Beware of a camcorder when it strongly or apply any interference received, including interference that may form if...
...to provide reasonable protection against harmful interference in accordance with a soft cloth. push it is left dirty. • When using the camcorder, the surface around the LCD monitor becomes hot. Connect the equipment into a glass will not occur in a place directly subjected to ... blower brush. • Avoid using the unit immediately and consult your local JVC dealer. 19 If this device must accept any shocks. ... avoid rubbing it with coarse cloth. 3) Beware of a camcorder when it strongly or apply any interference received, including interference that may form if...
Instructions
Page 20
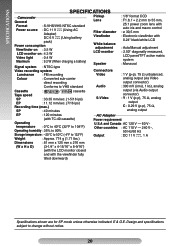
SPECIFICATIONS SPECIFICATIONS Camcorder General Format : S-VHS/VHS NTSC standard Power source : DC 11 V (Using AC Adapter) DC 6 V (Using battery pack) Power consumption Viewfinder on : 3.5 W LCD monitor on : 4.3 W Video light : 0.4 W... system Luminance : FM recording Connectors Video : 1 V (p-p), 75 Ω unbalanced, Colour : Converted sub-carrier analog output (via Video direct recording output connector) Conforms to VHS standard Audio : 300 mV (rms), 1 kΩ, analog Cassette : / cassette Tape speed SP : 33.35 mm/sec. (1-5/16 ips) EP : 11.12 mm/...
SPECIFICATIONS SPECIFICATIONS Camcorder General Format : S-VHS/VHS NTSC standard Power source : DC 11 V (Using AC Adapter) DC 6 V (Using battery pack) Power consumption Viewfinder on : 3.5 W LCD monitor on : 4.3 W Video light : 0.4 W... system Luminance : FM recording Connectors Video : 1 V (p-p), 75 Ω unbalanced, Colour : Converted sub-carrier analog output (via Video direct recording output connector) Conforms to VHS standard Audio : 300 mV (rms), 1 kΩ, analog Cassette : / cassette Tape speed SP : 33.35 mm/sec. (1-5/16 ips) EP : 11.12 mm/...
Instructions
Page 24
.... 14 Z Zooming pg. 10 L LCD Monitor/ Viewfinder, Indications ........ pg. 9, 15 C Q Quick Review pg. 10 R Recording pg. 9 Recording Format (S-VHS/ S-VHS ET).......pg. 15 Recording Mode pg. 14 Retake pg. 10 Cassette Adapter pg. 12 Rewind The Tape pg. 9 Charging The Battery Pack pg. 7 Clean The... Camcorder pg. 19 Connection To a VCR/ TV pg. 11 Counter Memory pg. 16 D Date/ Time Display pg. 15 Date/ Time Settings pg. 8 Demonstration...
.... 14 Z Zooming pg. 10 L LCD Monitor/ Viewfinder, Indications ........ pg. 9, 15 C Q Quick Review pg. 10 R Recording pg. 9 Recording Format (S-VHS/ S-VHS ET).......pg. 15 Recording Mode pg. 14 Retake pg. 10 Cassette Adapter pg. 12 Rewind The Tape pg. 9 Charging The Battery Pack pg. 7 Clean The... Camcorder pg. 19 Connection To a VCR/ TV pg. 11 Counter Memory pg. 16 D Date/ Time Display pg. 15 Date/ Time Settings pg. 8 Demonstration...


