Instructions
Page 8
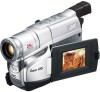
... MENU Wheel 1 to select "3TO SYSTEM MENU" and press it. 4) Rotate the MENU Wheel 1 to select "3DATE/ TIME SET" and press it manually to get the best view. 3) Turn the Diopter Adjustment Control , until the correct setting appears and then press it. Pull up the viewfinder... AC Adapter processes electricity internally, it becomes warm during use it only in . Consult an authorised JVC dealer for a long period af time, otherwise the battery performance will be reduced. 1) Attach the battery to the camcorder with no cassette inserted. 2) Set the Power Switch $ to " " or " " while ...
... MENU Wheel 1 to select "3TO SYSTEM MENU" and press it. 4) Rotate the MENU Wheel 1 to select "3DATE/ TIME SET" and press it manually to get the best view. 3) Turn the Diopter Adjustment Control , until the correct setting appears and then press it. Pull up the viewfinder... AC Adapter processes electricity internally, it becomes warm during use it only in . Consult an authorised JVC dealer for a long period af time, otherwise the battery performance will be reduced. 1) Attach the battery to the camcorder with no cassette inserted. 2) Set the Power Switch $ to " " or " " while ...

Instructions
Page 10
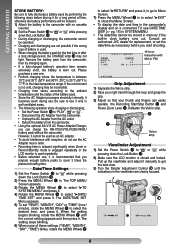
...shot. • Distortion may occur at an angle of the last recording. 1) Make sure the camcorder is reserved. 3) Press the Recording Start/Stop Buttons ". "AT" ! Rec. Auto/Manual Focus If correct focus cannot be used simultaneously. This is in Record-Standby mode for approx. ...;pg. 14) to "OFF" in the viewfinder (with Auto Focus, use Manual Focus. 1) Set the Power Switch $ to " " while pressing down . Recording starts, and after 5 seconds, the camcorder re-enters Record-Standby mode automatically. 4) To cancel the 5Sec. BASIC FEATURES To turn ...
...shot. • Distortion may occur at an angle of the last recording. 1) Make sure the camcorder is reserved. 3) Press the Recording Start/Stop Buttons ". "AT" ! Rec. Auto/Manual Focus If correct focus cannot be used simultaneously. This is in Record-Standby mode for approx. ...;pg. 14) to "OFF" in the viewfinder (with Auto Focus, use Manual Focus. 1) Set the Power Switch $ to " " while pressing down . Recording starts, and after 5 seconds, the camcorder re-enters Record-Standby mode automatically. 4) To cancel the 5Sec. BASIC FEATURES To turn ...
Instructions
Page 11
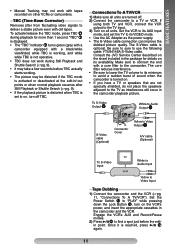
...Manual Tracking may be distorted if the TBC mode is activated or deactivated at the edit-in/-out points or when normal playback resumes after Still Playback or Shuttle Search (੬pg. 9). • If the playback picture is distorted when TBC is turned on other VCRs or camcorders. Consult the JVC... Service Center described on the sheet included in the package for more than 1 second. The core filter reduces interference. • Be sure to lower the TV volume to its minimum to avoid a sudden burst of sound when the camcorder is set ...
...Manual Tracking may be distorted if the TBC mode is activated or deactivated at the edit-in/-out points or when normal playback resumes after Still Playback or Shuttle Search (੬pg. 9). • If the playback picture is distorted when TBC is turned on other VCRs or camcorders. Consult the JVC... Service Center described on the sheet included in the package for more than 1 second. The core filter reduces interference. • Be sure to lower the TV volume to its minimum to avoid a sudden burst of sound when the camcorder is set ...
Instructions
Page 13
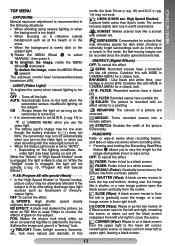
... the light. AUTO: Automatically turns on the light when the camcorder senses insufficient lighting on a black screen from the upper right to the lower left corner, revealing the scene, or wipes out from lower left to select "MANUAL", then press it a "fantasy" look misty white, as... to "AUTO": • Depending on the lighting conditions, the video light may be low even though the battery indicator ( ) does not blink, the camcorder may turn off automatically when you turn on the video light, or when you to a painting. TWILIGHT: Dusk, twilight scenery, fireworks, etc., look...
... the light. AUTO: Automatically turns on the light when the camcorder senses insufficient lighting on a black screen from the upper right to the lower left corner, revealing the scene, or wipes out from lower left to select "MANUAL", then press it a "fantasy" look misty white, as... to "AUTO": • Depending on the lighting conditions, the video light may be low even though the battery indicator ( ) does not blink, the camcorder may turn off automatically when you turn on the video light, or when you to a painting. TWILIGHT: Dusk, twilight scenery, fireworks, etc., look...
Instructions
Page 20
... viewfinder fully tilted downward) Specifications shown are for SP mode unless otherwise indicated. E & O.E. SPECIFICATIONS SPECIFICATIONS Camcorder General Format : S-VHS/VHS NTSC standard Power source : DC 11 V (Using AC Adapter) DC 6 V (Using battery pack) Power consumption Viewfi... with auto iris and macro control : ø 30,5 mm : Electronic viewfinder with 0.24" black/white LCD : Auto/Manual adjustment : 2.50" diagonally measured, LCD panel/TFT active matrix system : Monaural Video recording system Luminance : FM recording Connectors Video : ...
... viewfinder fully tilted downward) Specifications shown are for SP mode unless otherwise indicated. E & O.E. SPECIFICATIONS SPECIFICATIONS Camcorder General Format : S-VHS/VHS NTSC standard Power source : DC 11 V (Using AC Adapter) DC 6 V (Using battery pack) Power consumption Viewfi... with auto iris and macro control : ø 30,5 mm : Electronic viewfinder with 0.24" black/white LCD : Auto/Manual adjustment : 2.50" diagonally measured, LCD panel/TFT active matrix system : Monaural Video recording system Luminance : FM recording Connectors Video : ...
Instructions
Page 24
.... 15 Playback pg. 9 Auto Date Record pg. 15 Program AE with Special Effects pg. 13 Auto/Manual Focus pg. 10 Provided Accessories pg. 2 Auto Shut Off pg. 9 B Backlight Compensation pg. 10...64257;nder, Indications ........ pg. 9, 15 C Q Quick Review pg. 10 R Recording pg. 9 Recording Format (S-VHS/ S-VHS ET).......pg. 15 Recording Mode pg. 14 Retake pg. 10 Cassette Adapter pg. 12 Rewind The Tape pg. 9... Charging The Battery Pack pg. 7 Clean The Camcorder pg. 19 Connection To a VCR/ TV pg. 11 Counter Memory pg. 16 D Date/ Time ...
.... 15 Playback pg. 9 Auto Date Record pg. 15 Program AE with Special Effects pg. 13 Auto/Manual Focus pg. 10 Provided Accessories pg. 2 Auto Shut Off pg. 9 B Backlight Compensation pg. 10...64257;nder, Indications ........ pg. 9, 15 C Q Quick Review pg. 10 R Recording pg. 9 Recording Format (S-VHS/ S-VHS ET).......pg. 15 Recording Mode pg. 14 Retake pg. 10 Cassette Adapter pg. 12 Rewind The Tape pg. 9... Charging The Battery Pack pg. 7 Clean The Camcorder pg. 19 Connection To a VCR/ TV pg. 11 Counter Memory pg. 16 D Date/ Time ...


