
Instructions
Page 2
... direct sunlight. - This is not in use . We recommend periodically cleaning the video heads with this unit. ● Remember that you record an event such as a show, performance or exhibition for important recordings, we recommend using SP mode. ● For safety and reliability. Cassette tapes should be removed from the camcorder and stored in cassette cases. These spots are not recorded on the tape. Only cassettes marked " " and memory cards...
... direct sunlight. - This is not in use . We recommend periodically cleaning the video heads with this unit. ● Remember that you record an event such as a show, performance or exhibition for important recordings, we recommend using SP mode. ● For safety and reliability. Cassette tapes should be removed from the camcorder and stored in cassette cases. These spots are not recorded on the tape. Only cassettes marked " " and memory cards...
Instructions
Page 3
... the rear). Use the JVC BN-VF707U/VF714U/VF733U battery packs and, to recharge them or to supply power to allow for playback with arrowhead symbol, within an equilateral triangle, is also a risk of important operating and maintenance (servicing) instructions in the literature accompanying the appliance. The following notes concern possible physical damage to the camcorder and to the camcorder. Connecting cables (Audio/Video, S-Video, etc...
... the rear). Use the JVC BN-VF707U/VF714U/VF733U battery packs and, to recharge them or to supply power to allow for playback with arrowhead symbol, within an equilateral triangle, is also a risk of important operating and maintenance (servicing) instructions in the literature accompanying the appliance. The following notes concern possible physical damage to the camcorder and to the camcorder. Connecting cables (Audio/Video, S-Video, etc...

Instructions
Page 7
... Connection To A Personal Computer 41 REFERENCES 42 TROUBLESHOOTING 42 USER MAINTENANCE 46 CAUTIONS 47 SPECIFICATIONS 50 TERMS 51 Snapshot 24 D.S.C. RECORDING 24 Basic Shooting (D.S.C. GETTING STARTED CONTENTS EN 7 8 ADVANCED FEATURES 29 Index 8 Provided Accessories 12 Power 13 Operation Mode 15 Language Settings 16 Date/Time Settings 16 Grip Adjustment 16 Viewfinder Adjustment 17 Brightness Adjustment Of The Display........... 17 Tripod Mounting 17 Loading/Unloading A Cassette 18 Loading/Unloading A Memory Card 18 VIDEO RECORDING & PLAYBACK...
... Connection To A Personal Computer 41 REFERENCES 42 TROUBLESHOOTING 42 USER MAINTENANCE 46 CAUTIONS 47 SPECIFICATIONS 50 TERMS 51 Snapshot 24 D.S.C. RECORDING 24 Basic Shooting (D.S.C. GETTING STARTED CONTENTS EN 7 8 ADVANCED FEATURES 29 Index 8 Provided Accessories 12 Power 13 Operation Mode 15 Language Settings 16 Date/Time Settings 16 Grip Adjustment 16 Viewfinder Adjustment 17 Brightness Adjustment Of The Display........... 17 Tripod Mounting 17 Loading/Unloading A Cassette 18 Loading/Unloading A Memory Card 18 VIDEO RECORDING & PLAYBACK...

Instructions
Page 9
...; pg. 25) LED Light Button [LIGHT] !Diopter Adjustment Control (੬ pg. 17) "Auto Button [AUTO] (੬ pg. 15) #Snapshot Button [SNAPSHOT] (੬ pg. 24, 34) Live Slow Button (੬ pg. 29, 33) $Power Zoom Lever [T/W] (੬ pg. 20) Speaker Volume Control [VOL pg. 21) %Battery Release Button [PUSH BATT.] (੬ pg. 13) &Recording Start/Stop Button (੬ pg. 19) (Power Switch [REC, PLAY, OFF] (੬ pg. 15) )Lock Button (੬ pg. 15) ~Cassette Open/Eject Switch [OPEN/EJECT] (੬ pg. 18...
...; pg. 25) LED Light Button [LIGHT] !Diopter Adjustment Control (੬ pg. 17) "Auto Button [AUTO] (੬ pg. 15) #Snapshot Button [SNAPSHOT] (੬ pg. 24, 34) Live Slow Button (੬ pg. 29, 33) $Power Zoom Lever [T/W] (੬ pg. 20) Speaker Volume Control [VOL pg. 21) %Battery Release Button [PUSH BATT.] (੬ pg. 13) &Recording Start/Stop Button (੬ pg. 19) (Power Switch [REC, PLAY, OFF] (੬ pg. 15) )Lock Button (੬ pg. 15) ~Cassette Open/Eject Switch [OPEN/EJECT] (੬ pg. 18...
Instructions
Page 14
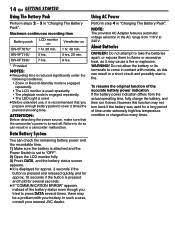
... the button is pressed and hold for a long period of time under the following conditions: • Zoom or Record-Standby mode is engaged repeatedly. • The LCD monitor is used repeatedly. • The playback mode is engaged repeatedly. • The LED Light is used for several times, there may not turn back if the battery was used . ● Before extended use, it is recommended that the camcorder's power...
... the button is pressed and hold for a long period of time under the following conditions: • Zoom or Record-Standby mode is engaged repeatedly. • The LCD monitor is used repeatedly. • The playback mode is engaged repeatedly. • The LED Light is used for several times, there may not turn back if the battery was used . ● Before extended use, it is recommended that the camcorder's power...

Instructions
Page 15
... Choose the appropriate operation mode according to "REC", you to set various playback functions using no special effects or manual adjustments. PLAY: ● Allows you to play back a recording on the tape. ● Allows you to display a still image stored in the memory card or to transfer a still image stored in a memory card. ● When the Power Switch is set to record on a tape or play back a tape. M Manual Mode : Manual recording is selected, the indicator " " appears on the LCD monitor. INFORMATION: The...
... Choose the appropriate operation mode according to "REC", you to set various playback functions using no special effects or manual adjustments. PLAY: ● Allows you to play back a recording on the tape. ● Allows you to display a still image stored in the memory card or to transfer a still image stored in a memory card. ● When the Power Switch is set to record on a tape or play back a tape. M Manual Mode : Manual recording is selected, the indicator " " appears on the LCD monitor. INFORMATION: The...

Instructions
Page 19
... locked. Tape Remaining Time VIDEO RECORDING & PLAYBACK VIDEO/MEMORY Zoom Lever POWER/CHARGE Lamp Lock Button Recording Start/Stop Button 1 Remove the lens cap. (੬ pg. 12) 2 Open the LCD monitor fully. 3 Set the VIDEO/MEMORY Switch to "VIDEO". 4 Set the Power Switch to "REC" while pressing down the Lock Button located on the display. Approximate recording time Tape 30 min. 60 min. 80 min. To turn the melody sounds off automatically. Pull on the LCD monitor and the viewfinder. While using the LCD monitor: Make...
... locked. Tape Remaining Time VIDEO RECORDING & PLAYBACK VIDEO/MEMORY Zoom Lever POWER/CHARGE Lamp Lock Button Recording Start/Stop Button 1 Remove the lens cap. (੬ pg. 12) 2 Open the LCD monitor fully. 3 Set the VIDEO/MEMORY Switch to "VIDEO". 4 Set the Power Switch to "REC" while pressing down the Lock Button located on the display. Approximate recording time Tape 30 min. 60 min. 80 min. To turn the melody sounds off automatically. Pull on the LCD monitor and the viewfinder. While using the LCD monitor: Make...

Instructions
Page 21
... VIDEO/ MEMORY MENU 7 1 Load a cassette. (੬ pg. 18) 2 Set the VIDEO/MEMORY Switch to "VIDEO". 3 Set the Power Switch to "REC" while pressing down the Lock Button located on a connected TV. (੬ pg. 23) ● If Stop mode continues for 5 minutes when power is rewound for about 3 minutes, the camcorder's Stop mode is not heard from a battery, the camcorder shuts off automatically. Lock Button Quick Review Enables to check the end of playback. Recording From The Middle Of A Tape 1) Play back a tape...
... VIDEO/ MEMORY MENU 7 1 Load a cassette. (੬ pg. 18) 2 Set the VIDEO/MEMORY Switch to "VIDEO". 3 Set the Power Switch to "REC" while pressing down the Lock Button located on a connected TV. (੬ pg. 23) ● If Stop mode continues for 5 minutes when power is rewound for about 3 minutes, the camcorder's Stop mode is not heard from a battery, the camcorder shuts off automatically. Lock Button Quick Review Enables to check the end of playback. Recording From The Middle Of A Tape 1) Play back a tape...

Instructions
Page 29
... cannot enter Menu Screen during recording. ● Certain functions cannot be displayed in the Video or D.S.C. Playback Menu, refer to select the desired parameter and press SET or 2. ADVANCED FEATURES For Video Playback Menu: ● Set the VIDEO/MEMORY Switch to "VIDEO". ● Set the Power Switch to "PLAY" while pressing down the Lock Button located on the selected function. MENUS FOR DETAILED ADJUSTMENT EN 29 Changing The Menu Settings This camcorder is currently saved inside the camcorder's memory. ● Press...
... cannot enter Menu Screen during recording. ● Certain functions cannot be displayed in the Video or D.S.C. Playback Menu, refer to select the desired parameter and press SET or 2. ADVANCED FEATURES For Video Playback Menu: ● Set the VIDEO/MEMORY Switch to "VIDEO". ● Set the Power Switch to "PLAY" while pressing down the Lock Button located on the selected function. MENUS FOR DETAILED ADJUSTMENT EN 29 Changing The Menu Settings This camcorder is currently saved inside the camcorder's memory. ● Press...

Instructions
Page 30
... camcorder. ● During playback of a tape recorded on the zoom position, the lens may be disengaged. 64X*: Allows you to use the Digital Zoom. SETTING The following menu settings can shoot a subject as large as possible at a distance of 800X digital magnification. * Available only when the VIDEO/MEMORY Switch is set to "VIDEO". 30 EN MENUS FOR DETAILED ADJUSTMENT Recording Menus FUNCTION The following settings are effective when the Power Switch is set to "REC". [ ] = Factory...
... camcorder. ● During playback of a tape recorded on the zoom position, the lens may be disengaged. 64X*: Allows you to use the Digital Zoom. SETTING The following menu settings can shoot a subject as large as possible at a distance of 800X digital magnification. * Available only when the VIDEO/MEMORY Switch is set to "VIDEO". 30 EN MENUS FOR DETAILED ADJUSTMENT Recording Menus FUNCTION The following settings are effective when the Power Switch is set to "REC". [ ] = Factory...

Instructions
Page 31
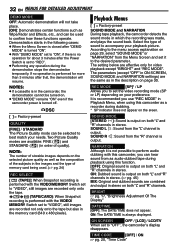
...) CAM RESET [RETURN]: Does not reset all settings to the factorypreset. ON: The date/time is displayed. ON SCREEN LCD: Keeps the camcorder's display (except the date, time and time code) from appearing on the connected TV screen. [LCD/TV]: Makes the camcorder's display appear on screen when the camcorder is bright. FINDER: The image is displayed in the AGC mode, but the image is connected to the factory-preset. AUTO : The shutter speed is normal. Shooting a subject in low or poor lighting...
...) CAM RESET [RETURN]: Does not reset all settings to the factorypreset. ON: The date/time is displayed. ON SCREEN LCD: Keeps the camcorder's display (except the date, time and time code) from appearing on the connected TV screen. [LCD/TV]: Makes the camcorder's display appear on screen when the camcorder is bright. FINDER: The image is displayed in the AGC mode, but the image is connected to the factory-preset. AUTO : The shutter speed is normal. Shooting a subject in low or poor lighting...
Instructions
Page 32
... the type of sound to "VIDEO", still images are recorded only onto the tape. / (TAPE/CARD): When Snapshot recording is performed with this camcorder, you use "REC MODE" in stereo. ON SCREEN OFF / [LCD] / LCD/TV When set to best match your preference. NOTES: ● If a cassette is output on the selected picture quality as well as in the description on both "L" and "R" channels in Playback Menu, when using this camcorder as a recorder during playback using this function...
... the type of sound to "VIDEO", still images are recorded only onto the tape. / (TAPE/CARD): When Snapshot recording is performed with this camcorder, you use "REC MODE" in stereo. ON SCREEN OFF / [LCD] / LCD/TV When set to best match your preference. NOTES: ● If a cassette is output on the selected picture quality as well as in the description on both "L" and "R" channels in Playback Menu, when using this camcorder as a recorder during playback using this function...

Instructions
Page 34
... reset to " ". (੬ pg. 15) 3 Press FOCUS. A still image will blink. 5 Press SET. color wall, or a clear, blue sky.* ● When a dark object is set to "REC". Motor Drive Mode Keeping SNAPSHOT pressed in step 5 provides an effect similar to serial photography. (Interval between still images: approx. 1 second) ● The Motor Drive mode is disabled when "REC SELECT" is barely visible in the LCD monitor or the view...
... reset to " ". (੬ pg. 15) 3 Press FOCUS. A still image will blink. 5 Press SET. color wall, or a clear, blue sky.* ● When a dark object is set to "REC". Motor Drive Mode Keeping SNAPSHOT pressed in step 5 provides an effect similar to serial photography. (Interval between still images: approx. 1 second) ● The Motor Drive mode is disabled when "REC SELECT" is barely visible in the LCD monitor or the view...
Instructions
Page 41
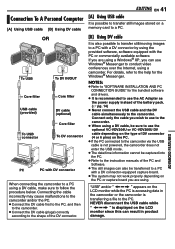
... camcorder is not powered, the camcorder does not enter the USB mode. ● The date/time information cannot be captured into the PC. ● Refer to the instruction manuals of the PC and Software. ● The still images can use the AC Adapter as the power supply instead of the DV connector. Connecting the cable incorrectly may not work properly depending on the PC or capture board you are using a Windows...
... camcorder is not powered, the camcorder does not enter the USB mode. ● The date/time information cannot be captured into the PC. ● Refer to the instruction manuals of the PC and Software. ● The still images can use the AC Adapter as the power supply instead of the DV connector. Connecting the cable incorrectly may not work properly depending on the PC or capture board you are using a Windows...
Instructions
Page 42
..." functions that cannot be performed. ● The tape's erase protection tab is set to the Manual mode. ➜Set Focus to the Auto mode. (੬ pg. 34) ● The lens is dirty or covered with new cassette. (੬ pg. 18) ● The cassette holder cover is too bright. ➜Set " " to "REC". (੬ pg. 18) ● "TAPE END" appears. ➜Replace with condensation. ➜Clean the lens and check the focus...
..." functions that cannot be performed. ● The tape's erase protection tab is set to the Manual mode. ➜Set Focus to the Auto mode. (੬ pg. 34) ● The lens is dirty or covered with new cassette. (੬ pg. 18) ● The cassette holder cover is too bright. ➜Set " " to "REC". (੬ pg. 18) ● "TAPE END" appears. ➜Replace with condensation. ➜Clean the lens and check the focus...
Instructions
Page 43
....99%) The cassette will not load properly. ● The battery's charge is low. ➜Install a fully charged battery. (੬ pg. 13) The memory card cannot be removed from the camcorder. ➜Push in the memory card a few more natural, set date/time has been erased. ➜Consult your nearest JVC dealer. This is not due to any defect of some kind has occured. TROUBLESHOOTING EN 43 White Balance cannot be...
....99%) The cassette will not load properly. ● The battery's charge is low. ➜Install a fully charged battery. (੬ pg. 13) The memory card cannot be removed from the camcorder. ➜Push in the memory card a few more natural, set date/time has been erased. ➜Consult your nearest JVC dealer. This is not due to any defect of some kind has occured. TROUBLESHOOTING EN 43 White Balance cannot be...
Instructions
Page 44
... "SAVE" while the Power Switch is set to "REC" and the VIDEO/MEMORY Switch is set to "REC" and the VIDEO/MEMORY Switch is set date/time has been erased. When this indication is loaded. Consult your nearest JVC dealer for 5 seconds after power is dark. HDV Appears when pictures recorded in the HDV format are no indication appears. MEMORY CARD! CARD ERROR! Appears when the camcorder does not recognize the loaded memory card. 44 EN TROUBLESHOOTING Warning Indications Displays the battery...
... "SAVE" while the Power Switch is set to "REC" and the VIDEO/MEMORY Switch is set to "REC" and the VIDEO/MEMORY Switch is set date/time has been erased. When this indication is loaded. Consult your nearest JVC dealer for 5 seconds after power is dark. HDV Appears when pictures recorded in the HDV format are no indication appears. MEMORY CARD! CARD ERROR! Appears when the camcorder does not recognize the loaded memory card. 44 EN TROUBLESHOOTING Warning Indications Displays the battery...

Instructions
Page 48
... turn off the camcorder. ● Store memory cards ... away from metallic objects when not in direct sunlight. ... While using the unit ... subject it . ● Dirty heads can cause the following phenomena for LCD monitor use . ● Avoid using the camcorder, the surface around the LCD monitor becomes hot. swing the soft camera case excessively when the camcorder is being accessed (during transportation. ... During recording or playback, the Head...
... turn off the camcorder. ● Store memory cards ... away from metallic objects when not in direct sunlight. ... While using the unit ... subject it . ● Dirty heads can cause the following phenomena for LCD monitor use . ● Avoid using the camcorder, the surface around the LCD monitor becomes hot. swing the soft camera case excessively when the camcorder is being accessed (during transportation. ... During recording or playback, the Head...
Instructions
Page 50
...) Cassette Mini DV cassette Tape speed SP: 18.8 mm/s, LP: 12.5 mm/s Maximum recording time (using 80 min. For Digital Still Camera Storage media SD Memory Card/MultiMediaCard Compression system JPEG (compatible) File size Still image: 1 mode (640 x 480 pixels) Picture quality 2 modes (FINE/STANDARD) Approximate number of storable images ੬ pg. 24 For Connectors AV Video output: 1.0 V (p-p), 75 Ω, analog Audio output: 300 mV (rms), 1 kΩ, analog, stereo DV Input/output: 4-pin, IEEE1394 compliant USB Mini USB-B type, USB 1.1 compliant AC Adapter Power requirement...
...) Cassette Mini DV cassette Tape speed SP: 18.8 mm/s, LP: 12.5 mm/s Maximum recording time (using 80 min. For Digital Still Camera Storage media SD Memory Card/MultiMediaCard Compression system JPEG (compatible) File size Still image: 1 mode (640 x 480 pixels) Picture quality 2 modes (FINE/STANDARD) Approximate number of storable images ੬ pg. 24 For Connectors AV Video output: 1.0 V (p-p), 75 Ω, analog Audio output: 300 mV (rms), 1 kΩ, analog, stereo DV Input/output: 4-pin, IEEE1394 compliant USB Mini USB-B type, USB 1.1 compliant AC Adapter Power requirement...

Instructions
Page 51
... M Manual Focus 34 Memory Card 18 Motor Drive Mode 34 N Night-Alive 33 P Picture Quality 32 Playback Sound 32 Power-Linked Operation 15 Program AE, Effects and Shutter Effects ....... 38 Q Quick Review 21 R Recording Capacity Memory Card 24 Tape 19 Recording Media Selection 32 Resetting The File Name 26 S Snapshot Mode 34 Sound Mode 30, 32 Speaker Volume 21 Specifications 50 Spot Exposure Control 36 T Tape Speed (REC MODE 30 Tele Macro 30 Time Code 20 Tripod Mounting 17 Troubleshooting 42-45 W Warning Indications 44 White Balance...
... M Manual Focus 34 Memory Card 18 Motor Drive Mode 34 N Night-Alive 33 P Picture Quality 32 Playback Sound 32 Power-Linked Operation 15 Program AE, Effects and Shutter Effects ....... 38 Q Quick Review 21 R Recording Capacity Memory Card 24 Tape 19 Recording Media Selection 32 Resetting The File Name 26 S Snapshot Mode 34 Sound Mode 30, 32 Speaker Volume 21 Specifications 50 Spot Exposure Control 36 T Tape Speed (REC MODE 30 Tele Macro 30 Time Code 20 Tripod Mounting 17 Troubleshooting 42-45 W Warning Indications 44 White Balance...


