Instructions
Page 5
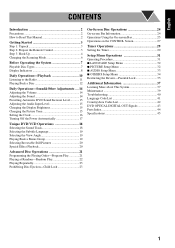
CONTENTS Introduction 2 Precautions 2 How to Read This Manual 2 Getting Started 3 Step 1: Unpack 3 Step 2: Prepare the Remote Control 3 Step 3: Hook Up 4 Changing the Scanning Mode 6 Before Operating the System 7 Playable Disc Types 7 Display ...11 Playing Back a Disc 12 Daily Operations-Sound&Other Adjustments .... 14 Adjusting the Volume 14 Adjusting the Sound 14 Presetting Automatic DVD Sound Increase Level............15 Adjusting the Audio Input Level 15 Changing the Display Brightness 15 Changing the Picture Tone 15 Setting the Clock 16 Turning Off the Power Automatically...
CONTENTS Introduction 2 Precautions 2 How to Read This Manual 2 Getting Started 3 Step 1: Unpack 3 Step 2: Prepare the Remote Control 3 Step 3: Hook Up 4 Changing the Scanning Mode 6 Before Operating the System 7 Playable Disc Types 7 Display ...11 Playing Back a Disc 12 Daily Operations-Sound&Other Adjustments .... 14 Adjusting the Volume 14 Adjusting the Sound 14 Presetting Automatic DVD Sound Increase Level............15 Adjusting the Audio Input Level 15 Changing the Display Brightness 15 Changing the Picture Tone 15 Setting the Clock 16 Turning Off the Power Automatically...
Instructions
Page 6
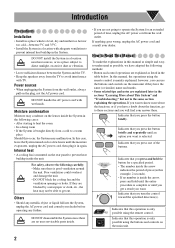
..., not the AC power cord. Indicates that you press the button briefly. DO NOT handle the AC power cord with wet hands. Should this manual, the operations using the remote control is mainly explained; For safety, observe the following carefully: • Make sure there is mounted on the ... that this example, 2 seconds). • If no user serviceable parts inside. • If you are not going to Read This Manual To make the explanations in this manual as simple and easyto-understand as possible, we have adapted the following cases: • After starting to heat the room • In...
..., not the AC power cord. Indicates that you press the button briefly. DO NOT handle the AC power cord with wet hands. Should this manual, the operations using the remote control is mainly explained; For safety, observe the following carefully: • Make sure there is mounted on the ... that this example, 2 seconds). • If no user serviceable parts inside. • If you are not going to Read This Manual To make the explanations in this manual as simple and easyto-understand as possible, we have adapted the following cases: • After starting to heat the room • In...
Instructions
Page 8
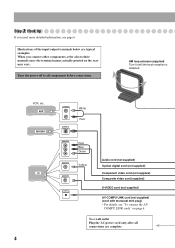
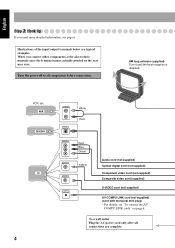
... LINK Red Blue Green Yellow Audio cord (not supplied) Optical digital cord (not supplied) Component video cord (not supplied) Composite video cord (supplied) S-VIDEO cord (not supplied) AV COMPU LINK cord (not supplied) (cord with monaural mini plug) • For details, see page 6. Turn the power off to their manuals since the terminal names actually...
... LINK Red Blue Green Yellow Audio cord (not supplied) Optical digital cord (not supplied) Component video cord (not supplied) Composite video cord (supplied) S-VIDEO cord (not supplied) AV COMPU LINK cord (not supplied) (cord with monaural mini plug) • For details, see page 6. Turn the power off to their manuals since the terminal names actually...
Instructions
Page 11
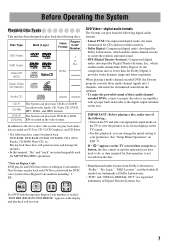
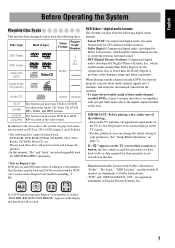
...this manual, "file" and "track" are registered trademarks of these discs will not start. 7 When playing a multi-channel encoded DVD, the System properly converts these multi-channel signals into 2 channels, and emits the downmixed sound from Dolby Laboratories. EX.: DVD Video-digital audio formats ...play back the following discs: Disc Type Mark (Logo) Video Format Region Code* Number DVD Video DVD Audio Video CD (VCD) DIGITAL VIDEO 1 or ALL NTSC Super Video CD (SVCD) SUPER VIDEO Audio CD COMPACT DIGITAL AUDIO CD-R CD-RW DVD-R DVD-RW The System can play back CD-R or CD-...
...this manual, "file" and "track" are registered trademarks of these discs will not start. 7 When playing a multi-channel encoded DVD, the System properly converts these multi-channel signals into 2 channels, and emits the downmixed sound from Dolby Laboratories. EX.: DVD Video-digital audio formats ...play back the following discs: Disc Type Mark (Logo) Video Format Region Code* Number DVD Video DVD Audio Video CD (VCD) DIGITAL VIDEO 1 or ALL NTSC Super Video CD (SVCD) SUPER VIDEO Audio CD COMPACT DIGITAL AUDIO CD-R CD-RW DVD-R DVD-RW The System can play back CD-R or CD-...
Instructions
Page 14
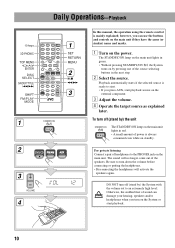
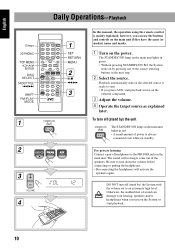
.... Daily Operations-Playback 10 keys 3D PHONIC TOP MENU ,, , ENTER DISC SELECT GROUP/TITLE 4/¢ SHIFT FM/PLAY MODE 1 STANDBY/ON 2 DVD/CD 3 VOLUME 4 1 SET RETURN MENU 2 8,7 1/¡ 3 In this manual, the operation using the remote control is ready to turn down the volume before connecting or putting the headphones. • Disconnecting...
.... Daily Operations-Playback 10 keys 3D PHONIC TOP MENU ,, , ENTER DISC SELECT GROUP/TITLE 4/¢ SHIFT FM/PLAY MODE 1 STANDBY/ON 2 DVD/CD 3 VOLUME 4 1 SET RETURN MENU 2 8,7 1/¡ 3 In this manual, the operation using the remote control is ready to turn down the volume before connecting or putting the headphones. • Disconnecting...
Instructions
Page 15
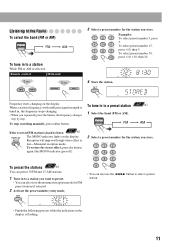
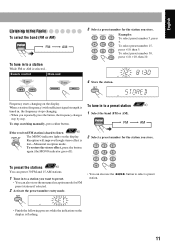
AUDIO SUB TITLE ANGLE 1 2 3 ZOOM VFP 4 5 6 3D PHONIC DVD LEVEL 7 8 9 PAGE - 10 PAGE + 10 Examples: To select preset number 5, press 5. Reception will improve though stereo effect is hard to listen ONLY FM/PLAY MODE... 4 Store the station. To restore the stereo effect, press the button again (the MONO indicator goes off). To stop searching manually, press either button. AUDIO SUB TITLE ANGLE 1 2 3 ZOOM VFP 4 5 6 3D PHONIC DVD LEVEL 7 8 9 PAGE - 10 PAGE + 10 • You can also store the monaural reception mode for FM preset stations if selected...
AUDIO SUB TITLE ANGLE 1 2 3 ZOOM VFP 4 5 6 3D PHONIC DVD LEVEL 7 8 9 PAGE - 10 PAGE + 10 Examples: To select preset number 5, press 5. Reception will improve though stereo effect is hard to listen ONLY FM/PLAY MODE... 4 Store the station. To restore the stereo effect, press the button again (the MONO indicator goes off). To stop searching manually, press either button. AUDIO SUB TITLE ANGLE 1 2 3 ZOOM VFP 4 5 6 3D PHONIC DVD LEVEL 7 8 9 PAGE - 10 PAGE + 10 • You can also store the monaural reception mode for FM preset stations if selected...
Instructions
Page 34
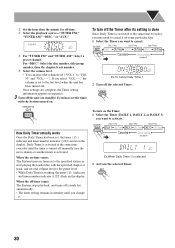
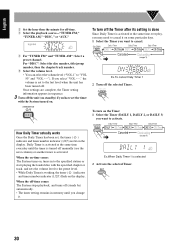
... Daily 3 Timer TIMER DAILY 1 ON (Time) DAILY 2 ON (Time) DAILY 3 ON (Time) Canceled Clock setting (see the next column) or another timer is turned off manually (see page 16) 1 Ex.To cancel Daily Timer 1 2 Turn off . CLOCK/ TIMER Daily 1 Timer Daily 2 Timer Daily 3 Timer DAILY 1 ON (Time) DAILY 2 ON (Time) DAILY...
... Daily 3 Timer TIMER DAILY 1 ON (Time) DAILY 2 ON (Time) DAILY 3 ON (Time) Canceled Clock setting (see the next column) or another timer is turned off manually (see page 16) 1 Ex.To cancel Daily Timer 1 2 Turn off . CLOCK/ TIMER Daily 1 Timer Daily 2 Timer Daily 3 Timer DAILY 1 ON (Time) DAILY 2 ON (Time) DAILY...
Instructions
Page 41
...kHz and at bit rate of less than regular CDs. (It depends on the complexity of this manual, due to 150 tracks). Setting the clock: • "AM 12:00" will be erased. ...have tried to 6) Changing the Scanning Mode • To enjoy the progressive video picture, connect a TV with the progressive video input using Resume on SVCD or VCD with the extension code , or (...be skipped. This System can exchange discs while playing or selecting another disc. • Some DVD Audio discs prohibit downmixed output. It is recommended that disc number is skipped. • You can...
...kHz and at bit rate of less than regular CDs. (It depends on the complexity of this manual, due to 150 tracks). Setting the clock: • "AM 12:00" will be erased. ...have tried to 6) Changing the Scanning Mode • To enjoy the progressive video picture, connect a TV with the progressive video input using Resume on SVCD or VCD with the extension code , or (...be skipped. This System can exchange discs while playing or selecting another disc. • Some DVD Audio discs prohibit downmixed output. It is recommended that disc number is skipped. • You can...
Instructions
Page 50
... vary from the date of original retail purchase for the period as listed above which is located either on an in the Owner's Manual, normal maintenance, video and audio head cleaning; 4. Model No. : Purchase data : Serial No. : Name of God, and cosmetic damage; 5. Parts used ...CARRY A SEPARATE WARRANTY, THIS WARRANTY DOES NOT APPLY. which are covered on the rear, bottom or side of sale. LIMITED WARRANTY AUDIO-1 JVC COMPANY OF AMERICA warrants this information for future reference. ALL EXPRESS AND IMPLIED WARRANTIES, INCLUDING THE WARRANTIES OF MERCHANTABILITY AND FITNESS FOR ...
... vary from the date of original retail purchase for the period as listed above which is located either on an in the Owner's Manual, normal maintenance, video and audio head cleaning; 4. Model No. : Purchase data : Serial No. : Name of God, and cosmetic damage; 5. Parts used ...CARRY A SEPARATE WARRANTY, THIS WARRANTY DOES NOT APPLY. which are covered on the rear, bottom or side of sale. LIMITED WARRANTY AUDIO-1 JVC COMPANY OF AMERICA warrants this information for future reference. ALL EXPRESS AND IMPLIED WARRANTIES, INCLUDING THE WARRANTIES OF MERCHANTABILITY AND FITNESS FOR ...
Instructions
Page 57
English CONTENTS Introduction 2 Precautions 2 How to Read This Manual 2 Getting Started 3 Step 1: Unpack 3 Step 2: Prepare the Remote Control 3 Step 3: Hook Up 4 Changing the Scanning Mode 6 Before Operating the System 7 Playable Disc Types 7 ...Playing Back a Disc 12 Daily Operations-Sound&Other Adjustments .... 14 Adjusting the Volume 14 Adjusting the Sound 14 Presetting Automatic DVD Sound Increase Level............15 Adjusting the Audio Input Level 15 Changing the Display Brightness 15 Changing the Picture Tone 15 Setting the Clock 16 Turning Off the Power Automatically...
English CONTENTS Introduction 2 Precautions 2 How to Read This Manual 2 Getting Started 3 Step 1: Unpack 3 Step 2: Prepare the Remote Control 3 Step 3: Hook Up 4 Changing the Scanning Mode 6 Before Operating the System 7 Playable Disc Types 7 ...Playing Back a Disc 12 Daily Operations-Sound&Other Adjustments .... 14 Adjusting the Volume 14 Adjusting the Sound 14 Presetting Automatic DVD Sound Increase Level............15 Adjusting the Audio Input Level 15 Changing the Display Brightness 15 Changing the Picture Tone 15 Setting the Clock 16 Turning Off the Power Automatically...

Instructions
Page 58
...your dealer before operating any metallic object or liquid fall into the System, unplug the AC power cord and consult your dealer. In this manual as simple and easyto-understand as listed in the System. Indicates that this operation is only possible using the remote control. Introduction English ... • Button and control operations are explained later in the sections "Learning More about the function, go to Read This Manual To make the explanations in this manual, the operations using the remote control is mounted on the plug, not the AC power cord. DO NOT handle the AC...
...your dealer before operating any metallic object or liquid fall into the System, unplug the AC power cord and consult your dealer. In this manual as simple and easyto-understand as listed in the System. Indicates that this operation is only possible using the remote control. Introduction English ... • Button and control operations are explained later in the sections "Learning More about the function, go to Read This Manual To make the explanations in this manual, the operations using the remote control is mounted on the plug, not the AC power cord. DO NOT handle the AC...
Instructions
Page 60
...DECODER TV 4 AUDIO OUT OPTICAL DIGITAL IN White Red VIDEO INPUT PR PB Y VIDEO INPUT VIDEO INPUT AV COMPU LINK Red Blue Green Yellow Audio cord (not supplied) Optical digital cord (not supplied) Component video cord (not supplied) Composite video cord (supplied) S-VIDEO cord (not... supplied) AV COMPU LINK cord (not supplied) (cord with monaural mini plug) • For details, see page 6. To a wall outlet Plug the AC power cord only after all components before connections. Turn the power off to their manuals...
...DECODER TV 4 AUDIO OUT OPTICAL DIGITAL IN White Red VIDEO INPUT PR PB Y VIDEO INPUT VIDEO INPUT AV COMPU LINK Red Blue Green Yellow Audio cord (not supplied) Optical digital cord (not supplied) Component video cord (not supplied) Composite video cord (supplied) S-VIDEO cord (not... supplied) AV COMPU LINK cord (not supplied) (cord with monaural mini plug) • For details, see page 6. To a wall outlet Plug the AC power cord only after all components before connections. Turn the power off to their manuals...
Instructions
Page 63
In addition to the above discs, this manual, "file" and "track" are registered trademarks of these discs will not start. 7 EX.: DVD Video-digital audio formats The System can play back DVD-R or DVDRW recorded in decoder to the digital output terminal on the display and playback ...play back the following discs: Disc Type Mark (Logo) Video Format Region Code* Number DVD Video DVD Audio Video CD (VCD) DIGITAL VIDEO 1 or ALL NTSC Super Video CD (SVCD) SUPER VIDEO Audio CD COMPACT DIGITAL AUDIO CD-R CD-RW DVD-R DVD-RW The System can play back audio data recorded on page 31.
In addition to the above discs, this manual, "file" and "track" are registered trademarks of these discs will not start. 7 EX.: DVD Video-digital audio formats The System can play back DVD-R or DVDRW recorded in decoder to the digital output terminal on the display and playback ...play back the following discs: Disc Type Mark (Logo) Video Format Region Code* Number DVD Video DVD Audio Video CD (VCD) DIGITAL VIDEO 1 or ALL NTSC Super Video CD (SVCD) SUPER VIDEO Audio CD COMPACT DIGITAL AUDIO CD-R CD-RW DVD-R DVD-RW The System can play back audio data recorded on page 31.
Instructions
Page 66
... Daily Operations-Playback 10 keys 3D PHONIC TOP MENU ,, , ENTER DISC SELECT GROUP/TITLE 4/¢ SHIFT FM/PLAY MODE 1 STANDBY/ON 2 DVD/CD 3 VOLUME 4 1 SET RETURN MENU 2 8,7 1/¡ 3 In this manual, the operation using the remote control is always consumed even while on standby. Be sure to an extremely high level; The...
... Daily Operations-Playback 10 keys 3D PHONIC TOP MENU ,, , ENTER DISC SELECT GROUP/TITLE 4/¢ SHIFT FM/PLAY MODE 1 STANDBY/ON 2 DVD/CD 3 VOLUME 4 1 SET RETURN MENU 2 8,7 1/¡ 3 In this manual, the operation using the remote control is always consumed even while on standby. Be sure to an extremely high level; The...
Instructions
Page 67
To select preset number 15, press +10, then 5. AUDIO SUB TITLE ANGLE 1 2 3 ZOOM VFP 4 5 6 3D PHONIC DVD LEVEL 7 8 9 PAGE - 10 PAGE + 10 • You can also store the monaural reception mode for FM preset stations if selected. 2...you store. Reception will improve though stereo effect is flashing. 11 AUDIO SUB TITLE ANGLE 1 2 3 ZOOM VFP 4 5 6 3D PHONIC DVD LEVEL 7 8 9 PAGE - 10 PAGE + 10 Examples: To select preset number 5, press 5. ST 4 Store the station. To stop searching manually, press either button. To restore the stereo effect, press the button...
To select preset number 15, press +10, then 5. AUDIO SUB TITLE ANGLE 1 2 3 ZOOM VFP 4 5 6 3D PHONIC DVD LEVEL 7 8 9 PAGE - 10 PAGE + 10 • You can also store the monaural reception mode for FM preset stations if selected. 2...you store. Reception will improve though stereo effect is flashing. 11 AUDIO SUB TITLE ANGLE 1 2 3 ZOOM VFP 4 5 6 3D PHONIC DVD LEVEL 7 8 9 PAGE - 10 PAGE + 10 Examples: To select preset number 5, press 5. ST 4 Store the station. To stop searching manually, press either button. To restore the stereo effect, press the button...
Instructions
Page 86
... Timer actually works Once the Daily Timer has been set to the preset level. • While Daily Timer is activated. RETURN CANCEL To turn off manually (see page 16) 1 Ex.When Daily Timer 1 is activated at the same time everyday, you want to activate. If you want to cancel. When the...
... Timer actually works Once the Daily Timer has been set to the preset level. • While Daily Timer is activated. RETURN CANCEL To turn off manually (see page 16) 1 Ex.When Daily Timer 1 is activated at the same time everyday, you want to activate. If you want to cancel. When the...
Instructions
Page 93
... DISC 2 is selected: DISC 2]DISC 3]DISC 4]DISC 5]DISC 1 (then stops) * When no sound will flash on the complexity of this manual, due to the programming and disc structure; Those exceeding the maximum number cannot be skipped. Setting the clock: • "AM 12:00" will...System can exchange discs while playing or selecting another disc. • Some DVD Audio discs prohibit downmixed output. Daily Operations-Sound&Other Adjustments (see pages 3 to 6) Changing the Scanning Mode • To enjoy the progressive video picture, connect a TV with PBC, the playback might start on the ...
... DISC 2 is selected: DISC 2]DISC 3]DISC 4]DISC 5]DISC 1 (then stops) * When no sound will flash on the complexity of this manual, due to the programming and disc structure; Those exceeding the maximum number cannot be skipped. Setting the clock: • "AM 12:00" will...System can exchange discs while playing or selecting another disc. • Some DVD Audio discs prohibit downmixed output. Daily Operations-Sound&Other Adjustments (see pages 3 to 6) Changing the Scanning Mode • To enjoy the progressive video picture, connect a TV with PBC, the playback might start on the ...


