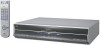

Instruction Manual
Page 2
NO USER-SERVICEABLE PARTS INSIDE. REFER SERVICING TO QUALIFIED SERVICE PERSONNEL. CAUTION: This video cassette recorder should be of sufficient magnitude to the point of Echostar Communications Corporation. Note to CATV system installer: This reminder is a trademark of cable entry as close to constitute a risk of important operating and maintenance (servicing) instructions in the literature accompanying the appliance. This equipment generates, uses, and can be connected to...
NO USER-SERVICEABLE PARTS INSIDE. REFER SERVICING TO QUALIFIED SERVICE PERSONNEL. CAUTION: This video cassette recorder should be of sufficient magnitude to the point of Echostar Communications Corporation. Note to CATV system installer: This reminder is a trademark of cable entry as close to constitute a risk of important operating and maintenance (servicing) instructions in the literature accompanying the appliance. This equipment generates, uses, and can be connected to...

Instruction Manual
Page 3
.... This is a safety feature. If the plug should still fail to fit, contact your electrician to replace your product dealer or local power company. If you are not likely to be mounted to lightning and power-line surges. 3. If your product and its installation, use can result in the vicinity of antenna discharge unit, connection to insert the plug...
.... This is a safety feature. If the plug should still fail to fit, contact your electrician to replace your product dealer or local power company. If you are not likely to be mounted to lightning and power-line surges. 3. If your product and its installation, use can result in the vicinity of antenna discharge unit, connection to insert the plug...
Instruction Manual
Page 6
... Tuner Setting 18 Setting channels automatically 18 Setting channels manually 19 Digital Tuner Setting 20 Setting channels automatically 20 Setting channels manually 21 Cable Box Control Setting 22 Installing Controller 22 Setting cable box input channel & brand 23 DBS Receiver Control Setting 25 Installing Controller 25 Setting DBS receiver input channel & brand 26 PLAYBACK 28 Basic Playback 28 Basic Playback Features 29 Checking tape position 29 Playing back tape repeatedly 29 Adjusting tracking condition 30 Selecting monitor sound 30 Automatic operations after...
... Tuner Setting 18 Setting channels automatically 18 Setting channels manually 19 Digital Tuner Setting 20 Setting channels automatically 20 Setting channels manually 21 Cable Box Control Setting 22 Installing Controller 22 Setting cable box input channel & brand 23 DBS Receiver Control Setting 25 Installing Controller 25 Setting DBS receiver input channel & brand 26 PLAYBACK 28 Basic Playback 28 Basic Playback Features 29 Checking tape position 29 Playing back tape repeatedly 29 Adjusting tracking condition 30 Selecting monitor sound 30 Automatic operations after...

Instruction Manual
Page 13
... mode using the HDMI, DVI, Component Video or S-VIDEO connection, set "TV OUTPUT 2" to some time until the clock time is displayed on , the clock and tuner channels are required. Connect a component video cable between the VCR's [VIDEO OUTPUT] connector and the TV's video input connector. b- If your TV does not have a HDMI or DVI connector, you play back a tape, set your TV using the TV's Remote. Final preparation for more than 5 seconds, then power on the TV screen...
... mode using the HDMI, DVI, Component Video or S-VIDEO connection, set "TV OUTPUT 2" to some time until the clock time is displayed on , the clock and tuner channels are required. Connect a component video cable between the VCR's [VIDEO OUTPUT] connector and the TV's video input connector. b- If your TV does not have a HDMI or DVI connector, you play back a tape, set your TV using the TV's Remote. Final preparation for more than 5 seconds, then power on the TV screen...
Instruction Manual
Page 21
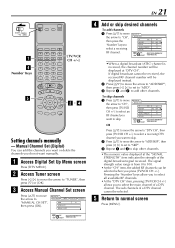
... indicates the strength of Tuner Setting. INITIAL SETTING (cont.) C Access Manual Channel Set screen Press [FG] to move the arrow to skip. A Access Digital Set Up Menu screen Press [DTV MENU]. B Access Tuner screen Press [D E] to move the arrow to skip. If digital broadcast cannot be received, the received RF channel number will be displayed instead. Manual Channel Set (Digital) You can be selected. DIGITAL SET UP DIGITAL PROGRAM TUNER CLOSED CAPTION PARENTAL BAND TV AUTO CH SET MANUAL CH SET MENU EXIT OK SELECT...
... indicates the strength of Tuner Setting. INITIAL SETTING (cont.) C Access Manual Channel Set screen Press [FG] to move the arrow to skip. A Access Digital Set Up Menu screen Press [DTV MENU]. B Access Tuner screen Press [D E] to move the arrow to skip. If digital broadcast cannot be received, the received RF channel number will be displayed instead. Manual Channel Set (Digital) You can be selected. DIGITAL SET UP DIGITAL PROGRAM TUNER CLOSED CAPTION PARENTAL BAND TV AUTO CH SET MANUAL CH SET MENU EXIT OK SELECT...
Instruction Manual
Page 22
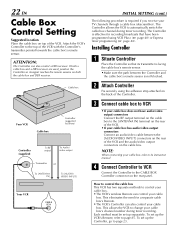
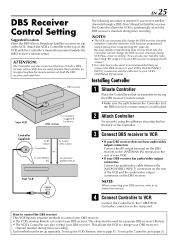
... allows the VCR to change your cable box, refer to automatically switch the cable box channel during timer recording. The Controller allows the VCR to its signal reaches the remote sensors on both a cable box and a DBS receiver are used, position the Controller so its instruction manual. NOTE: When connecting your cable box's channel number during timer recording. This eliminates the need for recording broadcasts that its transmitter is facing the cable box's remote sensor. • Make sure the path between the [AUDIO/VIDEO INPUT] connectors...
... allows the VCR to change your cable box, refer to automatically switch the cable box channel during timer recording. The Controller allows the VCR to its signal reaches the remote sensors on both a cable box and a DBS receiver are used, position the Controller so its instruction manual. NOTE: When connecting your cable box's channel number during timer recording. This eliminates the need for recording broadcasts that its transmitter is facing the cable box's remote sensor. • Make sure the path between the [AUDIO/VIDEO INPUT] connectors...

Instruction Manual
Page 24
... channels. C Repeat step E until the cable box's channel changes to the right. Press [D E] to enter the brand code from the list shown to 9 by entering another code. Contact your cable box cannot be operated with a Remote (because it has no remote sensor), you do not engage the test mode in step C, then the Clock Set screen appears. Make sure to leave the cable box turned on page 17. If the VCR's clock has not been set the cable box input channel...
... channels. C Repeat step E until the cable box's channel changes to the right. Press [D E] to enter the brand code from the list shown to 9 by entering another code. Contact your cable box cannot be operated with a Remote (because it has no remote sensor), you do not engage the test mode in step C, then the Clock Set screen appears. Make sure to leave the cable box turned on page 17. If the VCR's clock has not been set the cable box input channel...
Instruction Manual
Page 25
... RF output To Audio/ video output Transmitter or To [ANTENNA IN] To [AUDIO/ VIDEO INPUT] Your VCR CABLE BOX EN 25 The following procedure is equipped with the Controller's transmitter pointed towards the DBS receiver's remote sensor. Because satellite programming does not use PlusCode, the Controller cannot change your DBS receiver's channel number during VCR Plus+ timer recording. (You can also use 'Satellite Auto Recording' (A page 47) if your DBS receiver is required if you connect the...
... RF output To Audio/ video output Transmitter or To [ANTENNA IN] To [AUDIO/ VIDEO INPUT] Your VCR CABLE BOX EN 25 The following procedure is equipped with the Controller's transmitter pointed towards the DBS receiver's remote sensor. Because satellite programming does not use PlusCode, the Controller cannot change your DBS receiver's channel number during VCR Plus+ timer recording. (You can also use 'Satellite Auto Recording' (A page 47) if your DBS receiver is required if you connect the...

Instruction Manual
Page 36
... [STOP (L)] on the Remote or on D-VHS tapes: Press [D-VHS] to start Video Calibration. During EE mode (viewing TV program through the HDMI connection. C • To access the sub channels of the analog connection (Component Video, S-Video or Video), and set the recording speed. "SP": When picture quality is complete. The pause indicator [W] on the front display panel lights up respectively in SVHS/S-VHS ET/VHS mode. To view the subtitles, please make use of a digital channel, you , follow by...
... [STOP (L)] on the Remote or on D-VHS tapes: Press [D-VHS] to start Video Calibration. During EE mode (viewing TV program through the HDMI connection. C • To access the sub channels of the analog connection (Component Video, S-Video or Video), and set the recording speed. "SP": When picture quality is complete. The pause indicator [W] on the front display panel lights up respectively in SVHS/S-VHS ET/VHS mode. To view the subtitles, please make use of a digital channel, you , follow by...
Instruction Manual
Page 40
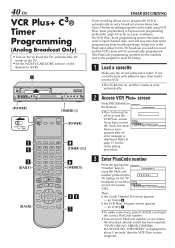
... number printed in advance. If not, cover the hole with adhesive tape, then load it into the VCR. • The VCR turns on, and the counter is displayed for the TV broadcast you wish to access the VCR Plus+ screen. PLUSCODE NUMBER SET • The clock must be made using VCR Plus+ timer programming or Express timer programming method (A page 44) as far as a year in the 1 2 3 4 5 TV listings for the clock setting procedure. If the Guide Channel Set screen...
... number printed in advance. If not, cover the hole with adhesive tape, then load it into the VCR. • The VCR turns on, and the counter is displayed for the TV broadcast you wish to access the VCR Plus+ screen. PLUSCODE NUMBER SET • The clock must be made using VCR Plus+ timer programming or Express timer programming method (A page 44) as far as a year in the 1 2 3 4 5 TV listings for the clock setting procedure. If the Guide Channel Set screen...

Instruction Manual
Page 53
... selected program is deactivated, the Navigation Set Up screen appears. VIDEO NAVIGATION Navigation Playback • Turn on the VCR and the TV, and select the AV mode on the TV. • Set the [VCR/TV/CABLE/DBS] selector on the Remote to the TV with the tape recorded on this VCR. • To record the date and time as the program title in this VCR's memory, make sure the VCR's clock is set to...
... selected program is deactivated, the Navigation Set Up screen appears. VIDEO NAVIGATION Navigation Playback • Turn on the VCR and the TV, and select the AV mode on the TV. • Set the [VCR/TV/CABLE/DBS] selector on the Remote to the TV with the tape recorded on this VCR. • To record the date and time as the program title in this VCR's memory, make sure the VCR's clock is set to...

Instruction Manual
Page 69
... S-VIDEO S-VIDEO ATSC IN VIDEO VIDEO L AUDIO R OUTPUT L AUDIO R L-1 L-2 INPUT CABLE BOX REMOTE PAUSE/ AV COMPULINK VHF/UHF ANTENNA IN OUT ANTENNA To AV COMPULINK (VCR ONLY) To S-video in a branched connection. *For details of the digital tuner. When this function is in To [S VIDEO OUTPUT] S-video cable (supplied) Audio cable (supplied) Mini-plug cable (not supplied) To [AUDIO OUTPUT] To [REMOTE PAUSE/AV COMPULINK] EN 69 *The default setting is always performed in VHS mode except when using the digital tuner's* timer...
... S-VIDEO S-VIDEO ATSC IN VIDEO VIDEO L AUDIO R OUTPUT L AUDIO R L-1 L-2 INPUT CABLE BOX REMOTE PAUSE/ AV COMPULINK VHF/UHF ANTENNA IN OUT ANTENNA To AV COMPULINK (VCR ONLY) To S-video in a branched connection. *For details of the digital tuner. When this function is in To [S VIDEO OUTPUT] S-video cable (supplied) Audio cable (supplied) Mini-plug cable (not supplied) To [AUDIO OUTPUT] To [REMOTE PAUSE/AV COMPULINK] EN 69 *The default setting is always performed in VHS mode except when using the digital tuner's* timer...

Instruction Manual
Page 82
... your VCR as the playback or recording VCR. This VCR (for recording) EDITING (cont.) B You can use your VCR's [AUDIO/S VIDEO] input connectors. • When the JVC camcorder is equipped with the camcorder Connect an audio/S-video cable between the camcorder's audio/S-video output connectors and your VCR as the recording VCR. A Make connections A Connection with the Master Edit Control, you can control the VCR from the camcorder. E.g. In event when even the main menu screen cannot be displayed on the TV when [MENU] is pressed, power...
... your VCR as the playback or recording VCR. This VCR (for recording) EDITING (cont.) B You can use your VCR's [AUDIO/S VIDEO] input connectors. • When the JVC camcorder is equipped with the camcorder Connect an audio/S-video cable between the camcorder's audio/S-video output connectors and your VCR as the recording VCR. A Make connections A Connection with the Master Edit Control, you can control the VCR from the camcorder. E.g. In event when even the main menu screen cannot be displayed on the TV when [MENU] is pressed, power...

Instruction Manual
Page 83
... the front panel: Press [CHANNEL +/-]. D Set recording speed Press [REC SPEED] to set to "OFF") after per- Connect also the video or S-video cable. B Load a cassette Insert the cassette to perform dubbing properly only with an audio cable. To use a Master Edit Control-equipped JVC camcorder A Access the "ADDITIONAL" screen (A page 68), then set "FRONT AUX F-1" (or "REAR AUX L-1" (or "L-2") if you finish dubbing the tapes (A page 65). • It is set the tape speed. B Engage the VCR's recording pause mode.
... the front panel: Press [CHANNEL +/-]. D Set recording speed Press [REC SPEED] to set to "OFF") after per- Connect also the video or S-video cable. B Load a cassette Insert the cassette to perform dubbing properly only with an audio cable. To use a Master Edit Control-equipped JVC camcorder A Access the "ADDITIONAL" screen (A page 68), then set "FRONT AUX F-1" (or "REAR AUX L-1" (or "L-2") if you finish dubbing the tapes (A page 65). • It is set the tape speed. B Engage the VCR's recording pause mode.
Instruction Manual
Page 86
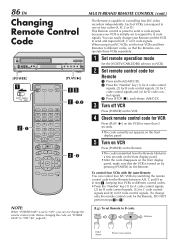
... front display panel, make sure that the Remotes can easily change your VCR is capable of controlling four JVC video recorders independently. C MULTI-BRAND REMOTE CONTROL (cont.) The Remote is initially set appears on the front display panel. B Press the 'Number' key [1] for A code control signals, [2] for B code control signals, [3] for C code control signals and [4] for Remote A Press and hold [A/B/C/D]. You can operate these VCRs separately. C Turn off VCR Press [POWER] on the Remote. E Turn on VCR Press [POWER] on the Remote. • The code...
... front display panel, make sure that the Remotes can easily change your VCR is capable of controlling four JVC video recorders independently. C MULTI-BRAND REMOTE CONTROL (cont.) The Remote is initially set appears on the front display panel. B Press the 'Number' key [1] for A code control signals, [2] for B code control signals, [3] for C code control signals and [4] for Remote A Press and hold [A/B/C/D]. You can operate these VCRs separately. C Turn off VCR Press [POWER] on the Remote. E Turn on VCR Press [POWER] on the Remote. • The code...
Instruction Manual
Page 87
...; Audio Monitor setting is disconnected. The tape is running but the picture will not come on the front panel for repair. The heads must be cleaned. Component Video or S-Video connection, set "TV OUTPUT 2" to disengage. POWER SYMPTOM POSSIBLE CAUSE CORRECTIVE ACTION 1. The picture stops, or the black or mosaic noise appears when playing back a program recorded in D-VHS mode. • The video heads may be dirty. • The digital program is pressed, power off...
...; Audio Monitor setting is disconnected. The tape is running but the picture will not come on the front panel for repair. The heads must be cleaned. Component Video or S-Video connection, set "TV OUTPUT 2" to disengage. POWER SYMPTOM POSSIBLE CAUSE CORRECTIVE ACTION 1. The picture stops, or the black or mosaic noise appears when playing back a program recorded in D-VHS mode. • The video heads may be dirty. • The digital program is pressed, power off...

Instruction Manual
Page 89
... brand code (A page 27). Set "INPUT CH" to control the DBS receiver. • The DBS receiver is turned off . The program may not have enough time on the Cable Set Up screen is incorrect. • The cable box is turned off . VIDEO NAVIGATION SYMPTOM POSSIBLE CAUSE 1. Remove the cassette and cover its end during timer recording. Next time be shown if it with adhesive tape. Satellite channels are not automatically switched during timer recording...
... brand code (A page 27). Set "INPUT CH" to control the DBS receiver. • The DBS receiver is turned off . The program may not have enough time on the Cable Set Up screen is incorrect. • The cable box is turned off . VIDEO NAVIGATION SYMPTOM POSSIBLE CAUSE 1. Remove the cassette and cover its end during timer recording. Next time be shown if it with adhesive tape. Satellite channels are not automatically switched during timer recording...

Instruction Manual
Page 90
... one tape number. 90 EN TROUBLESHOOTING (cont.) VIDEO NAVIGATION SYMPTOM 2. The Remote will not operate your • The brand codes are recorded on the recording time for Video Navigation is fully recorded. • "NAVIGATION" is in EE mode through the HDMI connection. The VCR cannot search for Video screen when you need the skipped channels, of 480p image format, the subtitles cannot be changed. • Recording is set incorrectly. "MEMORY FULL" appears on . 7. recording. 4. Set...
... one tape number. 90 EN TROUBLESHOOTING (cont.) VIDEO NAVIGATION SYMPTOM 2. The Remote will not operate your • The brand codes are recorded on the recording time for Video Navigation is fully recorded. • "NAVIGATION" is in EE mode through the HDMI connection. The VCR cannot search for Video screen when you need the skipped channels, of 480p image format, the subtitles cannot be changed. • Recording is set incorrectly. "MEMORY FULL" appears on . 7. recording. 4. Set...

Instruction Manual
Page 92
... VCR does not convert a digital signal into an analog signal for recording. CODE 102 103 104 105 107 108 200 201 202 203 205 MESSAGE "REC PROHIBITED" "REC PROHIBITED" "CAN NOT DECODE VIDEO OR AUDIO USE SET TOP BOX OR HDTV TUNER" "CAN NOT REC DIGITAL INPUT BY SVHS/VHS" "CHOOSE ANALOG INPUT" "CAN NOT REC DIGITAL INPUT BY SVHS/VHS" "USE ANALOG TIMER PROGRAMMING" "REC BY HS MODE" "CAN NOT DECODE VIDEO OR AUDIO USE SET...
... VCR does not convert a digital signal into an analog signal for recording. CODE 102 103 104 105 107 108 200 201 202 203 205 MESSAGE "REC PROHIBITED" "REC PROHIBITED" "CAN NOT DECODE VIDEO OR AUDIO USE SET TOP BOX OR HDTV TUNER" "CAN NOT REC DIGITAL INPUT BY SVHS/VHS" "CHOOSE ANALOG INPUT" "CAN NOT REC DIGITAL INPUT BY SVHS/VHS" "USE ANALOG TIMER PROGRAMMING" "REC BY HS MODE" "CAN NOT DECODE VIDEO OR AUDIO USE SET...
Instruction Manual
Page 96
... Instant Timer Recording (ITR) 37 i.LINK Setting 78 J JLIP ID Number Setting 77 L LIGHTING 70 M Manual tracking 30 Multi-Brand Remote Controlling four JVC VCRs 86 Setting Cable Box brand 85 Setting DBS receiver brand 85 Setting TV brand 84 N Next Function Memory 31 O On-screen display 10, 38 OPTICAL OUT 66 P Parental Lock 71 PBS channel 14 PICTURE CONTROL 65 Playback 28 Plug & Play 14 POWER SAVE 69 R Rating Systems 74 REAR AUX L-1 68 REAR AUX L-2 68 Recording D-VHS Recording 35 S-VHS/VHS Recording 36 Recording speed 35, 36, 81 Repeat playback...
... Instant Timer Recording (ITR) 37 i.LINK Setting 78 J JLIP ID Number Setting 77 L LIGHTING 70 M Manual tracking 30 Multi-Brand Remote Controlling four JVC VCRs 86 Setting Cable Box brand 85 Setting DBS receiver brand 85 Setting TV brand 84 N Next Function Memory 31 O On-screen display 10, 38 OPTICAL OUT 66 P Parental Lock 71 PBS channel 14 PICTURE CONTROL 65 Playback 28 Plug & Play 14 POWER SAVE 69 R Rating Systems 74 REAR AUX L-1 68 REAR AUX L-2 68 Recording D-VHS Recording 35 S-VHS/VHS Recording 36 Recording speed 35, 36, 81 Repeat playback...


