Instruction Manual
Page 1
...'s enclosure that may be of sufficient magnitude to constitute a risk of electric shock to qualified service personnel. DT-V24L3D DT-V20L3D MULTI FORMAT LCD MONITOR The illustration of the monitor is intended to alert the user to the presence of important operating and maintenance (servicing) instructions in the literature accompanying the appliance...
...'s enclosure that may be of sufficient magnitude to constitute a risk of electric shock to qualified service personnel. DT-V24L3D DT-V20L3D MULTI FORMAT LCD MONITOR The illustration of the monitor is intended to alert the user to the presence of important operating and maintenance (servicing) instructions in the literature accompanying the appliance...

Instruction Manual
Page 4
... reattach the removed screws. Monitor The illustration of the monitor is of DT-V24L3D. CAUTION • When lifting up the stand... - Installation 4 CAUTION • Do not rest your arm on the monitor or lean against the monitor. • Do not touch the LCD panel when installing the monitor. • Be sure to install the monitor securely to prevent the...
... reattach the removed screws. Monitor The illustration of the monitor is of DT-V24L3D. CAUTION • When lifting up the stand... - Installation 4 CAUTION • Do not rest your arm on the monitor or lean against the monitor. • Do not touch the LCD panel when installing the monitor. • Be sure to install the monitor securely to prevent the...
Instruction Manual
Page 5
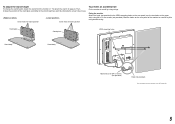
...plate VESA mounting holes Stand body Stand body Hook and screw (M4 x 10 mm) (not provided) Hook (not provided) The illustration of the monitor is of the monitor to a wall or a pillar using M4 x 10 mm screws (not provided). Screw holes for higher position Screw holes for lower position To ...prevent an accidental fall Fix the monitor to a wall by choosing the screw holes to the VESA mounting holes on page 4). Fixing the monitor Attach the hook (not provided) to use the two holes on the rear panel of DT-V24L3D. 5 Bind the hooks on the upper side) ...
...plate VESA mounting holes Stand body Stand body Hook and screw (M4 x 10 mm) (not provided) Hook (not provided) The illustration of the monitor is of the monitor to a wall or a pillar using M4 x 10 mm screws (not provided). Screw holes for higher position Screw holes for lower position To ...prevent an accidental fall Fix the monitor to a wall by choosing the screw holes to the VESA mounting holes on page 4). Fixing the monitor Attach the hook (not provided) to use the two holes on the rear panel of DT-V24L3D. 5 Bind the hooks on the upper side) ...
Instruction Manual
Page 6
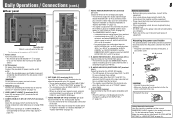
... works only when displaying the picture in 16:9 aspect ratio. • This function does not work when "SAFETY MARKER" or "R-SAFETY MARKER" is of DT-V24L3D. 1 Speakers (stereo) The speakers emit the same audio signal emitted from 4:3 to 16:9 when the picture of 16:9 aspect ratio is turned off (... page 16). • "NO EFFECT" is displayed when you press this button, the screen changes in the following order. Flashes in orange: The monitor is displayed and the lamps do not light). p SAFETY MARKER button/lamp Displays/hides the safety marker. • Adjust the area of the safety ...
... works only when displaying the picture in 16:9 aspect ratio. • This function does not work when "SAFETY MARKER" or "R-SAFETY MARKER" is of DT-V24L3D. 1 Speakers (stereo) The speakers emit the same audio signal emitted from 4:3 to 16:9 when the picture of 16:9 aspect ratio is turned off (... page 16). • "NO EFFECT" is displayed when you press this button, the screen changes in the following order. Flashes in orange: The monitor is displayed and the lamps do not light). p SAFETY MARKER button/lamp Displays/hides the safety marker. • Adjust the area of the safety ...
Instruction Manual
Page 8
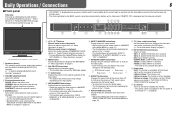
...prevent accidental disconnection of 48 kHz. CAUTION Do not connect the power cord until all connections are completed. 3 REMOTE terminal Terminal for controlling the monitor by an external control. (☞ "External Control" on the right). Connect the provided AC power cord to an AC outlet. • ...the audio signal input to AUDIO ASSIGN (IN 1 or IN 2) terminals when "SDI-1" or "SDI-2" is not displayed correctly, change the setting of DT-V24L3D. 1 Power switch Turns the power on or off all the equipment. • Use a cord whose plugs correctly match the terminals on page 13) &#...
...prevent accidental disconnection of 48 kHz. CAUTION Do not connect the power cord until all connections are completed. 3 REMOTE terminal Terminal for controlling the monitor by an external control. (☞ "External Control" on the right). Connect the provided AC power cord to an AC outlet. • ...the audio signal input to AUDIO ASSIGN (IN 1 or IN 2) terminals when "SDI-1" or "SDI-2" is not displayed correctly, change the setting of DT-V24L3D. 1 Power switch Turns the power on or off all the equipment. • Use a cord whose plugs correctly match the terminals on page 13) &#...

Instruction Manual
Page 10
...reset Restore the default settings for all the items in "PICTURE FUNCTION." *1 DT-V24L3D only *2 Memorized for each operation. • The menu automatically disappears in about...Setting value: AUTO, MODE1, MODE2, MODE3 When "AUTO" is compatible with "AUTO." • DVI-D input of the monitor is selected, the format of "PICTURE FUNCTION" while viewing the actual picture. Operation guide Shows the buttons for COMPO./RGB terminals...FIELD sub menu Display the sub menu which is peculiar to LCD. DVI INPUT SEL. Menu Configuration-MAIN MENU For the operation procedure, see page 7.
...reset Restore the default settings for all the items in "PICTURE FUNCTION." *1 DT-V24L3D only *2 Memorized for each operation. • The menu automatically disappears in about...Setting value: AUTO, MODE1, MODE2, MODE3 When "AUTO" is compatible with "AUTO." • DVI-D input of the monitor is selected, the format of "PICTURE FUNCTION" while viewing the actual picture. Operation guide Shows the buttons for COMPO./RGB terminals...FIELD sub menu Display the sub menu which is peculiar to LCD. DVI INPUT SEL. Menu Configuration-MAIN MENU For the operation procedure, see page 7.
Instruction Manual
Page 20
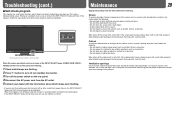
... panel start flashing... 1 Check which lamps are flashing. 2 Press button to turn off (on standby) the monitor. 3 Turn off . Leaving the dust around the intakes (all the openings). When the screen goes blank, ...a long time. • Do not wipe the cabinet forcefully. Troubleshooting (cont.) 7 Self-check program This monitor has a self-check function, which allows it to detect malfunctions and alert you turn off power and wait ..., wipe it with a soft cloth soaked in appearance of DT-V24L3D. If a vacuum cleaner is of the screen such as uneven color, discoloration, scratches, be displayed.
... panel start flashing... 1 Check which lamps are flashing. 2 Press button to turn off (on standby) the monitor. 3 Turn off . Leaving the dust around the intakes (all the openings). When the screen goes blank, ...a long time. • Do not wipe the cabinet forcefully. Troubleshooting (cont.) 7 Self-check program This monitor has a self-check function, which allows it to detect malfunctions and alert you turn off power and wait ..., wipe it with a soft cloth soaked in appearance of DT-V24L3D. If a vacuum cleaner is of the screen such as uneven color, discoloration, scratches, be displayed.
Instruction Manual
Page 21
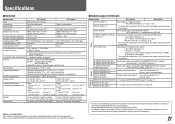
... and illustrations are shown by being emphasized, omitted or composed, and may be slightly different from sources other than JVC or JVC-authorized dealers. 7 Input/output terminals Model name DT-V24L3D DT-V20L3D VIDEO (INPUT 1) Input/output of composite signal: 1 line, BNC connector x 2, 1 V(p-p), 75 &#... format Format Audio output Operating conditions Power requirements Rated current External dimensions (excluding protruding parts) Weight Accessories DT-V24L3D DT-V20L3D Multi format LCD monitor Type 24 wide format Type 20 wide format 16:10 24˝ wide, active matrix TFT 20...
... and illustrations are shown by being emphasized, omitted or composed, and may be slightly different from sources other than JVC or JVC-authorized dealers. 7 Input/output terminals Model name DT-V24L3D DT-V20L3D VIDEO (INPUT 1) Input/output of composite signal: 1 line, BNC connector x 2, 1 V(p-p), 75 &#... format Format Audio output Operating conditions Power requirements Rated current External dimensions (excluding protruding parts) Weight Accessories DT-V24L3D DT-V20L3D Multi format LCD monitor Type 24 wide format Type 20 wide format 16:10 24˝ wide, active matrix TFT 20...

Instruction Manual
Page 22
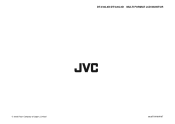
Specifications (cont.) 7 Dimensions Unit: mm (inch) DT-V24L3D 564 (22 1/4) 99 (4) 51.9 (2 1/8) 1.5 (1/16) 22 VESA mounting holes 100 (Size: 4-M4, depth: 10 mm) 448.6 (17 3/4)*/413.6 (16 3/8)** 408 (16 1/8) 117 100 DT-V20L3D 300 (11 7/8) 477 (18 7/8) 51 (2 1/8) 243 (9 5/8) 99 (4) 52.7 (2 1/8) 1.5 (1/16) VESA mounting holes (Size: 4-M4, depth: 10 mm) 100 100 394.6 (15 5/8)*/359.6 (14 1/4)** 354 (14) 117 * at the higher position ** at the lower position 300 (11 7/8) 51 (2 1/8) 243 (9 5/8)
Specifications (cont.) 7 Dimensions Unit: mm (inch) DT-V24L3D 564 (22 1/4) 99 (4) 51.9 (2 1/8) 1.5 (1/16) 22 VESA mounting holes 100 (Size: 4-M4, depth: 10 mm) 448.6 (17 3/4)*/413.6 (16 3/8)** 408 (16 1/8) 117 100 DT-V20L3D 300 (11 7/8) 477 (18 7/8) 51 (2 1/8) 243 (9 5/8) 99 (4) 52.7 (2 1/8) 1.5 (1/16) VESA mounting holes (Size: 4-M4, depth: 10 mm) 100 100 394.6 (15 5/8)*/359.6 (14 1/4)** 354 (14) 117 * at the higher position ** at the lower position 300 (11 7/8) 51 (2 1/8) 243 (9 5/8)
Instruction Manual
Page 24
DT-V24L3D/DT-V20L3D MULTI FORMAT LCD MONITOR © 2008 Victor Company of Japan, Limited 0908TKH-MW-MT
DT-V24L3D/DT-V20L3D MULTI FORMAT LCD MONITOR © 2008 Victor Company of Japan, Limited 0908TKH-MW-MT
