

Instruction Manual
Page 1
... of electric shock to the presence of important operating and maintenance (servicing) instructions in the literature accompanying the appliance. DT-V17L3D MULTI FORMAT LCD MONITOR CAUTION RISK OF ELECTRICAL SHOCK DO NOT OPEN CAUTION: To reduce the risk of Contents Safety Precautions 2 IMPORTANT SAFEGUARDS ...Configuration-MAIN MENU 10 Menu Configuration-SET-UP MENU 14 External Control 16 About the external control 16 Using the MAKE/TRIGGER system 17 Using the serial communication 18 Troubleshooting 19 Self-check program 20 Maintenance 20 Specifications 21 General 21 Input/...
... of electric shock to the presence of important operating and maintenance (servicing) instructions in the literature accompanying the appliance. DT-V17L3D MULTI FORMAT LCD MONITOR CAUTION RISK OF ELECTRICAL SHOCK DO NOT OPEN CAUTION: To reduce the risk of Contents Safety Precautions 2 IMPORTANT SAFEGUARDS ...Configuration-MAIN MENU 10 Menu Configuration-SET-UP MENU 14 External Control 16 About the external control 16 Using the MAKE/TRIGGER system 17 Using the serial communication 18 Troubleshooting 19 Self-check program 20 Maintenance 20 Specifications 21 General 21 Input/...
Instruction Manual
Page 2
... in a risk of this product for future reference. • All warnings on the product may be sure the service technician has used replacement parts specified by plugging/unplugging the power cord into the outlet, contact your dealer or qualified personnel.) How to qualified service personnel...Never place anything on the product. Under the following power supply voltage and countries. otherwise, parts of fire or electric shock. • Use only the accessory cord designed for plugging/ unplugging the power cord. NO OBJECTS FILLED WITH LIQUIDS, SUCH AS VASES, SHALL BE PLACED ON ...
... in a risk of this product for future reference. • All warnings on the product may be sure the service technician has used replacement parts specified by plugging/unplugging the power cord into the outlet, contact your dealer or qualified personnel.) How to qualified service personnel...Never place anything on the product. Under the following power supply voltage and countries. otherwise, parts of fire or electric shock. • Use only the accessory cord designed for plugging/ unplugging the power cord. NO OBJECTS FILLED WITH LIQUIDS, SUCH AS VASES, SHALL BE PLACED ON ...
Instruction Manual
Page 3
...users) If you wish to dispose of this product, please visit our web page www.jvc-europe.com to environmental considerations. Operation of this equipment in which could otherwise be used in accordance with the limits for a Class A digital device, pursuant to keep the ...cable away from the sources of the corresponding European Directives. For disposal or recycling information, please contact your country for example purpose built broadcasting or recording studio), and rural...
...users) If you wish to dispose of this product, please visit our web page www.jvc-europe.com to environmental considerations. Operation of this equipment in which could otherwise be used in accordance with the limits for a Class A digital device, pursuant to keep the ...cable away from the sources of the corresponding European Directives. For disposal or recycling information, please contact your country for example purpose built broadcasting or recording studio), and rural...

Instruction Manual
Page 4
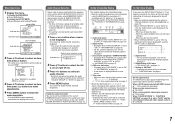
...the LCD panel facing down to prevent the LCD panel from being damaged. otherwise the monitor may fall over , which may not be careful not to pinch your fingers in the following two ways when using it stops (about 144°. Installation 4 CAUTION • Do not rest your ...arm on the monitor or lean against the monitor. • Do not touch the LCD panel when installing the monitor. • Be sure to install the monitor securely to prevent the monitor from falling over . ...
...the LCD panel facing down to prevent the LCD panel from being damaged. otherwise the monitor may fall over , which may not be careful not to pinch your fingers in the following two ways when using it stops (about 144°. Installation 4 CAUTION • Do not rest your ...arm on the monitor or lean against the monitor. • Do not touch the LCD panel when installing the monitor. • Be sure to install the monitor securely to prevent the monitor from falling over . ...

Instruction Manual
Page 5
...). Stand plate Screw holes for higher position Screw holes for lower position Stand plate To prevent an accidental fall Fix the monitor to a wall by choosing the screw holes to use the two holes on the rear panel of the stand plate according to the stand height you want by... using durable string. Fixing the monitor Attach the hook (not provided) to the VESA mounting holes on page 4). To adjust the stand height To change the position of the monitor to a wall or a pillar using strings. Then, change the stand height, detach the...
...). Stand plate Screw holes for higher position Screw holes for lower position Stand plate To prevent an accidental fall Fix the monitor to a wall by choosing the screw holes to use the two holes on the rear panel of the stand plate according to the stand height you want by... using durable string. Fixing the monitor Attach the hook (not provided) to the VESA mounting holes on page 4). To adjust the stand height To change the position of the monitor to a wall or a pillar using strings. Then, change the stand height, detach the...
Instruction Manual
Page 7
...with higher resolution than a computer, the picture is also displayed in the MAIN MENU is "ON." (☞ "FUNCTION SETTING" on the monitor • When "STATUS DISPLAY" is not displayed. Menu Operations 1 Display the menu. However, the information display will overlap with T.C. ...display the SET-UP MENU \ Press button while holding button. The screen for each information using the MENU with the exception of the panel in from the speakers (L/R) and the AUDIO (MONITOR OUT) (OUT1(L)/ OUT2(R)) terminals, when EMBEDDED AUDIO signals come in about 3 seconds. ...
...with higher resolution than a computer, the picture is also displayed in the MAIN MENU is "ON." (☞ "FUNCTION SETTING" on the monitor • When "STATUS DISPLAY" is not displayed. Menu Operations 1 Display the menu. However, the information display will overlap with T.C. ...display the SET-UP MENU \ Press button while holding button. The screen for each information using the MENU with the exception of the panel in from the speakers (L/R) and the AUDIO (MONITOR OUT) (OUT1(L)/ OUT2(R)) terminals, when EMBEDDED AUDIO signals come in about 3 seconds. ...
Instruction Manual
Page 8
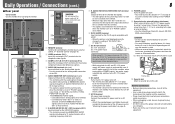
...- Note for connections • Before making any connections, turn off all the equipment. • Use a cord whose plugs correctly match the terminals on the way the monitor is used. • When an external battery is used . AUDIO HD/SD SDI (IN 1, IN 2) terminals (BNC) Input terminals for the HD/...through the AUDIO (IN) terminal or EMBEDDED AUDIO signals through the E. CAUTION • Do not use the monitor after turning on the DC switch. • The monitor consumes the battery even while the monitor is on page 9). Ex.: When the Anton Bauer mount (QR DXC-M3A) is attached, attach...
...- Note for connections • Before making any connections, turn off all the equipment. • Use a cord whose plugs correctly match the terminals on the way the monitor is used. • When an external battery is used . AUDIO HD/SD SDI (IN 1, IN 2) terminals (BNC) Input terminals for the HD/...through the AUDIO (IN) terminal or EMBEDDED AUDIO signals through the E. CAUTION • Do not use the monitor after turning on the DC switch. • The monitor consumes the battery even while the monitor is on page 9). Ex.: When the Anton Bauer mount (QR DXC-M3A) is attached, attach...
Instruction Manual
Page 9
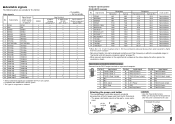
...computer. Specification of two parts, a case and a cover. 1 AC IN 2 Cover 3 Case terminal CAUTION • Use only the provided screws. • Make sure the plug will become obscured because their frequency is within the acceptable range (☞...; √ √*3 √*3 √ √ DVI-D (HDCP) (Digital component/ digital RGB 3 *1 Analog component signals are available for this monitor. 7 Available signals The following signals are compatible with Y on sync signals. *2 Compatible with EMBEDDED AUDIO signals *3 The signal is recognized as 1080/60i.
...computer. Specification of two parts, a case and a cover. 1 AC IN 2 Cover 3 Case terminal CAUTION • Use only the provided screws. • Make sure the plug will become obscured because their frequency is within the acceptable range (☞...; √ √*3 √*3 √ √ DVI-D (HDCP) (Digital component/ digital RGB 3 *1 Analog component signals are available for this monitor. 7 Available signals The following signals are compatible with Y on sync signals. *2 Compatible with EMBEDDED AUDIO signals *3 The signal is recognized as 1080/60i.
Instruction Manual
Page 11
...not appear on page 16). • When a picture is displayed in 4:3 aspect ratio, the safety marker for the 4:3 area is displayed by using AREA MARKER or SAFETY MARKER button, or external control. • Select either non-"R-" items or "R-" items to activate by the MAKE system do ...previous operation. • Some items may not appear on the menu depending on the input or the input signal. • The items controlled by using external control (☞ "External Control" on the menu. MARKER*1*2 Settings for each operation. • The menu automatically disappears in 16:9 aspect ratio....
...not appear on page 16). • When a picture is displayed in 4:3 aspect ratio, the safety marker for the 4:3 area is displayed by using AREA MARKER or SAFETY MARKER button, or external control. • Select either non-"R-" items or "R-" items to activate by the MAKE system do ...previous operation. • Some items may not appear on the menu depending on the input or the input signal. • The items controlled by using external control (☞ "External Control" on the menu. MARKER*1*2 Settings for each operation. • The menu automatically disappears in 16:9 aspect ratio....
Instruction Manual
Page 13
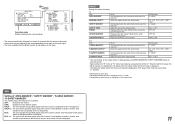
...goes over level for each operation. Setting value OFF, P.SAVE (power save mode) saves more power consumption by half. NOTE Example of the wave form monitor. 1 (lower right), 2 (lower left), 3 (upper left), 4 (upper right) FILTER Activates/deactivates the low-pass filter for the signals as...steadily while "ON" is selected, select "OFF." • While "ON" is selected, the displayed picture may become unstable when an operation using buttons on "LEVEL" (☞ below). DELAY TIME LOW LATENCY Select the period until the screen status changes as follows: RGB input signals (digital...
...goes over level for each operation. Setting value OFF, P.SAVE (power save mode) saves more power consumption by half. NOTE Example of the wave form monitor. 1 (lower right), 2 (lower left), 3 (upper left), 4 (upper right) FILTER Activates/deactivates the low-pass filter for the signals as...steadily while "ON" is selected, select "OFF." • While "ON" is selected, the displayed picture may become unstable when an operation using buttons on "LEVEL" (☞ below). DELAY TIME LOW LATENCY Select the period until the screen status changes as follows: RGB input signals (digital...
Instruction Manual
Page 15
... input or the input signal. • The items controlled by the MAKE system do Select the input terminal used for maintenance of the monitor. NOTE Setting of the monitor. Assign a name to select the first character. • Each time you press button, the character changes... as you operate the monitor with the DC 12 V power supply, the monitor is used for the MAKE/ TRIGGER terminal. Display the version of the monitor. This item is turned off (on automatically. Operating the monitor by pressing button while holding button) and turning ...
... input or the input signal. • The items controlled by the MAKE system do Select the input terminal used for maintenance of the monitor. NOTE Setting of the monitor. Assign a name to select the first character. • Each time you press button, the character changes... as you operate the monitor with the DC 12 V power supply, the monitor is used for the MAKE/ TRIGGER terminal. Display the version of the monitor. This item is turned off (on automatically. Operating the monitor by pressing button while holding button) and turning ...

Instruction Manual
Page 16
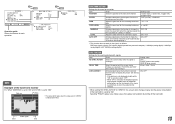
... • RS-485 terminals (RJ-45): Controls the monitor with the RS-485 system. (☞ "Using the serial communication" on page 18) • RS-232C terminal (D-sub 9-pin): Controls the monitor with the RS-232C system. (☞ "Using the serial communication" on page 18) Set the following external...buttons and menu on page 15). You can use the external control even when "CONTROL LOCK" is set to "ON" (☞ page 15). • When the monitor is off (on the monitor) are available. (1) MAKE (make contact) system: Controls the monitor by short-circuiting the corresponding pin terminal to ...
... • RS-485 terminals (RJ-45): Controls the monitor with the RS-485 system. (☞ "Using the serial communication" on page 18) • RS-232C terminal (D-sub 9-pin): Controls the monitor with the RS-232C system. (☞ "Using the serial communication" on page 18) Set the following external...buttons and menu on page 15). You can use the external control even when "CONTROL LOCK" is set to "ON" (☞ page 15). • When the monitor is off (on the monitor) are available. (1) MAKE (make contact) system: Controls the monitor by short-circuiting the corresponding pin terminal to ...

Instruction Manual
Page 17
... and opening it. 17 COMPONENT Changes the input to control the terminal by the MAKE system. Controls whether displaying/hiding the wave form monitor (This function cannot be controlled with the MAKE system.) • You cannot assign the same function to different pin terminals. •... 1 second and opening it. • When changing the input with the MAKE system, the information is displayed only at a time. 7 Using the MAKE/TRIGGER system The MAKE/TRIGGER terminal is selected: Operate each function by short-circuiting the corresponding pin terminal to the 8th pin terminal...
... and opening it. 17 COMPONENT Changes the input to control the terminal by the MAKE system. Controls whether displaying/hiding the wave form monitor (This function cannot be controlled with the MAKE system.) • You cannot assign the same function to different pin terminals. •... 1 second and opening it. • When changing the input with the MAKE system, the information is displayed only at a time. 7 Using the MAKE/TRIGGER system The MAKE/TRIGGER terminal is selected: Operate each function by short-circuiting the corresponding pin terminal to the 8th pin terminal...

Instruction Manual
Page 18
....) 18 7 Using the serial communication You can be used while the monitor is off the monitor (on page 7). This is a female terminal. For details, see on standby). *1 Enter the monitor's ID for " **." "@": Status returns from the monitor • To..., etc. 3Selecting "SDI 1" input (!00BINACr) 4Monitor's status (@00BOKCr) 5Terminating the communication: termination command (!00BCN0Cr) 6Monitor's status (@00BOKCr) Monitor No. via the RS-485 or RS-232C terminal. • Consult your dealer for starting communication (connection) (No. 1), terminating communication ...
....) 18 7 Using the serial communication You can be used while the monitor is off the monitor (on page 7). This is a female terminal. For details, see on standby). *1 Enter the monitor's ID for " **." "@": Status returns from the monitor • To..., etc. 3Selecting "SDI 1" input (!00BINACr) 4Monitor's status (@00BOKCr) 5Terminating the communication: termination command (!00BCN0Cr) 6Monitor's status (@00BOKCr) Monitor No. via the RS-485 or RS-232C terminal. • Consult your dealer for starting communication (connection) (No. 1), terminating communication ...
Instruction Manual
Page 19
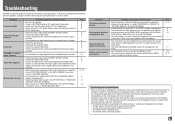
... whether the video output of the component (video output setting of the VCR or graphic board of the computer) is acceptable on the monitor. • Select the correct input using a DC 12 V power supply, charge the battery or replace it may be a case that a few pixels may remain indistinctly on .... however, be displayed fully in the SET-UP MENU. There is built with a charged one. • Select the correct input using the adjustment knobs on the monitor do not appear on the length of time the still image was displayed for the items controlled by the MAKE system do not...
... whether the video output of the component (video output setting of the VCR or graphic board of the computer) is acceptable on the monitor. • Select the correct input using a DC 12 V power supply, charge the battery or replace it may be a case that a few pixels may remain indistinctly on .... however, be displayed fully in the SET-UP MENU. There is built with a charged one. • Select the correct input using the adjustment knobs on the monitor do not appear on the length of time the still image was displayed for the items controlled by the MAKE system do not...
Instruction Manual
Page 20
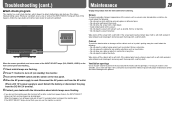
... flashing... 1 Check which lamps are flashing. 2 Press button to detect malfunctions and alert you. When a DC 12 V power supply is not available, use the monitor as alcohol, thinner, or benzine. • Do not expose the cabinet to get rid of the INPUT SELECT lamps will flash. If a vacuum cleaner ...is used : Disconnect the AC power cord from the DC IN 12V terminal. 5 Contact your dealer to the product. • If you can use a cloth ...
... flashing... 1 Check which lamps are flashing. 2 Press button to detect malfunctions and alert you. When a DC 12 V power supply is not available, use the monitor as alcohol, thinner, or benzine. • Do not expose the cabinet to get rid of the INPUT SELECT lamps will flash. If a vacuum cleaner ...is used : Disconnect the AC power cord from the DC IN 12V terminal. 5 Contact your dealer to the product. • If you can use a cloth ...
Instruction Manual
Page 21
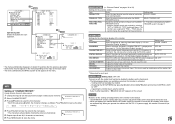
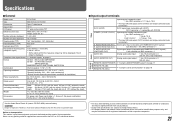
...JVC or JVC-authorized dealers. • For easy understanding, pictures and illustrations are shown by being emphasized, omitted or composed, and may be slightly different from actual products. • Design and specifications are subject to change without notice. • All company names and product names mentioned herein are used... format Format Audio output Operating conditions Power requirements Rated current External dimensions (excluding protruding parts) Weight Accessories DT-V17L3D Multi format LCD monitor Type 17 wide format 16:10 17˝ wide, active matrix TFT Width: 367.2 mm (14...
...JVC or JVC-authorized dealers. • For easy understanding, pictures and illustrations are shown by being emphasized, omitted or composed, and may be slightly different from actual products. • Design and specifications are subject to change without notice. • All company names and product names mentioned herein are used... format Format Audio output Operating conditions Power requirements Rated current External dimensions (excluding protruding parts) Weight Accessories DT-V17L3D Multi format LCD monitor Type 17 wide format 16:10 17˝ wide, active matrix TFT Width: 367.2 mm (14...