JVC DT-N21H Support and Manuals
Get Help and Manuals for this JVC item

Popular JVC DT-N21H Manual Pages
Instruction Manual - Page 1
Version:A
MULTI FORMAT LCD MONITOR
DT-N21H
INSTRUCTIONS
For Customer Use: Please read the Instruction Manual carefully and retain this information for future reference.
Instruction Manual - Page 4

...problems must be considered and the local rules or laws governing the disposal of these instructions. 3) Heed all warnings. 4) Follow all instructions... for replacement of ...INSTRUCTIONS
1) Read these instructions. 2) Keep these batteries must be exposed to dripping or splashing and no objects filled with a hard object. Install in contact for long periods of time. 14) Refer all servicing...
Instruction Manual - Page 7
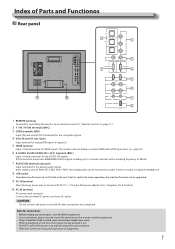
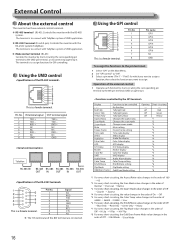
...Parts and Functionos
Rear panel
9
10
IN
1
RS-485
OUT
Y
2
Pb
Pr
GPI
OUT
IN
3
CVBS
RS-232C
1
VGA-IN
4
OUT
IN
5
HDMI
OUT1
IN1
OUT2
6
IN2
3G/HD/SD-SDI
L
R
7
AUDIO-IN
Firmware upgrade...Refer also to the user manual of each piece of equipment.
7 Index of 48 kHz.
AUDIO (IN) terminals (pin jack) Input terminals for the analog audio signals.
Set signal source as audio ...
Instruction Manual - Page 9
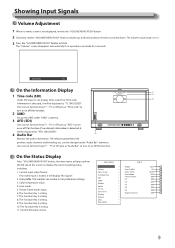
... video input is locked, it will be displayed as "Audio Bar" to volume down. The Function Key 1 setting. 7. The Function Key 5 setting. 11. User can be displayed as "Time code" to
TCğ00:15:13:07
(1)
CAMERA 1
(2)
(3)
2 UMD
-09
-20
Set up the UMD under "Audio Bar" submenu.
Scan mode. 5.
The Function Key...
Instruction Manual - Page 10
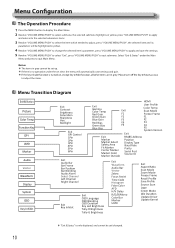
...;le Save Profile Source Scan Logo Green Mode
Update Driver Update Kernel
"Exit &Status" is no operation under the Main
Menu and press to quit Main Menu. Select "Exit & Status" under the set time, the menu will be highlighted in gray cannot be set up.
Notice: The items in yellow.
4 Revolve "VOLUME MENU...
Instruction Manual - Page 11
... Mode, Mute, Freeze Frame,
F4
Flip Mode ,CVBS, YPbPr ,VGA , Color Temp, Time Code, Zebra. F5 on the front panel to adjust the parameters of the display. Main Menu
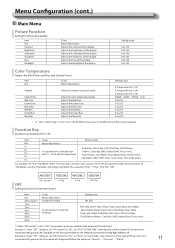
Picture Function
Setting for F1-F4
Item
To do
Setting value
Exit
Return Main Menu
F1
Audio Bar, False Color, AFD, H/V Delay, R/G/B/Mono,
F2...
Instruction Manual - Page 12
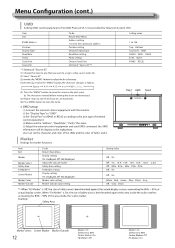
....35:1 a80%a85%a90%a93%a95% aOn
aOn
Marker Color Marker Outside
Marker color setting Marker Outside color setting
WhiteaRedaGreenaBlueaBlackaGray aGrayaBlack
of
actual display screen. UMD setup
(1) Connect the external control equipment with the monitor (2) Set "Display Type" to "UMD" (3) Set "Serial Port" to RS485 or RS232 according to store the name. When "Fit Marker...
Instruction Manual - Page 13

... the bar display transparent.
The current left and right channels to "Off", only the audio meter will display "UNLOCKED".
Audio Alarm : On
Audio Alarm*2
Display setting On: Displayed,
-09
-20 M U T E
-48
12 -04DB -06DB
Bar Frame : Off
12
Audio Alarm : Off
-09 -20 -48 12 -04DB -06DB
Left Channel Right Channel...
Instruction Manual - Page 14
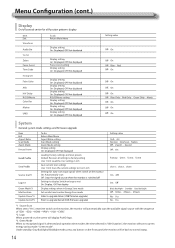
... for auto-scan input signals when switch on the monitor On: Automatically scan
Setting value 16:9a4:3 NormalaOverScanaNative
aZoom1aZoom2 aOn
FactoryaUser1aUser2aUser3
User1aUser2aUser3
Ona
Logo*2
Settings to display Switch on logo or not
Ona
Green Mode*3 Idle Duration Update Driver*4 Update Kernel*5
Display settings when in "Idle Duration", the monitor will be back to green energy saving...
Instruction Manual - Page 15
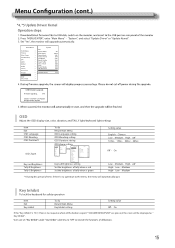
...file Save Profile Source Scan Logo Green Mode
Update Driver Update Kernel
XXXX XXX XXX XXX XXX XXX XXX XXX XXX
Yes XXX
USB firmware upgrade
Firmware Upgrating...
37%
Caution !
OSD
Adjust the OSD display size, color, duration, and TALLY light/keyboard light settings
Item Exit OSD Language OSD Blending OSD Duration*1
OSD Zoom...
Instruction Manual - Page 16
... system (TallyMan) The terminal is to the GND pin terminal, or disconnecting (opening it .
Display - - - Changes the scan mode Changes zoom mode Mute setting Freeze Frame setting Time code display Zebra display Audio Bar display False Color display AFD display H/V Delay display Marker display Color Bar display UMD display Audio Alarm display Color...
Instruction Manual - Page 17

... component and set correctly. Probable cause and corrective action press "POWER" button Firmly insert the AC power plug. Select the correct input using the INPUT SELECT buttons.
When a still image is built with the power on the power of the connected component and output video signals. Troubleshooting
Solutions to common problems related to...
Instruction Manual - Page 18
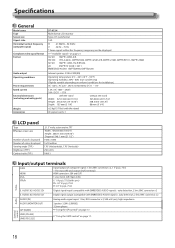
...Model name Type Screen size Aspect ratio Horizontal/vertical frequency (computer signal)
Compliant video signal format Format
Audio output Operating conditions
Power requirements Rated current External dimensions (excluding protruding parts)
Weight Accessories
DT-N21H... (non-condensing) (Slightly variable depending on ambient conditions for installation.) AC 120 V / AC 220 - 240 V, 50 Hz/60 Hz;
Instruction Manual - Page 21
... their respective companies.
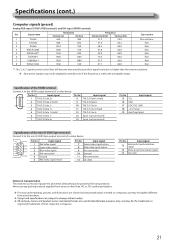
21 Input signal
13
Horizontal synchronization signal
14 Vertical synchronization signal
15 I2C clock
Notice on transportation This monitor is higher than JVC or JVC-authorized dealers.
Instruction Manual - Page 23
... Fax: +86-25-85805296 Email: [email protected] www.swit.cc MULTI FORMAT LCD MONITOR DT-N21H
This model is manufactured, warranted and supported by SWIT Electronics Co., Ltd. / SWIT Electronics USA, LLC, and distributed in North America by JVCKENWOOD USA Corporation To obtain service or for further information, please contact: SWIT Electronics USA, LLC.
JVC DT-N21H Reviews
We have not received any reviews for JVC yet.