
Instructions
Page 1
and Serial No. LVT1876-001A [J] which are located on the rear of cabinet. DVD VIDEO RECORDER DR-MV100B INSTRUCTIONS For Customer Use : Enter below the Model No. Model No. Retain this information for future reference. Serial No.
and Serial No. LVT1876-001A [J] which are located on the rear of cabinet. DVD VIDEO RECORDER DR-MV100B INSTRUCTIONS For Customer Use : Enter below the Model No. Model No. Retain this information for future reference. Serial No.

Instructions
Page 2
...other than those specified herein may be blocked by placing the product on the apparatus. This lightning flash with the manufacturer's instructions. Visible laser radiation when open the enclosure. DO NOT VIEW DIRECTLY WITH OPTICAL INSTRUMENTS. CAUTION RISK OF ELECTRIC SHOCK DO ... of uninsulated dangerous voltage within an equilateral triangle is provided or the manufacturer's instruction have been adhered to constitute a risk of important operating and maintenance (servicing) instructions in hazardous radiation exposure. To prevent direct exposure to laser beam, do not...
...other than those specified herein may be blocked by placing the product on the apparatus. This lightning flash with the manufacturer's instructions. Visible laser radiation when open the enclosure. DO NOT VIEW DIRECTLY WITH OPTICAL INSTRUMENTS. CAUTION RISK OF ELECTRIC SHOCK DO ... of uninsulated dangerous voltage within an equilateral triangle is provided or the manufacturer's instruction have been adhered to constitute a risk of important operating and maintenance (servicing) instructions in hazardous radiation exposure. To prevent direct exposure to laser beam, do not...

Instructions
Page 3
...they be placed upon . To disconnect power from physical or mechanical abuse, such as being twisted, kinked, pinched, closed in the instruction manual. Periodically examine the cord of your appliance, and if its appearance indicates damage or deterioration, unplug it, discontinue use radio frequency ...to be determined by one or more of these conditions could lose the authority to operate this owner's manual to comply with the instruction manual, may cause harmful interference unless the modifications are expressly approved in a door, or walked upon a dedicated circuit; This ...
...they be placed upon . To disconnect power from physical or mechanical abuse, such as being twisted, kinked, pinched, closed in the instruction manual. Periodically examine the cord of your appliance, and if its appearance indicates damage or deterioration, unplug it, discontinue use radio frequency ...to be determined by one or more of these conditions could lose the authority to operate this owner's manual to comply with the instruction manual, may cause harmful interference unless the modifications are expressly approved in a door, or walked upon a dedicated circuit; This ...

Instructions
Page 4
... the polarized or grounding-type plug. G-3 This product has been designed and manufactured to qualified service personnel. Read these instructions. - Heed all instructions. - All warnings on or pinched particularly at plugs, convenience receptacles, and the point where they exit from being walked...product and in any parts that produce heat. 9. Clean only with the apparatus. A polarized plug has two blades with the manufacturer's instructions. - Follow all warnings. - or near any ventilation openings. The openings should be placed in a built-in accordance with one ...
... the polarized or grounding-type plug. G-3 This product has been designed and manufactured to qualified service personnel. Read these instructions. - Heed all instructions. - All warnings on or pinched particularly at plugs, convenience receptacles, and the point where they exit from being walked...product and in any parts that produce heat. 9. Clean only with the apparatus. A polarized plug has two blades with the manufacturer's instructions. - Follow all warnings. - or near any ventilation openings. The openings should be placed in a built-in accordance with one ...

Instructions
Page 15
... LLC. Additional Information for this unit. - Try switching off the recorder and then turn off the HDMI/DVI device and this recorder. Check the operating instructions of the connected device to make sure of the device complies with HDMI-HDCP specifications. - Tip: When you use with DVD Players, Set-Top Boxes...
... LLC. Additional Information for this unit. - Try switching off the recorder and then turn off the HDMI/DVI device and this recorder. Check the operating instructions of the connected device to make sure of the device complies with HDMI-HDCP specifications. - Tip: When you use with DVD Players, Set-Top Boxes...

Instructions
Page 26
... in memory. The channel list menu will appear. 3. You can select a channel as shown below. Use the registration code to select a channel directly. Follow the instructions and download the video onto a disc for easy and quick channel searching. FAV. buttons Use CH +/- CH +/- button Press FAV +/- Press HOME and the Home...
... in memory. The channel list menu will appear. 3. You can select a channel as shown below. Use the registration code to select a channel directly. Follow the instructions and download the video onto a disc for easy and quick channel searching. FAV. buttons Use CH +/- CH +/- button Press FAV +/- Press HOME and the Home...

Instructions
Page 32
... If a menu screen is memorized. 28 VCD Use the number buttons to the menu screen. Menu settings and operating procedures may also set . 1. Follow the instructions on the screen. 2. To Recall or Clear a Marked Scene 1. The marker search menu appears on each menu screen. Or, Press CLEAR and use b / B to delete...
... If a menu screen is memorized. 28 VCD Use the number buttons to the menu screen. Menu settings and operating procedures may also set . 1. Follow the instructions on the screen. 2. To Recall or Clear a Marked Scene 1. The marker search menu appears on each menu screen. Or, Press CLEAR and use b / B to delete...

Instructions
Page 38
... or z REC. The REC indicator lights in the display window. Press z REC repeatedly to record. 4. VCR: Each subsequent press increases the recording time by 10 minutes (DVD) or 30 minutes (VCR). When you stop recording. Notes: • If you 'll hear as show below; - Use AUDIO ... by 30 minutes (maximum 540 minutes). Set a recording mode as shown left (Basic Recording from a TV Instant Timer Recording Follow the instructions below shows what you press PAUSE/STEP (X) during DVD recording, the recording will not automatically power off when the Instant Timer Recording ends....
... or z REC. The REC indicator lights in the display window. Press z REC repeatedly to record. 4. VCR: Each subsequent press increases the recording time by 10 minutes (DVD) or 30 minutes (VCR). When you stop recording. Notes: • If you 'll hear as show below; - Use AUDIO ... by 30 minutes (maximum 540 minutes). Set a recording mode as shown left (Basic Recording from a TV Instant Timer Recording Follow the instructions below shows what you press PAUSE/STEP (X) during DVD recording, the recording will not automatically power off when the Instant Timer Recording ends....

Instructions
Page 60
DVD/VCR OUT Connect your TV INPUT Video Audio (L) Audio (R) TV Go to " Initial Setup Wizard" (INSTRUCTIONS pg. 14) LVT1877-001A 0208SKMLGEEGL Connect with your TV After connections, Power On. -1- Please call the JVC Customer Service TOLL FREE CUSTOMER CARE HOTLINE: 1(800)252-5722 http://www.jvc....com Included Accessories RF cable "AAA" battery x 2 (For remote control) Remote control Video cable Audio cable Connection : Antenna or Wall jack (Cable TV) INSTRUCTIONS pg. 10 Antenna or cable DR-MV100B AC Outlet Connect the arial. DR-MV100B DVD VIDEO ...
DVD/VCR OUT Connect your TV INPUT Video Audio (L) Audio (R) TV Go to " Initial Setup Wizard" (INSTRUCTIONS pg. 14) LVT1877-001A 0208SKMLGEEGL Connect with your TV After connections, Power On. -1- Please call the JVC Customer Service TOLL FREE CUSTOMER CARE HOTLINE: 1(800)252-5722 http://www.jvc....com Included Accessories RF cable "AAA" battery x 2 (For remote control) Remote control Video cable Audio cable Connection : Antenna or Wall jack (Cable TV) INSTRUCTIONS pg. 10 Antenna or cable DR-MV100B AC Outlet Connect the arial. DR-MV100B DVD VIDEO ...

Instructions
Page 61
OUT) After connections, Power On. IN) Antenna or cable ANTENNA IN (RF. Audio - (L) Video (R) - When STEP is disconnectted: Select "Ch 3 or 4" of your recorder. -2- When STEP is connectted: Select Input "AV1" of your recorder. OUT) DVD/VCR OUT INPUT 1 INPUT Video Audio (L) Audio (R) TV ANTENNA IN (RF. Connection: With Cable Box Or DBS Receiver INSTRUCTIONS pg. 9 ANTENNA IN (RF. IN) DR-MV100B AC Outlet ANTENNA OUT (RF. OUTPUT (AV OUT) (R) - Audio - (L) Video Cable or Satellite Box ANTENNA OUT (RF. IN) Connect the arial.
OUT) After connections, Power On. IN) Antenna or cable ANTENNA IN (RF. Audio - (L) Video (R) - When STEP is disconnectted: Select "Ch 3 or 4" of your recorder. -2- When STEP is connectted: Select Input "AV1" of your recorder. OUT) DVD/VCR OUT INPUT 1 INPUT Video Audio (L) Audio (R) TV ANTENNA IN (RF. Connection: With Cable Box Or DBS Receiver INSTRUCTIONS pg. 9 ANTENNA IN (RF. IN) DR-MV100B AC Outlet ANTENNA OUT (RF. OUTPUT (AV OUT) (R) - Audio - (L) Video Cable or Satellite Box ANTENNA OUT (RF. IN) Connect the arial.

Instructions
Page 62
Press "ENTER" Finish 7 -3- Initial Setup Wizard STANDBY/ON TV Select Language 2 Move next step 3 Select "Tuning Band" 4 Press "ENTER" 5 INSTRUCTIONS pg. 14 Press "STANDBY/ON" 1 Set the "Date, Year and Time" 6 Moves the cursor to the previous or next column. Changes the setting at the current cursor position.
Press "ENTER" Finish 7 -3- Initial Setup Wizard STANDBY/ON TV Select Language 2 Move next step 3 Select "Tuning Band" 4 Press "ENTER" 5 INSTRUCTIONS pg. 14 Press "STANDBY/ON" 1 Set the "Date, Year and Time" 6 Moves the cursor to the previous or next column. Changes the setting at the current cursor position.

Instructions
Page 63
... Discs: DVD-Video, DVD-R, DVD+R, DVD-RW, DVD+RW, DVD-RAM, CD-R, CD-RW, Video CD, Audio CD BASIC RECORDING (One-Touch Recording) INSTRUCTIONS pg. 34 Select "DVD or VCR" or 1 Start Recording 4 Select Input (AV1, AV2, DV IN or Ch) or Channel 2 3 Stop Recording 5 Select Mode 3 DVD: XP, SP, LP or... EP VCR: SP or SLP Note: To playback the recorded disc with other DVD players, it is necessary to finalize the disc. (INSTRUCTIONS pg. 21) Recordable Discs: DVD-R, DVD+R, DVD-RW, DVD+RW, DVD-RAM -4-
... Discs: DVD-Video, DVD-R, DVD+R, DVD-RW, DVD+RW, DVD-RAM, CD-R, CD-RW, Video CD, Audio CD BASIC RECORDING (One-Touch Recording) INSTRUCTIONS pg. 34 Select "DVD or VCR" or 1 Start Recording 4 Select Input (AV1, AV2, DV IN or Ch) or Channel 2 3 Stop Recording 5 Select Mode 3 DVD: XP, SP, LP or... EP VCR: SP or SLP Note: To playback the recorded disc with other DVD players, it is necessary to finalize the disc. (INSTRUCTIONS pg. 21) Recordable Discs: DVD-R, DVD+R, DVD-RW, DVD+RW, DVD-RAM -4-

Instructions
Page 64
TIMER RECORDING INSTRUCTIONS (Munual Timer Programming) pg. 35 Select "HOME" 1 Select "Timer 2 Record" STANDBY/ON Press "ENTER" TV 3 Select "NEW" and Press "ENTER" 4 5 Enter the necessary information for you timer recording(s). Press "ENTER" to check on the Timer Record List 6 Press "RETURN" Finish 7 Note: To playback the recorded disc with other DVD players, it is necessary to finalize the disc. (INSTRUCTIONS pg. 21) -5- Changes the setting at the current cursor position.
TIMER RECORDING INSTRUCTIONS (Munual Timer Programming) pg. 35 Select "HOME" 1 Select "Timer 2 Record" STANDBY/ON Press "ENTER" TV 3 Select "NEW" and Press "ENTER" 4 5 Enter the necessary information for you timer recording(s). Press "ENTER" to check on the Timer Record List 6 Press "RETURN" Finish 7 Note: To playback the recorded disc with other DVD players, it is necessary to finalize the disc. (INSTRUCTIONS pg. 21) -5- Changes the setting at the current cursor position.

Instructions
Page 65
...playback the recorded disc with other DVD players, it is necessary to set the VCR mode. 1 Insert Blank Disc and Cassette 4 Select the desired Record Mode. Find the place 2 on the VHS tape from VCR to DVD INSTRUCTIONS pg. 37 VHS DVD You can copy the contents of a VHS tape to ...a DVD using the OUTPUT STATUS button before dubbing. This allows you want to start dubbing. Press VCR button to finalize the disc. (INSTRUCTIONS pg. 21) -6- Access the 3 Dubbing menu screen. 6 Start Dubbing. 7 Stop Dubbing. Dubbing from which you to archive your old ...
...playback the recorded disc with other DVD players, it is necessary to set the VCR mode. 1 Insert Blank Disc and Cassette 4 Select the desired Record Mode. Find the place 2 on the VHS tape from VCR to DVD INSTRUCTIONS pg. 37 VHS DVD You can copy the contents of a VHS tape to ...a DVD using the OUTPUT STATUS button before dubbing. This allows you want to start dubbing. Press VCR button to finalize the disc. (INSTRUCTIONS pg. 21) -6- Access the 3 Dubbing menu screen. 6 Start Dubbing. 7 Stop Dubbing. Dubbing from which you to archive your old ...

Instructions
Page 67
Serial No. which are located on the rear of cabinet. Model No. LVT1878-001A [J] Retain this information for future reference. DVD VIDEO RECORDER DR-MV79B INSTRUCTIONS For Customer Use : Enter below the Model No. and Serial No.
Serial No. which are located on the rear of cabinet. Model No. LVT1878-001A [J] Retain this information for future reference. DVD VIDEO RECORDER DR-MV79B INSTRUCTIONS For Customer Use : Enter below the Model No. and Serial No.

Instructions
Page 68
... uninsulated dangerous voltage within an equilateral triangle is provided or the manufacturer's instruction have been adhered to water (dripping or splashing) and no objects filled with the manufacturer's instructions. Performing controls, adjustments, or carrying out procedures other than those specified ...herein may be of sufficient magnitude to constitute a risk of important operating and maintenance (servicing) instructions in installation such as vases, should be placed on a bed, sofa, rug or other similar surface.This product should not ...
... uninsulated dangerous voltage within an equilateral triangle is provided or the manufacturer's instruction have been adhered to water (dripping or splashing) and no objects filled with the manufacturer's instructions. Performing controls, adjustments, or carrying out procedures other than those specified ...herein may be of sufficient magnitude to constitute a risk of important operating and maintenance (servicing) instructions in installation such as vases, should be placed on a bed, sofa, rug or other similar surface.This product should not ...

Instructions
Page 69
...not overload wall outlets. To disconnect power from physical or mechanical abuse, such as being twisted, kinked, pinched, closed in the instruction manual. REFERENCE G-2 These limits are designed to radio communications. This product generates, uses, and can be placed upon . Check... the product, ensure that interference will not occur in a residential installation. The user could result in accordance with the instruction manual, may cause harmful interference to provide reasonable protection against harmful interference when the product is no additional outlets or branch...
...not overload wall outlets. To disconnect power from physical or mechanical abuse, such as being twisted, kinked, pinched, closed in the instruction manual. REFERENCE G-2 These limits are designed to radio communications. This product generates, uses, and can be placed upon . Check... the product, ensure that interference will not occur in a residential installation. The user could result in accordance with the instruction manual, may cause harmful interference to provide reasonable protection against harmful interference when the product is no additional outlets or branch...

Instructions
Page 70
... procedures for replacement of the product and to protect it from over . 13. RETAIN THIS BOOKLET FOR FUTURE REFERENCE. Read these instructions. - Keep these instructions. - The safety, operating and use , and servicing. Heed all warnings. - Do not defeat the safety purpose of time.... Slots and openings in this apparatus during lightning storms or when unused for your outlet, consult an electrician for installation, use instructions should be adhered to assure personal safety. The safeguards incorporated in the cabinet are provided for long periods of the polarized or...
... procedures for replacement of the product and to protect it from over . 13. RETAIN THIS BOOKLET FOR FUTURE REFERENCE. Read these instructions. - Keep these instructions. - The safety, operating and use , and servicing. Heed all warnings. - Do not defeat the safety purpose of time.... Slots and openings in this apparatus during lightning storms or when unused for your outlet, consult an electrician for installation, use instructions should be adhered to assure personal safety. The safeguards incorporated in the cabinet are provided for long periods of the polarized or...

Instructions
Page 80
... AV devices such as a home theater receiver with HDMI-HDCP specifications. - The connected device's video input is not equipped with this recorder. Check the operating instructions of the connected device to "pass-through" so that the HDMI input of this unit will work with DTS decoder, set the [DTS] options to...
... AV devices such as a home theater receiver with HDMI-HDCP specifications. - The connected device's video input is not equipped with this recorder. Check the operating instructions of the connected device to "pass-through" so that the HDMI input of this unit will work with DTS decoder, set the [DTS] options to...
Instructions
Page 87
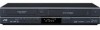
... recording. • DVD-RW (VR mode)/DVD-RAM: Prevents editing, erasing, and regular recording. For more depending on the type of existing recordings. Follow the instructions and download the video onto a disc for Playback Control and refers to purchase or rent the videos from DivX® VOD can be up to...
... recording. • DVD-RW (VR mode)/DVD-RAM: Prevents editing, erasing, and regular recording. For more depending on the type of existing recordings. Follow the instructions and download the video onto a disc for Playback Control and refers to purchase or rent the videos from DivX® VOD can be up to...