
User Guide
Page 12
... the Battery 22 Connecting a DR-HD100 to a DV/HD Camcorder 23 Record and Playback with the DR-HD100 24 Power On the DR-HD100 24 Select HDD Recorder Mode 25 Select a DV/HD File Format 26 Set Time and Date 27 Record With the DR-HD100 29 Manual Recording 31 Creating a New File without Dropping Frames 31 JVC GY-HD 32 Series Record and Split Slave Control Modes...
... the Battery 22 Connecting a DR-HD100 to a DV/HD Camcorder 23 Record and Playback with the DR-HD100 24 Power On the DR-HD100 24 Select HDD Recorder Mode 25 Select a DV/HD File Format 26 Set Time and Date 27 Record With the DR-HD100 29 Manual Recording 31 Creating a New File without Dropping Frames 31 JVC GY-HD 32 Series Record and Split Slave Control Modes...
User Guide
Page 13
...Fields 54 DR-HD100 System Information Screens 56 Record Screens 57 Normal Record 58 Retro Cache Record Mode 58 Retro Disk Record Mode 59 Loop Record 60 Saving Loop Record Clips 60 Snap Record 60 Time Lapse Record 61 HDD Mode Screen 62 Setting Up Master and Slave DR-HD100 64 Format Screen 65 DV Formats 65 HD Format Screen...DROP, NON-DROP 74 HDV TC TYPE 75 LCD CONTRAST 76 Functions Screen 77 Functions List 78 LOCK/UNLK 80 Assigning Clips to Reels 81 Blank 81 Utilities Screen 82 Organize Reel 82 Organize OMF 83 Organize MXF 83 ProHD DR-HD100 Portable DTE Recorder xi
...Fields 54 DR-HD100 System Information Screens 56 Record Screens 57 Normal Record 58 Retro Cache Record Mode 58 Retro Disk Record Mode 59 Loop Record 60 Saving Loop Record Clips 60 Snap Record 60 Time Lapse Record 61 HDD Mode Screen 62 Setting Up Master and Slave DR-HD100 64 Format Screen 65 DV Formats 65 HD Format Screen...DROP, NON-DROP 74 HDV TC TYPE 75 LCD CONTRAST 76 Functions Screen 77 Functions List 78 LOCK/UNLK 80 Assigning Clips to Reels 81 Blank 81 Utilities Screen 82 Organize Reel 82 Organize OMF 83 Organize MXF 83 ProHD DR-HD100 Portable DTE Recorder xi
User Guide
Page 23
... the Battery Pack 21 Connecting a DR-HD100 to a DV/HD Camcorder 23 Record and Playback with the DR-HD100 24 Power On the DR-HD100 24 Select HDD Recorder Mode 25 Select a DV/HD File Format 26 Set Time and Date 27 Record With the DR-HD100 29 Manual Recording 31 JVC GY-HD 32 Syncro Slave 34 External 35 Playback on the DR-HD100 36 ProHD DR-HD100 Portable DTE...
... the Battery Pack 21 Connecting a DR-HD100 to a DV/HD Camcorder 23 Record and Playback with the DR-HD100 24 Power On the DR-HD100 24 Select HDD Recorder Mode 25 Select a DV/HD File Format 26 Set Time and Date 27 Record With the DR-HD100 29 Manual Recording 31 JVC GY-HD 32 Syncro Slave 34 External 35 Playback on the DR-HD100 36 ProHD DR-HD100 Portable DTE...

User Guide
Page 34
DR-HD 18 ProHD DR-HD100 Portable DTE Recorder Quickstart • Setup Contains the controls for setting and reviewing the DR-HD100 configuration: • Set Date (MM/DD/YY) • Set Time (XX:XX:XX) • View Firmware Version • LCDLight ON • LCDLight OFF • ... or 2.0 upgrade only • TC SET • UB SET • TC DROP NTSC only • TC NON-DROP NTSC only • HDV TC TYPE HD only in 2.0 upgrade • LCD Contrast • HDD Mode Contains the following hard drive selections: • DV Recorder • HD Recorder • DD Drive • Use Ext.
DR-HD 18 ProHD DR-HD100 Portable DTE Recorder Quickstart • Setup Contains the controls for setting and reviewing the DR-HD100 configuration: • Set Date (MM/DD/YY) • Set Time (XX:XX:XX) • View Firmware Version • LCDLight ON • LCDLight OFF • ... or 2.0 upgrade only • TC SET • UB SET • TC DROP NTSC only • TC NON-DROP NTSC only • HDV TC TYPE HD only in 2.0 upgrade • LCD Contrast • HDD Mode Contains the following hard drive selections: • DV Recorder • HD Recorder • DD Drive • Use Ext.

User Guide
Page 35
When selecting DV Recorder the following recording functions: • Normal • Retro Disk • Retro Cache • Loop Record • SNAP DV mode only • Time Lapse DV mode only ProHD DR-HD100 Portable DTE Recorder 19 Quickstart • DV or HD Formats Following HDD mode is : • M2T • Record Contains the following formats are shown: • Raw DV •...
When selecting DV Recorder the following recording functions: • Normal • Retro Disk • Retro Cache • Loop Record • SNAP DV mode only • Time Lapse DV mode only ProHD DR-HD100 Portable DTE Recorder 19 Quickstart • DV or HD Formats Following HDD mode is : • M2T • Record Contains the following formats are shown: • Raw DV •...
User Guide
Page 40
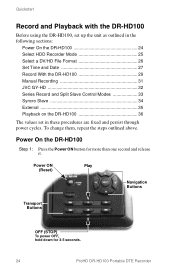
.... 24 ProHD DR-HD100 Portable DTE Recorder Quickstart Record and Playback with the DR-HD100 Before using the DR-HD100, set up the unit as outlined in the following sections: Power On the DR-HD100 24 Select HDD Recorder Mode 25 Select a DV/HD File Format 26 Set Time and Date 27 Record With the DR-HD100 29 Manual Recording 31 JVC GY-HD 32 Series Record and Split Slave...
.... 24 ProHD DR-HD100 Portable DTE Recorder Quickstart Record and Playback with the DR-HD100 Before using the DR-HD100, set up the unit as outlined in the following sections: Power On the DR-HD100 24 Select HDD Recorder Mode 25 Select a DV/HD File Format 26 Set Time and Date 27 Record With the DR-HD100 29 Manual Recording 31 JVC GY-HD 32 Series Record and Split Slave...

User Guide
Page 41
... when the DR-HD100 initializes. Press the Select button on page 53. DR-HD100 PORTABLE DTE RECORDER Step 3: The Home screen appears when the DR-HD100 first powers up. Press the Left button to return to highlight the recorder mode, either DV or HD. STOP 1COUNTER 00:00:14:02 DISK 1 168 min REEL SYNC DISP LOCK Select HDD Recorder Mode Step...
... when the DR-HD100 initializes. Press the Select button on page 53. DR-HD100 PORTABLE DTE RECORDER Step 3: The Home screen appears when the DR-HD100 first powers up. Press the Left button to return to highlight the recorder mode, either DV or HD. STOP 1COUNTER 00:00:14:02 DISK 1 168 min REEL SYNC DISP LOCK Select HDD Recorder Mode Step...

User Guide
Page 54
.... Consult the computer's documentation for more information. 38 ProHD DR-HD100 Portable DTE Recorder The DR-HD100 is required before mounting the DR-HD100 to a computer. • On the DR-HD100 go to the HDD screen. • Select DD Drive and Right arrow to Connect...DR-HD100 to a computer: • Connect the DR-HD100's Computer I /O 1394 port to the computer system using a standard 6-pin to 6-pin FireWire cable. This step is compatible with an active OHCI compliant IEEE-1394 FireWire port and the necessary FireWire disk drive drivers. Step 3: Step 4: Refer to the section, "HDD...
.... Consult the computer's documentation for more information. 38 ProHD DR-HD100 Portable DTE Recorder The DR-HD100 is required before mounting the DR-HD100 to a computer. • On the DR-HD100 go to the HDD screen. • Select DD Drive and Right arrow to Connect...DR-HD100 to a computer: • Connect the DR-HD100's Computer I /O 1394 port to the computer system using a standard 6-pin to 6-pin FireWire cable. This step is compatible with an active OHCI compliant IEEE-1394 FireWire port and the necessary FireWire disk drive drivers. Step 3: Step 4: Refer to the section, "HDD...

User Guide
Page 67
..., press the Left navigation button on the following LCD displays: General Screen Information 52 Record Screens 57 HDD Mode Screen 62 Format Screen 65 HD Format Screen 66 Setup Screens 67 Functions Screen 77 Utilities Screen 82 Control Screen 97 DR-HD100 screens are organized in a flat hierarchy. Every screen has a unique name, and it...
..., press the Left navigation button on the following LCD displays: General Screen Information 52 Record Screens 57 HDD Mode Screen 62 Format Screen 65 HD Format Screen 66 Setup Screens 67 Functions Screen 77 Utilities Screen 82 Control Screen 97 DR-HD100 screens are organized in a flat hierarchy. Every screen has a unique name, and it...
User Guide
Page 75
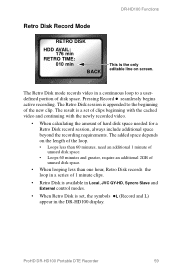
... in a series of 1 minute clips. • Retro Disk is available in Local, JVC GY-HD, Syncro Slave and External control modes. • When Retro Disk is appended to a userdefined portion of hard disk space needed for a Retro Disk record session, always include additional space beyond the recording requirements. DR-HD100 Functions Retro Disk Record Mode RETRO DISK HDD AVAIL: 176 min RETRO TIME: 010 min...
... in a series of 1 minute clips. • Retro Disk is available in Local, JVC GY-HD, Syncro Slave and External control modes. • When Retro Disk is appended to a userdefined portion of hard disk space needed for a Retro Disk record session, always include additional space beyond the recording requirements. DR-HD100 Functions Retro Disk Record Mode RETRO DISK HDD AVAIL: 176 min RETRO TIME: 010 min...

User Guide
Page 78
... RECORDER mode to increase recording space. 62 ProHD DR-HD100 Portable DTE Recorder Connect the camera to the DR-HD100 DV I /O port using a FireWire cable. • HD RECORDER This sets the DR-HD100 as a volume visible to a computer. The DR-HD100 functions as an HD recorder. In addition, this option when connecting the DR-HD100 to the computer. DR-HD100 Functions HDD Mode Screen HDD MODE -DV RECORDER HD RECORDER DD DRIVE > USE EXT DR-HD...
... RECORDER mode to increase recording space. 62 ProHD DR-HD100 Portable DTE Recorder Connect the camera to the DR-HD100 DV I /O port using a FireWire cable. • HD RECORDER This sets the DR-HD100 as a volume visible to a computer. The DR-HD100 functions as an HD recorder. In addition, this option when connecting the DR-HD100 to the computer. DR-HD100 Functions HDD Mode Screen HDD MODE -DV RECORDER HD RECORDER DD DRIVE > USE EXT DR-HD...
User Guide
Page 80
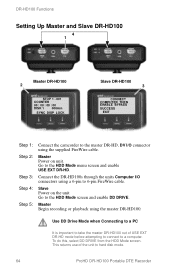
... the master DR-HD100 out of the unit to hard disk mode. 64 ProHD DR-HD100 Portable DTE Recorder To do this, select DD DRIVE from the HDD Mode screen. Master Power on the unit Go to the HDD Mode screen and enable DD DRIVE. Master Begin recording or playback using the master DR-HD100. This returns use of USE EXT DR-HD mode...
... the master DR-HD100 out of the unit to hard disk mode. 64 ProHD DR-HD100 Portable DTE Recorder To do this, select DD DRIVE from the HDD Mode screen. Master Power on the unit Go to the HDD Mode screen and enable DD DRIVE. Master Begin recording or playback using the master DR-HD100. This returns use of USE EXT DR-HD mode...
User Guide
Page 95
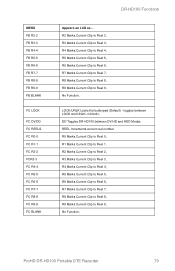
toggles between LOCK and UNLK DD Toggles DR-HD100 between DV/HD and HDD Modes REEL Increments current reel number R0 Marks Current Clip to Reel 0, R1 Marks Current Clip to Reel 1, R2 Marks Current Clip to Reel 2, R3 ... FC R0-0 FC R1-1 FC R2-2 FCR3-3 FC R4-4 FC R5-5 FC R6-6 FC R7-7 FC R8-8 FC R9-9 FC BLANK DR-HD100 Functions Appears on LCD as... ProHD DR-HD100 Portable DTE Recorder 79 R2 Marks Current Clip to Reel 2, R3 Marks Current Clip to Reel 3, R4 Marks Current Clip to Reel 4, R5 Marks...
toggles between LOCK and UNLK DD Toggles DR-HD100 between DV/HD and HDD Modes REEL Increments current reel number R0 Marks Current Clip to Reel 0, R1 Marks Current Clip to Reel 1, R2 Marks Current Clip to Reel 2, R3 ... FC R0-0 FC R1-1 FC R2-2 FCR3-3 FC R4-4 FC R5-5 FC R6-6 FC R7-7 FC R8-8 FC R9-9 FC BLANK DR-HD100 Functions Appears on LCD as... ProHD DR-HD100 Portable DTE Recorder 79 R2 Marks Current Clip to Reel 2, R3 Marks Current Clip to Reel 3, R4 Marks Current Clip to Reel 4, R5 Marks...
User Guide
Page 105
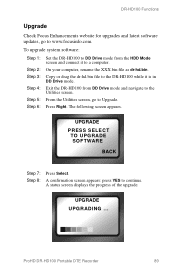
...screen appears: press YES to Upgrade. Exit the DR-HD100 from the HDD Mode screen and connect it is in DD Drive mode. On your computer, rename the XXX.bin file as dr-hd.bin. Press Right. UPGRADE UPGRADING ... Copy or drag the dr-hd.bin file to the Utilities screen. A status ...To upgrade system software: Step 1: Step 2: Step 3: Step 4: Step 5: Step 6: Set the DR-HD100 to DD Drive mode from DD Drive mode and navigate to the DR-HD100 while it to www.focusinfo.com. UPGRADE PRESS SELECT TO UPGRADE SOFTWARE BACK Step 7: Press Select. ProHD DR-HD100 Portable DTE Recorder 89
...screen appears: press YES to Upgrade. Exit the DR-HD100 from the HDD Mode screen and connect it is in DD Drive mode. On your computer, rename the XXX.bin file as dr-hd.bin. Press Right. UPGRADE UPGRADING ... Copy or drag the dr-hd.bin file to the Utilities screen. A status ...To upgrade system software: Step 1: Step 2: Step 3: Step 4: Step 5: Step 6: Set the DR-HD100 to DD Drive mode from DD Drive mode and navigate to the DR-HD100 while it to www.focusinfo.com. UPGRADE PRESS SELECT TO UPGRADE SOFTWARE BACK Step 7: Press Select. ProHD DR-HD100 Portable DTE Recorder 89