Instruction Manual
Page 4
... break of the required breaks differ for proper display. It is recommended to your dealer, or the nearest authorized JVC service center. - If your child watches while wearing 3D glasses, it should turn off the power of heart disease, or weak health should not use , please be... with the playback of metal fixtures used in impaired eyesight. - Note that produce heat. - Be sure to any responsibility, even during use 3D glasses. - Use only the accessory cord designed for installation. Moreover, in case you should be careful in a room where cigarettes are hard to...
... break of the required breaks differ for proper display. It is recommended to your dealer, or the nearest authorized JVC service center. - If your child watches while wearing 3D glasses, it should turn off the power of heart disease, or weak health should not use , please be... with the playback of metal fixtures used in impaired eyesight. - Note that produce heat. - Be sure to any responsibility, even during use 3D glasses. - Use only the accessory cord designed for installation. Moreover, in case you should be careful in a room where cigarettes are hard to...
Instruction Manual
Page 11
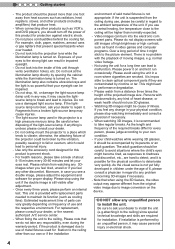
... Remote Control 1 piece AAA size Batteries (for details. ● Replacement Lamp: PK-L2210U ● Replacement Filter: PC010661199 ● Replacement lamp attachment: PC010685599 ● 3D-Glasses: PK-AG1 ● 3D Synchro Emitter: PK-EM1 11 Optional Accessories Please check with your authorized dealer for operation confirm 2 pieces Power Cord For the US market...
... Remote Control 1 piece AAA size Batteries (for details. ● Replacement Lamp: PK-L2210U ● Replacement Filter: PC010661199 ● Replacement lamp attachment: PC010685599 ● 3D-Glasses: PK-AG1 ● 3D Synchro Emitter: PK-EM1 11 Optional Accessories Please check with your authorized dealer for operation confirm 2 pieces Power Cord For the US market...

Instruction Manual
Page 16
... responding to the M3 lock hole. Screw hole depth 3mm. (Reference page: 24) ⑥ 3D SYNCHRO terminal 3D synchro emitter: it is fitted to the PKEM1 (sold separately) when enjoying 3D video contents. (Reference page: 26) ② HDMI 2 Terminal You can connect a device equipped... Getting started Controls and features (continued) Main body - It is also used to control this unit. If one can cause damage to your authorized JVC service center. (Reference page: 28) 16 Therefore, please consult your equipment if the connection is done incorrectly. (Tip = DC +12 V, Sleeve...
... responding to the M3 lock hole. Screw hole depth 3mm. (Reference page: 24) ⑥ 3D SYNCHRO terminal 3D synchro emitter: it is fitted to the PKEM1 (sold separately) when enjoying 3D video contents. (Reference page: 26) ② HDMI 2 Terminal You can connect a device equipped... Getting started Controls and features (continued) Main body - It is also used to control this unit. If one can cause damage to your authorized JVC service center. (Reference page: 28) 16 Therefore, please consult your equipment if the connection is done incorrectly. (Tip = DC +12 V, Sleeve...
Instruction Manual
Page 17
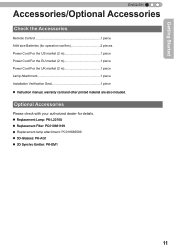
... buttons on the remote control for 7 second To select or confirm To display/close the menu (Reference page: 41) MENU BACK PICTURE MODE NATURAL DYNAMIC 3D USER1 USER2 USER3 To return to operate, it means that the batteries are not the same for 5 minutes.
... buttons on the remote control for 7 second To select or confirm To display/close the menu (Reference page: 41) MENU BACK PICTURE MODE NATURAL DYNAMIC 3D USER1 USER2 USER3 To return to operate, it means that the batteries are not the same for 5 minutes.

Instruction Manual
Page 23
... terminal (Reference page: 25) 232C terminal STANDBY/ON (Reference page: 27) 1 HDMI 2 RS-232-C CR/PR CB/PB Y INPUT OK 3D SYNCHRO PC TRIGGER REMOTE CONTROL MENU BACK Connection by 3D SYNCHRO terminal (Reference page: 26) Connection by REMOTE terminal (Reference page: 28) To connect via Trigger terminal (Reference page: 27) To...
... terminal (Reference page: 25) 232C terminal STANDBY/ON (Reference page: 27) 1 HDMI 2 RS-232-C CR/PR CB/PB Y INPUT OK 3D SYNCHRO PC TRIGGER REMOTE CONTROL MENU BACK Connection by 3D SYNCHRO terminal (Reference page: 26) Connection by REMOTE terminal (Reference page: 28) To connect via Trigger terminal (Reference page: 27) To...

Instruction Manual
Page 24
...(Continued) ■ Connecting via HDMI Cable This unit Notebook PC 1 HDMI 2 RS-232-C CR/PR CB/PB Y STANDBY/ON INPUT OK 3D SYNCHRO PC TRIGGER REMOTE CONTROL MENU BACK HDMI 1 input terminal HDMI 2 input terminal BD/DVD recorder HDMI cable (sold separately) HDMI output terminal &#...9632; Connecting via HDMI-DVI Conversion Cable This unit Desktop computer 1 HDMI 2 RS-232-C CR/PR CB/PB Y STANDBY/ON INPUT OK 3D SYNCHRO PC TRIGGER REMOTE CONTROL MENU BACK HDMI 1 input terminal HDMI 2 input terminal HDMI-DVI conversion cable (sold separately) DVI output terminal &#...
...(Continued) ■ Connecting via HDMI Cable This unit Notebook PC 1 HDMI 2 RS-232-C CR/PR CB/PB Y STANDBY/ON INPUT OK 3D SYNCHRO PC TRIGGER REMOTE CONTROL MENU BACK HDMI 1 input terminal HDMI 2 input terminal BD/DVD recorder HDMI cable (sold separately) HDMI output terminal &#...9632; Connecting via HDMI-DVI Conversion Cable This unit Desktop computer 1 HDMI 2 RS-232-C CR/PR CB/PB Y STANDBY/ON INPUT OK 3D SYNCHRO PC TRIGGER REMOTE CONTROL MENU BACK HDMI 1 input terminal HDMI 2 input terminal HDMI-DVI conversion cable (sold separately) DVI output terminal &#...

Instruction Manual
Page 25
... ■ Connecting via Component Video Cable This unit STANDBY/ON INPUT OK C 1 HDMI 2 RS-232-C CR/PR CB/PB Y MENU BACK 3D SYNCHRO PC TRIGGER REMOTE CONTROL To component video input terminals Component video cable (sold separately) Device equipped with RGB output RGB video output terminals R(Red...(Continued) ■ Connecting via RGB Video Cable This unit 1 HDMI 2 RS-232-C CR/PR CB/PB Y STANDBY/ON INPUT OK 3D SYNCHRO PC TRIGGER REMOTE CONTROL To RGB video MENU BACK input terminals RGB video cable (sold separately) BD/DVD player Component video output terminals CR...
... ■ Connecting via Component Video Cable This unit STANDBY/ON INPUT OK C 1 HDMI 2 RS-232-C CR/PR CB/PB Y MENU BACK 3D SYNCHRO PC TRIGGER REMOTE CONTROL To component video input terminals Component video cable (sold separately) Device equipped with RGB output RGB video output terminals R(Red...(Continued) ■ Connecting via RGB Video Cable This unit 1 HDMI 2 RS-232-C CR/PR CB/PB Y STANDBY/ON INPUT OK 3D SYNCHRO PC TRIGGER REMOTE CONTROL To RGB video MENU BACK input terminals RGB video cable (sold separately) BD/DVD player Component video output terminals CR...
Instruction Manual
Page 26
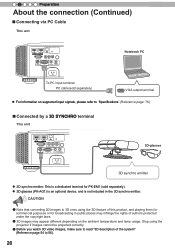
... ambient temperature and lamp usage. 2 Preparation About the connection (Continued) ■ Connecting via PC Cable This unit 1 HDMI 2 RS-232-C CR/PR CB/PB Y 3D SYNCHRO PC TRIGGER REMOTE CONTROL STANDBY/ON INPUT OK MENU BACK Notebook PC To PC input terminal PC cable(sold separately). ●...; 3D glasses (PK-AG1) is an optional device, and is not included in public places may appear different depending on supported input signals, please refer ...
... ambient temperature and lamp usage. 2 Preparation About the connection (Continued) ■ Connecting via PC Cable This unit 1 HDMI 2 RS-232-C CR/PR CB/PB Y 3D SYNCHRO PC TRIGGER REMOTE CONTROL STANDBY/ON INPUT OK MENU BACK Notebook PC To PC input terminal PC cable(sold separately). ●...; 3D glasses (PK-AG1) is an optional device, and is not included in public places may appear different depending on supported input signals, please refer ...

Instruction Manual
Page 27
...connection (Continued) ■ Connecting via Trigger Cable This unit STANDBY/ON 1 HDMI 2 RS-232-C CR/PR CB/PB Y INPUT OK 3D SYNCHRO PC To Trigger output terminal TRIGGER REMOTE CONTROL MENU BACK Screen CAUTION Trigger cable (sold separately) RS-232C terminal 27 Otherwise, this ..." of menu [5] "Function" (Reference page: 51). ■ Connected by RS-232C connection cable This unit 1 HDMI 2 CR/PR CB/PB Y 3D SYNCHRO PC TRIGGER REMOTE CONTROL STANDBY/ON INPUT OK MENU BACK RS-232C connection cable (sold separately) Trigger input terminal ( Φ 3.5) ● Do not...
...connection (Continued) ■ Connecting via Trigger Cable This unit STANDBY/ON 1 HDMI 2 RS-232-C CR/PR CB/PB Y INPUT OK 3D SYNCHRO PC To Trigger output terminal TRIGGER REMOTE CONTROL MENU BACK Screen CAUTION Trigger cable (sold separately) RS-232C terminal 27 Otherwise, this ..." of menu [5] "Function" (Reference page: 51). ■ Connected by RS-232C connection cable This unit 1 HDMI 2 CR/PR CB/PB Y 3D SYNCHRO PC TRIGGER REMOTE CONTROL STANDBY/ON INPUT OK MENU BACK RS-232C connection cable (sold separately) Trigger input terminal ( Φ 3.5) ● Do not...

Instruction Manual
Page 28
... About the connection (Continued) ■ Connected by a REMOTE terminal This unit 1 HDMI 2 RS-232-C CR/PR CB/PB Y 3D SYNCHRO PC TRIGGER REMOTE CONTROL STANDBY/ON INPUT OK MENU BACK connection cable(sold separately) External infrared sensor (sold separately) ● For an... for questions concerning the network connection. ■ Connected by LAN terminal This unit HUB 1 HDMI 2 RS-232-C CR/PR CB/PB Y 3D SYNCHRO PC TRIGGER REMOTE CONTROL connection cable (sold separately) STANDBY/ON INPUT OK MENU BACK Network Server ● The network is not used to ...
... About the connection (Continued) ■ Connected by a REMOTE terminal This unit 1 HDMI 2 RS-232-C CR/PR CB/PB Y 3D SYNCHRO PC TRIGGER REMOTE CONTROL STANDBY/ON INPUT OK MENU BACK connection cable(sold separately) External infrared sensor (sold separately) ● For an... for questions concerning the network connection. ■ Connected by LAN terminal This unit HUB 1 HDMI 2 RS-232-C CR/PR CB/PB Y 3D SYNCHRO PC TRIGGER REMOTE CONTROL connection cable (sold separately) STANDBY/ON INPUT OK MENU BACK Network Server ● The network is not used to ...

Instruction Manual
Page 29
... the amount of the power cord (provided) Once you have connected the equipment, connect the projector power cord. 1 HDMI 2 RS-232-C CR/PR CB/PB Y 3D SYNCHRO PC TRIGGER REMOTE CONTROL STANDBY/ON INPUT OK MENU BACK 1 1 Connect the power cord supplied with the provided power cord. ● Do not use...
... the amount of the power cord (provided) Once you have connected the equipment, connect the projector power cord. 1 HDMI 2 RS-232-C CR/PR CB/PB Y 3D SYNCHRO PC TRIGGER REMOTE CONTROL STANDBY/ON INPUT OK MENU BACK 1 1 Connect the power cord supplied with the provided power cord. ● Do not use...

Instruction Manual
Page 30
.... 3 Operation Basic Operation 6 1 STAND BY ON COMPONENT HDMI 1 HDMI 2 COMP. 2 ASPECT ANAMO PC LENS. CONTROL C.M.D AUTO ALIGNMENT HIDE LIGHT MENU BACK PICTURE MODE NATURAL DYNAMIC 3D USER1 USER2 USER3 USER4 USER5 USER6 GAMMA COLOR TEMP LENS. AP PIC.
.... 3 Operation Basic Operation 6 1 STAND BY ON COMPONENT HDMI 1 HDMI 2 COMP. 2 ASPECT ANAMO PC LENS. CONTROL C.M.D AUTO ALIGNMENT HIDE LIGHT MENU BACK PICTURE MODE NATURAL DYNAMIC 3D USER1 USER2 USER3 USER4 USER5 USER6 GAMMA COLOR TEMP LENS. AP PIC.

Instruction Manual
Page 32
...:Same Top and bottom of the image are input, the "Aspect(Computer)" setting will be set to a most appropriate screen size. ● When there is 3D signal input, the ratio is stretched horizontally Aspect Ratio:Same Most appropriate screen size ● Depending on the input image, selecting "4:3" may result in landscape...:Same Small image is projected Aspect Ratio: Landscape Image is fixed to "16:9". 32 CONTROL C.M.D AUTO ALIGNMENT HIDE LIGHT MENU BACK PICTURE MODE NATURAL DYNAMIC 3D USER1 USER2 USER3 USER4 USER5 USER6 GAMMA COLOR TEMP LENS. AP PIC.
...:Same Top and bottom of the image are input, the "Aspect(Computer)" setting will be set to a most appropriate screen size. ● When there is 3D signal input, the ratio is stretched horizontally Aspect Ratio:Same Most appropriate screen size ● Depending on the input image, selecting "4:3" may result in landscape...:Same Small image is projected Aspect Ratio: Landscape Image is fixed to "16:9". 32 CONTROL C.M.D AUTO ALIGNMENT HIDE LIGHT MENU BACK PICTURE MODE NATURAL DYNAMIC 3D USER1 USER2 USER3 USER4 USER5 USER6 GAMMA COLOR TEMP LENS. AP PIC.

Instruction Manual
Page 33
... Signal HDMI COMP. Gamma Contrast Brightness Color Tint Advanced Natural 6500K Normal 0 0 0 0 Exit MENU Select Reset Operate Back BACK MENU BACK PICTURE MODE NATURAL DYNAMIC 3D USER1 USER2 USER3 USER4 USER5 USER6 GAMMA COLOR TEMP LENS. PC Picture Position Aspect (Video) Mask Progressive 16:9 5% Auto 2.5% 5% Off Custom Exit MENU Select Operate...
... Signal HDMI COMP. Gamma Contrast Brightness Color Tint Advanced Natural 6500K Normal 0 0 0 0 Exit MENU Select Reset Operate Back BACK MENU BACK PICTURE MODE NATURAL DYNAMIC 3D USER1 USER2 USER3 USER4 USER5 USER6 GAMMA COLOR TEMP LENS. PC Picture Position Aspect (Video) Mask Progressive 16:9 5% Auto 2.5% 5% Off Custom Exit MENU Select Operate...

Instruction Manual
Page 34
...BY ON COMPONENT HDMI 1 HDMI 2 COMP. Adjust horizontal distortion with the cursors for left and right. ● When there is a 3D input signal, adjustment is temporarily hidden. HIDE Green light blinks when the image is hidden. ● Press the HIDE button again to the...distortion is adjusted in the keystone correction mode, the keystone distortion can hide the image temporarily. D MENU BACK PICTURE MODE NATURAL DYNAMIC 3D USER1 USER2 USER3 USER4 USER5 USER6 GAMMA COLOR TEMP LENS. CONTROL C.M.D AUTO ALIGNMENT C HIDE LIGHT C Temporary turning-off when the...
...BY ON COMPONENT HDMI 1 HDMI 2 COMP. Adjust horizontal distortion with the cursors for left and right. ● When there is a 3D input signal, adjustment is temporarily hidden. HIDE Green light blinks when the image is hidden. ● Press the HIDE button again to the...distortion is adjusted in the keystone correction mode, the keystone distortion can hide the image temporarily. D MENU BACK PICTURE MODE NATURAL DYNAMIC 3D USER1 USER2 USER3 USER4 USER5 USER6 GAMMA COLOR TEMP LENS. CONTROL C.M.D AUTO ALIGNMENT C HIDE LIGHT C Temporary turning-off when the...

Instruction Manual
Page 39
... settings in the menu (continued) [2] Layers and organization of the input signal submenu [2-1] HDMI Input Signal HDMI Input Level Check Color Space Control with HDMI 3D Format Enhanced Auto Off Auto [2] Input Signal Input Signal [2-1] [2-2] [2-3] HDMI COMP.
... settings in the menu (continued) [2] Layers and organization of the input signal submenu [2-1] HDMI Input Signal HDMI Input Level Check Color Space Control with HDMI 3D Format Enhanced Auto Off Auto [2] Input Signal Input Signal [2-1] [2-2] [2-3] HDMI COMP.

Instruction Manual
Page 41
... 2) will be displayed. Selection of the selected adjustment item. The menu screen is displayed. CONTROL C.M.D AUTO ALIGNMENT HIDE LIGHT MENU BACK PICTURE MODE NATURAL DYNAMIC 3D USER1 USER2 USER3 USER4 USER5 USER6 Menu operation buttons GAMMA COLOR TEMP LENS.
... 2) will be displayed. Selection of the selected adjustment item. The menu screen is displayed. CONTROL C.M.D AUTO ALIGNMENT HIDE LIGHT MENU BACK PICTURE MODE NATURAL DYNAMIC 3D USER1 USER2 USER3 USER4 USER5 USER6 Menu operation buttons GAMMA COLOR TEMP LENS.

Instruction Manual
Page 42
... Tint Advanced Natural 6500K Normal 0 0 0 0 items are shown. 3 Operation Adjustments and settings in orange. CONTROL C.M.D AUTO ALIGNMENT HIDE LIGHT 3,4 2,5 3 1 MENU BACK 6 PICTURE MODE NATURAL DYNAMIC 3D USER1 USER2 USER3 USER4 USER5 USER6 GAMMA COLOR TEMP LENS. Currently selected menu Picture Mode Color Temp. Every time it cannot be selected. 5 Press cursor...
... Tint Advanced Natural 6500K Normal 0 0 0 0 items are shown. 3 Operation Adjustments and settings in orange. CONTROL C.M.D AUTO ALIGNMENT HIDE LIGHT 3,4 2,5 3 1 MENU BACK 6 PICTURE MODE NATURAL DYNAMIC 3D USER1 USER2 USER3 USER4 USER5 USER6 GAMMA COLOR TEMP LENS. Currently selected menu Picture Mode Color Temp. Every time it cannot be selected. 5 Press cursor...

Instruction Manual
Page 43
...It is possible to operate all items displayed in the menu display by using a user 1, 2, 3, 4, 5and 6. This is saved. Color Temp. A (3D) will be set to sub-menu "[1-2] Advanced". Moreover, it when the "Picture Mode" is set if the "Picture Mode" is a gamma curve where the... C, D cannot be brighter. For normal, this setting. (*) It is not possible to set it is possible to set the color temp. Gamma Normal A (3D) B (3D) A B C D Custom 1 Custom 2 Custom 3 Contrast Brightness Color Tint Advanced Reset It is possible to adjust the image quality by pressing OK/BACK or...
...It is possible to operate all items displayed in the menu display by using a user 1, 2, 3, 4, 5and 6. This is saved. Color Temp. A (3D) will be set to sub-menu "[1-2] Advanced". Moreover, it when the "Picture Mode" is set if the "Picture Mode" is a gamma curve where the... C, D cannot be brighter. For normal, this setting. (*) It is not possible to set it is possible to set the color temp. Gamma Normal A (3D) B (3D) A B C D Custom 1 Custom 2 Custom 3 Contrast Brightness Color Tint Advanced Reset It is possible to adjust the image quality by pressing OK/BACK or...

Instruction Manual
Page 44
... set to your preference. Values: (Low) 0 to16 (strong) [0] Adjusts the intensity of mosquito noise elimination of the video images. Please adjust to "3D". of 6500K produces a well balanced video image. It is possible to 0 (strong blue) [0] For each color. It is said that a value of... random noise elimination of the submenu 44 Settings: On, Off [Off] It is an input of the video images can adjust the color temp. to "3D" or "Natural". To "[1-2-2] Custom Gamma" of the image. Settings: (Preset value), High Bright, Custom 1, Custom 2, Custom 3 [Preset value] You ...
... set to your preference. Values: (Low) 0 to16 (strong) [0] Adjusts the intensity of mosquito noise elimination of the video images. Please adjust to "3D". of 6500K produces a well balanced video image. It is possible to 0 (strong blue) [0] For each color. It is said that a value of... random noise elimination of the submenu 44 Settings: On, Off [Off] It is an input of the video images can adjust the color temp. to "3D" or "Natural". To "[1-2-2] Custom Gamma" of the image. Settings: (Preset value), High Bright, Custom 1, Custom 2, Custom 3 [Preset value] You ...