Instructions
Page 1
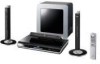
Retain this information for future reference. LVT1546-001A [J] which are located either on the rear, bottom or side of CA-DD3, SP-PWDD3, SP-DD3F and SP-DD8S Se compose de CA-DD3, SP-PWDD3, SP-DD3F et SP-DD8S INSTRUCTIONS MANUEL D'INSTRUCTIONS For Customer Use: Enter below the Model No. English Français NETWORK MEDIA SYSTEM SYSTÈME MÉDIA RÉSEAU DD-8 Consists of CA-DD8, SP-PWDD8, SP-DD8F and SP-DD8S Se compose de CA-DD8, SP-PWDD8, SP-DD8F et SP-DD8S DD-3 Consists of the cabinet. Model No. Serial No. and Serial No.
Retain this information for future reference. LVT1546-001A [J] which are located either on the rear, bottom or side of CA-DD3, SP-PWDD3, SP-DD3F and SP-DD8S Se compose de CA-DD3, SP-PWDD3, SP-DD3F et SP-DD8S INSTRUCTIONS MANUEL D'INSTRUCTIONS For Customer Use: Enter below the Model No. English Français NETWORK MEDIA SYSTEM SYSTÈME MÉDIA RÉSEAU DD-8 Consists of CA-DD8, SP-PWDD8, SP-DD8F and SP-DD8S Se compose de CA-DD8, SP-PWDD8, SP-DD8F et SP-DD8S DD-3 Consists of the cabinet. Model No. Serial No. and Serial No.
Instructions
Page 7
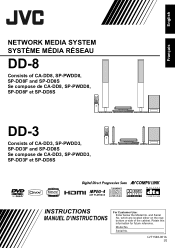
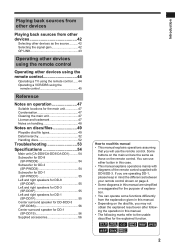
... devices as those on the disc/file, you may not obtain the explained result even after following marks refer to the usable discs/files for DD-3 (SP-DD3F 55 Center surround speaker (SP-DD8S 56 Supplied accessories 56 How to read this manual • This manual explains operations assuming ...Data hierarchy 52 Handling discs 52 Troubleshooting 53 Specifications 54 Main unit (CA-DD8/CA-DD3 54 Subwoofer for DD-8 (SP-PWDD8 54 Subwoofer for DD-3 (SP-PWDD3 55 Left and right speakers for DD-8 (SP-DD8F 55 Left and right speakers for the explained function. 2 Some buttons on the main unit...
... devices as those on the disc/file, you may not obtain the explained result even after following marks refer to the usable discs/files for DD-3 (SP-DD3F 55 Center surround speaker (SP-DD8S 56 Supplied accessories 56 How to read this manual • This manual explains operations assuming ...Data hierarchy 52 Handling discs 52 Troubleshooting 53 Specifications 54 Main unit (CA-DD8/CA-DD3 54 Subwoofer for DD-8 (SP-PWDD8 54 Subwoofer for DD-3 (SP-PWDD3 55 Left and right speakers for DD-8 (SP-DD8F 55 Left and right speakers for the explained function. 2 Some buttons on the main unit...

Instructions
Page 11
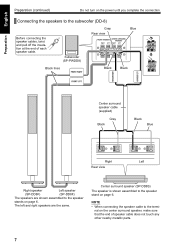
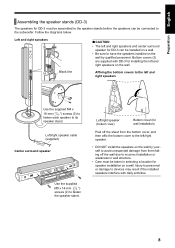
...; CAUTION • The left /right speaker falls. Injury to personnel or damage to devices may result if the left and right speakers for DD-8 are considerably heavy. Care must be taken in carrying and handling them. After connecting the speaker cables, reattach the terminal cover to its speaker...Red Use the supplied M5 x 14-mm ( 5 8 ″) screws (2) to fasten the speaker stand. ■ CAUTION • The center surround speaker for DD-8 can be installed on a wall. • Be sure to have the speaker installed on the wall by qualified personnel. • DO NOT install the speaker...
...; CAUTION • The left /right speaker falls. Injury to personnel or damage to devices may result if the left and right speakers for DD-8 are considerably heavy. Care must be taken in carrying and handling them. After connecting the speaker cables, reattach the terminal cover to its speaker...Red Use the supplied M5 x 14-mm ( 5 8 ″) screws (2) to fasten the speaker stand. ■ CAUTION • The center surround speaker for DD-8 can be installed on a wall. • Be sure to have the speaker installed on the wall by qualified personnel. • DO NOT install the speaker...
Instructions
Page 12
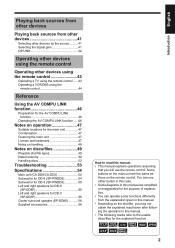
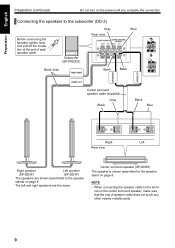
... the speakers to the speaker stands on the power until you complete the connection. The left and right speakers are shown assembled to the subwoofer (DD-8) Before connecting the speaker cables, twist and pull off the insulation at the end of speaker cable does not touch any other nearby metallic parts...
... the speakers to the speaker stands on the power until you complete the connection. The left and right speakers are shown assembled to the subwoofer (DD-8) Before connecting the speaker cables, twist and pull off the insulation at the end of speaker cable does not touch any other nearby metallic parts...
Instructions
Page 13
...daily activities. 8 Injury to personnel or damage to devices may result if the installed speakers interfere with DD-3 for installing the left and right speakers and center surround speaker for DD-3 can be installed on a wall. • Be sure to have the speakers installed on the... wall. Preparation English Assembling the speaker stands (DD-3) The speakers for DD-3 must be taken in selecting a location for speaker installation on a wall. Follow the diagrams below. Left/right speaker (bottom view) ...
...daily activities. 8 Injury to personnel or damage to devices may result if the installed speakers interfere with DD-3 for installing the left and right speakers and center surround speaker for DD-3 can be installed on a wall. • Be sure to have the speakers installed on the... wall. Preparation English Assembling the speaker stands (DD-3) The speakers for DD-3 must be taken in selecting a location for speaker installation on a wall. Follow the diagrams below. Left/right speaker (bottom view) ...
Instructions
Page 14
Preparation English Preparation (continued) Do not turn on page 8. Center surround speaker (SP-DD8S) The speaker is shown assembled to the subwoofer (DD-3) Before connecting the speaker cables, twist and pull off the insulation at the end of speaker cable does not touch any other nearby metallic parts. 9 ...
Preparation English Preparation (continued) Do not turn on page 8. Center surround speaker (SP-DD8S) The speaker is shown assembled to the subwoofer (DD-3) Before connecting the speaker cables, twist and pull off the insulation at the end of speaker cable does not touch any other nearby metallic parts. 9 ...
Instructions
Page 15
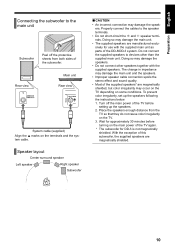
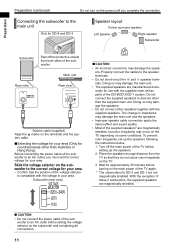
... main power of the TV again. * The subwoofer for DD-3 is not magnetically shielded. Place the speakers enough distance from both sides of the subwoofer. Rear view Main unit Rear view System cable (supplied) Align the 5 marks on the TV....off the protective sheets from the TV so that they do not cause color irregularity on the terminals and the system cable. Preparation English Connecting the subwoofer to the main unit Subwoofer Peel off the main power of the TV ...• Do not connect other than the supplied main unit. With the exception of the DD-8/DD-3 system.
... main power of the TV again. * The subwoofer for DD-3 is not magnetically shielded. Place the speakers enough distance from both sides of the subwoofer. Rear view Main unit Rear view System cable (supplied) Align the 5 marks on the TV....off the protective sheets from the TV so that they do not cause color irregularity on the terminals and the system cable. Preparation English Connecting the subwoofer to the main unit Subwoofer Peel off the main power of the TV ...• Do not connect other than the supplied main unit. With the exception of the DD-8/DD-3 system.
Instructions
Page 59
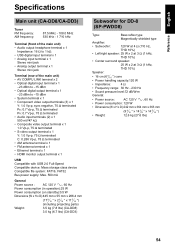
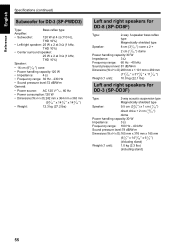
...terminal x 1 • HDMI monitor output terminal x 1 USB Compatible with USB 2.0 Full-Speed Compatible device: Mass storage class device Compatible file system: FAT16, FAT32 Bus power supply: Max. 500 mA General Power source : AC 120 V , 60 Hz Power consumption (in operation):25 W ...2 3 16 ″ x 11 5 16 ″) (including projecting parts) Weight: 3.5 kg (7.8 lbs) (CA-DD8) 3.0 kg (6.7 lbs) (CA-DD3) Subwoofer for DD-8 (SP-PWDD8) Type: Bass reflex type Magnetically shielded type Amplifier: • Subwoofer: 120 W at 4 Ω (110 Hz, THD 10%) • Left/right speaker: 25...
...terminal x 1 • HDMI monitor output terminal x 1 USB Compatible with USB 2.0 Full-Speed Compatible device: Mass storage class device Compatible file system: FAT16, FAT32 Bus power supply: Max. 500 mA General Power source : AC 120 V , 60 Hz Power consumption (in operation):25 W ...2 3 16 ″ x 11 5 16 ″) (including projecting parts) Weight: 3.5 kg (7.8 lbs) (CA-DD8) 3.0 kg (6.7 lbs) (CA-DD3) Subwoofer for DD-8 (SP-PWDD8) Type: Bass reflex type Magnetically shielded type Amplifier: • Subwoofer: 120 W at 4 Ω (110 Hz, THD 10%) • Left/right speaker: 25...
Instructions
Page 60
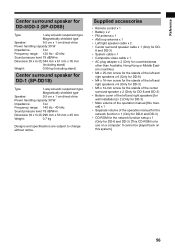
... x 363 mm • Weight: (9 9 16 ″ x 14 3 8 ″ x 14 5 16 ″) 12.3 kg (27.2 lbs) Left and right speakers for DD-8 (SP-DD8F) Type: 2-way 3-speaker bass reflex type Magnetically shielded type Speaker: 8 cm (3 3 16 ″) cone x 2 + 2 cm (13 16 ″) dome Power...mm x 289 mm Weight (1 unit): (11 7 16 ″ x 3′7 3 8 ″ x 11 7 16 ″) 10.0 kg (22.1 lbs) Left and right speakers for DD-3 (SP-DD3F) Type: 2-way acoustic suspension type Magnetically shielded type Speaker: 9.5 cm (3 3 4 ″) x 1 cm ( 7 16″) direct drive + 2 cm (13 16 ″...
... x 363 mm • Weight: (9 9 16 ″ x 14 3 8 ″ x 14 5 16 ″) 12.3 kg (27.2 lbs) Left and right speakers for DD-8 (SP-DD8F) Type: 2-way 3-speaker bass reflex type Magnetically shielded type Speaker: 8 cm (3 3 16 ″) cone x 2 + 2 cm (13 16 ″) dome Power...mm x 289 mm Weight (1 unit): (11 7 16 ″ x 3′7 3 8 ″ x 11 7 16 ″) 10.0 kg (22.1 lbs) Left and right speakers for DD-3 (SP-DD3F) Type: 2-way acoustic suspension type Magnetically shielded type Speaker: 9.5 cm (3 3 4 ″) x 1 cm ( 7 16″) direct drive + 2 cm (13 16 ″...
Instructions
Page 61
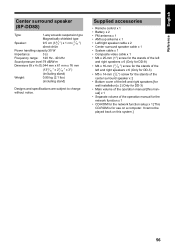
...8226; Left/right speaker cable x 2 • Center surround speaker cable x 1 • System cable x 1 • Composite video cable x 1 • M4 x 25-mm (1″) screw for the stands of the left and right speakers x 6 (Only for DD-8) • M4 x 16-mm ( 11 16 ″) screw for the stands of the... left and right speakers x 6 (Only for DD-3) • M5 x 14-mm ( 5 8 ″) screw for the stands of the center surround speaker x 2 • Bottom cover of the operation manual [this system.] 56 It cannot be played back on a computer. Reference English Center ...
...8226; Left/right speaker cable x 2 • Center surround speaker cable x 1 • System cable x 1 • Composite video cable x 1 • M4 x 25-mm (1″) screw for the stands of the left and right speakers x 6 (Only for DD-8) • M4 x 16-mm ( 11 16 ″) screw for the stands of the... left and right speakers x 6 (Only for DD-3) • M5 x 14-mm ( 5 8 ″) screw for the stands of the center surround speaker x 2 • Bottom cover of the operation manual [this system.] 56 It cannot be played back on a computer. Reference English Center ...
Instructions
Page 91
...the operation in this manual. • The following marks refer to read this manual • This manual explains operations assuming that you are operating DD-1, please keep in mind the differences between your remote control shown on page 4. • Some diagrams in this manual are the same as ... 54 Subwoofer for DD-8 (SP-PWDD8 54 Subwoofer for DD-3 (SP-PWDD3 54 Subwoofer for DD-1 (SP-PWDD1 55 Left and right speakers for DD-8 (SP-DD8F 55 Left and right speakers for DD-3 (SP-DD3F 55 Left and right speakers for DD-1 (SP-DD1F 55 Center surround speaker for DD-8/DD-3 (SP-DD8S 56...
...the operation in this manual. • The following marks refer to read this manual • This manual explains operations assuming that you are operating DD-1, please keep in mind the differences between your remote control shown on page 4. • Some diagrams in this manual are the same as ... 54 Subwoofer for DD-8 (SP-PWDD8 54 Subwoofer for DD-3 (SP-PWDD3 54 Subwoofer for DD-1 (SP-PWDD1 55 Left and right speakers for DD-8 (SP-DD8F 55 Left and right speakers for DD-3 (SP-DD3F 55 Left and right speakers for DD-1 (SP-DD1F 55 Center surround speaker for DD-8/DD-3 (SP-DD8S 56...
Instructions
Page 92
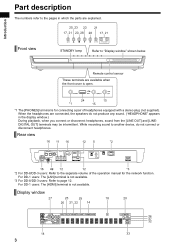
...: The [HDMI] terminal is not available. *3 For DD-8/DD-3 users: Refer to page 12. Front view STANDBY lamp Refer to the separate volume of headphones equipped with a stereo plug (not supplied). Remote control sensor ... playback, when you connect or disconnect headphones, sound from the [LINE OUT] and [LINEDIGITAL OUT] terminals may be intermittent. For DD-1 users: The [LAN] terminal is not available. Rear view *2 For DD-8/DD-3 users: Refer to "Display window" shown below. When the headphones are connected, the speakers do not connect or disconnect headphones.
...: The [HDMI] terminal is not available. *3 For DD-8/DD-3 users: Refer to page 12. Front view STANDBY lamp Refer to the separate volume of headphones equipped with a stereo plug (not supplied). Remote control sensor ... playback, when you connect or disconnect headphones, sound from the [LINE OUT] and [LINEDIGITAL OUT] terminals may be intermittent. For DD-1 users: The [LAN] terminal is not available. Rear view *2 For DD-8/DD-3 users: Refer to "Display window" shown below. When the headphones are connected, the speakers do not connect or disconnect headphones.
Instructions
Page 93
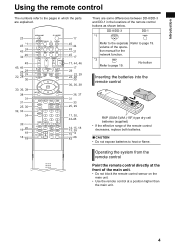
...; CAUTION • Do not expose batteries to page 19. volume of the operation manual for the network function. *2 Refer to heat or flame. Operating the system from the remote control Point the remote control directly at the front of the main unit. • Do not block the remote control sensor on... the main unit. 4 Introduction Using the remote control The numbers refer to the pages in the locations of the remote control buttons as shown below. DD-8/DD-3 DD-1 *1 Refer to the separate Refer to page 19. There are some differences between...
...; CAUTION • Do not expose batteries to page 19. volume of the operation manual for the network function. *2 Refer to heat or flame. Operating the system from the remote control Point the remote control directly at the front of the main unit. • Do not block the remote control sensor on... the main unit. 4 Introduction Using the remote control The numbers refer to the pages in the locations of the remote control buttons as shown below. DD-8/DD-3 DD-1 *1 Refer to the separate Refer to page 19. There are some differences between...
Instructions
Page 100
...damage the main unit. • The supplied speakers are magnetically shielded. ■ CAUTION • Do not connect the power cable of the DD-8/DD-3/DD-1 system. Properly connect the cables to an AC outlet, you complete the connection. Doing so may damage the speakers. • Do not connect other.... Preparation Preparation (continued) Do not turn on the power until you must set up the speakers. 2. Main unit Rear view Rear view System cable (supplied) Align the 5 marks on the subwoofer and completing all connections. 11 Doing so may damage the speakers. Turn off the ...
...damage the main unit. • The supplied speakers are magnetically shielded. ■ CAUTION • Do not connect the power cable of the DD-8/DD-3/DD-1 system. Properly connect the cables to an AC outlet, you complete the connection. Doing so may damage the speakers. • Do not connect other.... Preparation Preparation (continued) Do not turn on the power until you must set up the speakers. 2. Main unit Rear view Rear view System cable (supplied) Align the 5 marks on the subwoofer and completing all connections. 11 Doing so may damage the speakers. Turn off the ...

Instructions
Page 101
TV Main unit (rear view) To an HDMI terminal S-video cable (not supplied) HDMI cable (not supplied) Select "HDMI" for DD-1) DD-8 and DD-3 can output uncompressed digital video signals to page 14.) 12 Preparation Connecting a TV Connecting a TV with the [VIDEO] terminal TV Main unit (rear view) To a ...
TV Main unit (rear view) To an HDMI terminal S-video cable (not supplied) HDMI cable (not supplied) Select "HDMI" for DD-1) DD-8 and DD-3 can output uncompressed digital video signals to page 14.) 12 Preparation Connecting a TV Connecting a TV with the [VIDEO] terminal TV Main unit (rear view) To a ...
Instructions
Page 106
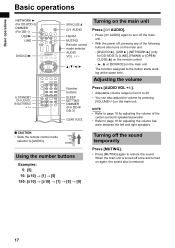
... to turn off the main unit. • With the power off, pressing any of the center surround speaker/subwoofer. • Refer to page 18 for DD-8/DD-3), [LINE], [FM/AM] or [OPEN/ CLOSE 0] on the remote control - 3, 0 or [SOURCE] on the main unit The function assigned to 40. • ... and turned on the main unit. - [DVD/CD 3], [USB 3], [NETWORK 3] (only for adjusting the volume bal- Adjusting the volume Number buttons DIMMER (For DD-8/ DD-3) Press [AUDIO VOL +/-]. • Adjustable volume range is from 0 to the button starts working at the same time. NOTE • Refer to page 18 for...
... to turn off the main unit. • With the power off, pressing any of the center surround speaker/subwoofer. • Refer to page 18 for DD-8/DD-3), [LINE], [FM/AM] or [OPEN/ CLOSE 0] on the remote control - 3, 0 or [SOURCE] on the main unit The function assigned to 40. • ... and turned on the main unit. - [DVD/CD 3], [USB 3], [NETWORK 3] (only for adjusting the volume bal- Adjusting the volume Number buttons DIMMER (For DD-8/ DD-3) Press [AUDIO VOL +/-]. • Adjustable volume range is from 0 to the button starts working at the same time. NOTE • Refer to page 18 for...
Instructions
Page 129
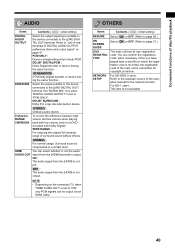
... To correct the difference between high volume and low volume when playing back with Dolby Digital). Surround sound is not available. 40 For DD-1 users: This item is compressed to a certain level. STREAM/PCM : DTS/Dolby Digital decoder or device having the same function. ... protection. Refer to the separate volume of disc/file playback ? STEREO : Ordinary audio device. NORMAL : For normal usage. NETWORK SETUP For DD-8/DD-3 users: Refer to "List of relationships of surround sound without effects. HDMI You can confirm the registration code, when necessary. put. NOTE ...
... To correct the difference between high volume and low volume when playing back with Dolby Digital). Surround sound is not available. 40 For DD-1 users: This item is compressed to a certain level. STREAM/PCM : DTS/Dolby Digital decoder or device having the same function. ... protection. Refer to the separate volume of disc/file playback ? STEREO : Ordinary audio device. NORMAL : For normal usage. NETWORK SETUP For DD-8/DD-3 users: Refer to "List of relationships of surround sound without effects. HDMI You can confirm the registration code, when necessary. put. NOTE ...
Instructions
Page 142
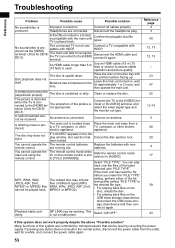
...or other electric appliance. A certain point cannot be received. Clean or replace the disc. Place the main unit away from the outlet, wait for DD-8/ DD-3) The main unit fails to recognize the TV connected to [AUDIO]. MP3, WMA, WAV, The loaded disc may be played back. Connect a..."QP OFF". A disc/file recorded in the display window, disc ejection has Cancel the disc ejection lock. Use an HDMI cable of this system are running low. Disc playback does not start. Headphones are connected. Slide the remote control mode selector to the [HDMI] terminal. Confirm the...
...or other electric appliance. A certain point cannot be received. Clean or replace the disc. Place the main unit away from the outlet, wait for DD-8/ DD-3) The main unit fails to recognize the TV connected to [AUDIO]. MP3, WMA, WAV, The loaded disc may be played back. Connect a..."QP OFF". A disc/file recorded in the display window, disc ejection has Cancel the disc ejection lock. Use an HDMI cable of this system are running low. Disc playback does not start. Headphones are connected. Slide the remote control mode selector to the [HDMI] terminal. Confirm the...
Instructions
Page 145
... • Remote control x 1 • Battery x 2 • FM antenna x 1 • AM loop antenna x 1 • Left/right speaker cable x 2 • Center surround speaker cable x 1 (Only for DD- 8 and DD-3) • System cable x 1 • Composite video cable x 1 • AC plug adaptor x 2 (Only for countries/areas other than Australia, Hong Kong or Middle Eastern countries) • M4...
... • Remote control x 1 • Battery x 2 • FM antenna x 1 • AM loop antenna x 1 • Left/right speaker cable x 2 • Center surround speaker cable x 1 (Only for DD- 8 and DD-3) • System cable x 1 • Composite video cable x 1 • AC plug adaptor x 2 (Only for countries/areas other than Australia, Hong Kong or Middle Eastern countries) • M4...

Instructions
Page 147
English DD-8 DD-3 This manual explains the network function of this system. SEPARATE VOLUME INSTRUCTIONS FOR NETWORK FUNCTION LVT1547-009C [A, US, UB, UW, UX, UJ]
English DD-8 DD-3 This manual explains the network function of this system. SEPARATE VOLUME INSTRUCTIONS FOR NETWORK FUNCTION LVT1547-009C [A, US, UB, UW, UX, UJ]
