Instruction Manual
Page 5
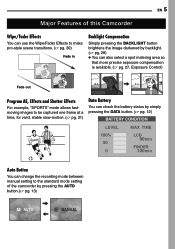
EN 5 Major Features of this Camcorder Wipe/Fader Effects You can use the Wipe/Fader Effects to make pro-style scene transitions. ( pg. 30) Fade in Backlight Compensation Simply pressing the ... the DATA button. ( pg. 12) BATTERY CONDITION LEVEL MAX TIME 100% 50 0 LCD 90min FINDER 100min Auto Button You can change the recording mode between manual setting to the standard mode setting of the camcorder by pressing the AUTO button.( pg. 13) AUTO...
EN 5 Major Features of this Camcorder Wipe/Fader Effects You can use the Wipe/Fader Effects to make pro-style scene transitions. ( pg. 30) Fade in Backlight Compensation Simply pressing the ... the DATA button. ( pg. 12) BATTERY CONDITION LEVEL MAX TIME 100% 50 0 LCD 90min FINDER 100min Auto Button You can change the recording mode between manual setting to the standard mode setting of the camcorder by pressing the AUTO button.( pg. 13) AUTO...
Instruction Manual
Page 9
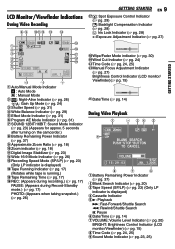
...Manual Mode 2 : Night-Alive Indicator ( pg. 26) : Gain Up Mode ( pg. 24) 3Shutter Speed ( pg. 31) 4White Balance Indicator ( pg. 29) 5Effect Mode Indicator ( pg. 31) 6Program AE Mode Indicator ( pg. 31) 7SOUND 12BIT/16BIT: Sound Mode Indicator ( pg. 23) (Appears for approx. 5 seconds after turning on the camcorder...pg. 27) EXPOSURE -1 ~Wipe/Fader Mode indicator ( pg. 30) +Wind Cut Indicator ( pg. 24) ,Time Code ( pg. 24, 25) -Manual Focus Adjustment Indicator ( pg. 27) Brightness Control Indicator (LCD monitor/ Viewfinder)( pg. 15) .Date/Time ( BRIGHT -1 pg. 14) During ...
...Manual Mode 2 : Night-Alive Indicator ( pg. 26) : Gain Up Mode ( pg. 24) 3Shutter Speed ( pg. 31) 4White Balance Indicator ( pg. 29) 5Effect Mode Indicator ( pg. 31) 6Program AE Mode Indicator ( pg. 31) 7SOUND 12BIT/16BIT: Sound Mode Indicator ( pg. 23) (Appears for approx. 5 seconds after turning on the camcorder...pg. 27) EXPOSURE -1 ~Wipe/Fader Mode indicator ( pg. 30) +Wind Cut Indicator ( pg. 24) ,Time Code ( pg. 24, 25) -Manual Focus Adjustment Indicator ( pg. 27) Brightness Control Indicator (LCD monitor/ Viewfinder)( pg. 15) .Date/Time ( BRIGHT -1 pg. 14) During ...
Instruction Manual
Page 13
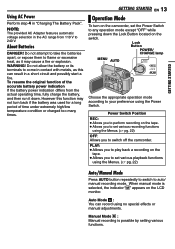
...9679; Allows you to set various recording functions using the Menus. ( pg. 22) OFF: Allows you to set the Power Switch to switch off the camcorder. Do not attempt to take the batteries apart, or expose them to flame or excessive heat, as this function may cause a fire or... 4 in the AC range from the actual operating time, fully charge the battery, and then run it may not turn on the camcorder, set various playback functions using the Menus. ( pg. 22) Auto/Manual Mode Press AUTO button repeatedly to switch to come in a short circuit and possibly start a fire.
...9679; Allows you to set various recording functions using the Menus. ( pg. 22) OFF: Allows you to set the Power Switch to switch off the camcorder. Do not attempt to take the batteries apart, or expose them to flame or excessive heat, as this function may cause a fire or... 4 in the AC range from the actual operating time, fully charge the battery, and then run it may not turn on the camcorder, set various playback functions using the Menus. ( pg. 22) Auto/Manual Mode Press AUTO button repeatedly to switch to come in a short circuit and possibly start a fire.
Instruction Manual
Page 14
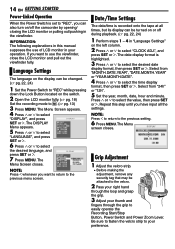
...-Linked Operation When the Power Switch is set to "REC", you have input all times, but its display can be turned on or off the camcorder by opening/ closing the LCD monitor or pulling out/pushing in your operation. DI SPLAY BR I ME CODE DEMO MOD E "LANGUAGE", and press SET or... monitor fully. ( pg. 18) Set the recording mode to your preference. Be sure to fasten the velcro strip to . ( pg. 13) 3 Press MENU. Repeat this manual supposes the use the viewfinder, close the LCD monitor and pull out the viewfinder fully. Select from "24h" or "12h". 5 Set...
...-Linked Operation When the Power Switch is set to "REC", you have input all times, but its display can be turned on or off the camcorder by opening/ closing the LCD monitor or pulling out/pushing in your operation. DI SPLAY BR I ME CODE DEMO MOD E "LANGUAGE", and press SET or... monitor fully. ( pg. 18) Set the recording mode to your preference. Be sure to fasten the velcro strip to . ( pg. 13) 3 Press MENU. Repeat this manual supposes the use the viewfinder, close the LCD monitor and pull out the viewfinder fully. Select from "24h" or "12h". 5 Set...
Instruction Manual
Page 15
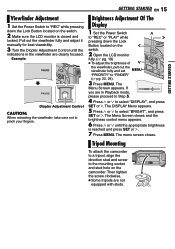
... or 4 until the indications in Playback mode, please proceed to Step 5. 4 Press 3 or 4 to pinch your fingers. Tripod Mounting To attach the camcorder to a tripod, align the direction stud and screw to the mounting socket and stud hole on the 1 switch. 2 Open the LCD monitor fully. ( pg... sure the LCD monitor is reached and press SET or 2. 7 Press MENU. Pull out the viewfinder fully and adjust it manually for best viewability. 3 Turn the Diopter Adjustment Control until the appropriate brightness is closed and locked. The menu screen closes. Brightness Adjustment Of...
... or 4 until the indications in Playback mode, please proceed to Step 5. 4 Press 3 or 4 to pinch your fingers. Tripod Mounting To attach the camcorder to a tripod, align the direction stud and screw to the mounting socket and stud hole on the 1 switch. 2 Open the LCD monitor fully. ( pg... sure the LCD monitor is reached and press SET or 2. 7 Press MENU. Pull out the viewfinder fully and adjust it manually for best viewability. 3 Turn the Diopter Adjustment Control until the appropriate brightness is closed and locked. The menu screen closes. Brightness Adjustment Of...
Instruction Manual
Page 18
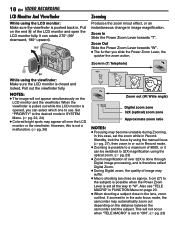
However, this case, set the zoom while in RecordStandby, lock the focus by using the manual focus ( pg. 27), then zoom in or out in SYSTEM Menu. ( pg. 22, 24) ● Colored bright spots may suffer. ... the LCD monitor is opened, you slide the Power Zoom Lever, the quicker the zoom action. Pull on the distance between the camcorder and the subject. Set "PRIORITY" to the lens, zoom out first. It can select which one to "W". Zoom Out... LCD monitor: Make sure the viewfinder is pushed back in the auto focus mode, the camcorder may become unstable during Zooming.
However, this case, set the zoom while in RecordStandby, lock the focus by using the manual focus ( pg. 27), then zoom in or out in SYSTEM Menu. ( pg. 22, 24) ● Colored bright spots may suffer. ... the LCD monitor is opened, you slide the Power Zoom Lever, the quicker the zoom action. Pull on the distance between the camcorder and the subject. Set "PRIORITY" to the lens, zoom out first. It can select which one to "W". Zoom Out... LCD monitor: Make sure the viewfinder is pushed back in the auto focus mode, the camcorder may become unstable during Zooming.
Instruction Manual
Page 21
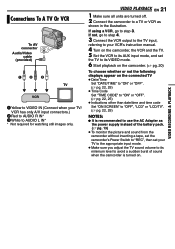
... instead of the battery pack. ( pg. 13) ● To monitor the picture and sound from the camcorder without inserting a tape, set the camcorder's Power Switch to "REC", then set your VCR's instruction manual. 4 Turn on the camcorder, the VCR and the TV. 5 Set the VCR to its AUX input mode, and set the TV... to its VIDEO mode. 6 Start playback on the camcorder. ( pg. 20) To choose whether or not the following displays appear on . VIDEO PLAYBACK...
... instead of the battery pack. ( pg. 13) ● To monitor the picture and sound from the camcorder without inserting a tape, set the camcorder's Power Switch to "REC", then set your VCR's instruction manual. 4 Turn on the camcorder, the VCR and the TV. 5 Set the VCR to its AUX input mode, and set the TV... to its VIDEO mode. 6 Start playback on the camcorder. ( pg. 20) To choose whether or not the following displays appear on . VIDEO PLAYBACK...

Instruction Manual
Page 26
...Record Still Image On Tape) This feature lets you to choose the type of image output format for approx. 5 seconds, then the camcorder re-enters the Record-Standby mode. ● You can perform Snapshot also during recording. The indicator appears. 26 EN FEATURES FOR RECORDING... Night-Alive indicator " " appears. ● The shutter speed is automatically adjusted to provide up to bring the camcorder into focus. Naturally expands the image to choose your TV's instruction manual. 16:9: For playback on 4:3 TVs/LCD monitor/ viewfinder, the image is elongated vertically. [ ] ...
...Record Still Image On Tape) This feature lets you to choose the type of image output format for approx. 5 seconds, then the camcorder re-enters the Record-Standby mode. ● You can perform Snapshot also during recording. The indicator appears. 26 EN FEATURES FOR RECORDING... Night-Alive indicator " " appears. ● The shutter speed is automatically adjusted to provide up to bring the camcorder into focus. Naturally expands the image to choose your TV's instruction manual. 16:9: For playback on 4:3 TVs/LCD monitor/ viewfinder, the image is elongated vertically. [ ] ...
Instruction Manual
Page 27
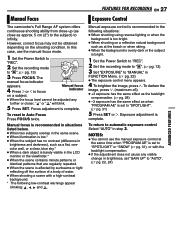
...Select "AUTO" in step 3. However, correct focus may not be adjusted any visible change in brightness, set to Auto Focus Press FOCUS twice. Manual exposure control is recommended in the following low-contrast warnings appear blinking: , , and . To darken the image, press 4. (maximum ±...(2") to the subject) to "REC". NOTES: ÷ You cannot use the manual focus mode. 1 Set the Power Switch to infinity. FEATURES FOR RECORDING EN 27 Manual Focus Exposure Control The camcorder's Full Range AF system offers continuous shooting ability from close-up (as close as ...
...Select "AUTO" in step 3. However, correct focus may not be adjusted any visible change in brightness, set to Auto Focus Press FOCUS twice. Manual exposure control is recommended in the following low-contrast warnings appear blinking: , , and . To darken the image, press 4. (maximum ±...(2") to the subject) to "REC". NOTES: ÷ You cannot use the manual focus mode. 1 Set the Power Switch to infinity. FEATURES FOR RECORDING EN 27 Manual Focus Exposure Control The camcorder's Full Range AF system offers continuous shooting ability from close-up (as close as ...

Instruction Manual
Page 29
... SET over 2 seconds. The white balance refers to " ". ( pg. 13) 3 Press BACKLIGHT twice so that the " " indicator disappears. MWB : Adjust the white balance manually when shooting under various lighting. FEATURES FOR RECORDING EN 29 Spot Exposure Control White Balance Adjustment Selection of a spot metering area enables more professional color...attained. NOTES: ÷ You cannot use the Spot Exposure Control at the centre of the three metering areas on a sunny day. However, more advanced camcorder operators control this function manually to "AUTO". ( pg. 23) ADVANCED FEATURES
... SET over 2 seconds. The white balance refers to " ". ( pg. 13) 3 Press BACKLIGHT twice so that the " " indicator disappears. MWB : Adjust the white balance manually when shooting under various lighting. FEATURES FOR RECORDING EN 29 Spot Exposure Control White Balance Adjustment Selection of a spot metering area enables more professional color...attained. NOTES: ÷ You cannot use the Spot Exposure Control at the centre of the three metering areas on a sunny day. However, more advanced camcorder operators control this function manually to "AUTO". ( pg. 23) ADVANCED FEATURES

Instruction Manual
Page 31
... for subjects that occurs when shooting under extremely strong direct lighting such as in step 3. From less than 10 m, adjust the focus manually. ADVANCED FEATURES CLASSIC : Gives recorded scenes a strobe effect. Use the shutter function under good lighting conditions. TWILIGHT : Makes evening scenes...(Factory-preset) SHUTTER 1/60: The shutter speed is reduced. Black bands that may appear (smear phenomenon). When Twilight is chosen, the camcorder automatically adjusts the focus from approx. 10 m (32 ft) to be used during Record-Standby. ● Some modes of Program AE...
... for subjects that occurs when shooting under extremely strong direct lighting such as in step 3. From less than 10 m, adjust the focus manually. ADVANCED FEATURES CLASSIC : Gives recorded scenes a strobe effect. Use the shutter function under good lighting conditions. TWILIGHT : Makes evening scenes...(Factory-preset) SHUTTER 1/60: The shutter speed is reduced. Black bands that may appear (smear phenomenon). When Twilight is chosen, the camcorder automatically adjusts the focus from approx. 10 m (32 ft) to be used during Record-Standby. ● Some modes of Program AE...

Instruction Manual
Page 32
...cable (provided) VCR 1Yellow to VIDEO IN 2Red to AUDIO R IN 3White to AUDIO L IN 1 Following the illustrations, connect the camcorder and the VCR's input connectors. 2 Start playback on the camcorder. ( pg. 20) 3 At the point you want to start dubbing, start recording on the VCR. (Refer to the VCR...'s instruction manual.) 4 To stop dubbing, stop recording on the VCR, then stop playback on the connected TV ● Date/time Set "DATE...
...cable (provided) VCR 1Yellow to VIDEO IN 2Red to AUDIO R IN 3White to AUDIO L IN 1 Following the illustrations, connect the camcorder and the VCR's input connectors. 2 Start playback on the camcorder. ( pg. 20) 3 At the point you want to start dubbing, start recording on the VCR. (Refer to the VCR...'s instruction manual.) 4 To stop dubbing, stop recording on the VCR, then stop playback on the connected TV ● Date/time Set "DATE...

Instruction Manual
Page 33
.... 20) 4 At the point you want to start dubbing, start dubbing, press the Recording Start/Stop Button to use the optional JVC VC-VDV204U DV cable. The indication stops rotating. 9 Press 7 to return to use the AC Adapter as shown in the illustration. 3 Start ... indication rotates. 8 Press the Recording Start/Stop Button again to the video unit's instruction manual.) 5 To stop dubbing, stop recording on this camcorder as shown in the illustration. 3 Set the camcorder's Power Switch to "PLAY". 4 Set "REC MODE" to "SP" or "LP". ( pg. 25) 5 Press the Recording Start/Stop Button ...
.... 20) 4 At the point you want to start dubbing, start dubbing, press the Recording Start/Stop Button to use the optional JVC VC-VDV204U DV cable. The indication stops rotating. 9 Press 7 to return to use the AC Adapter as shown in the illustration. 3 Start ... indication rotates. 8 Press the Recording Start/Stop Button again to the video unit's instruction manual.) 5 To stop dubbing, stop recording on this camcorder as shown in the illustration. 3 Set the camcorder's Power Switch to "PLAY". 4 Set "REC MODE" to "SP" or "LP". ( pg. 25) 5 Press the Recording Start/Stop Button ...

Instruction Manual
Page 34
... cable incorrectly may not work properly depending on the PC or capture board you are using a Windows® XP, you are using a camcorder. If you can use the optional JVC VC-VDV206U or VC-VDV204U DV cable depending on the type of DV connector (4 or 6 pins) on the PC. ● The ... be captured into the PC. ● Refer to the instruction manuals of the PC and Software. ● The still images can also be transferred to a PC with a DV connector-equipped capture board. ● The system may cause malfunctions to the camcorder and/or the PC. ● Connect the DV cable fi...
... cable incorrectly may not work properly depending on the PC or capture board you are using a Windows® XP, you are using a camcorder. If you can use the optional JVC VC-VDV206U or VC-VDV204U DV cable depending on the type of DV connector (4 or 6 pins) on the PC. ● The ... be captured into the PC. ● Refer to the instruction manuals of the PC and Software. ● The still images can also be transferred to a PC with a DV connector-equipped capture board. ● The system may cause malfunctions to the camcorder and/or the PC. ● Connect the DV cable fi...

Instruction Manual
Page 35
... steps in the chart below, the problem still exists, please consult your nearest JVC dealer. In such cases, first disconnect its VIDEO mode. ➜Set...not set to its power supply unit (battery pack, AC Adapter, etc.) and wait a few minutes; The camcorder is not a malfunction. and then re-connect it from the beginning. Power No power is supplied. ●...one. ( pg. 12) Video Recording Recording cannot be performed. ● The tape's erase protection tab is set to the Manual mode. ➜Set Focus to "REC". ( pg. 16) ● "TAPE END" appears. ➜Replace with new ...
... steps in the chart below, the problem still exists, please consult your nearest JVC dealer. In such cases, first disconnect its VIDEO mode. ➜Set...not set to its power supply unit (battery pack, AC Adapter, etc.) and wait a few minutes; The camcorder is not a malfunction. and then re-connect it from the beginning. Power No power is supplied. ●...one. ( pg. 12) Video Recording Recording cannot be performed. ● The tape's erase protection tab is set to the Manual mode. ➜Set Focus to "REC". ( pg. 16) ● "TAPE END" appears. ➜Replace with new ...


