
Owners Manual
Page 4
... 32 Replacing Standard Back Upholstery...32 9 SEAT TO FLOOR 33 Changing Seat-to-Floor Height ...33 10 REAR WHEELS 35 11 FRONT CASTERS/FORKS 36 Removing/Installing Eight Inch Forks ...36 Adjusting Forks...36 Removing/Installing Front Casters ...37 12 ANTI-TIPPERS/WHEEL LOCKS 38 Installing/Adjusting Anti-tippers...38 Using/Adjusting The Wheel Locks...40 Invacare® Veranda™Wheelchair 4 Part No...
... 32 Replacing Standard Back Upholstery...32 9 SEAT TO FLOOR 33 Changing Seat-to-Floor Height ...33 10 REAR WHEELS 35 11 FRONT CASTERS/FORKS 36 Removing/Installing Eight Inch Forks ...36 Adjusting Forks...36 Removing/Installing Front Casters ...37 12 ANTI-TIPPERS/WHEEL LOCKS 38 Installing/Adjusting Anti-tippers...38 Using/Adjusting The Wheel Locks...40 Invacare® Veranda™Wheelchair 4 Part No...

Owners Manual
Page 6
... WARRANTY SHALL NOT APPLY TO PROBLEMS ARISING FROM NORMAL WEAR OR FAILURE TO ADHERE TO THESE INSTRUCTIONS. INVACARE SHALL NOT BE LIABLE FOR ANY CONSEQUENTIAL OR INCIDENTAL DAMAGES WHATSOEVER. This warranty gives you specific legal rights and you do not receive satisfactory warranty service, please write directly to such repair and/or replacement. Do not return products...
... WARRANTY SHALL NOT APPLY TO PROBLEMS ARISING FROM NORMAL WEAR OR FAILURE TO ADHERE TO THESE INSTRUCTIONS. INVACARE SHALL NOT BE LIABLE FOR ANY CONSEQUENTIAL OR INCIDENTAL DAMAGES WHATSOEVER. This warranty gives you specific legal rights and you do not receive satisfactory warranty service, please write directly to such repair and/or replacement. Do not return products...

Owners Manual
Page 7
...use. 00078X021-0394 Part No. 1148116 2 OVERVIEW Serial Number Label Location is engaged to secure mounting bracket in desired location and recheck lock shoe embedding. 4. Loosen wheel lock mounting fastener, which runs through mounting bracket and frame. 2. Slide clamp toward rear wheel until wheel..., paragraph 3.2.4.5.3. Inspect for pneumatic tires). 3. If these wheel locks do not meet your needs, follow instructions below. ! 2 Overview 2.1 Label Locations IMPORTANT NOTICE The wheel locks on this wheelchair have been pre-set at least 1/8" into tire material at least 1/8" when ...
...use. 00078X021-0394 Part No. 1148116 2 OVERVIEW Serial Number Label Location is engaged to secure mounting bracket in desired location and recheck lock shoe embedding. 4. Loosen wheel lock mounting fastener, which runs through mounting bracket and frame. 2. Slide clamp toward rear wheel until wheel..., paragraph 3.2.4.5.3. Inspect for pneumatic tires). 3. If these wheel locks do not meet your needs, follow instructions below. ! 2 Overview 2.1 Label Locations IMPORTANT NOTICE The wheel locks on this wheelchair have been pre-set at least 1/8" into tire material at least 1/8" when ...

Owners Manual
Page 10
... owner's manuals, service manuals or instruction sheets supplied with this wheelchair. In case of this product or optional equipment. A qualified technician MUST perform the initial set up of damage, DO NOT use this equipment - NOTICE THE INFORMATION CONTAINED IN THIS DOCUMENT IS SUBJECT TO CHANGE WITHOUT NOTICE. also, a qualified technician must perform all parts for further instruction. Check all procedures specifically...
... owner's manuals, service manuals or instruction sheets supplied with this wheelchair. In case of this product or optional equipment. A qualified technician MUST perform the initial set up of damage, DO NOT use this equipment - NOTICE THE INFORMATION CONTAINED IN THIS DOCUMENT IS SUBJECT TO CHANGE WITHOUT NOTICE. also, a qualified technician must perform all parts for further instruction. Check all procedures specifically...

Owners Manual
Page 11
... additional safeguard for transportation of a user while in a wheelchair, in wheelchairs. With regards to ensure the safe operation of the restraints made available by the user. Serious injury can occur in vehicles for use be replaced IMMEDIATELY. Part No. 1148116 11 Invacare® Veranda™Wheelchair Wheelchair Tie Down Restraints and Seat Positioning Strap Wheelchair users should be transferred into appropriate seating in the event...
... additional safeguard for transportation of a user while in a wheelchair, in wheelchairs. With regards to ensure the safe operation of the restraints made available by the user. Serious injury can occur in vehicles for use be replaced IMMEDIATELY. Part No. 1148116 11 Invacare® Veranda™Wheelchair Wheelchair Tie Down Restraints and Seat Positioning Strap Wheelchair users should be transferred into appropriate seating in the event...

Owners Manual
Page 12
... an incline with cool water. Invacare® Veranda™Wheelchair 12 Part No. 1148116 Inasmuch as an additional safeguard for the wheelchair user. Operating Information After any adjustments, repair or service and before attempting active use . Serious injury or damage to use of protection against tipover. ALWAYS use anti-tippers. Unless otherwise noted, all service and adjustment should be attached at...
... an incline with cool water. Invacare® Veranda™Wheelchair 12 Part No. 1148116 Inasmuch as an additional safeguard for the wheelchair user. Operating Information After any adjustments, repair or service and before attempting active use . Serious injury or damage to use of protection against tipover. ALWAYS use anti-tippers. Unless otherwise noted, all service and adjustment should be attached at...

Owners Manual
Page 13
...footrests towards the outside of the wheelchair, make sure that the footplates are not brakes. Weight Limitation The Veranda wheelchair has a weight limitation of moving wheelchair with wheel locks. DO NOT attempt to avoid injury. Wheel locks are in injury to the user or damage to the wheelchair. ALWAYS use of its wheelchairs as a seat...wheels themselves. DO NOT stand on roads, streets or highways. Invacare wheelchairs have to pick them up from the wheelchair, ALWAYS engage both casters parallel to ride over . Part No. 1148116 13 Invacare® Veranda™Wheelchair...
...footrests towards the outside of the wheelchair, make sure that the footplates are not brakes. Weight Limitation The Veranda wheelchair has a weight limitation of moving wheelchair with wheel locks. DO NOT attempt to avoid injury. Wheel locks are in injury to the user or damage to the wheelchair. ALWAYS use of its wheelchairs as a seat...wheels themselves. DO NOT stand on roads, streets or highways. Invacare wheelchairs have to pick them up from the wheelchair, ALWAYS engage both casters parallel to ride over . Part No. 1148116 13 Invacare® Veranda™Wheelchair...

Owners Manual
Page 14
... to accommodate one individual occupies the wheelchair this manual MUST be heeded. Invacare recognizes and encourages each individual to try what works best for all warnings and cautions given in the safe operation and maintenance of the wheelchair user as well as a basic guide. Individual wheelchair users often develop skills to the wheelchair. If more than 9°. The techniques...
... to accommodate one individual occupies the wheelchair this manual MUST be heeded. Invacare recognizes and encourages each individual to try what works best for all warnings and cautions given in the safe operation and maintenance of the wheelchair user as well as a basic guide. Individual wheelchair users often develop skills to the wheelchair. If more than 9°. The techniques...

Owners Manual
Page 15
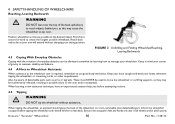
...engage wheel locks. FIGURE 1 Unfolding and Folding Wheelchair Part No. 1148116 15 Invacare® Veranda™Wheelchair Your wheelchair has been designed to use of the wheelchair. When reaching, leaning, or bending forward, it in a straight line Many activities require the wheelchair owner to move beyond the center of the wheelchair. ...as a tool to the normal balance, the center of gravity, and the weight distribution of gravity. Invacare recommends using seat/chest positioning straps for your weight. Make sure the casters are pointing in activities that they are ...
...engage wheel locks. FIGURE 1 Unfolding and Folding Wheelchair Part No. 1148116 15 Invacare® Veranda™Wheelchair Your wheelchair has been designed to use of the wheelchair. When reaching, leaning, or bending forward, it in a straight line Many activities require the wheelchair owner to move beyond the center of the wheelchair. ...as a tool to the normal balance, the center of gravity, and the weight distribution of gravity. Invacare recommends using seat/chest positioning straps for your weight. Make sure the casters are pointing in activities that they are ...
Owners Manual
Page 16
... move the wheelchair or as lifting supports, as possible to manage your wheelchair. Invacare® Veranda™Wheelchair 16 Part No. 1148116 Keep your back straight and bend your arm will extend without assistance. Point front casters forward to the user and/or assistant(s). Also, be inadvertently released, resulting in mind your sitting position. When learning a new...
... move the wheelchair or as lifting supports, as possible to manage your wheelchair. Invacare® Veranda™Wheelchair 16 Part No. 1148116 Keep your back straight and bend your arm will extend without assistance. Point front casters forward to the user and/or assistant(s). Also, be inadvertently released, resulting in mind your sitting position. When learning a new...

Owners Manual
Page 17
... possible, the user be removed from the wheelchair prior to tilt the wheelchair toward you. Extreme caution is advised when it is achieved and the front casters clear the curb. Invacare recommends using the wheelchair. 4 SAFETY/HANDLING OF WHEELCHAIRS After mastering the techniques of tipping the wheelchair, use only secure, non-detachable parts for hand-held supports. Roll the wheelchair forward and...
... possible, the user be removed from the wheelchair prior to tilt the wheelchair toward you. Extreme caution is advised when it is achieved and the front casters clear the curb. Invacare recommends using the wheelchair. 4 SAFETY/HANDLING OF WHEELCHAIRS After mastering the techniques of tipping the wheelchair, use only secure, non-detachable parts for hand-held supports. Roll the wheelchair forward and...

Owners Manual
Page 21
Pivot footplates upward to the inside of the wheelchair. 2. Swing footrest/legrest in locked position to hang between the cross braces. 4. FIGURE 6 Unfolding Folding Wheelchair 1. Part No. 1148116 21 Invacare® Veranda™Wheelchair Place excess seat upholstery over the armrest. DO NOT place any part of the seat upholstery at the front and back edge and lift up. ƽ...
Pivot footplates upward to the inside of the wheelchair. 2. Swing footrest/legrest in locked position to hang between the cross braces. 4. FIGURE 6 Unfolding Folding Wheelchair 1. Part No. 1148116 21 Invacare® Veranda™Wheelchair Place excess seat upholstery over the armrest. DO NOT place any part of the seat upholstery at the front and back edge and lift up. ƽ...

Owners Manual
Page 23
... for just like any vehicle, check the wheels and tires periodically for a thorough inspection and servicing. Part No. 1148116 23 Invacare® Veranda™Wheelchair To operate properly and safely, your personal body structure and preference. 5 Safety Inspection/Troubleshooting 5 SAFETY INSPECTION/TROUBLESHOOTING Every six months or as necessary, take your wheelchair. Regular cleaning will extend the life...
... for just like any vehicle, check the wheels and tires periodically for a thorough inspection and servicing. Part No. 1148116 23 Invacare® Veranda™Wheelchair To operate properly and safely, your personal body structure and preference. 5 Safety Inspection/Troubleshooting 5 SAFETY INSPECTION/TROUBLESHOOTING Every six months or as necessary, take your wheelchair. Regular cleaning will extend the life...

Owners Manual
Page 26
... could cause damage to the frame tubing. Before using your wheelchair, make sure all nuts and bolts are missing, worn, or torn. Replace any adjustments, repair or service and before use, make sure all attaching hardware is tightened securely. Check that rear wheels are equally spaced away from seat frame. 5.3 Maintenance Maintenance Safety Precautions ƽ WARNING After any...
... could cause damage to the frame tubing. Before using your wheelchair, make sure all nuts and bolts are missing, worn, or torn. Replace any adjustments, repair or service and before use, make sure all attaching hardware is tightened securely. Check that rear wheels are equally spaced away from seat frame. 5.3 Maintenance Maintenance Safety Precautions ƽ WARNING After any...

Owners Manual
Page 27
... towel lightly dampened with any vehicle, check the wheels and tires periodically for sagging, rips or tears. Use a Teflon™ lubricant if necessary. ƽ WARNING When cleaning rear cane or hand grip areas use . If the solid rubber tire needs repaired, Invacare recommends replacing the complete wheel assembly. Replace if looseness or deterioration is not recommended. 5 SAFETY INSPECTION/TROUBLESHOOTING ƽ...
... towel lightly dampened with any vehicle, check the wheels and tires periodically for sagging, rips or tears. Use a Teflon™ lubricant if necessary. ƽ WARNING When cleaning rear cane or hand grip areas use . If the solid rubber tire needs repaired, Invacare recommends replacing the complete wheel assembly. Replace if looseness or deterioration is not recommended. 5 SAFETY INSPECTION/TROUBLESHOOTING ƽ...

Owners Manual
Page 29
... Installing/Removing Front Riggings Installing 1. Install the front rigging hinge plates onto the hinge pins on front rigging and remove from the wheelchair. 3. To release the front rigging, push the footrest release lever inward, rotate footrest...wheelchair. 5. Hinge Plates Footplate FIGURE 1 Installing/Removing Front Riggings Part No. 1148116 29 Invacare® Veranda™Wheelchair Repeat STEPS 1-2 for the opposite side of the wheelchair until it locks into place. 6 Front Rigging 6 FRONT RIGGING ƽ WARNING After any adjustments, repair or service and before use...
... Installing/Removing Front Riggings Installing 1. Install the front rigging hinge plates onto the hinge pins on front rigging and remove from the wheelchair. 3. To release the front rigging, push the footrest release lever inward, rotate footrest...wheelchair. 5. Hinge Plates Footplate FIGURE 1 Installing/Removing Front Riggings Part No. 1148116 29 Invacare® Veranda™Wheelchair Repeat STEPS 1-2 for the opposite side of the wheelchair until it locks into place. 6 Front Rigging 6 FRONT RIGGING ƽ WARNING After any adjustments, repair or service and before use...

Owners Manual
Page 32
...wheelchair frame. It is tightened securely. Install the new back upholstery over the mounted back cane. 5. 8 BACK 8 Back ƽ WARNING After any adjustments, repair or service and before use , make sure all attaching hardware is necessary to remove only one back cane to replace... Washers Back Upholstery Mounting Screw Back Cane FIGURE 1 Replacing Standard Back Upholstery Invacare® Veranda™Wheelchair 32 Part No. 1148116 Securely install the back onto the wheelchair before use . 8.1 Replacing Standard Back Upholstery 1. Secure the new back upholstery to...
...wheelchair frame. It is tightened securely. Install the new back upholstery over the mounted back cane. 5. 8 BACK 8 Back ƽ WARNING After any adjustments, repair or service and before use , make sure all attaching hardware is necessary to remove only one back cane to replace... Washers Back Upholstery Mounting Screw Back Cane FIGURE 1 Replacing Standard Back Upholstery Invacare® Veranda™Wheelchair 32 Part No. 1148116 Securely install the back onto the wheelchair before use . 8.1 Replacing Standard Back Upholstery 1. Secure the new back upholstery to...
Owners Manual
Page 33
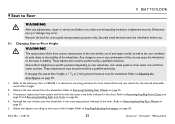
... adjustments, repair or service and before use. 9.1 Changing Seat-to-Floor Height ƽ WARNING The size/position of the front casters, size/position of the rear wheels, use of anti-tipper model, as well as the user condition directly relate to the stability of the six may occur. Refer to -floor height: 2. Part No. 1148116 33 Invacare® Veranda™Wheelchair
... adjustments, repair or service and before use. 9.1 Changing Seat-to-Floor Height ƽ WARNING The size/position of the front casters, size/position of the rear wheels, use of anti-tipper model, as well as the user condition directly relate to the stability of the six may occur. Refer to -floor height: 2. Part No. 1148116 33 Invacare® Veranda™Wheelchair

Owners Manual
Page 35
...Wheelchair Frame Part No. 1148116 Hex Screw FIGURE 1 Removing/Installing Rear Wheels 35 Invacare® Veranda™Wheelchair Adjust the wheel locks. To reinstall the rear wheel(s) onto the wheelchair, reverse STEPS 1-2. 4. Refer to 40 ft-lbs. 5. Removing/Installing Rear Wheels ƽ WARNING Only a qualified technician may change the size of the rear wheel or the seat-to the wheelchair...rear wheel to -floor height. 10 Rear Wheels 10 REAR WHEELS ƽ WARNING After any adjustments, repair or service and before using the wheelchair. Repeat STEP 1 ...
...Wheelchair Frame Part No. 1148116 Hex Screw FIGURE 1 Removing/Installing Rear Wheels 35 Invacare® Veranda™Wheelchair Adjust the wheel locks. To reinstall the rear wheel(s) onto the wheelchair, reverse STEPS 1-2. 4. Refer to 40 ft-lbs. 5. Removing/Installing Rear Wheels ƽ WARNING Only a qualified technician may change the size of the rear wheel or the seat-to the wheelchair...rear wheel to -floor height. 10 Rear Wheels 10 REAR WHEELS ƽ WARNING After any adjustments, repair or service and before using the wheelchair. Repeat STEP 1 ...

Owners Manual
Page 41
.... 5. Repeat STEPS 1-7 for the opposite wheel lock. 9. Part No. 1148116 41 Invacare® Veranda™Wheelchair Otherwise injury or damage may occur. Reposition the wheel lock so that secure the wheel lock to stop a moving wheelchair with the wheel locks. Repeat the STEPS 1-6 until the wheel lock holds the wheelchair. Repeat STEPS 1-9 until the wheel lock shoe embeds the tire 1/8-inch...
.... 5. Repeat STEPS 1-7 for the opposite wheel lock. 9. Part No. 1148116 41 Invacare® Veranda™Wheelchair Otherwise injury or damage may occur. Reposition the wheel lock so that secure the wheel lock to stop a moving wheelchair with the wheel locks. Repeat the STEPS 1-6 until the wheel lock holds the wheelchair. Repeat STEPS 1-9 until the wheel lock shoe embeds the tire 1/8-inch...


