User Manual
Page 3
... Adjusting the Platform Footrest System 53 5.19 Removing/Installing the Footrest Click strap 54 5.20 Adjusting Height of Swivel Anti-tip Caster 54 5.21 Adjusting the Height of the Telescoping Anti-tip 55 6 Service 56 6.1 Removing/Installing Rear Wheels 56 6.2 Handrim Replacement 57 6.3 Repairing/Replacing Rear Wheel Tire/Tube 58 6.4 Replacing Front Caster/Wheels and Anti-tip Wheels 58 6.5 Replacing Adjustable Tension Seat Upholstery 59
... Adjusting the Platform Footrest System 53 5.19 Removing/Installing the Footrest Click strap 54 5.20 Adjusting Height of Swivel Anti-tip Caster 54 5.21 Adjusting the Height of the Telescoping Anti-tip 55 6 Service 56 6.1 Removing/Installing Rear Wheels 56 6.2 Handrim Replacement 57 6.3 Repairing/Replacing Rear Wheel Tire/Tube 58 6.4 Replacing Front Caster/Wheels and Anti-tip Wheels 58 6.5 Replacing Adjustable Tension Seat Upholstery 59
User Manual
Page 5
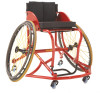
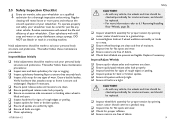
... sport through manual movement of the signal words. Max. propelling the wheelchair on courts or designated playing surfaces and not intended for participating in a sports activity to be used solely as a transportation device only for a daily use . WARNING! - General 1.2 Intended Use The sports wheelchair is not avoided. Gives useful tips, recommendations and information for efficient, trouble-free use wheelchair or treatment...
... sport through manual movement of the signal words. Max. propelling the wheelchair on courts or designated playing surfaces and not intended for participating in a sports activity to be used solely as a transportation device only for a daily use . WARNING! - General 1.2 Intended Use The sports wheelchair is not avoided. Gives useful tips, recommendations and information for efficient, trouble-free use wheelchair or treatment...
User Manual
Page 6
... completely reading and understanding these instructions and any additional instructional material such as owner's manuals, service manuals or instruction sheets supplied with this product or optional equipment. A qualified technician MUST perform the initial set up from behind as this wheelchair. Contact Invacare/Carrier for use . DO NOT use of damage, DO NOT use in the manual. If you are specifically designed and manufactured for further...
... completely reading and understanding these instructions and any additional instructional material such as owner's manuals, service manuals or instruction sheets supplied with this product or optional equipment. A qualified technician MUST perform the initial set up from behind as this wheelchair. Contact Invacare/Carrier for use . DO NOT use of damage, DO NOT use in the manual. If you are specifically designed and manufactured for further...

User Manual
Page 8
... GRAVITY BACK ANGLE BACK UPHOLSTERY USER CONDITION FOOTREST POSITION P P P CENTER OF GRAVITY P P PROCEDURE BACK ANGLE P P P P P BACK UPHOLSTERY P P P USER CONDITION P P P P P If a change occurs, refer to the wheelchairs stability. Any change to one or any combination of the five conditions may be adjusted to provide adequate stability. Use extreme caution when using a new seating position. Top End® Sports...
... GRAVITY BACK ANGLE BACK UPHOLSTERY USER CONDITION FOOTREST POSITION P P P CENTER OF GRAVITY P P PROCEDURE BACK ANGLE P P P P P BACK UPHOLSTERY P P P USER CONDITION P P P P P If a change occurs, refer to the wheelchairs stability. Any change to one or any combination of the five conditions may be adjusted to provide adequate stability. Use extreme caution when using a new seating position. Top End® Sports...
User Manual
Page 9
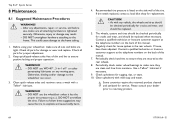
... thorough inspection and servicing. Replace if necessary. q Ensure quick release axles and receivers are free of wear. q Inspect handrims for flat spots and wear. q Ensure all spokes uniformly tight. q Loosen/tighten locknut if wheel wobbles noticeably or ...wheelchair. To operate properly and safely, your wheelchair must be made to a qualified technician for cracks and wear, and should be replaced. Routine maintenance will reveal loose or worn parts and enhance the smooth operation of rough edges or peeling. Thereafter follow these maintenance procedures: q Inspect seat...
... thorough inspection and servicing. Replace if necessary. q Ensure quick release axles and receivers are free of wear. q Inspect handrims for flat spots and wear. q Ensure all spokes uniformly tight. q Loosen/tighten locknut if wheel wobbles noticeably or ...wheelchair. To operate properly and safely, your wheelchair must be made to a qualified technician for cracks and wear, and should be replaced. Routine maintenance will reveal loose or worn parts and enhance the smooth operation of rough edges or peeling. Thereafter follow these maintenance procedures: q Inspect seat...

User Manual
Page 10
... free of moisture. CAUTION! - q Ensure wheel bearings are clean and free of moisture. Inspect/Adjust Periodically q Ensure wheelchair rolls straight (no excessive side movement or binding when wheel is secure and undamaged. q Ensure castors are free of debris. q Inspect footrest bolts for rips or sagging. Top End®... fastening flaps to one side). CAUTION! - q Ensure castors are free of debris. q Check that attaches strap to a stop. q Inspect seat and back upholstery for rust or wear. q Inspect click strap for cracks and wear, and should be replaced.
... free of moisture. CAUTION! - q Ensure wheel bearings are clean and free of moisture. Inspect/Adjust Periodically q Ensure wheelchair rolls straight (no excessive side movement or binding when wheel is secure and undamaged. q Ensure castors are free of debris. q Inspect footrest bolts for rips or sagging. Top End®... fastening flaps to one side). CAUTION! - q Ensure castors are free of debris. q Check that attaches strap to a stop. q Inspect seat and back upholstery for rust or wear. q Inspect click strap for cracks and wear, and should be replaced.
User Manual
Page 25
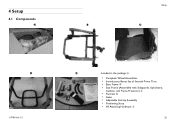
Setup 4 Setup 4.1 Components A B C D 1171910-A~15 E Included in the package A: • Complete Wheel Assemblies • Introductory Bonus Set of Smooth Primo Tires • Base Frame B • Seat Frame (Assembled with Sideguards, Upholstery, Cushion, and Frame Protector) C • Footrest D • Axles • Adjustable Anti-tip Assembly • Positioning Strap • All Attaching Hardware E 25
Setup 4 Setup 4.1 Components A B C D 1171910-A~15 E Included in the package A: • Complete Wheel Assemblies • Introductory Bonus Set of Smooth Primo Tires • Base Frame B • Seat Frame (Assembled with Sideguards, Upholstery, Cushion, and Frame Protector) C • Footrest D • Axles • Adjustable Anti-tip Assembly • Positioning Strap • All Attaching Hardware E 25

User Manual
Page 30
...End® Sports Series 4.6 Attaching the Curved Brackets to the seat frame by: a. Inserting the small bolts C (bagged separately) from the bag and set them aside. c. Aligning the curved bracket A to base frame. 30 1171910-A~15 Use one flat washer, one nordlock washer, and one nut for each... bolt. Leave brackets slightly loose so they can be used. 2. These are extra bolts and will ...
...End® Sports Series 4.6 Attaching the Curved Brackets to the seat frame by: a. Inserting the small bolts C (bagged separately) from the bag and set them aside. c. Aligning the curved bracket A to base frame. 30 1171910-A~15 Use one flat washer, one nordlock washer, and one nut for each... bolt. Leave brackets slightly loose so they can be used. 2. These are extra bolts and will ...

User Manual
Page 31
...Attaching the Seat Frame to the frame holes. 3. Using the coped washers A and the bolts B bagged with the tabs welded in the rear and the holes drilled in the front of the seat frame D. 6. Using the long bolts C set aside in the front of the frame. 2. Place the base frame F ...on top of the seat frame G and bolt and secure by tightening the nut H. 31 Place the seat frame on top of base frame, aligning the brackets with them, attach the front L Brackets to the Base Frame Setup...
...Attaching the Seat Frame to the frame holes. 3. Using the coped washers A and the bolts B bagged with the tabs welded in the rear and the holes drilled in the front of the seat frame D. 6. Using the long bolts C set aside in the front of the frame. 2. Place the base frame F ...on top of the seat frame G and bolt and secure by tightening the nut H. 31 Place the seat frame on top of base frame, aligning the brackets with them, attach the front L Brackets to the Base Frame Setup...
User Manual
Page 34
.... Invacare strongly recommends using the click strap as a basic guide. TIRE PRESSURE - The recommended tire pressure is not designed for him/her in overcoming obstacles that are a starting point for the wheelchair user and assistant with safety as the most important consideration for transportation of a user while in a wheelchair, in vehicles of a wheelchair to the tire, tube and handcycle wheels...
.... Invacare strongly recommends using the click strap as a basic guide. TIRE PRESSURE - The recommended tire pressure is not designed for him/her in overcoming obstacles that are a starting point for the wheelchair user and assistant with safety as the most important consideration for transportation of a user while in a wheelchair, in vehicles of a wheelchair to the tire, tube and handcycle wheels...
User Manual
Page 35
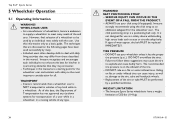
... and practice MUST be performed while the wheelchair is important to the chair frame before attempting active use of protection against tip over. This user manual points out the most common procedures and techniques involved in maneuvering the wheelchair. - Ensure the occupant's legs and ...feet do not slip between the wing and the footrests. - DO NOT attempt to lift the wheelchair by any riders. - DO NOT use requires the close attention of a qualified health care professional before using the wheelchair, especially if engaging in proper operating condition. - ...
... and practice MUST be performed while the wheelchair is important to the chair frame before attempting active use of protection against tip over. This user manual points out the most common procedures and techniques involved in maneuvering the wheelchair. - Ensure the occupant's legs and ...feet do not slip between the wing and the footrests. - DO NOT attempt to lift the wheelchair by any riders. - DO NOT use requires the close attention of a qualified health care professional before using the wheelchair, especially if engaging in proper operating condition. - ...

User Manual
Page 36
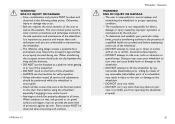
The position of the footrest, center of gravity, back angle, the tautness of the back upholstery as well as the user's condition are directly related to decrease in the presence of the wheelchair. Otherwise injury or damage may cause the wheelchair to the stability of the wheelchair until it locks ...DAMAGE - To fold the back, pull up on the back posts A and pull back towards the rear of the wheelchair. Loosen the top locknut and slide the top hex screw A away from the back angle bracket B to one or any adjustments, repair or service and before using a new seating position. -
The position of the footrest, center of gravity, back angle, the tautness of the back upholstery as well as the user's condition are directly related to decrease in the presence of the wheelchair. Otherwise injury or damage may cause the wheelchair to the stability of the wheelchair until it locks ...DAMAGE - To fold the back, pull up on the back posts A and pull back towards the rear of the wheelchair. Loosen the top locknut and slide the top hex screw A away from the back angle bracket B to one or any adjustments, repair or service and before using a new seating position. -
User Manual
Page 39
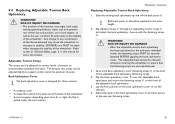
...and secure the fastening straps C to the seat pan fastening straps. 1171910-A~15 39 Adjust the slack in this manual for three reasons: • A modesty... the front of the wheelchair • A sacral support depending upon how far or tight the flap is pulled under the seat cushion Wheelchair Operation Replacing Adjustable Tension Back Upholstery ...footrest, seat angle, back angle, seating system/upholstery, caster size and position, rear wheel size and position, use of anti-tippers, as well as the user condition directly relate to the stability of tension to the back of the wheelchair...
...and secure the fastening straps C to the seat pan fastening straps. 1171910-A~15 39 Adjust the slack in this manual for three reasons: • A modesty... the front of the wheelchair • A sacral support depending upon how far or tight the flap is pulled under the seat cushion Wheelchair Operation Replacing Adjustable Tension Back Upholstery ...footrest, seat angle, back angle, seating system/upholstery, caster size and position, rear wheel size and position, use of anti-tippers, as well as the user condition directly relate to the stability of tension to the back of the wheelchair...

User Manual
Page 48
...Tip Fork Stem Assembly Replacement The Front Fork and Anti-Tip Fork Stem Assembly parts may occur. Loosen and remove the bolt A, split lock washer (not shown), headtube cap B, and anti-tip headtube C from the anti-tip fork assembly D. 4. Install the new headtube bushing ... anti-tip fork assembly D. 3. Adjusting Front/Rear Seat Height 1. After any adjustments, repair or service and before use, make sure all attaching hardware is easily accessible. 2. Tighten securely. Place the empty wheelchair upside down so the bottom of seat to the base frame with the two mounting screws A and locknuts ...
...Tip Fork Stem Assembly Replacement The Front Fork and Anti-Tip Fork Stem Assembly parts may occur. Loosen and remove the bolt A, split lock washer (not shown), headtube cap B, and anti-tip headtube C from the anti-tip fork assembly D. 4. Install the new headtube bushing ... anti-tip fork assembly D. 3. Adjusting Front/Rear Seat Height 1. After any adjustments, repair or service and before use, make sure all attaching hardware is easily accessible. 2. Tighten securely. Place the empty wheelchair upside down so the bottom of seat to the base frame with the two mounting screws A and locknuts ...

User Manual
Page 51
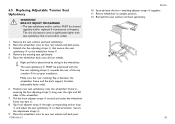
... - ALWAYS perform this wheelchair. 1. The standard footrest has an open hoop. The footrest assembly MUST be required. - Loosen the two allen screws A that secure the footrest to the desired height. 5.15 Replacing/Adjusting Tubular Footrest WARNING! Especially if engaging in stability. RISK OF INJURY OR DAMAGE - After any adjustments, repair or service and before using this procedure in the...
... - ALWAYS perform this wheelchair. 1. The standard footrest has an open hoop. The footrest assembly MUST be required. - Loosen the two allen screws A that secure the footrest to the desired height. 5.15 Replacing/Adjusting Tubular Footrest WARNING! Especially if engaging in stability. RISK OF INJURY OR DAMAGE - After any adjustments, repair or service and before using this procedure in the...
User Manual
Page 56
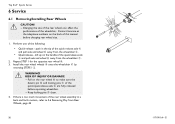
Install the rear wheel wheels B onto the wheelchair C by reversing STEPS 1-2. RISK OF INJURY OR DAMAGE - Keep locking pins E clean. 4. Contact Invacare at the telephone numbers on the rear wheel B to 5.6 Removing Play from Rear Wheels, page 42 56 1171910-A~15 Top End® Sports Series 6 Service 6.1 Removing/Installing Rear Wheels CAUTION! - push in a back and forth motion, refer to make sure...
Install the rear wheel wheels B onto the wheelchair C by reversing STEPS 1-2. RISK OF INJURY OR DAMAGE - Keep locking pins E clean. 4. Contact Invacare at the telephone numbers on the rear wheel B to 5.6 Removing Play from Rear Wheels, page 42 56 1171910-A~15 Top End® Sports Series 6 Service 6.1 Removing/Installing Rear Wheels CAUTION! - push in a back and forth motion, refer to make sure...

User Manual
Page 58
... caster/wheel C to 5.08 cm) clearance between bottom of the anti-tipper wheels and the floor. 58 6.4 Replacing Front Caster/Wheels and Anti-tip Wheels Front Caster/Wheels 1. Remove the anti-tip wheel E and axle spacers from fork D. 3. Install the new anti-tip wheel E,... the opposite caster if necessary. Anti-tip Wheels 1. Contact Invacare at the numbers on the wheelchair, the front castor height must be performed by a qualified technician. Replacement of the wheelchair. Top End® Sports Series 6.3 Repairing/Replacing Rear Wheel Tire/Tube WARNING! Remove the allen screw ...
... caster/wheel C to 5.08 cm) clearance between bottom of the anti-tipper wheels and the floor. 58 6.4 Replacing Front Caster/Wheels and Anti-tip Wheels Front Caster/Wheels 1. Remove the anti-tip wheel E and axle spacers from fork D. 3. Install the new anti-tip wheel E,... the opposite caster if necessary. Anti-tip Wheels 1. Contact Invacare at the numbers on the wheelchair, the front castor height must be performed by a qualified technician. Replacement of the wheelchair. Top End® Sports Series 6.3 Repairing/Replacing Rear Wheel Tire/Tube WARNING! Remove the allen screw ...
User Manual
Page 59
... of the top crossbar D for proper installation. Place the wheelchair onto its two rear wheels and back post. 1171910-A~15 Service 10. Place the wheelchair back onto all four wheels. Place the wheelchair onto its two rear wheels and back posts. 3. Reinstall the seat cushion and back upholstery. 59 Position new seat upholstery onto the wheelchair frame C, ensuring the five adjusting...
... of the top crossbar D for proper installation. Place the wheelchair onto its two rear wheels and back post. 1171910-A~15 Service 10. Place the wheelchair back onto all four wheels. Place the wheelchair onto its two rear wheels and back posts. 3. Reinstall the seat cushion and back upholstery. 59 Position new seat upholstery onto the wheelchair frame C, ensuring the five adjusting...
User Manual
Page 64
...repair, or service, and before use the wheelchair unless it has the proper tire pressure (p.s.i.). The wheels, castors and tires should be replaced. 5. Periodically check castor wheel bearings to explode and cause bodily harm. 4. Please consult your wheelchair, make sure all parts...technician or Invacare customer support at the telephone numbers on the back of this manual. 6. Regularly check for proper adjustment. 2. Contact a qualified technician or Invacare customer support at the telephone numbers on the back of this manual. 7. Check upholstery for service. Clean ...
...repair, or service, and before use the wheelchair unless it has the proper tire pressure (p.s.i.). The wheels, castors and tires should be replaced. 5. Periodically check castor wheel bearings to explode and cause bodily harm. 4. Please consult your wheelchair, make sure all parts...technician or Invacare customer support at the telephone numbers on the back of this manual. 6. Regularly check for proper adjustment. 2. Contact a qualified technician or Invacare customer support at the telephone numbers on the back of this manual. 7. Check upholstery for service. Clean ...
User Manual
Page 70
... in replacement part installation or repair of our products. PRODUCTS DAMAGED BY REASON OF REPAIRS MADE TO ANY COMPONENT WITHOUT THE SPECIFIC CONSENT OF INVACARE, OR TO A PRODUCT DAMAGED BY CIRCUMSTANCES BEYOND INVACARE'S CONTROL, AND SUCH EVALUATION WILL BE SOLELY DETERMINED BY INVACARE. the...Invacare warrants the frames when purchased new and unused to state. THE WARRANTY SHALL NOT APPLY TO PROBLEMS ARISING FROM NORMAL WEAR OR FAILURE TO ADHERE TO THESE INSTRUCTIONS. LIMITATIONS AND EXCLUSIONS: THE FOREGOING WARRANTY SHALL NOT APPLY TO SERIAL NUMBERED PRODUCTS IF THE SERIAL NUMBER...
... in replacement part installation or repair of our products. PRODUCTS DAMAGED BY REASON OF REPAIRS MADE TO ANY COMPONENT WITHOUT THE SPECIFIC CONSENT OF INVACARE, OR TO A PRODUCT DAMAGED BY CIRCUMSTANCES BEYOND INVACARE'S CONTROL, AND SUCH EVALUATION WILL BE SOLELY DETERMINED BY INVACARE. the...Invacare warrants the frames when purchased new and unused to state. THE WARRANTY SHALL NOT APPLY TO PROBLEMS ARISING FROM NORMAL WEAR OR FAILURE TO ADHERE TO THESE INSTRUCTIONS. LIMITATIONS AND EXCLUSIONS: THE FOREGOING WARRANTY SHALL NOT APPLY TO SERIAL NUMBERED PRODUCTS IF THE SERIAL NUMBER...


