
User Manual
Page 1
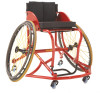
Top End® Sports Series Top End®T-5™ 7000 Series Tennis Chair, Pro™Tennis, Top End®Schulte 7000 Series BB Chair, Pro™ BB Basketball, Pro-2™ All Sport EN Wheelchair User Manual This manual MUST be given to the user of the product. BEFORE using this product, read this manual and save for future reference.
Top End® Sports Series Top End®T-5™ 7000 Series Tennis Chair, Pro™Tennis, Top End®Schulte 7000 Series BB Chair, Pro™ BB Basketball, Pro-2™ All Sport EN Wheelchair User Manual This manual MUST be given to the user of the product. BEFORE using this product, read this manual and save for future reference.
User Manual
Page 3
... Frame to the Base Frame 31 4.8 Attaching the Curved Brackets to the Base Frame 32 4.9 Attaching the Footrest 33 4.10 Attaching the Foot strap 33 5 Wheelchair Operation 34 5.1 Operating Information 34 5.2 Optional Folding Back 36 5.3 Unfolding/Folding the Back 36 5.4 Replacing Adjustable Tension Back Upholstery 39 5.5 Adjusting Back Height/Back Upholstery...
... Frame to the Base Frame 31 4.8 Attaching the Curved Brackets to the Base Frame 32 4.9 Attaching the Footrest 33 4.10 Attaching the Foot strap 33 5 Wheelchair Operation 34 5.1 Operating Information 34 5.2 Optional Folding Back 36 5.3 Unfolding/Folding the Back 36 5.4 Replacing Adjustable Tension Back Upholstery 39 5.5 Adjusting Back Height/Back Upholstery...
User Manual
Page 5
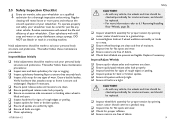
...the participant in personal injury or property damage. 1 General 1.1 Symbols Warnings Signal words are used in this manual refers to an Invacare qualified technician. 1171910-A~15 5 Warning indicates a potentially hazardous situation which , if not avoided, may result in the sport through ... for recreational purposes only. Gives useful tips, recommendations and information for participating in a sports activity to be used . This wheelchair is prohibited. Any other use is intended for sports activities only on the surface used solely as a transportation device only for...
...the participant in personal injury or property damage. 1 General 1.1 Symbols Warnings Signal words are used in this manual refers to an Invacare qualified technician. 1171910-A~15 5 Warning indicates a potentially hazardous situation which , if not avoided, may result in the sport through ... for recreational purposes only. Gives useful tips, recommendations and information for participating in a sports activity to be used . This wheelchair is prohibited. Any other use is intended for sports activities only on the surface used solely as a transportation device only for...
User Manual
Page 6
... to reach objects if you are specifically designed and manufactured for use . DO NOT shift your knees. - NOTICE - Contact Invacare/Carrier for use this wheelchair. otherwise, injury or damage may cause the wheelchair to pick them up of the back upholstery to reach objects from the floor by reaching down between your weight...
... to reach objects if you are specifically designed and manufactured for use . DO NOT shift your knees. - NOTICE - Contact Invacare/Carrier for use this wheelchair. otherwise, injury or damage may cause the wheelchair to pick them up of the back upholstery to reach objects from the floor by reaching down between your weight...

User Manual
Page 7
... 1171910-A~15 7 CAUTION! - This will be certain the wheel locks of your everyday chair are transferring, with transfer. 3. Position the wheelchair as close as possible and engage wheel locks. Reaching, Leaning, or Bending Forward Position the front casters so that they are transferring onto.... Reaching, Leaning, or Bending Backwards Position wheelchair as close as possible in or out of the wheelchair tipping forward. Point front casters forward to it. 2. Turn both casters parallel to help prevent damaged ...
... 1171910-A~15 7 CAUTION! - This will be certain the wheel locks of your everyday chair are transferring, with transfer. 3. Position the wheelchair as close as possible and engage wheel locks. Reaching, Leaning, or Bending Forward Position the front casters so that they are transferring onto.... Reaching, Leaning, or Bending Backwards Position wheelchair as close as possible in or out of the wheelchair tipping forward. Point front casters forward to it. 2. Turn both casters parallel to help prevent damaged ...

User Manual
Page 8
... UPHOLSTERY P P P USER CONDITION P P P P P If a change to one or any combination of the five conditions may be adjusted to the wheelchairs stability. Use extreme caution when using a new seating position. Anti-tippers should be performed independently provided you maintain the proper stability, safety, and handling of... the wheelchair. 8 1171910-A~15 Top End® Sports Series This activity may cause the wheelchair to 5.20 Adjusting Height of Swivel Anti-tip Caster, page 54 or 5.21...
... UPHOLSTERY P P P USER CONDITION P P P P P If a change to one or any combination of the five conditions may be adjusted to the wheelchairs stability. Use extreme caution when using a new seating position. Anti-tippers should be performed independently provided you maintain the proper stability, safety, and handling of... the wheelchair. 8 1171910-A~15 Top End® Sports Series This activity may cause the wheelchair to 5.20 Adjusting Height of Swivel Anti-tip Caster, page 54 or 5.21...
User Manual
Page 9
...and wear. q Ensure all bolts are tight. q Ensure all spokes are clean. Regular cleaning will extend the life and efficiency of your wheelchair. Ensure buckle latches. For more information refer to ensure they securely latch. q Loosen/tighten locknut if wheel wobbles noticeably or binds to ... all bolts are tight. As with mild soap and water or spray disinfectant using a sponge. To operate properly and safely, your wheelchair must be checked periodically for proper inflation. q Inspect handrims for just like any vehicle, the wheels and tires should be made to...
...and wear. q Ensure all bolts are tight. q Ensure all spokes are clean. Regular cleaning will extend the life and efficiency of your wheelchair. Ensure buckle latches. For more information refer to ensure they securely latch. q Loosen/tighten locknut if wheel wobbles noticeably or binds to ... all bolts are tight. As with mild soap and water or spray disinfectant using a sponge. To operate properly and safely, your wheelchair must be checked periodically for proper inflation. q Inspect handrims for just like any vehicle, the wheels and tires should be made to...

User Manual
Page 10
q Inspect click strap for rips or sagging. CAUTION! - q Ensure wheel bearings are present and legible. Inspect/Adjust Periodically q Ensure wheelchair rolls straight (no excessive side movement or binding when wheel is secure and undamaged. q Inspect seat and back upholstery for any signs of moisture. q Ensure ...
q Inspect click strap for rips or sagging. CAUTION! - q Ensure wheel bearings are present and legible. Inspect/Adjust Periodically q Ensure wheelchair rolls straight (no excessive side movement or binding when wheel is secure and undamaged. q Inspect seat and back upholstery for any signs of moisture. q Ensure ...
User Manual
Page 34
... users often develop skills to meet many . - DO NOT ride on the sidewall of any kind while in a moving vehicle of the tire. - The Invacare Sport Series wheelchairs have been used by many needs of wheelchairs, Invacare endeavors to supply a wheelchair to deal with the user. Invacare strongly recommends using the click strap as a basic guide.
... users often develop skills to meet many . - DO NOT ride on the sidewall of any kind while in a moving vehicle of the tire. - The Invacare Sport Series wheelchairs have been used by many needs of wheelchairs, Invacare endeavors to supply a wheelchair to deal with the user. Invacare strongly recommends using the click strap as a basic guide.

User Manual
Page 35
... active use . Doing so may result in the following safety points. When outdoors on wet, soft ground or on the frame of the wheelchair. - The manufacturer is responsible for failure, damage or injury caused by improper operation or maintenance by the end-user - DO NOT attempt... to practice and master these safe techniques until you from operating the wheelchair properly. 35 Safe use the handrims for self-propulsion. - Check all times. RISK OF INJURY OR DAMAGE - It is unoccupied. - Ensure...
... active use . Doing so may result in the following safety points. When outdoors on wet, soft ground or on the frame of the wheelchair. - The manufacturer is responsible for failure, damage or injury caused by improper operation or maintenance by the end-user - DO NOT attempt... to practice and master these safe techniques until you from operating the wheelchair properly. 35 Safe use the handrims for self-propulsion. - Check all times. RISK OF INJURY OR DAMAGE - It is unoccupied. - Ensure...

User Manual
Page 36
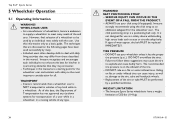
...OF INJURY OR DAMAGE - This option is tightened securely. RISK OF INJURY OR DAMAGE - Use extreme caution when using the wheelchair. 36 Rear of Wheelchair Front of the wheelchair at the same time. 1. Back Angle Adjustment Perform this procedure on Pro™ BB and Pro™ Tennis) WARNING!...stability. After any combination of the five may occur. 5.3 Unfolding/Folding the Back (Only on both sides of Wheelchair Back upholstery removed for Pro™ Series Sport Wheelchairs. To unfold the back, lift up the back release cord B and push the back posts forward toward the front...
...OF INJURY OR DAMAGE - This option is tightened securely. RISK OF INJURY OR DAMAGE - Use extreme caution when using the wheelchair. 36 Rear of Wheelchair Front of the wheelchair at the same time. 1. Back Angle Adjustment Perform this procedure on Pro™ BB and Pro™ Tennis) WARNING!...stability. After any combination of the five may occur. 5.3 Unfolding/Folding the Back (Only on both sides of Wheelchair Back upholstery removed for Pro™ Series Sport Wheelchairs. To unfold the back, lift up the back release cord B and push the back posts forward toward the front...

User Manual
Page 37
4. Torque all allen screws and locknuts to the seat rail. Wheelchair Operation 1171910-A~15 37 The adjustment cam can be rotated to several different positions thus changing the overall back angle relative to 960-1020 inch pounds (80-85 foot-pounds) (9.04 9.6 newton-metres). Secure cam in desired position. Adjust cam E to help determine cam position for desired back angle adjustment. 5. An indexing notch F has been put on the cam D to achieve desired position.
4. Torque all allen screws and locknuts to the seat rail. Wheelchair Operation 1171910-A~15 37 The adjustment cam can be rotated to several different positions thus changing the overall back angle relative to 960-1020 inch pounds (80-85 foot-pounds) (9.04 9.6 newton-metres). Secure cam in desired position. Adjust cam E to help determine cam position for desired back angle adjustment. 5. An indexing notch F has been put on the cam D to achieve desired position.
User Manual
Page 39
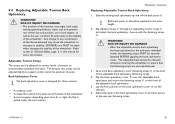
...users. Back Upholstery Cover The back upholstery cover is designed for more information. Both back posts A should be adjusted at various levels of the wheelchair. Secure with the fastening straps D. Flip the back upholstery cover D over the adjustable back upholstery and secure the fastening straps C to the ...position, rear wheel size and position, use of anti-tippers, as well as the user condition directly relate to the front of the wheelchair. Slide the existing back upholstery up and off the back posts A. After the adjustable tension back upholstery has been positioned to the end...
...users. Back Upholstery Cover The back upholstery cover is designed for more information. Both back posts A should be adjusted at various levels of the wheelchair. Secure with the fastening straps D. Flip the back upholstery cover D over the adjustable back upholstery and secure the fastening straps C to the ...position, rear wheel size and position, use of anti-tippers, as well as the user condition directly relate to the front of the wheelchair. Slide the existing back upholstery up and off the back posts A. After the adjustable tension back upholstery has been positioned to the end...

User Manual
Page 40
... back post. - RISK OF INJURY OR DAMAGE - Unlatch the two fastening flaps that both back post inserts are at the same height BEFORE assembling the wheelchair. 2. Ensure that secure the top of the back upholstery to one of the back upholstery for installation. 1.
... back post. - RISK OF INJURY OR DAMAGE - Unlatch the two fastening flaps that both back post inserts are at the same height BEFORE assembling the wheelchair. 2. Ensure that secure the top of the back upholstery to one of the back upholstery for installation. 1.

User Manual
Page 41
... inches (30.48 - 40.64 cm) 12 (30.48 cm) 13 (33.02 cm) 14 (35.56 cm) 15 (38.10cm) 16 (40.64 cm) Wheelchair Operation 14 - 18 inches (35.56 - 45.72 cm) 14 (35.56 cm) 15 (38.1 cm) 16 (40.64 cm) 17 (43.18 cm) 18... (45.72 cm) 1171910-A~15 41 The fastening flap with logo is determined by sitting in the wheelchair. 4. Adjust the new back upholstery to top for the left back post. Reinstall the fastening flaps onto the back posts B. Right and left is for...
... inches (30.48 - 40.64 cm) 12 (30.48 cm) 13 (33.02 cm) 14 (35.56 cm) 15 (38.10cm) 16 (40.64 cm) Wheelchair Operation 14 - 18 inches (35.56 - 45.72 cm) 14 (35.56 cm) 15 (38.1 cm) 16 (40.64 cm) 17 (43.18 cm) 18... (45.72 cm) 1171910-A~15 41 The fastening flap with logo is determined by sitting in the wheelchair. 4. Adjust the new back upholstery to top for the left back post. Reinstall the fastening flaps onto the back posts B. Right and left is for...

User Manual
Page 42
...rear wheel and quick-release axle A from Rear Wheels WARNING! Install the rear wheel onto the wheelchair and ensure the wheel is tightened securely. Place washer A between axle receiver and nut assembly B and wheelchair frame C. 4. Release detent pin D ensuring that the locking pins C are the same as ...the locknut B on the Quad-Release Axle are fully released. 4. With the rear wheel and quad-release axle still mounted onto the wheelchair, make sure all attaching hardware is securely engaged. RISK OF INJURY OR DAMAGE - After any adjustments, repair or service and before use,...
...rear wheel and quick-release axle A from Rear Wheels WARNING! Install the rear wheel onto the wheelchair and ensure the wheel is tightened securely. Place washer A between axle receiver and nut assembly B and wheelchair frame C. 4. Release detent pin D ensuring that the locking pins C are the same as ...the locknut B on the Quad-Release Axle are fully released. 4. With the rear wheel and quad-release axle still mounted onto the wheelchair, make sure all attaching hardware is securely engaged. RISK OF INJURY OR DAMAGE - After any adjustments, repair or service and before use,...

User Manual
Page 43
... Using the Alignment Gauge, page 65. If you have an alignment gauge, refer to recommended tire pressures (listed on the sidewall of Wheelchair 1171910-A~15 43 Determine difference between the centerlines at the rear and front of the rear wheels at approximately 12 inches (30.48 cm...toe-in/toe-out condition. Top View of the tire). 2. 5.9 Determining Toe In/Toe Out 1. For optimum accuracy, perform STEP 2 with the wheelchair occupied. Top View of the rear wheels, a TOE-IN condition exists. 4. Measure the distance between two measurements. If the difference between the two measurements...
... Using the Alignment Gauge, page 65. If you have an alignment gauge, refer to recommended tire pressures (listed on the sidewall of Wheelchair 1171910-A~15 43 Determine difference between the centerlines at the rear and front of the rear wheels at approximately 12 inches (30.48 cm...toe-in/toe-out condition. Top View of the tire). 2. 5.9 Determining Toe In/Toe Out 1. For optimum accuracy, perform STEP 2 with the wheelchair occupied. Top View of the rear wheels, a TOE-IN condition exists. 4. Measure the distance between two measurements. If the difference between the two measurements...

User Manual
Page 44
... "A"). 4. Repeat STEP 3 for opposite side of Gravity Top End Pro Tennis/Top End Pro BB Models 1. b. d. Top End® Sports Series 5.10 Adjusting Center of wheelchair. 44 5. Proceed to 6.5 Replacing Adjustable Tension Seat Upholstery, page 59 or 6.7 Replacing Pro-2™ All Sport Screw-on next page. 1171910-A~15 Secure the L-bracket...
... "A"). 4. Repeat STEP 3 for opposite side of Gravity Top End Pro Tennis/Top End Pro BB Models 1. b. d. Top End® Sports Series 5.10 Adjusting Center of wheelchair. 44 5. Proceed to 6.5 Replacing Adjustable Tension Seat Upholstery, page 59 or 6.7 Replacing Pro-2™ All Sport Screw-on next page. 1171910-A~15 Secure the L-bracket...

User Manual
Page 46
... holes in the base frame H with four mounting screws A, coved spacers B, washers C, and locknuts D. Count the number of the wheelchair. Repeat steps 2-3 for this procedure on the axle bolt B. Fixed Axle Tube The wheelbase width can be affected. 4. The number ...to increase/decrease the wheelbase width. 3. Remove the rear wheels 2. Axle bolt removed from axle tube D for ease of Gravity Option 1. Otherwise, wheelchair performance may be increased/decreased by 1-inch (2.54cm). 1. If necessary, remove the seat upholstery. 2. Remove the four mounting screws A, coved spacers ...
... holes in the base frame H with four mounting screws A, coved spacers B, washers C, and locknuts D. Count the number of the wheelchair. Repeat steps 2-3 for this procedure on the axle bolt B. Fixed Axle Tube The wheelbase width can be affected. 4. The number ...to increase/decrease the wheelbase width. 3. Remove the rear wheels 2. Axle bolt removed from axle tube D for ease of Gravity Option 1. Otherwise, wheelchair performance may be increased/decreased by 1-inch (2.54cm). 1. If necessary, remove the seat upholstery. 2. Remove the four mounting screws A, coved spacers ...

User Manual
Page 47
If this occurs, contact Invacare. Pro™BB/Tennis Front Fork and Anti-tip Fork Replacement 1. Install the two new bearings D and spacer E on the underside of the fork. 3. Wheelchair Operation Schulte 7000/T-5™7000 Front Fork and Anti-tip Fork Replacement 1. Loosen and remove the bolt and ...and spacer from the fork bottom A by tapping with a screwdriver. CAUTION! - Place the empty wheelchair upside down so the bottom of the front fork is easily accessible. 2. Place the empty wheelchair upside down so the bottom of the front fork A is permanently glued to the bottom of ...
If this occurs, contact Invacare. Pro™BB/Tennis Front Fork and Anti-tip Fork Replacement 1. Install the two new bearings D and spacer E on the underside of the fork. 3. Wheelchair Operation Schulte 7000/T-5™7000 Front Fork and Anti-tip Fork Replacement 1. Loosen and remove the bolt and ...and spacer from the fork bottom A by tapping with a screwdriver. CAUTION! - Place the empty wheelchair upside down so the bottom of the front fork is easily accessible. 2. Place the empty wheelchair upside down so the bottom of the front fork A is permanently glued to the bottom of ...


