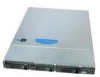
Service Guide
Page 3
...a list of this manual provides technical specifications, regulatory information, "getting help you for troubleshooting, upgrading, and repairing this server system. Intel® Server System SR1600UR Service Guide iii For the latest version of the server system. Chapter 2 provides a brief overview of this manual, see http://www.intel.com/p/en_US/support/highlights/server/s5520ur. It provides step-bystep instructions and diagrams for navigating through the BIOS Setup screens, performing a BIOS update, and resetting the password or BIOS defaults. Preface About this Manual...
...a list of this manual provides technical specifications, regulatory information, "getting help you for troubleshooting, upgrading, and repairing this server system. Intel® Server System SR1600UR Service Guide iii For the latest version of the server system. Chapter 2 provides a brief overview of this manual, see http://www.intel.com/p/en_US/support/highlights/server/s5520ur. It provides step-bystep instructions and diagrams for navigating through the BIOS Setup screens, performing a BIOS update, and resetting the password or BIOS defaults. Preface About this Manual...

Service Guide
Page 7
... cables. After removing a board from its protective wrapper or from system, you may be extremely sensitive to the safety instructions. Some jumpers have such a tab, take care when using this guide to the server before you perform all procedures in which the product is a small plastic encased conductor that jumper. Intel® Server System SR1600UR Service Guide vii Otherwise, personal injury or equipment damage can damage disk drives, boards...
... cables. After removing a board from its protective wrapper or from system, you may be extremely sensitive to the safety instructions. Some jumpers have such a tab, take care when using this guide to the server before you perform all procedures in which the product is a small plastic encased conductor that jumper. Intel® Server System SR1600UR Service Guide vii Otherwise, personal injury or equipment damage can damage disk drives, boards...

Service Guide
Page 10
... Installing the Heatsink 52 Removing the Heatsink 54 Removing the Processor 55 Removing and Installing the Small Air Baffle 56 Removing the Small Air Baffle 56 Installing the Small Air Baffle 56 Installing and Removing a Fixed Mount Hard Drive (Fixed Mount Hard Drive System Only) . 57 Installing a Fixed Mount Hard Disk Drive 57 Removing a Fixed Mount Hard Disk Drive 60 Installing and Removing a Hot-swap Hard Drive (Hot-swap Hard Drive System Only) ...... 61 Installing a Hot-swap SAS or SATA Hard Disk Drive 61 x Intel® Server System SR1600UR Service Guide
... Installing the Heatsink 52 Removing the Heatsink 54 Removing the Processor 55 Removing and Installing the Small Air Baffle 56 Removing the Small Air Baffle 56 Installing the Small Air Baffle 56 Installing and Removing a Fixed Mount Hard Drive (Fixed Mount Hard Drive System Only) . 57 Installing a Fixed Mount Hard Disk Drive 57 Removing a Fixed Mount Hard Disk Drive 60 Installing and Removing a Hot-swap Hard Drive (Hot-swap Hard Drive System Only) ...... 61 Installing a Hot-swap SAS or SATA Hard Disk Drive 61 x Intel® Server System SR1600UR Service Guide
Service Guide
Page 11
... Hard Drive System only 88 Removing and Installing the Fan Assembly 90 Removing the System Fan Assembly 90 Installing the System Fan Assembly 91 Replacing a System Fan ...93 Installing and Removing the Rack Handles 94 Installing the Rack Handles 94 Removing the Rack Handles 95 Chapter 4: Server Utilities 97 Using the BIOS Setup Utility 97 Entering BIOS Setup 97 If You Cannot Access Setup 97 Setup Menus ...97 Upgrading the BIOS ...99 Preparing for the Upgrade 99 Upgrading the BIOS 100 Clearing the Password ...100 Restoring the BIOS Defaults 102 Appendix A: Technical...
... Hard Drive System only 88 Removing and Installing the Fan Assembly 90 Removing the System Fan Assembly 90 Installing the System Fan Assembly 91 Replacing a System Fan ...93 Installing and Removing the Rack Handles 94 Installing the Rack Handles 94 Removing the Rack Handles 95 Chapter 4: Server Utilities 97 Using the BIOS Setup Utility 97 Entering BIOS Setup 97 If You Cannot Access Setup 97 Setup Menus ...97 Upgrading the BIOS ...99 Preparing for the Upgrade 99 Upgrading the BIOS 100 Clearing the Password ...100 Restoring the BIOS Defaults 102 Appendix A: Technical...
Service Guide
Page 15
Intel® Light-Guided Diagnostic LEDs - Server Board Connector and Component Locations 15 Figure 8. Intel® Local Control Panel 21 Figure 12. Back Panel Connectors 23 Figure 14. Cable Routing (Fixed Mount Hard Drive System 30 Figure 17. Cable Routing (Hot-swap Hard Drive System 32 Figure 19. Removing the Server System Cover 39 Figure 25. Installing the Server System Cover 40 Figure 26. Removing PCI Riser Assembly from the Server System 41 Figure 27. Removing the Protective Socket Cover 51 Figure 38. Configuration Jumpers 16 Figure 9. Optional Peripherals...
Intel® Light-Guided Diagnostic LEDs - Server Board Connector and Component Locations 15 Figure 8. Intel® Local Control Panel 21 Figure 12. Back Panel Connectors 23 Figure 14. Cable Routing (Fixed Mount Hard Drive System 30 Figure 17. Cable Routing (Hot-swap Hard Drive System 32 Figure 19. Removing the Server System Cover 39 Figure 25. Installing the Server System Cover 40 Figure 26. Removing PCI Riser Assembly from the Server System 41 Figure 27. Removing the Protective Socket Cover 51 Figure 38. Configuration Jumpers 16 Figure 9. Optional Peripherals...

Service Guide
Page 16
.... Installing Control Panel Module into the Fan Module 94 Figure 85. Installing a Fan into the Server System 89 Figure 81. Password Clear Jumper 101 Figure 88. BIOS Default Jumper 102 Figure 89. Diagnostic LED Placement Diagram 114 xvi Intel® Server System SR1600UR Service Guide Removing Fixed Mount Drive Carrier from the Server System 82 Figure 74. Removing Retention Device from the Server System 75 Figure 68. Connecting the Intel® RMM3 cable 72 Figure 64. Removing the Fan Board from Drive Carrier 62 Figure 52. Installing the Hard Drive Cables 60...
.... Installing Control Panel Module into the Fan Module 94 Figure 85. Installing a Fan into the Server System 89 Figure 81. Password Clear Jumper 101 Figure 88. BIOS Default Jumper 102 Figure 89. Diagnostic LED Placement Diagram 114 xvi Intel® Server System SR1600UR Service Guide Removing Fixed Mount Drive Carrier from the Server System 82 Figure 74. Removing Retention Device from the Server System 75 Figure 68. Connecting the Intel® RMM3 cable 72 Figure 64. Removing the Fan Board from Drive Carrier 62 Figure 52. Installing the Hard Drive Cables 60...
Service Guide
Page 25
... power connector • One SSI-compliant 8-pin CPU power connector • One SSI-compliant auxiliary power connector On-board ServerEngines* LLC Pilot II Controller • Integrated 2D Video Controller • 32 MB DDR2 Memory Two 10/100/1000 Intel® 82575 PHYs One x16 PCI Express* Gen 2 PCI riser slot capable of supporting a full-length full-height PCI Express* add-in Card slot (Gen 2) • Standard control panel • Hot-swap hard drive system only: Intel® Local Control Panel Intel® Server System SR1600UR Service Guide...
... power connector • One SSI-compliant 8-pin CPU power connector • One SSI-compliant auxiliary power connector On-board ServerEngines* LLC Pilot II Controller • Integrated 2D Video Controller • 32 MB DDR2 Memory Two 10/100/1000 Intel® 82575 PHYs One x16 PCI Express* Gen 2 PCI riser slot capable of supporting a full-length full-height PCI Express* add-in Card slot (Gen 2) • Standard control panel • Hot-swap hard drive system only: Intel® Local Control Panel Intel® Server System SR1600UR Service Guide...

Service Guide
Page 26
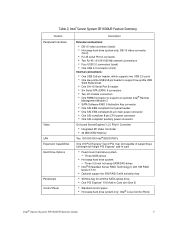
...174; Server System SR1600UR Feature Summary Feature LEDs and displays Description LEDs with standard control panel: • NIC1 Activity • NIC2 Activity • Power/Sleep • System Status • System Identification • Hard Drive Activity Power Supply Fans System Management Intel® Light-Guided diagnostic LEDs: • Fan Fault • DIMM Fault • CPU Fault • 5V-STBY • System Status • System Identification • POST Code Diagnostics Single 600-W power supply • Five 40x40x56-mm, non-redundant, variable-speed, dual-rotor system fans...
...174; Server System SR1600UR Feature Summary Feature LEDs and displays Description LEDs with standard control panel: • NIC1 Activity • NIC2 Activity • Power/Sleep • System Status • System Identification • Hard Drive Activity Power Supply Fans System Management Intel® Light-Guided diagnostic LEDs: • Fan Fault • DIMM Fault • CPU Fault • 5V-STBY • System Status • System Identification • POST Code Diagnostics Single 600-W power supply • Five 40x40x56-mm, non-redundant, variable-speed, dual-rotor system fans...

Service Guide
Page 36
...SATA) hard drives. For a list of supported hard drives, use the bay for these drives. 18 Intel® Server System SR1600UR Service Guide Hard Disk Drive Carriers The fixed mount hard drive server system (Product Code: SR1600UR) ships with three hot-swap drive carriers for installing three SAS or Serial ATA (SATA) drives. To use the Server Configurator Tool. Note: The Intel® Server System SR1600UR does not support all slimline optical drives. Drive in the optical drive carrier is turned off. For instructions on installing hard drives, see "Additional Information and Software...
...SATA) hard drives. For a list of supported hard drives, use the bay for these drives. 18 Intel® Server System SR1600UR Service Guide Hard Disk Drive Carriers The fixed mount hard drive server system (Product Code: SR1600UR) ships with three hot-swap drive carriers for installing three SAS or Serial ATA (SATA) drives. To use the Server Configurator Tool. Note: The Intel® Server System SR1600UR does not support all slimline optical drives. Drive in the optical drive carrier is turned off. For instructions on installing hard drives, see "Additional Information and Software...

Service Guide
Page 37
...Intel® Server System SR1600UR Service Guide 19 L KJ TP02160 Feature NIC 2 Activity LED NIC 1 Activity LED Power/Sleep Button Power/Sleep LED Hard Disk Drive Activity LED Function Continuous green light indicates a link between the system and the network to it is in an ACPI sleep state. No light indicates no hard disk drive activity. Continuous green light indicates the system has power applied to which it or the system is connected. Control Panel The Intel® Server System SR1600UR supports the following types of control panels: • Standard Control Panel...
...Intel® Server System SR1600UR Service Guide 19 L KJ TP02160 Feature NIC 2 Activity LED NIC 1 Activity LED Power/Sleep Button Power/Sleep LED Hard Disk Drive Activity LED Function Continuous green light indicates a link between the system and the network to it is in an ACPI sleep state. No light indicates no hard disk drive activity. Continuous green light indicates the system has power applied to which it or the system is connected. Control Panel The Intel® Server System SR1600UR supports the following types of control panels: • Standard Control Panel...

Service Guide
Page 38
... "Replacing the Control Panel Module (Hot-swap Hard Drive System only)" on the hot-swap hard drive system (Product Code: SR1600URHS). L. Feature System Status LED System Identification LED System Identification Button Reset Button USB Port NMI Button Video Port Function Solid green indicates normal operation. J. After issuing the interrupt, a memory download can be used at the same time. Allows you to attach a USB component to determine the cause of the system. NOTE: The video port option is only supported in a halt-state for diagnostic...
... "Replacing the Control Panel Module (Hot-swap Hard Drive System only)" on the hot-swap hard drive system (Product Code: SR1600URHS). L. Feature System Status LED System Identification LED System Identification Button Reset Button USB Port NMI Button Video Port Function Solid green indicates normal operation. J. After issuing the interrupt, a memory download can be used at the same time. Allows you to attach a USB component to determine the cause of the system. NOTE: The video port option is only supported in a halt-state for diagnostic...
Service Guide
Page 42
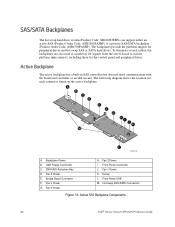
The following diagram shows the location for peripheral drives and hot-swap SAS or SATA hard drives. Backplane Power B. Bridge Board Connector F. Front Panel Connector J. Hot-swap SAS/SATA Connectors Figure 14. USB Floppy Connector C. Active SAS Backplane Components 24 Intel® Server System SR1600UR Service Guide The backplanes provide the platform support for each connector found on the active backplane. SW RAID Activation Key D. Screw L. Front Panel USB M. Fan 4 Power G. To eliminate several cables, the backplanes are also used as a pathway...
The following diagram shows the location for peripheral drives and hot-swap SAS or SATA hard drives. Backplane Power B. Bridge Board Connector F. Front Panel Connector J. Hot-swap SAS/SATA Connectors Figure 14. USB Floppy Connector C. Active SAS Backplane Components 24 Intel® Server System SR1600UR Service Guide The backplanes provide the platform support for each connector found on the active backplane. SW RAID Activation Key D. Screw L. Front Panel USB M. Fan 4 Power G. To eliminate several cables, the backplanes are also used as a pathway...

Service Guide
Page 44
... supports four disk drives and does not provide RAID support. • Enhanced supports six disk drives and is enabled by default. The Onboard SATA Controller option is included on page 70. 26 Intel® Server System SR1600UR Service Guide It also provides Remote KVM Redirection and USB Media Redirection allowing USB devices attached to the remote system to be used on the Advanced | ATA Controller setup page, some of which affect the ability to enable or disable "AHCI Mode" or "Configure SATA as RAID" option. The SATA controller supports...
... supports four disk drives and does not provide RAID support. • Enhanced supports six disk drives and is enabled by default. The Onboard SATA Controller option is included on page 70. 26 Intel® Server System SR1600UR Service Guide It also provides Remote KVM Redirection and USB Media Redirection allowing USB devices attached to the remote system to be used on the Advanced | ATA Controller setup page, some of which affect the ability to enable or disable "AHCI Mode" or "Configure SATA as RAID" option. The SATA controller supports...

Service Guide
Page 75
... supported hardware, see "Cable Routing" on page 3. Note: For a web link to a list of service, turn off all peripheral devices connected to three fixed SATA hard drives in Figure 45) and pushing it forward. Intel® Server System SR1600UR Service Guide 57 AF002886 Figure 44. Release the fixed mount drive carrier from the drive bay by pressing the power button, and unplug the AC power cord from inside the chassis. Installing and Removing a Fixed Mount Hard Drive...
... supported hardware, see "Cable Routing" on page 3. Note: For a web link to a list of service, turn off all peripheral devices connected to three fixed SATA hard drives in Figure 45) and pushing it forward. Intel® Server System SR1600UR Service Guide 57 AF002886 Figure 44. Release the fixed mount drive carrier from the drive bay by pressing the power button, and unplug the AC power cord from inside the chassis. Installing and Removing a Fixed Mount Hard Drive...

Service Guide
Page 78
.... 60 Intel® Server System SR1600UR Service Guide Slide the hard drive carrier into the server system until it forward. 2. Release the fixed mount drive carrier from the drive bay by pressing the blue carrier latch (from the Server System 4. Removing Fixed Hard Drive from inside the chassis) at the end of the server system (see "Installing a Fixed Mount Hard Disk Drive" on page 57. - Remove the four screws that attach the hard drive to the hard drive(s). 1. Installing the Hard Drive Cables Removing...
.... 60 Intel® Server System SR1600UR Service Guide Slide the hard drive carrier into the server system until it forward. 2. Release the fixed mount drive carrier from the drive bay by pressing the blue carrier latch (from the Server System 4. Removing Fixed Hard Drive from inside the chassis) at the end of the server system (see "Installing a Fixed Mount Hard Disk Drive" on page 57. - Remove the four screws that attach the hard drive to the hard drive(s). 1. Installing the Hard Drive Cables Removing...

Service Guide
Page 105
... need to run the BIOS setup to restore the system configuration settings to local ordinance. 7. The power supply can be replaced if it fails or if one of the fans that is not hot-swappable. To replace the power supply, follow these steps: 1. Disconnect all peripheral devices connected to observe the correct polarity, insert it in Figure 77) and remove the power supply by pressing the power button, and unplug the AC power...
... need to run the BIOS setup to restore the system configuration settings to local ordinance. 7. The power supply can be replaced if it fails or if one of the fans that is not hot-swappable. To replace the power supply, follow these steps: 1. Disconnect all peripheral devices connected to observe the correct polarity, insert it in Figure 77) and remove the power supply by pressing the power button, and unplug the AC power...

Service Guide
Page 106
... be operated with a control panel installed. Note: The Intel® Local Control Panel is only supported in Figure 79). 88 Intel® Server System SR1600UR Service Guide B A B AF000367 Figure 78. Press the latch at the back of service, turn off all power cables. Replacing the Control Panel Module (Hot-swap Hard Drive System only) Your server system must first take the server out of the control panel and push it clicks into the Server System 4. Unplug the front panel and USB cables from the Server System 3. Removing Power Supply...
... be operated with a control panel installed. Note: The Intel® Local Control Panel is only supported in Figure 79). 88 Intel® Server System SR1600UR Service Guide B A B AF000367 Figure 78. Press the latch at the back of service, turn off all power cables. Replacing the Control Panel Module (Hot-swap Hard Drive System only) Your server system must first take the server out of the control panel and push it clicks into the Server System 4. Unplug the front panel and USB cables from the Server System 3. Removing Power Supply...

Service Guide
Page 111
... backplane or fan board (see letter "B" in Figure 83). 4. Lift the failed fan from the Fan Module 5. A B AF000368 Figure 83. Position the replacement fan so the connector on page 41. 2. Use the following steps to the system, turn off all peripheral devices connected to replace a dual rotor fan. 1. Intel® Server System SR1600UR Service Guide 93 Before removing or replacing a fan, you must be individually replaced if one of them fails. If installed, remove the PCI riser assembly...
... backplane or fan board (see letter "B" in Figure 83). 4. Lift the failed fan from the Fan Module 5. A B AF000368 Figure 83. Position the replacement fan so the connector on page 41. 2. Use the following steps to the system, turn off all peripheral devices connected to replace a dual rotor fan. 1. Intel® Server System SR1600UR Service Guide 93 Before removing or replacing a fan, you must be individually replaced if one of them fails. If installed, remove the PCI riser assembly...

Service Guide
Page 118
... the Password If the user or administrator password(s) is completed. Power down the system during the BIOS update process! Open the server system. Note: You may encounter a CMOS Checksum error or other information to the Password Clear Erase position (covering pins 2 and 3). 100 Intel® Server System SR1600UR Service Guide If this happens, shut down the system and boot it again. The password clear jumper must be restored to the update software. For instructions on removing the system cover, see "Removing the System Cover" on your hard drive. Upgrading the BIOS...
... the Password If the user or administrator password(s) is completed. Power down the system during the BIOS update process! Open the server system. Note: You may encounter a CMOS Checksum error or other information to the Password Clear Erase position (covering pins 2 and 3). 100 Intel® Server System SR1600UR Service Guide If this happens, shut down the system and boot it again. The password clear jumper must be restored to the update software. For instructions on removing the system cover, see "Removing the System Cover" on your hard drive. Upgrading the BIOS...

Quick Start Guide
Page 1
... CPU 1 and D1 DIMM first for future use the Server Configurator Tool available at http://www.intel.com/p/en_US/support/highlights/server/s5520ur. E D C B A 9 Install I /O Connector 1 Filler Panels 10 Install Intel® Remote Management Module 3 (optional) A Squeeze the sides of it . If you are keyed and can be attached to perform the following procedure: A Using a #2 Phillips* screwdriver, start with your Intel® Server System for buying an Intel® Server System. Hot-Swap Drive System Fixed Drive System Minimum Hardware...
... CPU 1 and D1 DIMM first for future use the Server Configurator Tool available at http://www.intel.com/p/en_US/support/highlights/server/s5520ur. E D C B A 9 Install I /O Connector 1 Filler Panels 10 Install Intel® Remote Management Module 3 (optional) A Squeeze the sides of it . If you are keyed and can be attached to perform the following procedure: A Using a #2 Phillips* screwdriver, start with your Intel® Server System for buying an Intel® Server System. Hot-Swap Drive System Fixed Drive System Minimum Hardware...


