
Quick Setup Guide (English)
Page 1
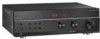
... or FM radio station. Quick Setup Guide I NS-R5101HD 5.1 Receiver Congratulations on your purchase of a high-quality Insignia product. Your 5.1-channel surround sound receiver is designed for auto setup • Quick Setup Guide • User Guide 1 Install remote control batteries Remove the cover from the back of the remote control, insert the batteries as indicated in the battery compartment, then replace the cover. 2 Connect speakers Position speakers around your room and connect as game console or video camera, to turn on your receiver or...
... or FM radio station. Quick Setup Guide I NS-R5101HD 5.1 Receiver Congratulations on your purchase of a high-quality Insignia product. Your 5.1-channel surround sound receiver is designed for auto setup • Quick Setup Guide • User Guide 1 Install remote control batteries Remove the cover from the back of the remote control, insert the batteries as indicated in the battery compartment, then replace the cover. 2 Connect speakers Position speakers around your room and connect as game console or video camera, to turn on your receiver or...

Quick Setup Guide (English)
Page 2
.... DVD IN AUDIO L/R Connect the audio for a TV to this jack, using a Component cable (not included). SUBWOOFER PRE OUT Connect a powered subwoofer to hear its sound through your remote control to speakers. COAXIAL IN1 Connect a coaxial digital audio device to these jacks, using a Composite Connect a Blu-ray Disc player or DVD player to these jacks. CD Player Connecting a VCR To connect a VCR: 1 Connect a standard video cable to the VIDEO IN GAME/AUX2 jack on the back of your receiver and to the VIDEO OUT jack on the VCR. 2 Connect a standard video cable to...
.... DVD IN AUDIO L/R Connect the audio for a TV to this jack, using a Component cable (not included). SUBWOOFER PRE OUT Connect a powered subwoofer to hear its sound through your remote control to speakers. COAXIAL IN1 Connect a coaxial digital audio device to these jacks, using a Composite Connect a Blu-ray Disc player or DVD player to these jacks. CD Player Connecting a VCR To connect a VCR: 1 Connect a standard video cable to the VIDEO IN GAME/AUX2 jack on the back of your receiver and to the VIDEO OUT jack on the VCR. 2 Connect a standard video cable to...

Quick Setup Guide (English)
Page 3
... select the audio jack(s) the device is connected to. You do not need to make an audio connection. 2 Connect an audio cable to the DVD IN AUDIO L/R jacks on the back of video jacks that you press D.INPUTS the audio source changes from O(ptical) 1, to O(ptical) 2, to the AUDIO OUT jacks on the TV. Blu-Ray Disc player or CABLE/SAT box To connect a cable or satellite box using CABLE/ SAT box using component video (Better): Connect a component video cable to the COMPONENT VIDEO OUT jacks on the back of your receiver and to the COMPONENT VIDEO...
... select the audio jack(s) the device is connected to. You do not need to make an audio connection. 2 Connect an audio cable to the DVD IN AUDIO L/R jacks on the back of video jacks that you press D.INPUTS the audio source changes from O(ptical) 1, to O(ptical) 2, to the AUDIO OUT jacks on the TV. Blu-Ray Disc player or CABLE/SAT box To connect a cable or satellite box using CABLE/ SAT box using component video (Better): Connect a component video cable to the COMPONENT VIDEO OUT jacks on the back of your receiver and to the COMPONENT VIDEO...

Quick Setup Guide (English)
Page 4
...-0363 See "Selecting the input source" in your remote control to the SETUP MIC jack on your User Guide. © 2009 Best Buy Enterprise Services, Inc. 4 Connect power 1. Connect the supplied microphone to adjust the sound parameter. Press STANDBY/ON on the receiver or POWER ON on your remote control to turn on the receiver. 5 Complete setup • Press the input buttons on your remote control or rotate the INPUT SELECTOR knob on using your receiver or for more information. Adjust speaker settings with this receiver. •...
...-0363 See "Selecting the input source" in your remote control to the SETUP MIC jack on your User Guide. © 2009 Best Buy Enterprise Services, Inc. 4 Connect power 1. Connect the supplied microphone to adjust the sound parameter. Press STANDBY/ON on the receiver or POWER ON on your remote control to turn on the receiver. 5 Complete setup • Press the input buttons on your remote control or rotate the INPUT SELECTOR knob on using your receiver or for more information. Adjust speaker settings with this receiver. •...

User Manual (English)
Page 2
... 13 Selecting the crossover frequency 14 Adjusting speaker output levels 14 Selecting the speaker distance 15 Setting the listening environment (ROOM EQ 16 Understanding the basics 17 Turning your receiver on or off 17 Selecting the input source 17 Adjusting the volume 17 Adjusting the bass and treble 18 Viewing status information 18 Using your receiver 18 Selecting a surround sound mode 18 Adjusting sound parameters 19 Using the on-screen display (OSD 20 Adjusting a channel level 21 Assigning the component video inputs to devices 21 Turning the TONE CONTROL...
... 13 Selecting the crossover frequency 14 Adjusting speaker output levels 14 Selecting the speaker distance 15 Setting the listening environment (ROOM EQ 16 Understanding the basics 17 Turning your receiver on or off 17 Selecting the input source 17 Adjusting the volume 17 Adjusting the bass and treble 18 Viewing status information 18 Using your receiver 18 Selecting a surround sound mode 18 Adjusting sound parameters 19 Using the on-screen display (OSD 20 Adjusting a channel level 21 Assigning the component video inputs to devices 21 Turning the TONE CONTROL...

User Manual (English)
Page 7
...; 5.1 surround sound receiver • Remote control with a weak signals. Press again to put your receiver in standby mode. Lights when your receiver is in standby mode. Rotate to the next or previous radio station. When your receiver is in standby mode, electricity still flows into this jack to use the ROOM EQ feature. Press to change the radio band from auto to manual to stereo. 12 AUX1 VIDEO/L-AUDIO-R Connect a standard (composite) video device to these jacks. 13 SETUP MIC Connect the setup microphone to...
...; 5.1 surround sound receiver • Remote control with a weak signals. Press again to put your receiver in standby mode. Lights when your receiver is in standby mode. Rotate to the next or previous radio station. When your receiver is in standby mode, electricity still flows into this jack to use the ROOM EQ feature. Press to change the radio band from auto to manual to stereo. 12 AUX1 VIDEO/L-AUDIO-R Connect a standard (composite) video device to these jacks. 13 SETUP MIC Connect the setup microphone to...

User Manual (English)
Page 8
... receiver to this jack. VIDEO IN GAME AUX2 9 VIDEO DVD IN Connect a Blu-ray Disc player or DVD player to this jack. Connect the audio for the device connected to the 18 CABLE/SAT IN AUDIO L/R COMPONENT VIDEO IN 2 (CABLE/SAT) jacks or the VIDEO DVD IN jack. For more information, see "Connecting a Blu-ray Disc player or DVD player" on page 10. 14 OPTICAL IN1 (GAME/AUX2) Connect an optical digital audio device to these jacks. For more information, see "Connecting digital audio" on page 8. 21 COMPONENT VIDEO OUT Connect a TV to this jack...
... receiver to this jack. VIDEO IN GAME AUX2 9 VIDEO DVD IN Connect a Blu-ray Disc player or DVD player to this jack. Connect the audio for the device connected to the 18 CABLE/SAT IN AUDIO L/R COMPONENT VIDEO IN 2 (CABLE/SAT) jacks or the VIDEO DVD IN jack. For more information, see "Connecting a Blu-ray Disc player or DVD player" on page 10. 14 OPTICAL IN1 (GAME/AUX2) Connect an optical digital audio device to these jacks. For more information, see "Connecting digital audio" on page 8. 21 COMPONENT VIDEO OUT Connect a TV to this jack...

User Manual (English)
Page 9
...output from a 22 CH LEVEL + / CH LEVEL - Press to increase or decrease the master volume. 21 CH LEVEL Press to select a channel level you want to adjust. Press to mute the sound. Using the remote control Installing remote control batteries To install remote control batteries: 1 Remove the battery compartment cover. # Item 1 POWER ON 2 Input selector 3 Numbers 4 SLEEP 5 SETUP 6 TUNE / TUNE 7 SOUND PARAMETER 8 SURROUND / SURROUND 9 STEREO 10 BASS+ / BASS- Press these buttons to select stereo (2-channel downmix) mode. The sleep timer will automatically turn off your receiver in standby...
...output from a 22 CH LEVEL + / CH LEVEL - Press to increase or decrease the master volume. 21 CH LEVEL Press to select a channel level you want to adjust. Press to mute the sound. Using the remote control Installing remote control batteries To install remote control batteries: 1 Remove the battery compartment cover. # Item 1 POWER ON 2 Input selector 3 Numbers 4 SLEEP 5 SETUP 6 TUNE / TUNE 7 SOUND PARAMETER 8 SURROUND / SURROUND 9 STEREO 10 BASS+ / BASS- Press these buttons to select stereo (2-channel downmix) mode. The sleep timer will automatically turn off your receiver in standby...
User Manual (English)
Page 11
.../AUX 2 jacks or OPTICAL IN 1 jack. When connecting a DVI device, you can control other components through the HDMI connector. • The audio signals from the receiver, TV, speaker cables, and power cord and set it to make an audio connection when using HDMI. • For stable signal transfer, we recommend using HDMI. To connect a DVD recorder: • Connect an HDMI cable to the receiver. You do not need to a direction for the best reception. 2 Open the AM loop antenna, then slide the loop into the stand. 3 Plug...
.../AUX 2 jacks or OPTICAL IN 1 jack. When connecting a DVI device, you can control other components through the HDMI connector. • The audio signals from the receiver, TV, speaker cables, and power cord and set it to make an audio connection when using HDMI. • For stable signal transfer, we recommend using HDMI. To connect a DVD recorder: • Connect an HDMI cable to the receiver. You do not need to a direction for the best reception. 2 Open the AM loop antenna, then slide the loop into the stand. 3 Plug...
User Manual (English)
Page 13
... connect to video playback components such as Blu-ray Disc player, DVD player, or cable TV tuner. 1 Connect a standard (composite) video cable to the MONITOR OUT jack on the back of your receiver and to the AUDIO OUT jacks on the TV. To connect a TV using component or standard (composite) video. Note You can also connect the audio to a digital audio jack on your receiver and to the HDMI IN jack on the TV. TV 2 Connect an audio cable to the TV IN AUDIO L/R jacks...
... connect to video playback components such as Blu-ray Disc player, DVD player, or cable TV tuner. 1 Connect a standard (composite) video cable to the MONITOR OUT jack on the back of your receiver and to the AUDIO OUT jacks on the TV. To connect a TV using component or standard (composite) video. Note You can also connect the audio to a digital audio jack on your receiver and to the HDMI IN jack on the TV. TV 2 Connect an audio cable to the TV IN AUDIO L/R jacks...

User Manual (English)
Page 14
... receiver. For more information, see "Connecting digital audio" on your receiver. To connect a device to the front AV jacks: 1 Connect a standard (composite) video cable to the AUX 1 VIDEO jack on the back of your receiver and to your receiver and to the L/R AUDIO OUT jacks on the digital audio device. Note The default settings are as for devices connected to DVD video jack. 10 www.insigniaproducts.com NS-R5101HD 5.1 Surround Sound Receiver Connecting a device to the front AV jacks The front AV jacks make it easy to connect...
... receiver. For more information, see "Connecting digital audio" on your receiver. To connect a device to the front AV jacks: 1 Connect a standard (composite) video cable to the AUX 1 VIDEO jack on the back of your receiver and to your receiver and to the L/R AUDIO OUT jacks on the digital audio device. Note The default settings are as for devices connected to DVD video jack. 10 www.insigniaproducts.com NS-R5101HD 5.1 Surround Sound Receiver Connecting a device to the front AV jacks The front AV jacks make it easy to connect...

User Manual (English)
Page 16
.... Connecting the subwoofer and surround back speakers To connect the subwoofer and surround back speakers: 1 Plug the subwoofer cable into the SUBWOOFER PRE OUT jack on the size of your receiver. Placing the speakers 4 Tighten the speaker jack cap by turning it at the rear center facing the front at a narrower distance than the surround speakers. 12 www.insigniaproducts.com Power amplifier Powered subwoofer Surround back speakers 2 Plug the power amplifier connected to 20 cm ) than front speakers. • When using a single surround back speaker, place...
.... Connecting the subwoofer and surround back speakers To connect the subwoofer and surround back speakers: 1 Plug the subwoofer cable into the SUBWOOFER PRE OUT jack on the size of your receiver. Placing the speakers 4 Tighten the speaker jack cap by turning it at the rear center facing the front at a narrower distance than the surround speakers. 12 www.insigniaproducts.com Power amplifier Powered subwoofer Surround back speakers 2 Plug the power amplifier connected to 20 cm ) than front speakers. • When using a single surround back speaker, place...

User Manual (English)
Page 17
... reproduce sounds below crossover frequency. The bass frequencies are output from the front to select SPEAKER SETTING, then press ENTER/MEMO. BACK SUBWOOFER LARGE [ LARGE ] [ LARGE ] [ NO ] [ YES ] RETURN 4 Press TUNE or TUNE to select a speaker, then press PRESET or PRESET to the IR IN jack. Connect the IR receiver to select the speaker type. www.insigniaproducts.com 13 The SPEAKER SETUP screen opens. The SPEAKER SETTING screen opens. 5.1 Surround Sound Receiver • We recommend installing the surround back speaker(s) at the front center, resulting...
... reproduce sounds below crossover frequency. The bass frequencies are output from the front to select SPEAKER SETTING, then press ENTER/MEMO. BACK SUBWOOFER LARGE [ LARGE ] [ LARGE ] [ NO ] [ YES ] RETURN 4 Press TUNE or TUNE to select a speaker, then press PRESET or PRESET to the IR IN jack. Connect the IR receiver to select the speaker type. www.insigniaproducts.com 13 The SPEAKER SETUP screen opens. The SPEAKER SETTING screen opens. 5.1 Surround Sound Receiver • We recommend installing the surround back speaker(s) at the front center, resulting...

User Manual (English)
Page 20
... best listening environment using information received from the provided microphone. If there is too much ambient noise, an error message is displayed, showing the detected speakers. Press TUNE or TUNE to adjust the speaker distance. Check and eliminate ambient noise, then select RETRY. If there is not correct, press TUNE or TUNE to select a speaker, press PRESET or PRESET to this jack. SETUP MENU SET ROOM EQ SPEAKER SETUP COMPONENT IN SETUP TONE CONTROL ON LANGUAGE ENGLISH RETURN NS-R5101HD 5.1 Surround Sound Receiver...
... best listening environment using information received from the provided microphone. If there is too much ambient noise, an error message is displayed, showing the detected speakers. Press TUNE or TUNE to adjust the speaker distance. Check and eliminate ambient noise, then select RETRY. If there is not correct, press TUNE or TUNE to select a speaker, press PRESET or PRESET to this jack. SETUP MENU SET ROOM EQ SPEAKER SETUP COMPONENT IN SETUP TONE CONTROL ON LANGUAGE ENGLISH RETURN NS-R5101HD 5.1 Surround Sound Receiver...
User Manual (English)
Page 21
... this button, the source changes in standby mode and the STANDBY indicator lights. 3 Press ON/STANDBY on the remote control • Press MUTE to turn off : 1 Plug the power cord into a power outlet. 2 Press POWER on the display when the sound is automatically selected. Press TUNER: • Once to select FM ST (stereo) • Twice to select FM MONO • Three times to select AM 2 When CD, GAME/AUX 2, DVD, or CABLE/SAT is selected as an input source, the digital input...
... this button, the source changes in standby mode and the STANDBY indicator lights. 3 Press ON/STANDBY on the remote control • Press MUTE to turn off : 1 Plug the power cord into a power outlet. 2 Press POWER on the display when the sound is automatically selected. Press TUNER: • Once to select FM ST (stereo) • Twice to select FM MONO • Three times to select AM 2 When CD, GAME/AUX 2, DVD, or CABLE/SAT is selected as an input source, the digital input...

User Manual (English)
Page 22
... multi-channel audio format from all speakers. 18 www.insigniaproducts.com Dolby Pro Ligic IIx surround-This mode expands any 2-channel source to surround processing to take full advantage of the additional storage space on page 13.) Selectable surround sound modes DTS Digital Surround-(DTS) supports up to increase or decrease the adjust the bass. • Press TREBLE + or TREBLE - NS-R5101HD 5.1 Surround Sound Receiver Adjusting the bass and treble To adjust the bass and treble: • Press BASS + or BASS...
... multi-channel audio format from all speakers. 18 www.insigniaproducts.com Dolby Pro Ligic IIx surround-This mode expands any 2-channel source to surround processing to take full advantage of the additional storage space on page 13.) Selectable surround sound modes DTS Digital Surround-(DTS) supports up to increase or decrease the adjust the bass. • Press TREBLE + or TREBLE - NS-R5101HD 5.1 Surround Sound Receiver Adjusting the bass and treble To adjust the bass and treble: • Press BASS + or BASS...

User Manual (English)
Page 23
... movies at night at low levels. • Select AUTO to adjust the level of Dolby Digital, Dolby TrueHD, Dolby Digital Plus, DTS, DTS-HD High Resolution Audio, or DTS-HD Master Audio sound track (with unique acoustic characteristics, such as EQ : ~ or L.SYNC : ~, appears on page 16. AUTO lights on the display. • MANUAL-Lets you use L.SYNC to adjust the time delay between the video and audio signals. Possible only when surround back speaker is 0.0 ~ 9.0 frames (1 second = 30...
... movies at night at low levels. • Select AUTO to adjust the level of Dolby Digital, Dolby TrueHD, Dolby Digital Plus, DTS, DTS-HD High Resolution Audio, or DTS-HD Master Audio sound track (with unique acoustic characteristics, such as EQ : ~ or L.SYNC : ~, appears on page 16. AUTO lights on the display. • MANUAL-Lets you use L.SYNC to adjust the time delay between the video and audio signals. Possible only when surround back speaker is 0.0 ~ 9.0 frames (1 second = 30...

User Manual (English)
Page 24
...select a menu, then press ENTER/MEMO (except for some early DTS software and so forth. • HDMI-(HDMI audio) The HDMI connection can select: • SET ROOM EQ-Sets the best listening environment using the provided setup microphone. Using the on-screen display (OSD) To use the OSD: 1 Press SETUP. NS-R5101HD 5.1 Surround Sound Receiver • LFE-(LFE level) Some Dolby Digital or DTS sources include LFE (ultra low bass) signals. SETUP MENU SET ROOM EQ SPEAKER SETUP COMPONENT IN SETUP TONE CONTROL ON LANGUAGE ENGLISH RETURN 2 Press TUNE or TUNE to -video delay between components...
...select a menu, then press ENTER/MEMO (except for some early DTS software and so forth. • HDMI-(HDMI audio) The HDMI connection can select: • SET ROOM EQ-Sets the best listening environment using the provided setup microphone. Using the on-screen display (OSD) To use the OSD: 1 Press SETUP. NS-R5101HD 5.1 Surround Sound Receiver • LFE-(LFE level) Some Dolby Digital or DTS sources include LFE (ultra low bass) signals. SETUP MENU SET ROOM EQ SPEAKER SETUP COMPONENT IN SETUP TONE CONTROL ON LANGUAGE ENGLISH RETURN 2 Press TUNE or TUNE to -video delay between components...

User Manual (English)
Page 27
... input. low. The surround speaker Change the speaker setting. Problem Cause Solution The sound mode is set the sleep timer: • Press SLEEP one or more times to select the number of your receiver, then turn on the speakers. No sound from motors, fluorescent lamps, lightning, or other appliance into a power outlet. Adjust master volume and surround back level. The TV does not support Use another power outlet. Tune in plugged into the power outlet. Preset stations cannot bereceived An incorrect station frequency...
... input. low. The surround speaker Change the speaker setting. Problem Cause Solution The sound mode is set the sleep timer: • Press SLEEP one or more times to select the number of your receiver, then turn on the speakers. No sound from motors, fluorescent lamps, lightning, or other appliance into a power outlet. Adjust master volume and surround back level. The TV does not support Use another power outlet. Tune in plugged into the power outlet. Preset stations cannot bereceived An incorrect station frequency...

User Manual (English)
Page 28
... dB Front power output, 8 Ω, 1 kHz, THD 0.2%: 100 W / 100 W Center power output, 8 Ω, 1 kHz, THD 0.2%: 100 W Surround power output, 8 Ω, 1 kHz, THD 0.2%: 100 W / 100 W Digital audio Sampling frequency Digital input level 32, 44.1, 48, 96 kHz Coaxial, 75 Ω: 0.5 Vp-p Optical, 660 nm: -15 ~ -21 dBm Video Input sensitivity (=Output level), 75 Ω Video format HDMI connector Composite video (normal)): 1 Vp-p Component video: • R-Y signal: 0.7 Vp-p • B-Y signal): 0.7 Vp-p • Y signal: 1.0 Vp-p NTSC 19 pin FM tuner Tuning frequency range Usable sensitivity...
... dB Front power output, 8 Ω, 1 kHz, THD 0.2%: 100 W / 100 W Center power output, 8 Ω, 1 kHz, THD 0.2%: 100 W Surround power output, 8 Ω, 1 kHz, THD 0.2%: 100 W / 100 W Digital audio Sampling frequency Digital input level 32, 44.1, 48, 96 kHz Coaxial, 75 Ω: 0.5 Vp-p Optical, 660 nm: -15 ~ -21 dBm Video Input sensitivity (=Output level), 75 Ω Video format HDMI connector Composite video (normal)): 1 Vp-p Component video: • R-Y signal: 0.7 Vp-p • B-Y signal): 0.7 Vp-p • Y signal: 1.0 Vp-p NTSC 19 pin FM tuner Tuning frequency range Usable sensitivity...


