RS232 Serial Commands (English)
Page 3
... more time * In this format when receiving normal data. Input Select x 04. Volume Control k 08. Contrast k 09. Green Adjustment k f 0 ~ 64 21. Adjustment range is controlled. Screen Mute k 06. Color Temperature k d 0~1 19. Low Power j i 0 ~ 64 25. OK Acknowledgement [Command2][ ][Set ID][ ][OK][Data][x] The TV transmits ACK (acknowledgement) based on this model, TV will not send the status during the standby mode. * Data Format [Command 2]: Use as command. [Set ID]: Use...
... more time * In this format when receiving normal data. Input Select x 04. Volume Control k 08. Contrast k 09. Green Adjustment k f 0 ~ 64 21. Adjustment range is controlled. Screen Mute k 06. Color Temperature k d 0~1 19. Low Power j i 0 ~ 64 25. OK Acknowledgement [Command2][ ][Set ID][ ][OK][Data][x] The TV transmits ACK (acknowledgement) based on this model, TV will not send the status during the standby mode. * Data Format [Command 2]: Use as command. [Set ID]: Use...
RS232 Serial Commands (English)
Page 4
...: In this model, TV will send the Acknowledge after power on remote control or in the Picture menu. Input Select (Command: k b) (Main Picture Input) To select input source for TV. Power (Command: k a) To control Power On/Off of the TV. You can also adjust the screen format using the MUTE button on remote control. Volume Mute (Command: k e) To control volume mute on /off . You can also adjust brightness in the Picture menu. See page 93. Acknowledgement [h][ ][Set ID][ ][OK...
...: In this model, TV will send the Acknowledge after power on remote control or in the Picture menu. Input Select (Command: k b) (Main Picture Input) To select input source for TV. Power (Command: k a) To control Power On/Off of the TV. You can also adjust the screen format using the MUTE button on remote control. Volume Mute (Command: k e) To control volume mute on /off . You can also adjust brightness in the Picture menu. See page 93. Acknowledgement [h][ ][Set ID][ ][OK...
RS232 Serial Commands (English)
Page 6
... Adjustment (Command: k $) To adjust blue in color temperature. ISM Method (Command: j p) (Only Plasma TV model) To avoid having a fixed image remain on Acknowledgement [q][ ][Set ID][ ][OK/NG][Data][x] 24. Data3 & 4: Minor Channel Number Not needed for the Major and Minor, normally only the second byte is used. Acknowledgement [$][ ][Set ID][ ][OK/NG][Data][x] 22. The Physical number is the actual digital channel number, the Major is the number...
... Adjustment (Command: k $) To adjust blue in color temperature. ISM Method (Command: j p) (Only Plasma TV model) To avoid having a fixed image remain on Acknowledgement [q][ ][Set ID][ ][OK/NG][Data][x] 24. Data3 & 4: Minor Channel Number Not needed for the Major and Minor, normally only the second byte is used. Acknowledgement [$][ ][Set ID][ ][OK/NG][Data][x] 22. The Physical number is the actual digital channel number, the Major is the number...
User Manual (English)
Page 3
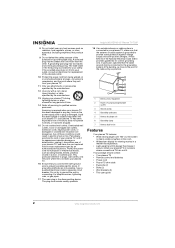
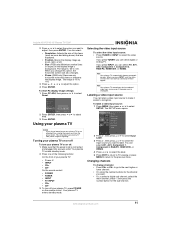
... and off timers 18 Setting the sleep timer 19 Turning Auto Off on and off 19 Selecting the aspect ratio 19 Selecting the on-screen display (OSD) language . 20 Checking the DTV signal strength 20 Selecting closed captions 20 Changing closed caption styles 21 Using low power 21 Avoiding image burn-in 21 Setting parental controls 22 Maintaining 23 Cleaning the screen 23 Cleaning the cabinet 23 Troubleshooting 23 Specifications 24 Programming the remote control 24 Remote control codes 24 One-Year Limited Warranty 29...
... and off timers 18 Setting the sleep timer 19 Turning Auto Off on and off 19 Selecting the aspect ratio 19 Selecting the on-screen display (OSD) language . 20 Checking the DTV signal strength 20 Selecting closed captions 20 Changing closed caption styles 21 Using low power 21 Avoiding image burn-in 21 Setting parental controls 22 Maintaining 23 Cleaning the screen 23 Cleaning the cabinet 23 Troubleshooting 23 Specifications 24 Programming the remote control 24 Remote control codes 24 One-Year Limited Warranty 29...
User Manual (English)
Page 4
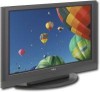
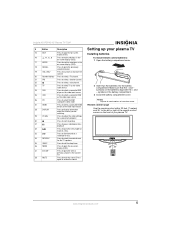
... plasma TV • Remote control and batteries • Power cord • Round 75 ohm cable • Eye-bolts (2) • Bolts (2) • Wall brackets (2) • This user guide 2 www.insignia-products.com A grounding type plug has two blades and a third grounding prong. Any of time. 14 Refer all servicing to provide some protection against voltage surges and built-up static charges. Insignia NS-PDP42 42" Plasma TV-720P 8 Do not install...
... plasma TV • Remote control and batteries • Power cord • Round 75 ohm cable • Eye-bolts (2) • Bolts (2) • Wall brackets (2) • This user guide 2 www.insignia-products.com A grounding type plug has two blades and a third grounding prong. Any of time. 14 Refer all servicing to provide some protection against voltage surges and built-up static charges. Insignia NS-PDP42 42" Plasma TV-720P 8 Do not install...
User Manual (English)
Page 5
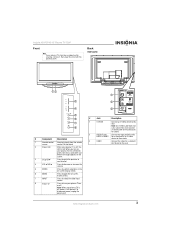
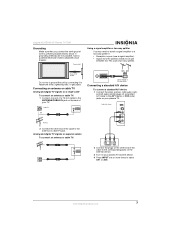
... covering, remove it, then wipe the stand with the polishing cloth. You must connect an audio cable to the audio jacks for sound. 2 AUDIO-R and Connect the right and left audio AUDIO L MONO for a standard AV or S-Video device to these jacks. 3 VIDEO Connect the video for a standard A/V device to this jack. www.insignia-products.com 3 Back Side jacks 12 CH 3 VOL 4 ENTER 5 MENU 6 INPUT 7 8 # Component Description 1 Remote control Receives signals from the remote sensor control. Insignia NS-PDP42 42" Plasma TV...
... covering, remove it, then wipe the stand with the polishing cloth. You must connect an audio cable to the audio jacks for sound. 2 AUDIO-R and Connect the right and left audio AUDIO L MONO for a standard AV or S-Video device to these jacks. 3 VIDEO Connect the video for a standard A/V device to this jack. www.insignia-products.com 3 Back Side jacks 12 CH 3 VOL 4 ENTER 5 MENU 6 INPUT 7 8 # Component Description 1 Remote control Receives signals from the remote sensor control. Insignia NS-PDP42 42" Plasma TV...
User Manual (English)
Page 6
Note: An HDMI cable carries sound, so you need to increase or decrease the brightness. Press to make any additional audio connections. In analog TV mode, press to select the video input source. There are two sets on a videotape or DVD. There are two jacks. Press to select a closed caption mode. 4 www.insignia-products.com Press to select the aspect ratio. Press to fast-reverse on jacks. 9 AV OUT Connect an external TV or monitor to these...
Note: An HDMI cable carries sound, so you need to increase or decrease the brightness. Press to make any additional audio connections. In analog TV mode, press to select the video input source. There are two sets on a videotape or DVD. There are two jacks. Press to select a closed caption mode. 4 www.insignia-products.com Press to select the aspect ratio. Press to fast-reverse on jacks. 9 AV OUT Connect an external TV or monitor to these...
User Manual (English)
Page 7
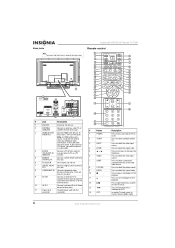
Press to adjust the video settings for the TV speakers. Press to mute the sound. Press to fast-forward on a videotape or disc. TUNER POWER INPUT MODE TV DVD ZOOM VCR VIDEO COMP HDMI RGB-PC PICTURE AUDIO ADJUST DISPLAY www.insignia-products.com 5 Press to select a connected VCR as the video input source. Press again to pause videotape or disc playback. Remote control range Use the remote control within 23 feet (7 meters) and 30° to the left...
Press to adjust the video settings for the TV speakers. Press to mute the sound. Press to fast-forward on a videotape or disc. TUNER POWER INPUT MODE TV DVD ZOOM VCR VIDEO COMP HDMI RGB-PC PICTURE AUDIO ADJUST DISPLAY www.insignia-products.com 5 Press to select a connected VCR as the video input source. Press again to pause videotape or disc playback. Remote control range Use the remote control within 23 feet (7 meters) and 30° to the left...
User Manual (English)
Page 9
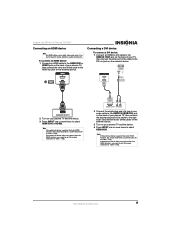
... cable to the antenna or cable TV jack. Analog and digital TV signals on separate cables To connect an antenna or cable TV: ANTENNA/ CABLE IN L AUDIO R VIDEO 2 Connect the plugs on the other end of the cable to the ANTENNA/CABLE IN jack on a single cable To connect an antenna or cable TV: 1 Connect one or more times to prevent possible electric shock. Insignia NS-PDP42 42" Plasma TV-720P Grounding Make sure that you connect the earth ground wire to select...
... cable to the antenna or cable TV jack. Analog and digital TV signals on separate cables To connect an antenna or cable TV: ANTENNA/ CABLE IN L AUDIO R VIDEO 2 Connect the plugs on the other end of the cable to the ANTENNA/CABLE IN jack on a single cable To connect an antenna or cable TV: 1 Connect one or more times to prevent possible electric shock. Insignia NS-PDP42 42" Plasma TV-720P Grounding Make sure that you connect the earth ground wire to select...
User Manual (English)
Page 11
... Auto HDMI function, you need to set the screen resolution to 1280 × 720p. 2 Connect the single-plug end of a two-to-one audio cable to the AUDIO IN (RGB/DVI) jack on the back of your plasma TV, then connect the double-plug end of the cable to the right audio (red) and left audio (white) jacks on the external device. 3 Turn on the back of your plasma TV and the device. 4 Press INPUT...
... Auto HDMI function, you need to set the screen resolution to 1280 × 720p. 2 Connect the single-plug end of a two-to-one audio cable to the AUDIO IN (RGB/DVI) jack on the back of your plasma TV, then connect the double-plug end of the cable to the right audio (red) and left audio (white) jacks on the external device. 3 Turn on the back of your plasma TV and the device. 4 Press INPUT...
User Manual (English)
Page 12
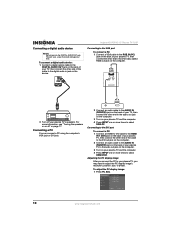
..., see "Turning the speakers on or off your plasma TV and the computer. 4 Press INPUT one or more times to select HDMI1/DVI. Connecting a PC You can connect a PC using the computer's VGA jack or DVI jack. 2 Connect an audio cable to the AUDIO IN (RGB/DVI) jack on the back of the cable to your eyes. Adjusting the PC display image After you connect the PC to the digital audio in jack on the device. The jack uses a laser...
..., see "Turning the speakers on or off your plasma TV and the computer. 4 Press INPUT one or more times to select HDMI1/DVI. Connecting a PC You can connect a PC using the computer's VGA jack or DVI jack. 2 Connect an audio cable to the AUDIO IN (RGB/DVI) jack on the back of the cable to your eyes. Adjusting the PC display image After you connect the PC to the digital audio in jack on the device. The jack uses a laser...
User Manual (English)
Page 13
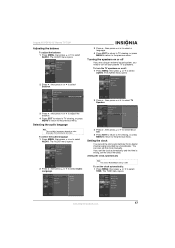
... reset PC display image settings: 1 Press PC ADJ, then press or to them appear. When you press INPUT, only the video sources that have devices connected to select Reset. Your plasma TV enters standby mode. 2 Press , then press or to select Input Label. 3 Press , then press or to select the input source you want to select a digital sub-channel, select the main channel, press -, then press the number button for the sub-channel...
... reset PC display image settings: 1 Press PC ADJ, then press or to them appear. When you press INPUT, only the video sources that have devices connected to select Reset. Your plasma TV enters standby mode. 2 Press , then press or to select Input Label. 3 Press , then press or to select the input source you want to select a digital sub-channel, select the main channel, press -, then press the number button for the sub-channel...
User Manual (English)
Page 14
... that have turned on the Lock System, you can add a channel to increase or decrease the volume. • To mute the sound, press MUTE. To manually create the channel list: 1 Press MENU, then press or to select SETUP. You should update the channel list when your plasma TV. Adding or deleting a channel After you create the channel list from the EZ Scan menu, you first set up your antenna or cable connection changes. to or...
... that have turned on the Lock System, you can add a channel to increase or decrease the volume. • To mute the sound, press MUTE. To manually create the channel list: 1 Press MENU, then press or to select SETUP. You should update the channel list when your plasma TV. Adding or deleting a channel After you create the channel list from the EZ Scan menu, you first set up your antenna or cable connection changes. to or...
User Manual (English)
Page 16
.... The VIDEO menu opens. You can also manually adjust the DB settings to create a custom DB mode. 14 www.insignia-products.com Creating a custom color temperature mode To create a custom color temperature mode: 1 Press MENU, then press or to the previous menu. Adjusting the color temperature The Color Temperature option adjusts the amount of red, blue, and green in the picture. This option is called DB (digital booster). Insignia NS-PDP42 42" Plasma TV...
.... The VIDEO menu opens. You can also manually adjust the DB settings to create a custom DB mode. 14 www.insignia-products.com Creating a custom color temperature mode To create a custom color temperature mode: 1 Press MENU, then press or to the previous menu. Adjusting the color temperature The Color Temperature option adjusts the amount of red, blue, and green in the picture. This option is called DB (digital booster). Insignia NS-PDP42 42" Plasma TV...
User Manual (English)
Page 18
... the factory defaults. 4 Press EXIT to return to TV viewing, or press MENU to return to select AUDIO. Selecting a preset sound mode To select a preset sound mode: 1 Press AUDIO one or more times to select the sound mode you set Front Surround to SRS TruSurround XT, the Balance option is automatically set to adjust. Note When you want to 0. To restore video settings: 1 Press MENU, then press or to adjust the option. Insignia NS-PDP42 42" Plasma TV...
... the factory defaults. 4 Press EXIT to return to TV viewing, or press MENU to return to select AUDIO. Selecting a preset sound mode To select a preset sound mode: 1 Press AUDIO one or more times to select the sound mode you set Front Surround to SRS TruSurround XT, the Balance option is automatically set to adjust. Note When you want to 0. To restore video settings: 1 Press MENU, then press or to adjust the option. Insignia NS-PDP42 42" Plasma TV...
User Manual (English)
Page 19
... using an external sound system, you set the clock automatically from a digital channel signal provided by a broadcaster. www.insignia-products.com 17 To turn off : 1 Press MENU, then press or to turn the TV speakers on what languages the broadcaster provides. The TIME menu opens. Insignia NS-PDP42 42" Plasma TV-720P Adjusting the balance To adjust the balance: 1 Press MENU, then press or to select TIME. Setting the clock automatically Note The default Auto Clock setting...
... using an external sound system, you set the clock automatically from a digital channel signal provided by a broadcaster. www.insignia-products.com 17 To turn off : 1 Press MENU, then press or to turn the TV speakers on what languages the broadcaster provides. The TIME menu opens. Insignia NS-PDP42 42" Plasma TV-720P Adjusting the balance To adjust the balance: 1 Press MENU, then press or to select TIME. Setting the clock automatically Note The default Auto Clock setting...

User Manual (English)
Page 21
... the sleep timer, press SLEEP one or more times to select the number of minutes you turn the Auto Off feature on . Insignia NS-PDP42 42" Plasma TV-720P Setting the sleep timer You can specific the amount of time you want your plasma TV to stay on the video input source. Selecting the aspect ratio Note When you connect a PC to the RGB-PC or HDMI1/DVI jack, you can select: 4:3-Displays the program at the original 4:3 ratio. 16...
... the sleep timer, press SLEEP one or more times to select the number of minutes you turn the Auto Off feature on . Insignia NS-PDP42 42" Plasma TV-720P Setting the sleep timer You can specific the amount of time you want your plasma TV to stay on the video input source. Selecting the aspect ratio Note When you connect a PC to the RGB-PC or HDMI1/DVI jack, you can select: 4:3-Displays the program at the original 4:3 ratio. 16...
User Manual (English)
Page 24
... parental lock on their ratings. The default password is never a problem. • White Wash-Removes burn-in image. • Orbiter-Moves a fixed image around on their ratings. 4 Press EXIT to return to TV viewing, or press MENU to return to select LOCK. You can block the input from: • AV1 • AV2 • Component 1 • Component 2 • RGB-PC • HDMI1/DVI • HDMI2 To set , press the number buttons...
... parental lock on their ratings. The default password is never a problem. • White Wash-Removes burn-in image. • Orbiter-Moves a fixed image around on their ratings. 4 Press EXIT to return to TV viewing, or press MENU to return to select LOCK. You can block the input from: • AV1 • AV2 • Component 1 • Component 2 • RGB-PC • HDMI1/DVI • HDMI2 To set , press the number buttons...
User Manual (English)
Page 25
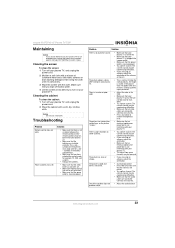
... qualified repair personnel. • Adjust the color in the battery compartment. • Make sure that you have selected the correct mode, for an extended time, unplug the power cord to protect against damage from some channels. There is poor reception on your plasma TV. symbols in the OSD. • Make sure that you wipe off . Caution Do not use your plasma TV. Troubleshooting Problem Remote control...
... qualified repair personnel. • Adjust the color in the battery compartment. • Make sure that you have selected the correct mode, for an extended time, unplug the power cord to protect against damage from some channels. There is poor reception on your plasma TV. symbols in the OSD. • Make sure that you wipe off . Caution Do not use your plasma TV. Troubleshooting Problem Remote control...
User Manual (English)
Page 26
... that the cables are coming from inside your plasma TV on page 24. 4 Press the mode button for the device. In PC mode, the signal is out of pressing MENU and MUTE, programming is connected correctly and securely. • Use the auto adjust feature to program the remote control. Problem Solution Unusual sounds are connected correctly and securely. • Reinstall the PC video card or driver. Note The provided remote control may...
... that the cables are coming from inside your plasma TV on page 24. 4 Press the mode button for the device. In PC mode, the signal is out of pressing MENU and MUTE, programming is connected correctly and securely. • Use the auto adjust feature to program the remote control. Problem Solution Unusual sounds are connected correctly and securely. • Reinstall the PC video card or driver. Note The provided remote control may...


