User Manual (English)
Page 3
... the stand (NS-LDVD26Q-10A 4 Installing the stand (NS-LDVD32Q-10A 4 Attaching a wall-mount bracket (NS-LDVD26Q-10A 5 Attaching a wall-mount bracket (NS-LDVD32Q-10A 6 TV components 6 Package contents 6 Front 6 Back 7 Remote Control 8 Using the remote control 9 Installing remote control batteries 9 Aiming the remote control 9 Programming a universal remote control to work with your TV . . . 10 Making connections 10 Connecting the power cord 10 Connecting...
... the stand (NS-LDVD26Q-10A 4 Installing the stand (NS-LDVD32Q-10A 4 Attaching a wall-mount bracket (NS-LDVD26Q-10A 5 Attaching a wall-mount bracket (NS-LDVD32Q-10A 6 TV components 6 Package contents 6 Front 6 Back 7 Remote Control 8 Using the remote control 9 Installing remote control batteries 9 Aiming the remote control 9 Programming a universal remote control to work with your TV . . . 10 Making connections 10 Connecting the power cord 10 Connecting...
User Manual (English)
Page 8
... or circuits as power-supply cord or plug is damaged, liquid has been spilled or objects have the same characteristics as radiators, heat registers, stoves, or other electric light or power circuits, or where it can fall into such power lines or circuits. Handling the LCD panel • Your TV's screen is located on the back...
... or circuits as power-supply cord or plug is damaged, liquid has been spilled or objects have the same characteristics as radiators, heat registers, stoves, or other electric light or power circuits, or where it can fall into such power lines or circuits. Handling the LCD panel • Your TV's screen is located on the back...

User Manual (English)
Page 9
... or your local power company. When this , let the TV stand in its normal operation. • If your TV has been dropped or damaged in any way. • When your TV does not operate normally by following conditions: • When the power supply cord or plug is exposed... provides guidance for environmental reasons. End of life directives Your TV contains tin-lead solder and a fluorescent lamp containing a small amount of the TV. Specifically, it on the marking label. Non-active pixels The LCD panel contains almost 3 million thin film transistors, which provide exceptionally...
... or your local power company. When this , let the TV stand in its normal operation. • If your TV has been dropped or damaged in any way. • When your TV does not operate normally by following conditions: • When the power supply cord or plug is exposed... provides guidance for environmental reasons. End of life directives Your TV contains tin-lead solder and a fluorescent lamp containing a small amount of the TV. Specifically, it on the marking label. Non-active pixels The LCD panel contains almost 3 million thin film transistors, which provide exceptionally...
User Manual (English)
Page 12
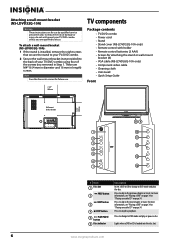
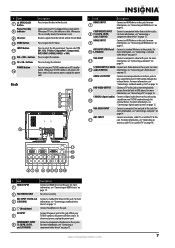
...-mount bracket (8) • VGA cable (NS-LDVD26Q-10A only) • Component video cable • Cleaning cloth • User Guide • Quick Setup Guide Front Wall-mount bracket location 7.878" 200 mm Disc label towards front MENU INPUT VOL VOL CH CH POWER # Item 1 Disc slot PREV button 2...CD" on page 34. Note Save the four extra screws for future use. 7.878" 200 mm TV components Package contents • TV/DVD combo • Power cord • Stand • Stand cover (NS-LDVD32Q-10A only) • Remote control with holder • Remote control batteries (2 AAA) • Screws ...
...-mount bracket (8) • VGA cable (NS-LDVD26Q-10A only) • Component video cable • Cleaning cloth • User Guide • Quick Setup Guide Front Wall-mount bracket location 7.878" 200 mm Disc label towards front MENU INPUT VOL VOL CH CH POWER # Item 1 Disc slot PREV button 2...CD" on page 34. Note Save the four extra screws for future use. 7.878" 200 mm TV components Package contents • TV/DVD combo • Power cord • Stand • Stand cover (NS-LDVD32Q-10A only) • Remote control with holder • Remote control batteries (2 AAA) • Screws ...
User Manual (English)
Page 13
... 15 sound from the built-in the disc slot. For more information, see "Connecting an antenna, cable TV, or satellite TV" on page 12. To disconnect power, unplug the power cord. For more information, see "Connecting a component video device" on page 10. buttons Press to this jack... see "Connecting an HDMI device" on page 12. Connect headphones to this jack. Connect the power cord to this jack. Connect a component video device to view the playback picture from your TV/DVD combo is blue. INPUT AUDIO COMPONENT1 INPUT AV1 INPUT S-VIDEO OUTPUT Y CB/PB CR...
... 15 sound from the built-in the disc slot. For more information, see "Connecting an antenna, cable TV, or satellite TV" on page 12. To disconnect power, unplug the power cord. For more information, see "Connecting a component video device" on page 10. buttons Press to this jack... see "Connecting an HDMI device" on page 12. Connect headphones to this jack. Connect the power cord to this jack. Connect a component video device to view the playback picture from your TV/DVD combo is blue. INPUT AUDIO COMPONENT1 INPUT AV1 INPUT S-VIDEO OUTPUT Y CB/PB CR...

User Manual (English)
Page 14
To disconnect power, unplug the power cord. Press to increase or decrease the volume. Press to enter channel numbers and ...18 DVD/MENU REPEAT 19 AUDIO 20 21 (eject) INPUT 22 ZOOM 23 CH /CH 24 25 RECALL FAVORITE 26 27 INFO PICTURE 28 29 AUDIO 30 31 EXIT 32 SETUP 33 A-B 34 SLOW 35 RETURN 36 SUBTITLE Description Press...GUIDE FAVORITE INFO MENU V AUDIO PICTU T RE OK ENTER STOP DVD MENU EXIT SETUP REPEAT AUDIO A-B SLOW SUBTITLE RETURN RC-261 # Button (power) 1 2 TV 3 DVD 4 Numbers 5 (decimal) 6 (mute) 7 VOL +/VOL- Press to the main menu when playing a Playback Control-featured VIDEO...
To disconnect power, unplug the power cord. Press to increase or decrease the volume. Press to enter channel numbers and ...18 DVD/MENU REPEAT 19 AUDIO 20 21 (eject) INPUT 22 ZOOM 23 CH /CH 24 25 RECALL FAVORITE 26 27 INFO PICTURE 28 29 AUDIO 30 31 EXIT 32 SETUP 33 A-B 34 SLOW 35 RETURN 36 SUBTITLE Description Press...GUIDE FAVORITE INFO MENU V AUDIO PICTU T RE OK ENTER STOP DVD MENU EXIT SETUP REPEAT AUDIO A-B SLOW SUBTITLE RETURN RC-261 # Button (power) 1 2 TV 3 DVD 4 Numbers 5 (decimal) 6 (mute) 7 VOL +/VOL- Press to the main menu when playing a Playback Control-featured VIDEO...
User Manual (English)
Page 16
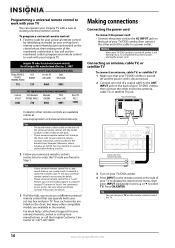
... TIVO Series 3, HD 720 0463 0091 DirectTV RC23 10463 Making connections Connecting the power cord To connect the power cord: • Connect the power cord to identify a code that can manually program it using the Insignia TV remote to the ANT. To completely disconnect power, unplug the power cord. INPUT AUDIO COMPONENT1 INPUT AV1 INPUT S-VIDEO OUTPUT Y CB/PB CR/PR...
... TIVO Series 3, HD 720 0463 0091 DirectTV RC23 10463 Making connections Connecting the power cord To connect the power cord: • Connect the power cord to identify a code that can manually program it using the Insignia TV remote to the ANT. To completely disconnect power, unplug the power cord. INPUT AUDIO COMPONENT1 INPUT AV1 INPUT S-VIDEO OUTPUT Y CB/PB CR/PR...
User Manual (English)
Page 17
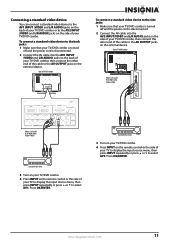
...repeatedly or press or to select AV1. www.insigniaproducts.com 11 To connect a standard video device to the back jacks: 1 Make sure that your TV/DVD combo is turned off and the power cord is disconnected. 2 Connect the AV cable into the AV1 INPUT (VIDEO and L/R AUDIO) jacks on the back of your... AV OUTPUT jacks on the external device. Press OK/ENTER. To connect a standard video device to the side jacks: 1 Make sure that your TV/DVD combo is turned off and the power cord is disconnected. 2 Connect the AV cable into the AV2 INPUT(VIDEO and L/R AUDIO) jacks on the side of your...
...repeatedly or press or to select AV1. www.insigniaproducts.com 11 To connect a standard video device to the back jacks: 1 Make sure that your TV/DVD combo is turned off and the power cord is disconnected. 2 Connect the AV cable into the AV1 INPUT (VIDEO and L/R AUDIO) jacks on the back of your... AV OUTPUT jacks on the external device. Press OK/ENTER. To connect a standard video device to the side jacks: 1 Make sure that your TV/DVD combo is turned off and the power cord is disconnected. 2 Connect the AV cable into the AV2 INPUT(VIDEO and L/R AUDIO) jacks on the side of your...
User Manual (English)
Page 18
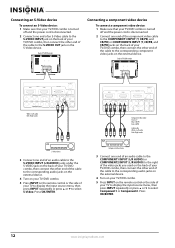
...L R AUDIO L L OUTPUT COMPONENT2 INPUT R S-VIDEO INPUT R DVD VIDEO Connecting a component video device To connect a component video device: 1 Make sure that your TV/DVD combo is turned off and the power cord is disconnected. 2 Connect one end of an S-Video cable to the S-VIDEO INPUT jack on the back of your... OK/ENTER. 12 www.insigniaproducts.com Connecting an S-Video device To connect an S-Video device: 1 Make sure that your TV/DVD combo is turned off and the power cord is disconnected. 2 Connect one end of the component video cable to the COMPONENT1 INPUT (Y, CB/PB, and CR/PR)...
...L R AUDIO L L OUTPUT COMPONENT2 INPUT R S-VIDEO INPUT R DVD VIDEO Connecting a component video device To connect a component video device: 1 Make sure that your TV/DVD combo is turned off and the power cord is disconnected. 2 Connect one end of an S-Video cable to the S-VIDEO INPUT jack on the back of your... OK/ENTER. 12 www.insigniaproducts.com Connecting an S-Video device To connect an S-Video device: 1 Make sure that your TV/DVD combo is turned off and the power cord is disconnected. 2 Connect one end of the component video cable to the COMPONENT1 INPUT (Y, CB/PB, and CR/PR)...
User Manual (English)
Page 19
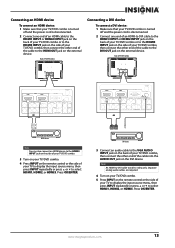
... R DVD VIDEO HDMI1 INPUT HDMI2 VGA INPUT ANT. Connecting an HDMI device To connect an HDMI device: 1 Make sure that your TV/DVD combo is turned off and the power cord is disconnected. 2 Connect one end of an HDMI cable to the HDMI1 INPUT or HDMI2 INPUT jack on the back of your... end of the cable into the AUDIO OUT jack on the DVI device. Back of TV/DVD combo Connecting a DVI device To connect a DVI device: 1 Make sure that your TV/DVD combo is turned off and the power cord is disconnected. 2 Connect one end of an HDMI-to DVI cable to the HDMI1 INPUT...
... R DVD VIDEO HDMI1 INPUT HDMI2 VGA INPUT ANT. Connecting an HDMI device To connect an HDMI device: 1 Make sure that your TV/DVD combo is turned off and the power cord is disconnected. 2 Connect one end of an HDMI cable to the HDMI1 INPUT or HDMI2 INPUT jack on the back of your... end of the cable into the AUDIO OUT jack on the DVI device. Back of TV/DVD combo Connecting a DVI device To connect a DVI device: 1 Make sure that your TV/DVD combo is turned off and the power cord is disconnected. 2 Connect one end of an HDMI-to DVI cable to the HDMI1 INPUT...
User Manual (English)
Page 20
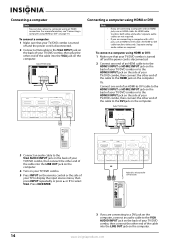
... COAXIAL L R AUDIO L L OUTPUT COMPONENT2 INPUT R S-VIDEO INPUT R DVD VIDEO Connecting a computer using HDMI or DVI: 1 Make sure that your TV/DVD combo is turned off and the power cord is disconnected. 2 Connect one end of an HDMI-to-DVI cable to the HDMI1 INPUT or HDMI2 INPUT jack on the back... then press INPUT repeatedly or press or to the HDMI jack on the computer. To connect a computer: 1 Make sure that your TV/DVD combo is turned off and the power cord is only required for a DVI connection. 3 If you are connecting to a DVI jack on the computer, connect an audio cable ...
... COAXIAL L R AUDIO L L OUTPUT COMPONENT2 INPUT R S-VIDEO INPUT R DVD VIDEO Connecting a computer using HDMI or DVI: 1 Make sure that your TV/DVD combo is turned off and the power cord is disconnected. 2 Connect one end of an HDMI-to-DVI cable to the HDMI1 INPUT or HDMI2 INPUT jack on the back... then press INPUT repeatedly or press or to the HDMI jack on the computer. To connect a computer: 1 Make sure that your TV/DVD combo is turned off and the power cord is only required for a DVI connection. 3 If you are connecting to a DVI jack on the computer, connect an audio cable ...
User Manual (English)
Page 21
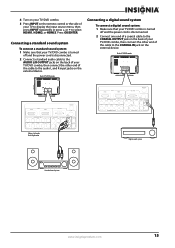
...system To connect a standard sound system: 1 Make sure that your TV/DVD combo is turned off and the power cord is disconnected. 2 Connect one end of a coaxial cable to the COAXIAL OUTPUT jack on the back of your TV/DVD combo, then connect the other end of the cable to select ... R DVD VIDEO HDMI1 INPUT HDMI2 VGA INPUT ANT. Press OK/ENTER. Back of TV/DVD combo Connecting a digital sound system To connect a digital sound system: 1 Make sure that your TV/DVD combo is turned off and the power cord is disconnected. 2 Connect a standard audio cable to the AUDIO L/R OUTPUT jacks on...
...system To connect a standard sound system: 1 Make sure that your TV/DVD combo is turned off and the power cord is disconnected. 2 Connect one end of a coaxial cable to the COAXIAL OUTPUT jack on the back of your TV/DVD combo, then connect the other end of the cable to select ... R DVD VIDEO HDMI1 INPUT HDMI2 VGA INPUT ANT. Press OK/ENTER. Back of TV/DVD combo Connecting a digital sound system To connect a digital sound system: 1 Make sure that your TV/DVD combo is turned off and the power cord is disconnected. 2 Connect a standard audio cable to the AUDIO L/R OUTPUT jacks on...
User Manual (English)
Page 22
... opens. If you are using an antenna for the first time The first time you select this option, your TV/DVD combo: 1 Make sure that your TV/DVD combo is turned off and the power cord is normal when you do not need to the AUDIO L and R INPUT jacks on page 10. • Connected... the power cord. Back of the cable to the VIDEO INPUT jack on the back of your TV/DVD combo, the Setup Wizard opens. INPUT AUDIO COMPONENT1 INPUT AV1 INPUT S-VIDEO OUTPUT Y CB/PB CR/PR...
... opens. If you are using an antenna for the first time The first time you select this option, your TV/DVD combo: 1 Make sure that your TV/DVD combo is turned off and the power cord is normal when you do not need to the AUDIO L and R INPUT jacks on page 10. • Connected... the power cord. Back of the cable to the VIDEO INPUT jack on the back of your TV/DVD combo, the Setup Wizard opens. INPUT AUDIO COMPONENT1 INPUT AV1 INPUT S-VIDEO OUTPUT Y CB/PB CR/PR...
User Manual (English)
Page 23
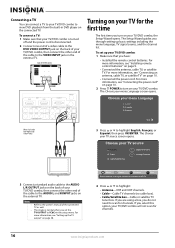
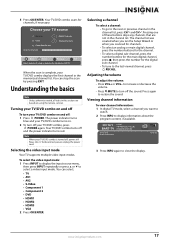
...1 • Component 2 • DVD • HDMI1 • HDMI2 • HDMI3 • VGA 2 Press OK/ENTER. The power indicator turns blue and your TV/DVD combo on . 2 To turn off the sound. To disconnect power, unplug the power cord. to increase or decrease the volume. • Press MUTE to turn your... TV/DVD combo turns on and off , power still flows into it. When the scan is turned off : 1 Press POWER. Turning your TV/DVD combo displays the first ...
...1 • Component 2 • DVD • HDMI1 • HDMI2 • HDMI3 • VGA 2 Press OK/ENTER. The power indicator turns blue and your TV/DVD combo on . 2 To turn off the sound. To disconnect power, unplug the power cord. to increase or decrease the volume. • Press MUTE to turn your... TV/DVD combo turns on and off , power still flows into it. When the scan is turned off : 1 Press POWER. Turning your TV/DVD combo displays the first ...


