User Manual (English)
Page 3
... the stand (NS-LDVD26Q-10A 4 Installing the stand (NS-LDVD32Q-10A 4 Attaching a wall-mount bracket (NS-LDVD26Q-10A 5 Attaching a wall-mount bracket (NS-LDVD32Q-10A 6 TV components 6 Package contents 6 Front 6 Back 7 Remote Control 8 Using the remote control 9 Installing remote control batteries 9 Aiming the remote control 9 Programming a universal remote control to work with your TV . . . 10 Making connections 10 Connecting the power cord 10...
... the stand (NS-LDVD26Q-10A 4 Installing the stand (NS-LDVD32Q-10A 4 Attaching a wall-mount bracket (NS-LDVD26Q-10A 5 Attaching a wall-mount bracket (NS-LDVD32Q-10A 6 TV components 6 Package contents 6 Front 6 Back 7 Remote Control 8 Using the remote control 9 Installing remote control batteries 9 Aiming the remote control 9 Programming a universal remote control to work with your TV . . . 10 Making connections 10 Connecting the power cord 10...
User Manual (English)
Page 8
...only with a cart, stand, tripod, bracket, or table specified by the manufacturer that have fallen into such power lines or circuits. Handling the LCD panel • Your TV's screen is in any cover or expose the device to qualified service personnel. Unauthorized substitutions may cause skin ...liquid gets in clean water. This label is a class I apparatus need to be careful of broken glass. • If the LCD panel is present within your TV. 1 Read these instructions. 2 Keep these instructions. 3 Heed all warnings. 4 Follow all servicing to rain or moisture. The plug...
...only with a cart, stand, tripod, bracket, or table specified by the manufacturer that have fallen into such power lines or circuits. Handling the LCD panel • Your TV's screen is in any cover or expose the device to qualified service personnel. Unauthorized substitutions may cause skin ...liquid gets in clean water. This label is a class I apparatus need to be careful of broken glass. • If the LCD panel is present within your TV. 1 Read these instructions. 2 Keep these instructions. 3 Heed all warnings. 4 Follow all servicing to rain or moisture. The plug...

User Manual (English)
Page 9
... and built-up static charges. Outdoor antenna grounding If an outside antenna or cable system is connected to your TV, and are covered by following conditions: • When the power supply cord or plug is brought from the type of the building as a fixed blue, green, or red... point. Disposal of your TV, make sure that are not considered defects. Non-active pixels The LCD panel contains almost 3 million thin film transistors...
... and built-up static charges. Outdoor antenna grounding If an outside antenna or cable system is connected to your TV, and are covered by following conditions: • When the power supply cord or plug is brought from the type of the building as a fixed blue, green, or red... point. Disposal of your TV, make sure that are not considered defects. Non-active pixels The LCD panel contains almost 3 million thin film transistors...
User Manual (English)
Page 12
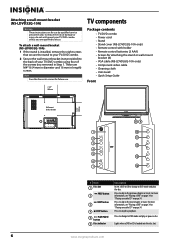
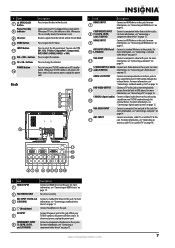
...wall-mount bracket (8) • VGA cable (NS-LDVD26Q-10A only) • Component video cable • Cleaning cloth • User Guide • Quick Setup Guide Front Wall-mount bracket location 7.878" 200 mm Disc label towards front MENU INPUT VOL VOL CH CH POWER # Item 1 Disc slot PREV button 2 NEXT...Press to do so. Note Save the four extra screws for future use. 7.878" 200 mm TV components Package contents • TV/DVD combo • Power cord • Stand • Stand cover (NS-LDVD32Q-10A only) • Remote control with holder • Remote control batteries (2 AAA) • ...
...wall-mount bracket (8) • VGA cable (NS-LDVD26Q-10A only) • Component video cable • Cleaning cloth • User Guide • Quick Setup Guide Front Wall-mount bracket location 7.878" 200 mm Disc label towards front MENU INPUT VOL VOL CH CH POWER # Item 1 Disc slot PREV button 2 NEXT...Press to do so. Note Save the four extra screws for future use. 7.878" 200 mm TV components Package contents • TV/DVD combo • Power cord • Stand • Stand cover (NS-LDVD32Q-10A only) • Remote control with holder • Remote control batteries (2 AAA) • ...
User Manual (English)
Page 13
...For more information, see "Connecting an HDMI device" on page 15. www.insigniaproducts.com 7 Lights when your TV is in standby mode, the indicator is plugged into a power outlet. Receives signals from the built-in the disc slot. Press to change the channel. buttons Press to adjust...PR, and L/R AUDIO) Description Connect an HDMI device to this jack. Connect the power cord to this jack. Connect a component video device to play 15 sound from your TV/DVD combo on page 12. You can select TV, AV1, AV2, S-Video, Component1, Component2, DVD, HDMI1, HDMI2, HDMI3, or...
...For more information, see "Connecting an HDMI device" on page 15. www.insigniaproducts.com 7 Lights when your TV is in standby mode, the indicator is plugged into a power outlet. Receives signals from the built-in the disc slot. Press to change the channel. buttons Press to adjust...PR, and L/R AUDIO) Description Connect an HDMI device to this jack. Connect the power cord to this jack. Connect a component video device to play 15 sound from your TV/DVD combo on page 12. You can select TV, AV1, AV2, S-Video, Component1, Component2, DVD, HDMI1, HDMI2, HDMI3, or...

User Manual (English)
Page 14
... 15 STOP 16 DVD/TITLE 17 18 DVD/MENU REPEAT 19 AUDIO 20 21 (eject) INPUT 22 ZOOM 23 CH /CH 24 25 RECALL FAVORITE 26 27 INFO PICTURE 28 29 AUDIO 30 31 EXIT 32 SETUP 33 A-B 34 SLOW 35 RETURN 36 SUBTITLE Description Press to confirm selections in slow... CH RECALL CCD GUIDE FAVORITE INFO MENU V AUDIO PICTU T RE OK ENTER STOP DVD MENU EXIT SETUP REPEAT AUDIO A-B SLOW SUBTITLE RETURN RC-261 # Button (power) 1 2 TV 3 DVD 4 Numbers 5 (decimal) 6 (mute) 7 VOL +/VOL- For more information, see "Playing a DVD" on -screen menus. Press to open a DVD menu, if available. For...
... 15 STOP 16 DVD/TITLE 17 18 DVD/MENU REPEAT 19 AUDIO 20 21 (eject) INPUT 22 ZOOM 23 CH /CH 24 25 RECALL FAVORITE 26 27 INFO PICTURE 28 29 AUDIO 30 31 EXIT 32 SETUP 33 A-B 34 SLOW 35 RETURN 36 SUBTITLE Description Press to confirm selections in slow... CH RECALL CCD GUIDE FAVORITE INFO MENU V AUDIO PICTU T RE OK ENTER STOP DVD MENU EXIT SETUP REPEAT AUDIO A-B SLOW SUBTITLE RETURN RC-261 # Button (power) 1 2 TV 3 DVD 4 Numbers 5 (decimal) 6 (mute) 7 VOL +/VOL- For more information, see "Playing a DVD" on -screen menus. Press to open a DVD menu, if available. For...
User Manual (English)
Page 16
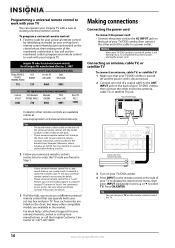
...Insignia TV. Insignia TV codes for universal remote controls (for all else fails, you found in the market. Connecting an antenna, cable TV, or satellite TV To connect an antenna, cable TV, or satellite TV: 1 Make sure that matches your TV/DVD combo is turned off , power is still flowing into it using the Insignia TV... remote to identify a code that your TV. Tips • If ...
...Insignia TV. Insignia TV codes for universal remote controls (for all else fails, you found in the market. Connecting an antenna, cable TV, or satellite TV To connect an antenna, cable TV, or satellite TV: 1 Make sure that matches your TV/DVD combo is turned off , power is still flowing into it using the Insignia TV... remote to identify a code that your TV. Tips • If ...
User Manual (English)
Page 17
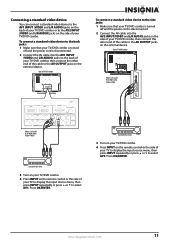
... a standard video device to the back jacks: 1 Make sure that your TV/DVD combo is turned off and the power cord is disconnected. 2 Connect the AV cable into the AV1 INPUT (VIDEO and L/R AUDIO) jacks on the back of your TV to display the input source menu, then press INPUT repeatedly or press... R S-VIDEO INPUT R DVD VIDEO HDMI1 INPUT HDMI2 VGA INPUT ANT. To connect a standard video device to the side jacks: 1 Make sure that your TV/DVD combo is turned off and the power cord is disconnected. 2 Connect the AV cable into the AV2 INPUT(VIDEO and L/R AUDIO) jacks on the side of your...
... a standard video device to the back jacks: 1 Make sure that your TV/DVD combo is turned off and the power cord is disconnected. 2 Connect the AV cable into the AV1 INPUT (VIDEO and L/R AUDIO) jacks on the back of your TV to display the input source menu, then press INPUT repeatedly or press... R S-VIDEO INPUT R DVD VIDEO HDMI1 INPUT HDMI2 VGA INPUT ANT. To connect a standard video device to the side jacks: 1 Make sure that your TV/DVD combo is turned off and the power cord is disconnected. 2 Connect the AV cable into the AV2 INPUT(VIDEO and L/R AUDIO) jacks on the side of your...
User Manual (English)
Page 18
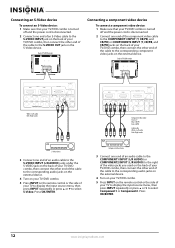
... HDMI1 INPUT HDMI2 VGA INPUT ANT. Connecting an S-Video device To connect an S-Video device: 1 Make sure that your TV/DVD combo is turned off and the power cord is disconnected. 2 Connect one end of the component video cable to the COMPONENT1 INPUT (Y, CB/PB, and CR/... AUDIO L L OUTPUT COMPONENT2 INPUT R S-VIDEO INPUT R DVD VIDEO Connecting a component video device To connect a component video device: 1 Make sure that your TV/DVD combo is turned off and the power cord is disconnected. 2 Connect one end of an S-Video cable to the S-VIDEO INPUT jack on the back of your...
... HDMI1 INPUT HDMI2 VGA INPUT ANT. Connecting an S-Video device To connect an S-Video device: 1 Make sure that your TV/DVD combo is turned off and the power cord is disconnected. 2 Connect one end of the component video cable to the COMPONENT1 INPUT (Y, CB/PB, and CR/... AUDIO L L OUTPUT COMPONENT2 INPUT R S-VIDEO INPUT R DVD VIDEO Connecting a component video device To connect a component video device: 1 Make sure that your TV/DVD combo is turned off and the power cord is disconnected. 2 Connect one end of an S-Video cable to the S-VIDEO INPUT jack on the back of your...
User Manual (English)
Page 19
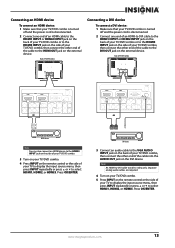
... device To connect a DVI device: 1 Make sure that your TV/DVD combo is turned off and the power cord is disconnected. 2 Connect one end of an HDMI-to DVI cable to the HDMI1 INPUT or HDMI2 INPUT jack on the back of your TV/DVD combo or to the HDMI3 INPUT jack on... AC INPUT HDMI1 INPUT HDMI2 VGA INPUT ANT. Connecting an HDMI device To connect an HDMI device: 1 Make sure that your TV/DVD combo is turned off and the power cord is disconnected. 2 Connect one end of an HDMI cable to the HDMI1 INPUT or HDMI2 INPUT jack on the back of...
... device To connect a DVI device: 1 Make sure that your TV/DVD combo is turned off and the power cord is disconnected. 2 Connect one end of an HDMI-to DVI cable to the HDMI1 INPUT or HDMI2 INPUT jack on the back of your TV/DVD combo or to the HDMI3 INPUT jack on... AC INPUT HDMI1 INPUT HDMI2 VGA INPUT ANT. Connecting an HDMI device To connect an HDMI device: 1 Make sure that your TV/DVD combo is turned off and the power cord is disconnected. 2 Connect one end of an HDMI cable to the HDMI1 INPUT or HDMI2 INPUT jack on the back of...
User Manual (English)
Page 20
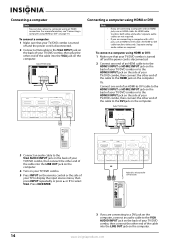
... L R AUDIO L L OUTPUT COMPONENT2 INPUT R S-VIDEO INPUT R DVD VIDEO Connecting a computer using HDMI or DVI: 1 Make sure that your TV/DVD combo is turned off and the power cord is disconnected. 2 Connect one end of an HDMI-to-DVI cable to the HDMI1 INPUT or HDMI2 INPUT jack on the... select VGA. HDMI1 INPUT HDMI2 VGA INPUT ANT. If you are not required. To connect a computer: 1 Make sure that your TV/DVD combo is turned off and the power cord is only required for a DVI connection. 3 If you are required. Separate analog audio cables are connecting to a DVI jack...
... L R AUDIO L L OUTPUT COMPONENT2 INPUT R S-VIDEO INPUT R DVD VIDEO Connecting a computer using HDMI or DVI: 1 Make sure that your TV/DVD combo is turned off and the power cord is disconnected. 2 Connect one end of an HDMI-to-DVI cable to the HDMI1 INPUT or HDMI2 INPUT jack on the... select VGA. HDMI1 INPUT HDMI2 VGA INPUT ANT. If you are not required. To connect a computer: 1 Make sure that your TV/DVD combo is turned off and the power cord is only required for a DVI connection. 3 If you are required. Separate analog audio cables are connecting to a DVI jack...
User Manual (English)
Page 21
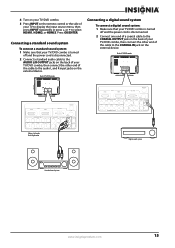
... of the cable to the COAXIAL IN jack on the external device. Back of TV/DVD combo Connecting a digital sound system To connect a digital sound system: 1 Make sure that your TV/DVD combo is turned off and the power cord is disconnected. 2 Connect a standard audio cable to the AUDIO L/R OUTPUT ... system www.insigniaproducts.com 15 Press OK/ENTER. Connecting a standard sound system To connect a standard sound system: 1 Make sure that your TV/DVD combo is turned off and the power cord is disconnected. 2 Connect one end of a coaxial cable to the COAXIAL OUTPUT jack on the back of your...
... of the cable to the COAXIAL IN jack on the external device. Back of TV/DVD combo Connecting a digital sound system To connect a digital sound system: 1 Make sure that your TV/DVD combo is turned off and the power cord is disconnected. 2 Connect a standard audio cable to the AUDIO L/R OUTPUT ... system www.insigniaproducts.com 15 Press OK/ENTER. Connecting a standard sound system To connect a standard sound system: 1 Make sure that your TV/DVD combo is turned off and the power cord is disconnected. 2 Connect one end of a coaxial cable to the COAXIAL OUTPUT jack on the back of your...
User Manual (English)
Page 22
... L L OUTPUT COMPONENT2 INPUT R S-VIDEO INPLUT R DVD VIDEO Turning on page 10. • Connected the power cord. For more information, see "Setting up basic settings including the menu language, TV signal source, and the channel list. For more information, see "Installing remote control batteries" on your... Cable/Satellite box-Cable or satellite TV tuner box. To set the TV OUTPUT to turn on page 9. • Connected the antenna, cable TV, or satellite TV. For more information, see "Connecting the power cord" on page 10. 2 Press POWER to YCbCr in DVD player on page...
... L L OUTPUT COMPONENT2 INPUT R S-VIDEO INPLUT R DVD VIDEO Turning on page 10. • Connected the power cord. For more information, see "Setting up basic settings including the menu language, TV signal source, and the channel list. For more information, see "Installing remote control batteries" on your... Cable/Satellite box-Cable or satellite TV tuner box. To set the TV OUTPUT to turn on page 9. • Connected the antenna, cable TV, or satellite TV. For more information, see "Connecting the power cord" on page 10. 2 Press POWER to YCbCr in DVD player on page...
User Manual (English)
Page 23
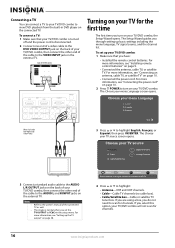
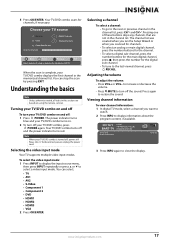
... NL 3 Press INFO again to restore the sound. Note When your TV/DVD combo on and off To turn your TV/DVD combo is complete, your TV/DVD combo, press POWER again. www.insigniaproducts.com 17 Choose your TV source Antenna 0 Cable 0 Cable/Satellite box Scan for channels Digital Channels ... VOL+ or VOL- Press again to close the display. When the scan is turned off, power still flows into it. To disconnect power, unplug the power cord. The power indicator turns blue and your TV/DVD combo turns on using an antenna for the digital sub-channel. • To tune to...
... NL 3 Press INFO again to restore the sound. Note When your TV/DVD combo on and off To turn your TV/DVD combo is complete, your TV/DVD combo, press POWER again. www.insigniaproducts.com 17 Choose your TV source Antenna 0 Cable 0 Cable/Satellite box Scan for channels Digital Channels ... VOL+ or VOL- Press again to close the display. When the scan is turned off, power still flows into it. To disconnect power, unplug the power cord. The power indicator turns blue and your TV/DVD combo turns on using an antenna for the digital sub-channel. • To tune to...
User Manual (English)
Page 26
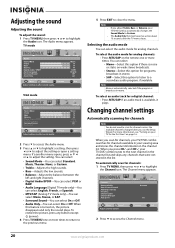
...settings Automatically scanning for channels Note You do not need to the next channel in the list. To automatically scan for channels available in your TV/DVD combo tunes to scan for a digital channel: • Press MTS/SAP. Channel Antenna/Cable Auto Channel Search Add/Skip Channels Favorites...The Channel menu appears. To restore the picture, press any channels that were not stored in the channel list and skips any button except (power). 4 Press TV MENU one or more information, see "Turning on page 16. You can select On or Off. MENU Previous EXIT Exit 2 Press to ...
...settings Automatically scanning for channels Note You do not need to the next channel in the list. To automatically scan for channels available in your TV/DVD combo tunes to scan for a digital channel: • Press MTS/SAP. Channel Antenna/Cable Auto Channel Search Add/Skip Channels Favorites...The Channel menu appears. To restore the picture, press any channels that were not stored in the channel list and skips any button except (power). 4 Press TV MENU one or more information, see "Turning on page 16. You can select On or Off. MENU Previous EXIT Exit 2 Press to ...
User Manual (English)
Page 38
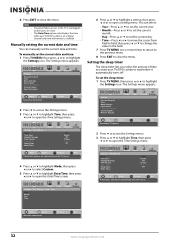
...Reset to wait before it automatically turns off. MENU Previous EXIT Exit 32 www.insigniaproducts.com To manually set the sleep timer: 1 Press TV MENU, then press or to highlight the Settings icon. The Settings menu appears. Settings • Time Settings Mode Time Zone Daylight Savings Time... to highlight the Settings icon. To set the current date and time: 1 Press TV MENU, then press or to set the current date and time. Note • If a power failure occurs or the TV is available. Settings Parental Controls Time Menu Settings Input Labels Computer Settings Closed Caption Reset...
...Reset to wait before it automatically turns off. MENU Previous EXIT Exit 32 www.insigniaproducts.com To manually set the sleep timer: 1 Press TV MENU, then press or to highlight the Settings icon. The Settings menu appears. Settings • Time Settings Mode Time Zone Daylight Savings Time... to highlight the Settings icon. To set the current date and time: 1 Press TV MENU, then press or to set the current date and time. Note • If a power failure occurs or the TV is available. Settings Parental Controls Time Menu Settings Input Labels Computer Settings Closed Caption Reset...
User Manual (English)
Page 40
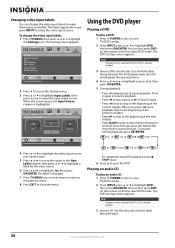
...access the Settings menu. 3 Press or to highlight Input Labels, then press or to Factory Picture Audio Channel Settings Move OK Select ENTER Set various TV options. When the screen opens, the Input Source column is already loaded. 3 Insert a DVD into the disc slot, with the label facing ... turn on the remote control to play a DVD: 1 Press POWER to turn on the remote control to pause playback. The DVD startup screen appears. Changing video input labels You can change the video input labels: 1 Press TV MENU, then press or to highlight DVD, then press OK/ENTER....
...access the Settings menu. 3 Press or to highlight Input Labels, then press or to Factory Picture Audio Channel Settings Move OK Select ENTER Set various TV options. When the screen opens, the Input Source column is already loaded. 3 Insert a DVD into the disc slot, with the label facing ... turn on the remote control to play a DVD: 1 Press POWER to turn on the remote control to pause playback. The DVD startup screen appears. Changing video input labels You can change the video input labels: 1 Press TV MENU, then press or to highlight DVD, then press OK/ENTER....
User Manual (English)
Page 51
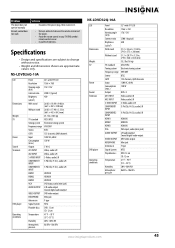
...Remove obstacles between the remote control and the player. • Point the remote control at your TV/DVD combo's remote control sensor. • Install fresh batteries. NS-LDVD26Q-10A LCD Dimensions Weight TV Power Sound Terminals DVD player Operating conditions Panel Resolution Viewing angle (H/V) Contrast ratio Brightness (cd/m2) ...Antenna in Signal System Playable discs Temperature Humidity Atmospheric pressure 26"-wide TFT LCD 1366 × 768 176°/176° 2500:1 (typical) 450 26.02 × 18.98 × 9.06 in. (661 × 482 × 230 mm) 26.02 × 17.40 × 3.33 in. ...
...Remove obstacles between the remote control and the player. • Point the remote control at your TV/DVD combo's remote control sensor. • Install fresh batteries. NS-LDVD26Q-10A LCD Dimensions Weight TV Power Sound Terminals DVD player Operating conditions Panel Resolution Viewing angle (H/V) Contrast ratio Brightness (cd/m2) ...Antenna in Signal System Playable discs Temperature Humidity Atmospheric pressure 26"-wide TFT LCD 1366 × 768 176°/176° 2500:1 (typical) 450 26.02 × 18.98 × 9.06 in. (661 × 482 × 230 mm) 26.02 × 17.40 × 3.33 in. ...

User Manual (English)
Page 52
... is prohibited. This equipment has been tested and found to operate this device must accept any interference received, including interference that the equivalent isotropically radiated power (e.i.r.p.) is connected. • Consult the dealer or an experienced technician for compliance with the FCC Rules could void the user's authority to comply within the...
... is prohibited. This equipment has been tested and found to operate this device must accept any interference received, including interference that the equivalent isotropically radiated power (e.i.r.p.) is connected. • Consult the dealer or an experienced technician for compliance with the FCC Rules could void the user's authority to comply within the...


