
Firmware Installation Guide (English)
Page 1
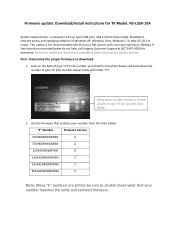
...are similar be sure to download 1. First: Determine the proper firmware to double check what that matches your TV for use with letter "E"). Use the firmware that your TV (this update process. This option is not recommended with dial‐up or DSL service with an open...chart below do not help, call Insignia Customer Support at (877) 467‐4289 for assistance. Write down the number of Windows XP, Windows Vista, Windows 7 or Mac OS 10.3 or newer. Firmware update: Download/Install instructions for TV Model: NS‐L55X‐10A System requirements: a computer with ...
...are similar be sure to download 1. First: Determine the proper firmware to double check what that matches your TV for use with letter "E"). Use the firmware that your TV (this update process. This option is not recommended with dial‐up or DSL service with an open...chart below do not help, call Insignia Customer Support at (877) 467‐4289 for assistance. Write down the number of Windows XP, Windows Vista, Windows 7 or Mac OS 10.3 or newer. Firmware update: Download/Install instructions for TV Model: NS‐L55X‐10A System requirements: a computer with ...
Firmware Installation Guide (English)
Page 2
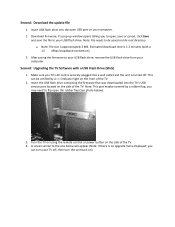
...is 1‐2 minutes (with a USB Flash Drive (Stick) 1. Note: This port maybe covered by a red indicator light on the root directory. This can turn your TV off . A screen similar to flip open the rubber flap (See photo below will appear (Note: if there is no upgrade menu displayed; you... TV's AC cord is turned off , then turn the unit back on your USB flash drive. Download firmware; After saving the firmware to your computer. 2. ...
...is 1‐2 minutes (with a USB Flash Drive (Stick) 1. Note: This port maybe covered by a red indicator light on the root directory. This can turn your TV off . A screen similar to flip open the rubber flap (See photo below will appear (Note: if there is no upgrade menu displayed; you... TV's AC cord is turned off , then turn the unit back on your USB flash drive. Download firmware; After saving the firmware to your computer. 2. ...
Firmware Installation Guide (English)
Page 3
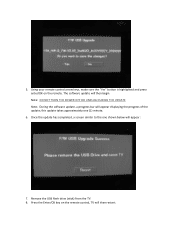
Once the update has completed, a screen similar to the one (1) minute. 6. this update takes approximately one shown below will appear: 7. The software update will then begin Note: DO NOT TURN THE POWER OFF OR UNPLUG DURING THE UPDATE Note: During the software update, a progress bar will then restart. Remove the USB flash drive (stick) from the TV. 8. Press the Enter/OK key on the remote. Using your remote control arrow keys, make sure the "Yes" button is highlighted and press enter/OK on the remote control, TV will appear displaying the progress of the update; 5.
Once the update has completed, a screen similar to the one (1) minute. 6. this update takes approximately one shown below will appear: 7. The software update will then begin Note: DO NOT TURN THE POWER OFF OR UNPLUG DURING THE UPDATE Note: During the software update, a progress bar will then restart. Remove the USB flash drive (stick) from the TV. 8. Press the Enter/OK key on the remote. Using your remote control arrow keys, make sure the "Yes" button is highlighted and press enter/OK on the remote control, TV will appear displaying the progress of the update; 5.
Firmware Installation Guide (English)
Page 4
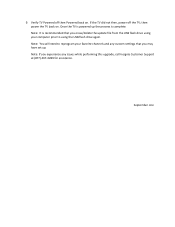
... USB flash drive using the USB flash drive again. Verify TV Powered off the TV; Note: You will need to reprogram your computer prior to using your favorite channels and any issues while performing this upgrade, call Insignia Customer Support at (877) 467‐4289 for assistance. ...9. then power the TV back on . Note: If you experience any custom settings that you may have set up. September...
... USB flash drive using the USB flash drive again. Verify TV Powered off the TV; Note: You will need to reprogram your computer prior to using your favorite channels and any issues while performing this upgrade, call Insignia Customer Support at (877) 467‐4289 for assistance. ...9. then power the TV back on . Note: If you experience any custom settings that you may have set up. September...

Warranty (English)
Page 1
... the Warranty Period of a defect covered by an authorized Insignia repair center or store personnel, Insignia will have an Insignia-approved repair person dispatched to your TV is printed on the receipt you must be free of this warranty cover? Two-year limited warranty Insignia Products ("Insignia") warrants to you purchased the Product from an online...
... the Warranty Period of a defect covered by an authorized Insignia repair center or store personnel, Insignia will have an Insignia-approved repair person dispatched to your TV is printed on the receipt you must be free of this warranty cover? Two-year limited warranty Insignia Products ("Insignia") warrants to you purchased the Product from an online...
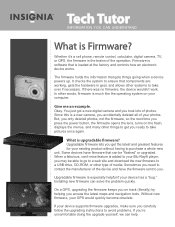
What is Firmware? (English)
Page 1
... next time you press the power button, the firmware opens the lens, turns on your computer. Whether it's a cell phone, remote control, calculator, digital camera, TV, or GPS, the firmware is upgradable firmware? Give me an example. Since this is a new camera, you can 't-miss-feature is software that components are...
... next time you press the power button, the firmware opens the lens, turns on your computer. Whether it's a cell phone, remote control, calculator, digital camera, TV, or GPS, the firmware is upgradable firmware? Give me an example. Since this is a new camera, you can 't-miss-feature is software that components are...
User Manual (English)
Page 3
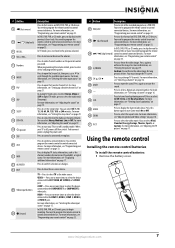
... 8 Using the remote control holder 8 Programming a universal remote control to work with your TV . . . . 8 Making connections 9 Connecting the power 9 Connecting an outdoor antenna 9 Connecting cable TV 9 Connecting satellite TV via a satellite TV box 10 Connecting a VCR 10 Connecting a camcorder or game console 11 Connecting an HDMI ...13 Connecting a digital audio amplifier 13 Connecting an analog audio amplifier 14 Turning on your TV for the first time 14 Understanding the basics 15 Turning your TV on or off 15 Selecting the video input source 15 On-screen menu overview 15 ...
... 8 Using the remote control holder 8 Programming a universal remote control to work with your TV . . . . 8 Making connections 9 Connecting the power 9 Connecting an outdoor antenna 9 Connecting cable TV 9 Connecting satellite TV via a satellite TV box 10 Connecting a VCR 10 Connecting a camcorder or game console 11 Connecting an HDMI ...13 Connecting a digital audio amplifier 13 Connecting an analog audio amplifier 14 Turning on your TV for the first time 14 Understanding the basics 15 Turning your TV on or off 15 Selecting the video input source 15 On-screen menu overview 15 ...
User Manual (English)
Page 4
... the DTV signal strength 23 Setting parental controls 23 Setting or changing the password 23 Setting parental control levels 24 Blocking unrated TV 25 Downloading rating information 26 Locking control buttons 27 Using closed captioning 27 Viewing closed captioning 27 Selecting the closed captioning mode... 29 Adjusting menu settings 30 Selecting the menu language 30 Changing the menu transparency 30 Labeling an input source 31 Adjusting the INSIGNIA logo brightness 32 Turning Auto Input Sensing on or off 32 Resetting settings to the defaults 33 Programming your remote control 33...
... the DTV signal strength 23 Setting parental controls 23 Setting or changing the password 23 Setting parental control levels 24 Blocking unrated TV 25 Downloading rating information 26 Locking control buttons 27 Using closed captioning 27 Viewing closed captioning 27 Selecting the closed captioning mode... 29 Adjusting menu settings 30 Selecting the menu language 30 Changing the menu transparency 30 Labeling an input source 31 Adjusting the INSIGNIA logo brightness 32 Turning Auto Input Sensing on or off 32 Resetting settings to the defaults 33 Programming your remote control 33...

User Manual (English)
Page 5
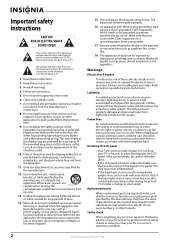
...sure that can easily be used as steps, such as suitable for safe wall mount installation. Wall mounting If you decide to wall mount your TV. • Follow all cords and cables so that they cannot be pulled or grabbed by an independent laboratory as a chest of drawers. &#..., bookcases, shelves, desks, speakers, chests, or carts may fall over , or knocked down. • Make sure that has been recommended by this TV manufacturer, listed in mind The issue The home theater entertainment experience is appropriate. f CHILD SAFETY It makes a difference how and where you use of this...
...sure that can easily be used as steps, such as suitable for safe wall mount installation. Wall mounting If you decide to wall mount your TV. • Follow all cords and cables so that they cannot be pulled or grabbed by an independent laboratory as a chest of drawers. &#..., bookcases, shelves, desks, speakers, chests, or carts may fall over , or knocked down. • Make sure that has been recommended by this TV manufacturer, listed in mind The issue The home theater entertainment experience is appropriate. f CHILD SAFETY It makes a difference how and where you use of this...
User Manual (English)
Page 6
...cloth. 7 Do not block any service or repair to this apparatus during a lightning storm, or when it is left unattended and unused for your TV. 1 Read these instructions. 2 Keep these instructions. 3 Heed all warnings. 4 Follow all servicing to rain or moisture, does not operate normally,...or sold with them might be careful of glass. Replacement parts When replacement parts are inside. If the provided plug does not fit into your TV. Refer servicing to rain or moisture. Class I apparatus. If the screen breaks, be fatal. A grounding type plug has two blades and...
...cloth. 7 Do not block any service or repair to this apparatus during a lightning storm, or when it is left unattended and unused for your TV. 1 Read these instructions. 2 Keep these instructions. 3 Heed all warnings. 4 Follow all servicing to rain or moisture, does not operate normally,...or sold with them might be careful of glass. Replacement parts When replacement parts are inside. If the provided plug does not fit into your TV. Refer servicing to rain or moisture. Class I apparatus. If the screen breaks, be fatal. A grounding type plug has two blades and...
User Manual (English)
Page 7
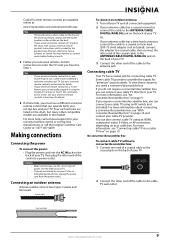
...result in damage and will form on the screen as practical. Outdoor antenna grounding If an outside antenna or cable system is connected to your TV, make sure that the room temperature rises gradually. Specifically, it on the marking label. Condensation Moisture will often require extensive work by following ... to your home, consult an electrician or your local power company. Disposal of these materials may also form during the summer if the TV is exposed to the breeze from an air conditioner. Article 810 of the National Electrical Code, ANSI/NFPA No. 70, provides information with...
...result in damage and will form on the screen as practical. Outdoor antenna grounding If an outside antenna or cable system is connected to your TV, make sure that the room temperature rises gradually. Specifically, it on the marking label. Condensation Moisture will often require extensive work by following ... to your home, consult an electrician or your local power company. Disposal of these materials may also form during the summer if the TV is exposed to the breeze from an air conditioner. Article 810 of the National Electrical Code, ANSI/NFPA No. 70, provides information with...
User Manual (English)
Page 8
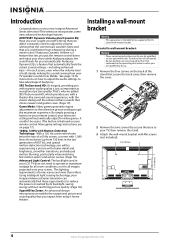
...blurring, particularly when watching fast-motion sports and action scenes. (Page 18) Advanced Light Control: The backlight used in your TV, then remove the stand. 3 Attach the wall-mount bracket with superior audio quality is held steady, making the sound coming ... quality. This television incorporates some scenes are for video games. The lighting requirements of Audyssey. Introduction Congratulations on your Insignia Advanced Series television can automatically find these opportunities to reduce the power consumed by its backlight, saving energy without sacrificing picture...
...blurring, particularly when watching fast-motion sports and action scenes. (Page 18) Advanced Light Control: The backlight used in your TV, then remove the stand. 3 Attach the wall-mount bracket with superior audio quality is held steady, making the sound coming ... quality. This television incorporates some scenes are for video games. The lighting requirements of Audyssey. Introduction Congratulations on your Insignia Advanced Series television can automatically find these opportunities to reduce the power consumed by its backlight, saving energy without sacrificing picture...
User Manual (English)
Page 9
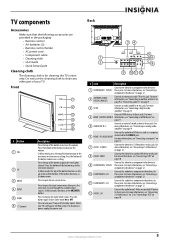
... 1 VIDEO Connect the video for a component video device to increase a setting. Press this button again to this jack. When your TV is for a component video device to these jacks. For more information, see "Connecting an outdoor antenna" on page 9 or "Connecting cable... TV" on page 12. 10 COMPONENT 2 L/R Connect the audio for cleaning the TV screen only. For more information, see "Connecting a digital audio amplifier" on page 10. Connect HDMI devices to...
... 1 VIDEO Connect the video for a component video device to increase a setting. Press this button again to this jack. When your TV is for a component video device to these jacks. For more information, see "Connecting an outdoor antenna" on page 9 or "Connecting cable... TV" on page 12. 10 COMPONENT 2 L/R Connect the audio for cleaning the TV screen only. For more information, see "Connecting a digital audio amplifier" on page 10. Connect HDMI devices to...
User Manual (English)
Page 10
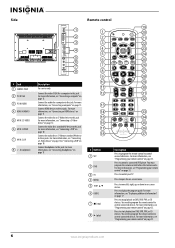
...7 26 8 27 9 28 10 29 11 30 12 31 32 13 14 33 15 34 16 GAME 35 DYN VOL 17 36 18 NS-RC02U-10A 37 # Button 1 SET 2 DVD 3 TV 4 MENU 5 6 GUIDE 7 (stop playback on -screen menus. For more information, see "Programming your remote control" on page 17. ...display the program guide. Press to this jack. For more information, see "Displaying additional information" on page 33. For more information, see "Programming your TV. Connect HDMI devices to these jacks. Press to open the on DVD, DVR, PVR, or CD devices. For more information, see "Connecting a computer...
...7 26 8 27 9 28 10 29 11 30 12 31 32 13 14 33 15 34 16 GAME 35 DYN VOL 17 36 18 NS-RC02U-10A 37 # Button 1 SET 2 DVD 3 TV 4 MENU 5 6 GUIDE 7 (stop playback on -screen menus. For more information, see "Programming your remote control" on page 17. ...display the program guide. Press to this jack. For more information, see "Displaying additional information" on page 33. For more information, see "Programming your TV. Connect HDMI devices to these jacks. Press to open the on DVD, DVR, PVR, or CD devices. For more information, see "Connecting a computer...
User Manual (English)
Page 11
...begin recording. You can select Off, 5, 10, 15, 30, 60, 90, 120, 180, or 240 minutes. www.insigniaproducts.com 7 In TV mode, press to return to restore the sound. 33 - For more information, see "Programming your remote control" on or off. Press again to ...the remote control to control a connected device. For more information, see "Viewing closed captioning on page 33. For more information, see "Programming your TV is off, power still flows into it. You need to program the remote control to control connected devices. # Button 9 (fast reverse) 10 ...
...begin recording. You can select Off, 5, 10, 15, 30, 60, 90, 120, 180, or 240 minutes. www.insigniaproducts.com 7 In TV mode, press to return to restore the sound. 33 - For more information, see "Programming your remote control" on or off. Press again to ...the remote control to control a connected device. For more information, see "Viewing closed captioning on page 33. For more information, see "Programming your TV is off, power still flows into it. You need to program the remote control to control connected devices. # Button 9 (fast reverse) 10 ...
User Manual (English)
Page 12
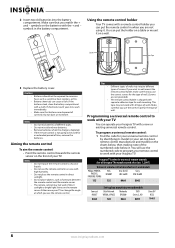
...Make sure that you use the correct tape for the type of wall. If the batteries leak, clean the battery compartment with all Insignia TVs manufactured after Jan. 1, 2007) Universal remote control manufacturers and models Philips PHDVD5, PH5DSS, PMDVR8, PDVR8 RCA RCU807 One for wall ... Programming a universal remote control to excessive heat, such as furniture, between the remote control and the remote sensor. You can operate your Insignia TV. Cautions • Batteries should not be used for the type of wall. (Screws are disposed of time, remove the batteries. Remove...
...Make sure that you use the correct tape for the type of wall. If the batteries leak, clean the battery compartment with all Insignia TVs manufactured after Jan. 1, 2007) Universal remote control manufacturers and models Philips PHDVD5, PH5DSS, PMDVR8, PDVR8 RCA RCU807 One for wall ... Programming a universal remote control to excessive heat, such as furniture, between the remote control and the remote sensor. You can operate your Insignia TV. Cautions • Batteries should not be used for the type of wall. (Screws are disposed of time, remove the batteries. Remove...
User Manual (English)
Page 13
...that you must use a different universal remote control that matches your cable box. To view these channels, you can manually program it using the Insignia TV remote to "teach" the commands one end of a coaxial cable to use the correct type of time, unplug the power cord from the ... an HDMI, component video, S-Video, or AV connection, depending on page 10. Some cable TV providers scramble the signals for connecting cable TV. For more help, call the Insignia Customer Care Center at 1-877-467-4289. Or, If your antenna cable has a twin-lead connector, connect the cable to a ...
...that you must use a different universal remote control that matches your cable box. To view these channels, you can manually program it using the Insignia TV remote to "teach" the commands one end of a coaxial cable to use the correct type of time, unplug the power cord from the ... an HDMI, component video, S-Video, or AV connection, depending on page 10. Some cable TV providers scramble the signals for connecting cable TV. For more help, call the Insignia Customer Care Center at 1-877-467-4289. Or, If your antenna cable has a twin-lead connector, connect the cable to a ...

User Manual (English)
Page 14
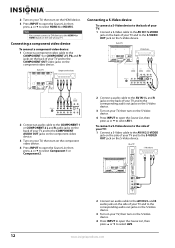
...VIDEO jack controls the AV IN 1 L and R jacks. The connection can be to the cable-out, HDMI, component video, S-Video, or AV jack. Back of TV VCR HDMI Video or S-Video Component 3 If you use a component video, S-Video, or AV cable, connect an audio cable to the corresponding jacks on the... available on the cable box, connect a cable from the outgoing jacks on the satellite box to the corresponding jacks on the back of your TV. Back of TV Satellite receiver HDMI Video or S-Video Component 3 If you need a two-way splitter, an RF (A/B) switch, and four lengths of antenna cable. With ...
...VIDEO jack controls the AV IN 1 L and R jacks. The connection can be to the cable-out, HDMI, component video, S-Video, or AV jack. Back of TV VCR HDMI Video or S-Video Component 3 If you use a component video, S-Video, or AV cable, connect an audio cable to the corresponding jacks on the... available on the cable box, connect a cable from the outgoing jacks on the satellite box to the corresponding jacks on the back of your TV. Back of TV Satellite receiver HDMI Video or S-Video Component 3 If you need a two-way splitter, an RF (A/B) switch, and four lengths of antenna cable. With ...

User Manual (English)
Page 15
...the cable to the VIDEO OUT and AUDIO OUT jacks on the camcorder or game console. 3 Turn on your TV, then turn on the camcorder or game console. 4 Press INPUT to open the Source List, then press or... an AV cable to the AV IN 2 VIDEO and AV IN 2 L and R audio jacks on the side of your TV and to the S-VIDEO jack, the S-VIDEO jack controls the AV IN 2 L and R audio jacks. If the picture mode... To assign the audio jacks to the AV IN 2 VIDEO jack, unplug the S-Video device. 2 Turn on your TV, then turn on the HDMI device. 3 Press INPUT to open the Source List, then press or to Game or ...
...the cable to the VIDEO OUT and AUDIO OUT jacks on the camcorder or game console. 3 Turn on your TV, then turn on the camcorder or game console. 4 Press INPUT to open the Source List, then press or... an AV cable to the AV IN 2 VIDEO and AV IN 2 L and R audio jacks on the side of your TV and to the S-VIDEO jack, the S-VIDEO jack controls the AV IN 2 L and R audio jacks. If the picture mode... To assign the audio jacks to the AV IN 2 VIDEO jack, unplug the S-Video device. 2 Turn on your TV, then turn on the HDMI device. 3 Press INPUT to open the Source List, then press or to Game or ...
User Manual (English)
Page 16
... the Source List, then press or to select Component 1 or Component 2. 2 Connect a audio cable to the AV IN 1 L and R jacks on the back of your TV and to the COMPONENT OUT video jacks on the S-Video device. 4 Press INPUT to open the Source List, then press or to select AV1. Side... device. 3 Press INPUT to open the Source List, then press or to select HDMI 4 or HDMI 5 . Back of TV Component video device Connecting a S-Video device To connect a S-Video device to the back of your TV. Note You cannot connect a DVI device to the HDMI 4 or HDMI 5 jack on the side of your...
... the Source List, then press or to select Component 1 or Component 2. 2 Connect a audio cable to the AV IN 1 L and R jacks on the back of your TV and to the COMPONENT OUT video jacks on the S-Video device. 4 Press INPUT to open the Source List, then press or to select AV1. Side... device. 3 Press INPUT to open the Source List, then press or to select HDMI 4 or HDMI 5 . Back of TV Component video device Connecting a S-Video device To connect a S-Video device to the back of your TV. Note You cannot connect a DVI device to the HDMI 4 or HDMI 5 jack on the side of your...

