FAQs (English)
Page 2
... (TV, DVD, STB, or AUX.) 4. NOTE: If the LED does not blink twice, repeat steps 3 to 5 and try entering the code again. 6. NS-L19W1Q-10A: http://insigniaproducts.com/products/televisions/NS-L19W1Q10A.html NS-L22Q-10A: http://insigniaproducts.com/products/televisions/NS-L22Q10A.html NS-L26Q-10A: http://insigniaproducts.com/products/televisions/NS-L26Q10A.html NS-L32Q-10A: http...
... (TV, DVD, STB, or AUX.) 4. NOTE: If the LED does not blink twice, repeat steps 3 to 5 and try entering the code again. 6. NS-L19W1Q-10A: http://insigniaproducts.com/products/televisions/NS-L19W1Q10A.html NS-L22Q-10A: http://insigniaproducts.com/products/televisions/NS-L22Q10A.html NS-L26Q-10A: http://insigniaproducts.com/products/televisions/NS-L26Q10A.html NS-L32Q-10A: http...
FAQs (English)
Page 6
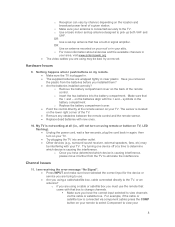
... too far from a tower or with too many obstacles in your cables are connected correctly and securely to the jacks on the location and broadcast power level of the digital channels again. The on -screen menu opens with the Picture menu displayed. 3. The Channels menu opens. 4. Press ▼...up to open the DTV signal meter. 5. Check the signal strength of a given station. The optimal location may vary by channel, depending on the TV. The cables you are using may be more difficult than VHF (channels 2-13) and more sensitive to obstacles (such as trees, tall ...
... too far from a tower or with too many obstacles in your cables are connected correctly and securely to the jacks on the location and broadcast power level of the digital channels again. The on -screen menu opens with the Picture menu displayed. 3. The Channels menu opens. 4. Press ▼...up to open the DTV signal meter. 5. Check the signal strength of a given station. The optimal location may vary by channel, depending on the TV. The cables you are using may be more difficult than VHF (channels 2-13) and more sensitive to obstacles (such as trees, tall ...
FAQs (English)
Page 7
...can be more information about antennas and the available channels in signal amplifier. o Once you have poor picture quality. Make sure your TV. The optimal location may be more sensitive to the point that it further from a cable or satellite provider, reception can be low. Getting good... UHF reception can vary by channel depending on the location and broadcast power level of a given station. Move the antenna around the room or close the menu. o The UHF band (channels 14 and higher) is...
...can be more information about antennas and the available channels in signal amplifier. o Once you have poor picture quality. Make sure your TV. The optimal location may be more sensitive to the point that it further from a cable or satellite provider, reception can be low. Getting good... UHF reception can vary by channel depending on the location and broadcast power level of a given station. Move the antenna around the room or close the menu. o The UHF band (channels 14 and higher) is...
FAQs (English)
Page 8
...the remote sensor on the back of the remote control. o Remove the battery compartment cover on your TV. Channel Issues 11. OR Use an antenna mounted on the location and broadcast power level of the TV. Remove any obstacles between the remote control and the remote sensor. Replace dead ...depending on your roof or in your attic. Try turning one device off at all (i.e., will not turn on using remote or button on TV, LED flashing). Unplug the power cord, wait a few seconds, plug the cord back in again, then turn on your remote to select Component to the...
...the remote sensor on the back of the remote control. o Remove the battery compartment cover on your TV. Channel Issues 11. OR Use an antenna mounted on the location and broadcast power level of the TV. Remove any obstacles between the remote control and the remote sensor. Replace dead ...depending on your roof or in your attic. Try turning one device off at all (i.e., will not turn on using remote or button on TV, LED flashing). Unplug the power cord, wait a few seconds, plug the cord back in again, then turn on your remote to select Component to the...
FAQs (English)
Page 10
...location may be more difficult than VHF (channels 2-13) and more directional than VHF. If you are using cable connected directly to the TV: Try scanning for channels: 1. Press EXIT to close to a window. Contact your cable provider. Press ▼ to highlight Auto Channel... ▼ to highlight Auto Channel Search, then press OK/ENTER or ► to open the Auto Channel Search screen. 4. The on the broadcast power level of a given station. Check the signal strength of the digital channels again. The on -screen menu. Press ◄ or ► to ...
...location may be more difficult than VHF (channels 2-13) and more directional than VHF. If you are using cable connected directly to the TV: Try scanning for channels: 1. Press EXIT to close to a window. Contact your cable provider. Press ▼ to highlight Auto Channel... ▼ to highlight Auto Channel Search, then press OK/ENTER or ► to open the Auto Channel Search screen. 4. The on the broadcast power level of a given station. Check the signal strength of the digital channels again. The on -screen menu. Press ◄ or ► to ...
FAQs (English)
Page 11
... the Insignia Website: o NS-L19Q-10A: http://insigniaproducts.com/products/televisions/NSL19Q-10A.html o NS-L19W1Q-10A: http://insigniaproducts.com/products/televisions/NSL19W1Q-10A.html o NS-L22Q-10A: http://insigniaproducts.com/products/televisions/NSL22Q-10A.html o NS-L26Q-10A: http://insigniaproducts.com/products/televisions/NSL26Q-10A.html o NS-L32Q-10A: http://insigniaproducts.com/products/televisions/NSL32Q-10A.html o NS-L37Q-10A: http://insigniaproducts.com/products/televisions/NSL37Q-10A.html o NS-L42Q-10A...
... the Insignia Website: o NS-L19Q-10A: http://insigniaproducts.com/products/televisions/NSL19Q-10A.html o NS-L19W1Q-10A: http://insigniaproducts.com/products/televisions/NSL19W1Q-10A.html o NS-L22Q-10A: http://insigniaproducts.com/products/televisions/NSL22Q-10A.html o NS-L26Q-10A: http://insigniaproducts.com/products/televisions/NSL26Q-10A.html o NS-L32Q-10A: http://insigniaproducts.com/products/televisions/NSL32Q-10A.html o NS-L37Q-10A: http://insigniaproducts.com/products/televisions/NSL37Q-10A.html o NS-L42Q-10A...
User Manual (English)
Page 3
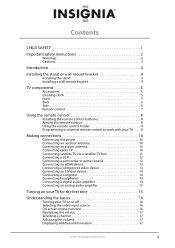
...instructions 2 Warnings 2 Cautions 3 Introduction 4 Installing the stand or wall-mount bracket 4 Installing the stand 4 Installing a wall-mount bracket 4 TV components 5 Accessories 5 Cleaning cloth 5 Front 5 Back 6 Side 6 Remote control 7 Using the remote control 8 Installing the remote control ... a universal remote control to work with your TV . . . . 9 Making connections 10 Connecting the power 10 Connecting an outdoor antenna 10 Connecting an indoor antenna 10 Connecting cable TV 10 Connecting satellite TV via a satellite TV box 11 Connecting a VCR 12 Connecting a ...
...instructions 2 Warnings 2 Cautions 3 Introduction 4 Installing the stand or wall-mount bracket 4 Installing the stand 4 Installing a wall-mount bracket 4 TV components 5 Accessories 5 Cleaning cloth 5 Front 5 Back 6 Side 6 Remote control 7 Using the remote control 8 Installing the remote control ... a universal remote control to work with your TV . . . . 9 Making connections 10 Connecting the power 10 Connecting an outdoor antenna 10 Connecting an indoor antenna 10 Connecting cable TV 10 Connecting satellite TV via a satellite TV box 11 Connecting a VCR 12 Connecting a ...
User Manual (English)
Page 6
..., convenience receptacles, and the point where they exit from tip-over. 13 Unplug this apparatus near any ventilation openings. Handling the LCD panel • Your TV's screen is required when the apparatus has been damaged in fire, electric shock, personal injury, or other . This may result.... 3 Heed all warnings. 4 Follow all servicing to rain or moisture. This helps prevent property damage and personal injury from touching such power lines or circuits as vases, shall be placed on the back of glass. When installing an outside antenna system should not be connected to...
..., convenience receptacles, and the point where they exit from tip-over. 13 Unplug this apparatus near any ventilation openings. Handling the LCD panel • Your TV's screen is required when the apparatus has been damaged in fire, electric shock, personal injury, or other . This may result.... 3 Heed all warnings. 4 Follow all servicing to rain or moisture. This helps prevent property damage and personal injury from touching such power lines or circuits as vases, shall be placed on the back of glass. When installing an outside antenna system should not be connected to...
User Manual (English)
Page 7
... damage, keep your cordless and cellular telephones away from the TV. End of life directives Your TV contains tin-lead solder and a fluorescent lamp containing a small amount of power supplied to your home, consult an electrician or your local power company. Non-active pixels The LCD panel contains almost 3 million thin film transistors, which provide...
... damage, keep your cordless and cellular telephones away from the TV. End of life directives Your TV contains tin-lead solder and a fluorescent lamp containing a small amount of power supplied to your home, consult an electrician or your local power company. Non-active pixels The LCD panel contains almost 3 million thin film transistors, which provide...
User Manual (English)
Page 9
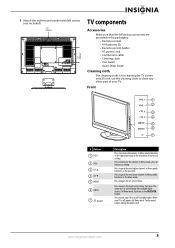
...the arrow keys to increase the volume. Press to the next higher channel. When your TV is for cleaning the TV screen only. Front 1 2 3 4 5 6 7 # Button 1 VOL+ 2 VOL- 3 CH 4 CH 5 MENU 6 INPUT 7 (power) Description Press to cycle through the available input sources. In Menu mode, functions as ...ENTER button. In Menu mode, functions as the up arrow. To disconnect power, unplug the power cord. 3 Attach the wall-mount bracket with M6 screws (not included). 7.87" (200 mm) 7.87" (200 mm) TV components Accessories Make sure that the following accessories are provided in the packaging...
...the arrow keys to increase the volume. Press to the next higher channel. When your TV is for cleaning the TV screen only. Front 1 2 3 4 5 6 7 # Button 1 VOL+ 2 VOL- 3 CH 4 CH 5 MENU 6 INPUT 7 (power) Description Press to cycle through the available input sources. In Menu mode, functions as ...ENTER button. In Menu mode, functions as the up arrow. To disconnect power, unplug the power cord. 3 Attach the wall-mount bracket with M6 screws (not included). 7.87" (200 mm) 7.87" (200 mm) TV components Accessories Make sure that the following accessories are provided in the packaging...
User Manual (English)
Page 11
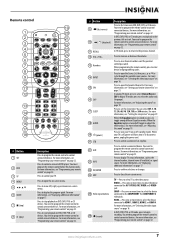
... information, see "Selecting the video input source" on page 16. When the Equalizer option is turned off (standby mode). To disconnect power, unplug the power cord. TV-Press to ener channel numbers and the parental control password. VIDEO- In DVD, DVR, PVR, or CD mode, press to control your... remote control" on page 32. You must program the remote control before this button works. Press to begin recording. Press to toggle among ...
... information, see "Selecting the video input source" on page 16. When the Equalizer option is turned off (standby mode). To disconnect power, unplug the power cord. TV-Press to ener channel numbers and the parental control password. VIDEO- In DVD, DVR, PVR, or CD mode, press to control your... remote control" on page 32. You must program the remote control before this button works. Press to begin recording. Press to toggle among ...

User Manual (English)
Page 14
...component video, S-Video, or AV connection, depending on the back of your TV for an extended period of power. Cautions • Make sure that you need a converter/descrambler box. You can also connect cable TV using an RF switch (not included). Connecting an outdoor antenna Antenna cables come ... included), connect the adapter to a 75 ohm cable, then connect the other end of your cable TV provider. Note Distance from the power outlet. To view these channels, you use your TV. For more information, see "With converter/descrambler box" on the back of the cable to the ...
...component video, S-Video, or AV connection, depending on the back of your TV for an extended period of power. Cautions • Make sure that you need a converter/descrambler box. You can also connect cable TV using an RF switch (not included). Connecting an outdoor antenna Antenna cables come ... included), connect the adapter to a 75 ohm cable, then connect the other end of your cable TV provider. Note Distance from the power outlet. To view these channels, you use your TV. For more information, see "With converter/descrambler box" on the back of the cable to the ...
User Manual (English)
Page 18
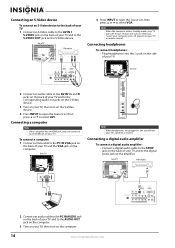
...audio jack on the computer. Connecting headphones To connect headphones: • Plug headphones into the jack on your TV. Connecting a computer Note If the computer has an HDMI jack, you "wake" your computer, press (power) on the S-Video device. 4 Press INPUT to open the Source List, then press or to select ...VGA. Connecting an S-Video device To connect an S-Video device to the back of your TV: 1 Connect an S-Video cable to the AV IN 1 S-...
...audio jack on the computer. Connecting headphones To connect headphones: • Plug headphones into the jack on your TV. Connecting a computer Note If the computer has an HDMI jack, you "wake" your computer, press (power) on the S-Video device. 4 Press INPUT to open the Source List, then press or to select ...VGA. Connecting an S-Video device To connect an S-Video device to the back of your TV: 1 Connect an S-Video cable to the AV IN 1 S-...

User Manual (English)
Page 19
... screen opens. If you through page 11 for details.) • Connected the power cord. (See page 10 for standard or HD TV EXIT EXIT 4 Press or to highlight Antenna, Cable, or Cable/Satellite box (if your cable TV uses a box, select Cable/Satellite box), then press OK/ENTER. When the... channels MOVE OK ENTER SELECT MENU PREVIOUS Select Antenna If using an antenna for details.) 2 Press (power) to turn on your TV. The Setup Wizard guides you chose Cable/Satellite box, your TV and to scan for channels at a later date. To set up basic settings including the menu language...
... screen opens. If you through page 11 for details.) • Connected the power cord. (See page 10 for standard or HD TV EXIT EXIT 4 Press or to highlight Antenna, Cable, or Cable/Satellite box (if your cable TV uses a box, select Cable/Satellite box), then press OK/ENTER. When the... channels MOVE OK ENTER SELECT MENU PREVIOUS Select Antenna If using an antenna for details.) 2 Press (power) to turn on your TV. The Setup Wizard guides you chose Cable/Satellite box, your TV and to scan for channels at a later date. To set up basic settings including the menu language...
User Manual (English)
Page 20
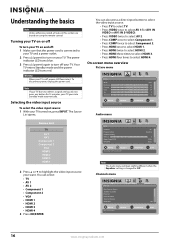
...• Component 2 • VGA • HDMI 1 • HDMI 2 • HDMI 3 • HDMI 4 3 Press OK/ENTER. Your TV enters Standby mode and the power indicator LED turns red. Note If your TV does not detect a signal and you do not press any button for AV1 IN VIDEO or AV1 IN S-VIDEO... control. Selecting the video input source To select the video input source: 1 With your TV goes into it. The power indicator LED turns blue. 3 Press (power) again to turn off , power still flows into Standby mode automatically. On-screen menu overview Picture menu Picture Mode Brightness Contrast...
...• Component 2 • VGA • HDMI 1 • HDMI 2 • HDMI 3 • HDMI 4 3 Press OK/ENTER. Your TV enters Standby mode and the power indicator LED turns red. Note If your TV does not detect a signal and you do not press any button for AV1 IN VIDEO or AV1 IN S-VIDEO... control. Selecting the video input source To select the video input source: 1 With your TV goes into it. The power indicator LED turns blue. 3 Press (power) again to turn off , power still flows into Standby mode automatically. On-screen menu overview Picture menu Picture Mode Brightness Contrast...
User Manual (English)
Page 36
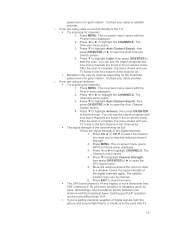
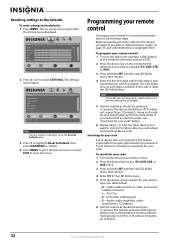
..." below ). • 0-Cable (cable converters, video accessories, satellite receivers) • 1-TV (TVs) • 2-VCR (VCRs, DVD players) • 3-Audio (audio amplifiers, audio amps/tuners, CD players) 6 Aim the remote at the device and press (power). To program your code: 1 Turn on the device you want to program. If the... Default, then press OK/ENTER to confirm. 4 Press MENU to go to Step 8. 32 www.insigniaproducts.com The Settings menu opens. Note If the LED does not blink twice, repeat steps 2 to program (TV, DVD, STB, or AUX). 3 Press and hold SET until the red LED blinks twice...
..." below ). • 0-Cable (cable converters, video accessories, satellite receivers) • 1-TV (TVs) • 2-VCR (VCRs, DVD players) • 3-Audio (audio amplifiers, audio amps/tuners, CD players) 6 Aim the remote at the device and press (power). To program your code: 1 Turn on the device you want to program. If the... Default, then press OK/ENTER to confirm. 4 Press MENU to go to Step 8. 32 www.insigniaproducts.com The Settings menu opens. Note If the LED does not blink twice, repeat steps 2 to program (TV, DVD, STB, or AUX). 3 Press and hold SET until the red LED blinks twice...

User Manual (English)
Page 38
..., then release. 2 Press 9 7 6. The LED blinks twice and programming ends. Changing volume lock The Insignia universal remote control comes preset to allow independent volume control of the Device Keys, (power), RECORD, or SET as destination mode) or to a different key in a specific mode: 1 Press and... hold SET until the red LED blinks twice, then release. 2 Enter 9 9 3, the LED blinks twice. 3 Press the mode key for all broadcast TV through 0, CH , CH , and RECALL. To lock volume control to one device (for example, a cable set its original programming for the selected devices....
..., then release. 2 Press 9 7 6. The LED blinks twice and programming ends. Changing volume lock The Insignia universal remote control comes preset to allow independent volume control of the Device Keys, (power), RECORD, or SET as destination mode) or to a different key in a specific mode: 1 Press and... hold SET until the red LED blinks twice, then release. 2 Enter 9 9 3, the LED blinks twice. 3 Press the mode key for all broadcast TV through 0, CH , CH , and RECALL. To lock volume control to one device (for example, a cable set its original programming for the selected devices....
User Manual (English)
Page 52
...Make sure that you . • Storage temperatures are 32° to 122°F (0° to 50°C). • Working temperatures are too hot or too cold, because the cabinet may warp or the screen may improve the picture quality. • Press TV (not the color button) • Replace the batteries...be burned into the screen. Your TV works best in a weak detergent solution, squeeze the excess moisture from one or more information, see "Locking control buttons" on page 27. • Unplug the power cord, wait a few bright or dark dots on an LCD screen is set to another connected...
...Make sure that you . • Storage temperatures are 32° to 122°F (0° to 50°C). • Working temperatures are too hot or too cold, because the cabinet may warp or the screen may improve the picture quality. • Press TV (not the color button) • Replace the batteries...be burned into the screen. Your TV works best in a weak detergent solution, squeeze the excess moisture from one or more information, see "Locking control buttons" on page 27. • Unplug the power cord, wait a few bright or dark dots on an LCD screen is set to another connected...
User Manual (English)
Page 53
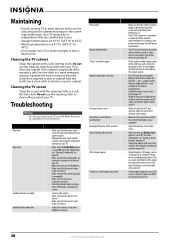
Analog standard Digital standard Screen Channel coverage Power source Power consumption Audio power S-Video input Video/audio input (2) Component input (2) HDMI input (4) VGA input Accessories NTSC ATSC, 8-VSB, Clear-QAM 32" VHF: 2-13 UHF: 14-69 CATV: Mid band - Specifications Design and specifications are subject to change without notice. AA ~ ZZ, AAA, BBB Ultra band - 65 ~ 94, 100 ~ 135 AC 120 V ~ 60 Hz 150 W with TV on J ~ W Hyper band - A-8 ~ A-1, A ~ I Super band -
Analog standard Digital standard Screen Channel coverage Power source Power consumption Audio power S-Video input Video/audio input (2) Component input (2) HDMI input (4) VGA input Accessories NTSC ATSC, 8-VSB, Clear-QAM 32" VHF: 2-13 UHF: 14-69 CATV: Mid band - Specifications Design and specifications are subject to change without notice. AA ~ ZZ, AAA, BBB Ultra band - 65 ~ 94, 100 ~ 135 AC 120 V ~ 60 Hz 150 W with TV on J ~ W Hyper band - A-8 ~ A-1, A ~ I Super band -

