Quick Setup Guide (English)
Page 1
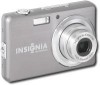
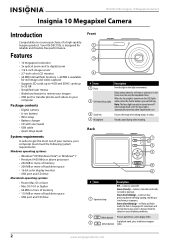
Package contents 10 mp digital camera USB cable Quick Setup Guide Li-ion battery (1) Battery charger CD with User Guide Wrist strap 1 Use this guide for reliable and troublefree performance. Your Insignia digital camera is designed for initial setup of your purchase of a high-quality Insignia product. If you have questions, see your User Guide on your camera. Quick Setup Guide NS-DSC10SL 10mp digital camera Congratulations on the enclosed CD for more information.
Package contents 10 mp digital camera USB cable Quick Setup Guide Li-ion battery (1) Battery charger CD with User Guide Wrist strap 1 Use this guide for reliable and troublefree performance. Your Insignia digital camera is designed for initial setup of your purchase of a high-quality Insignia product. If you have questions, see your User Guide on your camera. Quick Setup Guide NS-DSC10SL 10mp digital camera Congratulations on the enclosed CD for more information.

Quick Setup Guide (English)
Page 4
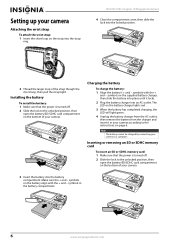
...to the unlocked position, then open the battery/ SD/SDHC card compartment on the battery with the card's metal contacts facing the front of the camera. 3 Close the compartment cover, then slide the lock into the locked position. LOCK 2 Insert an SD or SDHC card into the 2 locked... position. symbols on the bottom of your camera. 2 Insert the battery matching the 1 + and - Note: To remove the card, gently press on the bottom of your camera. Installing the battery 1 1 Slide the lock to the unlocked position, then open the battery...
...to the unlocked position, then open the battery/ SD/SDHC card compartment on the battery with the card's metal contacts facing the front of the camera. 3 Close the compartment cover, then slide the lock into the locked position. LOCK 2 Insert an SD or SDHC card into the 2 locked... position. symbols on the bottom of your camera. 2 Insert the battery matching the 1 + and - Note: To remove the card, gently press on the bottom of your camera. Installing the battery 1 1 Slide the lock to the unlocked position, then open the battery...

Quick Setup Guide (English)
Page 5
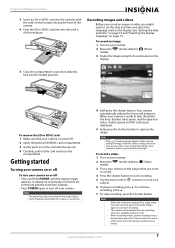
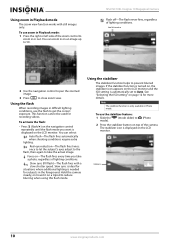
.... 3 Frame the shot using the focus bracket on the LCD screen. 4 Press the shutter button halfway. To take a photo: 1 Turn the camera on, then slide the mode slider to (Photo mode). 2 Press the POWER button to capture the image. NOTE: If the shake warning icon ( ) appears, hold ... until the startup image displays. Taking photos NOTE: The zoom lens does not extend if the mode slider is set to Playback mode when the camera is ready to capture the image, the focus bracket turns green, and the aperture value, shutter speed, and ISO setting are enabled, the startup sound...
.... 3 Frame the shot using the focus bracket on the LCD screen. 4 Press the shutter button halfway. To take a photo: 1 Turn the camera on, then slide the mode slider to (Photo mode). 2 Press the POWER button to capture the image. NOTE: If the shake warning icon ( ) appears, hold ... until the startup image displays. Taking photos NOTE: The zoom lens does not extend if the mode slider is set to Playback mode when the camera is ready to capture the image, the focus bracket turns green, and the aperture value, shutter speed, and ISO setting are enabled, the startup sound...
Quick Setup Guide (English)
Page 6
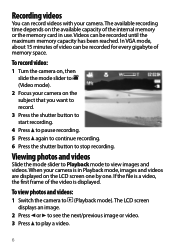
...about 15 minutes of video can be recorded for every gigabyte of memory space. To record video: 1 Turn the camera on, then slide the mode slider to (Video mode). 2 Focus your camera is in use. If the file is displayed. The LCD screen displays an image. 2 Press or to see ... the shutter button to start recording. 4 Press to pause recording. 5 Press again to continue recording. 6 Press the shutter button to (Playback mode). When your camera on the available capacity of the video is a video, the first frame of the internal memory or the memory card in Playback mode, images and...
...about 15 minutes of video can be recorded for every gigabyte of memory space. To record video: 1 Turn the camera on, then slide the mode slider to (Video mode). 2 Focus your camera is in use. If the file is displayed. The LCD screen displays an image. 2 Press or to see ... the shutter button to start recording. 4 Press to pause recording. 5 Press again to continue recording. 6 Press the shutter button to (Playback mode). When your camera on the available capacity of the video is a video, the first frame of the internal memory or the memory card in Playback mode, images and...
Quick Setup Guide (English)
Page 7
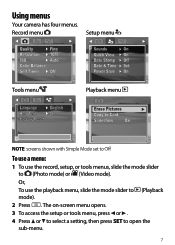
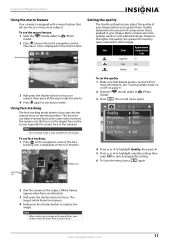
Using menus Your camera has four menus. Record menu Setup menu Quality Fine Resolution 10M ISO Auto Color Balance Self Timer Off Sounds On Quick View On Date Stamp ...
Using menus Your camera has four menus. Record menu Setup menu Quality Fine Resolution 10M ISO Auto Color Balance Self Timer Off Sounds On Quick View On Date Stamp ...

User Manual (English)
Page 2
...Sound indicators 4 LCD Photo mode icons 4 LCD Video mode icons 4 LCD Photo playback icons 5 LCD Video playback icons 5 Setting up your camera 6 Attaching the wrist strap 6 Installing the battery 6 Charging the battery 6 Inserting or removing an SD or SDHC memory card 6 Getting started 7 Turning... your camera on or off 7 Recording images and videos 7 Viewing images and videos 8 Viewing thumbnails 8 Viewing a slideshow of images 8 Deleting images...
...Sound indicators 4 LCD Photo mode icons 4 LCD Video mode icons 4 LCD Photo playback icons 5 LCD Video playback icons 5 Setting up your camera 6 Attaching the wrist strap 6 Installing the battery 6 Charging the battery 6 Inserting or removing an SD or SDHC memory card 6 Getting started 7 Turning... your camera on or off 7 Recording images and videos 7 Viewing images and videos 8 Viewing thumbnails 8 Viewing a slideshow of images 8 Deleting images...
User Manual (English)
Page 3
Contents Using the Date Stamp feature 18 Setting the power saving feature 18 Setting the date and time 19 Selecting the display language 19 Turning help text on or off 19 Resetting your camera to factory defaults 20 Connecting your camera to a computer 20 Working with files and folders 20 Troubleshooting 21 Specifications 21 Legal notices 22 One-year limited warranty 23 www.insigniaproducts.com iii
Contents Using the Date Stamp feature 18 Setting the power saving feature 18 Setting the date and time 19 Selecting the display language 19 Turning help text on or off 19 Resetting your camera to factory defaults 20 Connecting your camera to a computer 20 Working with files and folders 20 Troubleshooting 21 Specifications 21 Legal notices 22 One-year limited warranty 23 www.insigniaproducts.com iii

User Manual (English)
Page 5
...instructions. 2 Keep these instructions. 3 Heed all warnings. 4 Follow all instructions. 5 Do not use attachments/accessories specified by the manufacturer. 11 Unplug your camera near water. 6 Clean only with the same or equivalent type. Replace only with a dry cloth. 7 Do not block any ventilation openings. www.insigniaproducts.com...filled with liquids, such as power-supply cord or plug is damaged, liquid has been spilled or objects have fallen into your camera, your camera has been exposed to rain or moisture, does not operate normally, or has been dropped. 13 To reduce the risk of ...
...instructions. 2 Keep these instructions. 3 Heed all warnings. 4 Follow all instructions. 5 Do not use attachments/accessories specified by the manufacturer. 11 Unplug your camera near water. 6 Clean only with the same or equivalent type. Replace only with a dry cloth. 7 Do not block any ventilation openings. www.insigniaproducts.com...filled with liquids, such as power-supply cord or plug is damaged, liquid has been spilled or objects have fallen into your camera, your camera has been exposed to rain or moisture, does not operate normally, or has been dropped. 13 To reduce the risk of ...
User Manual (English)
Page 6
... timer nears the end, the lamp blinks faster. Records sound during video recording. Green (fast blinking)-Camera is busy processing data or deleting, copying, recording, or transferring is turned on. NS-DSC10SL Insignia 10 Megapixel Camera Insignia 10 Megapixel Camera Introduction Congratulations on your computer must meet the following system requirements: Windows operating systems: • Windows®...
... timer nears the end, the lamp blinks faster. Records sound during video recording. Green (fast blinking)-Camera is busy processing data or deleting, copying, recording, or transferring is turned on. NS-DSC10SL Insignia 10 Megapixel Camera Insignia 10 Megapixel Camera Introduction Congratulations on your computer must meet the following system requirements: Windows operating systems: • Windows®...
User Manual (English)
Page 7
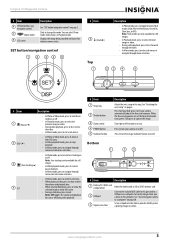
.... Turn right or left to toggle between flash modes (Auto, Red-eye Reduction, Forced On, Slow Sync, or Off ). See "Connecting your camera automatically adjust the focus and exposure. You can select Photo mode, Video mode, or Playback mode. Top 1 23 4 5 SET DISP # Item... button 3 Zoom control 4 POWER button 5 Stabilizer button Description Attach the wrist strap to enter sub-menus or navigate through menu selections. Insignia 10 Megapixel Camera # Item 4 SET button/four-way navigation control 5 (Mode slider) 6 LCD screen Description See "SET button/navigation control" on page...
.... Turn right or left to toggle between flash modes (Auto, Red-eye Reduction, Forced On, Slow Sync, or Off ). See "Connecting your camera automatically adjust the focus and exposure. You can select Photo mode, Video mode, or Playback mode. Top 1 23 4 5 SET DISP # Item... button 3 Zoom control 4 POWER button 5 Stabilizer button Description Attach the wrist strap to enter sub-menus or navigate through menu selections. Insignia 10 Megapixel Camera # Item 4 SET button/four-way navigation control 5 (Mode slider) 6 LCD screen Description See "SET button/navigation control" on page...
User Manual (English)
Page 8
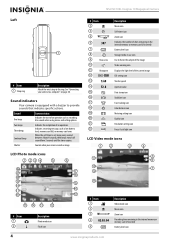
...such as low battery level, memory card full, or memory card error. Shutter Sounds when your camera to provide sounds that indicate specific actions. NS-DSC10SL Insignia 10 Megapixel Camera Left 1 # Item 1 Strap ring Description Attach the wrist strap to frame the subject of ...04 5 Description Video mode icon Macro icon Zoom icon Recording time remaining in use icon Use to this ring. See "Connecting your camera records a image. Sound indicators Your camera is set, beeps every second between 10 and 4 seconds, then beeps every half second from 3 seconds until the timer expires.
...such as low battery level, memory card full, or memory card error. Shutter Sounds when your camera to provide sounds that indicate specific actions. NS-DSC10SL Insignia 10 Megapixel Camera Left 1 # Item 1 Strap ring Description Attach the wrist strap to frame the subject of ...04 5 Description Video mode icon Macro icon Zoom icon Recording time remaining in use icon Use to this ring. See "Connecting your camera records a image. Sound indicators Your camera is set, beeps every second between 10 and 4 seconds, then beeps every half second from 3 seconds until the timer expires.

User Manual (English)
Page 9
Insignia 10 Megapixel Camera # Item 6 7 Focus area 8 9 10 11 16:9 Description Storage media in use icon Use to frame the subject to record Stabilizer icon Color balance icon Metering ...
Insignia 10 Megapixel Camera # Item 6 7 Focus area 8 9 10 11 16:9 Description Storage media in use icon Use to frame the subject to record Stabilizer icon Color balance icon Metering ...
User Manual (English)
Page 10
...charger from the AC outlet, then remove the battery from the charger and insert it locks. 2 Plug the battery charger into an AC outlet. NS-DSC10SL Insignia 10 Megapixel Camera 4 Close the compartment cover, then slide the lock into the strap ring. Make sure the + and - symbols in your...: 1 Make sure that the power is turned off . 2 Slide the lock to the instructions on page 6. symbols with the + and - Setting up your camera Attaching the wrist strap To attach the wrist strap: 1 Insert the short loop on the strap into the locked position. 2 Thread the larger loop of...
...charger from the AC outlet, then remove the battery from the charger and insert it locks. 2 Plug the battery charger into an AC outlet. NS-DSC10SL Insignia 10 Megapixel Camera 4 Close the compartment cover, then slide the lock into the strap ring. Make sure the + and - symbols in your...: 1 Make sure that the power is turned off . 2 Slide the lock to the instructions on page 6. symbols with the + and - Setting up your camera Attaching the wrist strap To attach the wrist strap: 1 Insert the short loop on the strap into the locked position. 2 Thread the larger loop of...
User Manual (English)
Page 11
... might want to record. 4 Press the shutter button to start recording. 5 Use the zoom control subject. The camera will automatically stop recording, press the shutter button. Insignia 10 Megapixel Camera 3 Insert an SD or SDHC card into the card slot with your arms at your side, or use a ...tripod to stabilize your camera in order to prevent blurred images. LOCK Recording images and videos Before you record ...
... might want to record. 4 Press the shutter button to start recording. 5 Use the zoom control subject. The camera will automatically stop recording, press the shutter button. Insignia 10 Megapixel Camera 3 Insert an SD or SDHC card into the card slot with your arms at your side, or use a ...tripod to stabilize your camera in order to prevent blurred images. LOCK Recording images and videos Before you record ...
User Manual (English)
Page 12
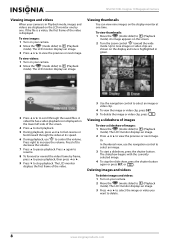
...displays an image. 3 Press or to select the image or video you want to view the previous or next image. NS-DSC10SL Insignia 10 Megapixel Camera Viewing images and videos When your camera is in green. 3 Press or to scroll through the video at one time. If the file is displayed. The...playback. 5 During playback, press or to start a slideshow, press the shutter button. Press again to (Playback mode). To view images: 1 Turn on your camera. 2 Move the (mode slider) to resume. 8 To forward or rewind the video frame by one is highlighted in Playback mode, images and videos are shown...
...displays an image. 3 Press or to select the image or video you want to view the previous or next image. NS-DSC10SL Insignia 10 Megapixel Camera Viewing images and videos When your camera is in green. 3 Press or to scroll through the video at one time. If the file is displayed. The...playback. 5 During playback, press or to start a slideshow, press the shutter button. Press again to (Playback mode). To view images: 1 Turn on your camera. 2 Move the (mode slider) to resume. 8 To forward or rewind the video frame by one is highlighted in Playback mode, images and videos are shown...
User Manual (English)
Page 13
... take high quality images and videos. The zoom indicator appears on or off 5 Press or to (Photo mode) or (Video mode). 2 Press M . Insignia 10 Megapixel Camera 4 Press . Note You cannot change the type of information displayed on the LCD screen by pressing the DISP button on the navigation control. The...menu opens. 4 Press or to highlight Simple Mode, then press or SET to highlight Yes, then press SET. Press the left side of your camera for the first time, it will reduce the quality of the Zoom control to delete additional images or videos. 7 To close the delete function, ...
... take high quality images and videos. The zoom indicator appears on or off 5 Press or to (Photo mode) or (Video mode). 2 Press M . Insignia 10 Megapixel Camera 4 Press . Note You cannot change the type of information displayed on the LCD screen by pressing the DISP button on the navigation control. The...menu opens. 4 Press or to highlight Simple Mode, then press or SET to highlight Yes, then press SET. Press the left side of your camera for the first time, it will reduce the quality of the Zoom control to delete additional images or videos. 7 To close the delete function, ...
User Manual (English)
Page 14
.... Using the stabilizer The stabilizer function helps to close zoom view. Auto flash turned on a tripod to take a photo, regardless of the camera. Red-eye reduction-The flash fires twice: once to let the subject's eyes adjust to the flash, then again to reduce blurring when using...use the flash to zoom in or out. Using zoom in Playback mode The zoom view function works with a slow shutter speed. NS-DSC10SL Insignia 10 Megapixel Camera Flash off-The flash never fires, regardless of the zoom control to get the correct exposure. Using the flash When recording images in ...
.... Using the stabilizer The stabilizer function helps to close zoom view. Auto flash turned on a tripod to take a photo, regardless of the camera. Red-eye reduction-The flash fires twice: once to let the subject's eyes adjust to the flash, then again to reduce blurring when using...use the flash to zoom in or out. Using zoom in Playback mode The zoom view function works with a slow shutter speed. NS-DSC10SL Insignia 10 Megapixel Camera Flash off-The flash never fires, regardless of the zoom control to get the correct exposure. Using the flash When recording images in ...
User Manual (English)
Page 15
... or to highlight a quality setting, then press SET to (Photo 2 Press (macro/ ) on the LCD monitor. Face-tracking icon 2 Aim the camera at the same time; The largest white frame turns green. 4 Fully press the shutter button to store images. Using face-tracking The face-tracking mode... The macro icon is displayed on the detected face. More compression (low quality) results in a less detailed image. Insignia 10 Megapixel Camera Using the macro feature Your camera is equipped with several faces at the subject. For more time to exit macro mode. Note When capturing an image ...
... or to highlight a quality setting, then press SET to (Photo 2 Press (macro/ ) on the LCD monitor. Face-tracking icon 2 Aim the camera at the same time; The largest white frame turns green. 4 Fully press the shutter button to store images. Using face-tracking The face-tracking mode... The macro icon is displayed on the detected face. More compression (low quality) results in a less detailed image. Insignia 10 Megapixel Camera Using the macro feature Your camera is equipped with several faces at the subject. For more time to exit macro mode. Note When capturing an image ...
User Manual (English)
Page 16
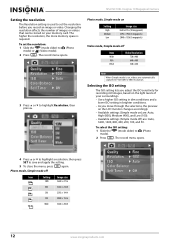
... 3M 2048 × 1536 16:9 Wide 3648 × 2048 Quality Fine Resolution 10M ISO Auto Color Balance Self Timer Off 12 www.insigniaproducts.com NS-DSC10SL Insignia 10 Megapixel Camera Setting the resolution The Resolution setting is used to set the resolution: 1 Slide the (mode slider) to (Photo mode) or (Video mode). 2 Press M . Quality...
... 3M 2048 × 1536 16:9 Wide 3648 × 2048 Quality Fine Resolution 10M ISO Auto Color Balance Self Timer Off 12 www.insigniaproducts.com NS-DSC10SL Insignia 10 Megapixel Camera Setting the resolution The Resolution setting is used to set the resolution: 1 Slide the (mode slider) to (Photo mode) or (Video mode). 2 Press M . Quality...

User Manual (English)
Page 17
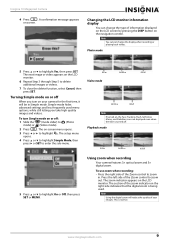
... still images. To set to the color balance selected. Quality Fine Resolution 10M ISO Auto Color Balance Self Timer Off www.insigniaproducts.com 13 Insignia 10 Megapixel Camera 3 Press or to save and apply the setting. 5 To close the menu, press M again. Quality AFuintoe Resolution 31200M0 4:3 ISO 1A6u0t0o Color Balance 800 Self... move through the selections, the preview on the LCD monitor changes according to Auto and cannot be changed . To turn off Icon Item Description Your camera automatically adjusts the Auto color balance.
... still images. To set to the color balance selected. Quality Fine Resolution 10M ISO Auto Color Balance Self Timer Off www.insigniaproducts.com 13 Insignia 10 Megapixel Camera 3 Press or to save and apply the setting. 5 To close the menu, press M again. Quality AFuintoe Resolution 31200M0 4:3 ISO 1A6u0t0o Color Balance 800 Self... move through the selections, the preview on the LCD monitor changes according to Auto and cannot be changed . To turn off Icon Item Description Your camera automatically adjusts the Auto color balance.


