User Manual (English)
Page 3
Your NS-CLW01 represents the state of the polarized or grounding-... If the provided plug does not fit into your outlet, consult an electrician for replacement of a high-quality Insignia product. Install in weatherband clock radios and is designed for your safety. Important safety instructions 1) Read these instructions... of the art in accordance with the manufacturer's instructions. 8) Do not install near any ventilation openings. Insignia NS-CLW01 Weatherband Clock Radio Contents Welcome 3 Important safety instructions 3 Features 6 Setting up your weatherband clock radio 9...
Your NS-CLW01 represents the state of the polarized or grounding-... If the provided plug does not fit into your outlet, consult an electrician for replacement of a high-quality Insignia product. Install in weatherband clock radios and is designed for your safety. Important safety instructions 1) Read these instructions... of the art in accordance with the manufacturer's instructions. 8) Do not install near any ventilation openings. Insignia NS-CLW01 Weatherband Clock Radio Contents Welcome 3 Important safety instructions 3 Features 6 Setting up your weatherband clock radio 9...
User Manual (English)
Page 4
... fire or shock hazard, do not expose this can be placed on the apparatus. • Attachments-Do not use attachments not recommended by Insignia because they exit from the apparatus. 11) Only use attachments/accessories specified by the manufacturer. 12) Use only with the cart, stand,..., in a risk of time. 14) Refer all servicing to your home, consult Insignia Technical Support or your local power company. Such as vases, shall be fully inserted to rain or moisture. Insignia NS-CLW01 Weatherband Clock Radio 10) Protect the power cord from being walked on or pinched particularly...
... fire or shock hazard, do not expose this can be placed on the apparatus. • Attachments-Do not use attachments not recommended by Insignia because they exit from the apparatus. 11) Only use attachments/accessories specified by the manufacturer. 12) Use only with the cart, stand,..., in a risk of time. 14) Refer all servicing to your home, consult Insignia Technical Support or your local power company. Such as vases, shall be fully inserted to rain or moisture. Insignia NS-CLW01 Weatherband Clock Radio 10) Protect the power cord from being walked on or pinched particularly...
User Manual (English)
Page 5
... power, the AC power plug should be disconnected from the power outlet and refer servicing to qualified service personnel under the following the operating instructions. Insignia NS-CLW01 Weatherband Clock Radio • Object and liquid entry-Never insert objects of any way. • When your weatherband clock radio exhibits a distinct change in performance...
... power, the AC power plug should be disconnected from the power outlet and refer servicing to qualified service personnel under the following the operating instructions. Insignia NS-CLW01 Weatherband Clock Radio • Object and liquid entry-Never insert objects of any way. • When your weatherband clock radio exhibits a distinct change in performance...

User Manual (English)
Page 6
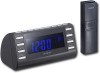
... turn the radio on. Press to tune the radio to a higher station. Press to tune the radio to a lower station. Press once to set Alarm 2. Insignia NS-CLW01 Weatherband Clock Radio Features Package contents: • Weatherband clock radio • Outdoor temperature transmitter • Transmitter mount with mounting screws (3) • Battery (CR2032 x 1) • User...
... turn the radio on. Press to tune the radio to a higher station. Press to tune the radio to a lower station. Press once to set Alarm 2. Insignia NS-CLW01 Weatherband Clock Radio Features Package contents: • Weatherband clock radio • Outdoor temperature transmitter • Transmitter mount with mounting screws (3) • Battery (CR2032 x 1) • User...
User Manual (English)
Page 7
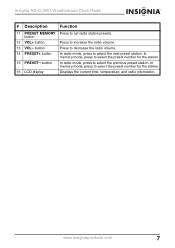
.... 15 PRESET- In memory mode, press to select the preset number for the station. 16 LCD display Displays the current time, temperature, and radio information. Insignia NS-CLW01 Weatherband Clock Radio # Description Function 11 PRESET MEMORY Press to select the previous preset station. www.insigniaproducts.com 7 button In radio mode, press to set...
.... 15 PRESET- In memory mode, press to select the preset number for the station. 16 LCD display Displays the current time, temperature, and radio information. Insignia NS-CLW01 Weatherband Clock Radio # Description Function 11 PRESET MEMORY Press to select the previous preset station. www.insigniaproducts.com 7 button In radio mode, press to set...
User Manual (English)
Page 8
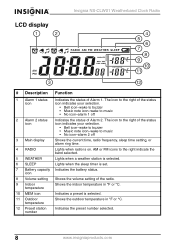
... radio. 9 Indoor temperature Shows the indoor temperature in °F or °C. 12 Preset station number Indicates the preset number selected. 8 www.insigniaproducts.com LCD display Insignia NS-CLW01 Weatherband Clock Radio # Description Function 1 Alarm 1 status Indicates the status of the status icon icon indicates your selection. • Bell icon-wake to buzzer •...
... radio. 9 Indoor temperature Shows the indoor temperature in °F or °C. 12 Preset station number Indicates the preset number selected. 8 www.insigniaproducts.com LCD display Insignia NS-CLW01 Weatherband Clock Radio # Description Function 1 Alarm 1 status Indicates the status of the status icon icon indicates your selection. • Bell icon-wake to buzzer •...
User Manual (English)
Page 9
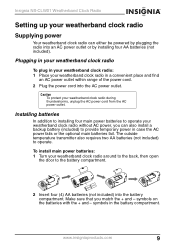
Caution To protect your weatherband clock radio in case the AC power fails or the optional main batteries fail. Insignia NS-CLW01 Weatherband Clock Radio Setting up your weatherband clock radio Supplying power Your weatherband clock radio can also install a backup battery (included) to operate. Installing batteries ...
Caution To protect your weatherband clock radio in case the AC power fails or the optional main batteries fail. Insignia NS-CLW01 Weatherband Clock Radio Setting up your weatherband clock radio Supplying power Your weatherband clock radio can also install a backup battery (included) to operate. Installing batteries ...
User Manual (English)
Page 10
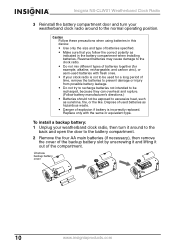
Insignia NS-CLW01 Weatherband Clock Radio 3 Reinstall the battery compartment door and turn it around to the normal operating position. Reversed batteries may cause damage to the clock ...
Insignia NS-CLW01 Weatherband Clock Radio 3 Reinstall the battery compartment door and turn it around to the normal operating position. Reversed batteries may cause damage to the clock ...
User Manual (English)
Page 11
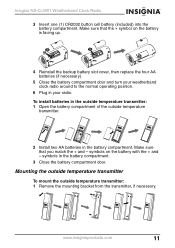
... battery compartment door. Make sure that you match the + and - www.insigniaproducts.com 11 Make sure that the + symbol on the battery with the + and - Insignia NS-CLW01 Weatherband Clock Radio 3 Insert one (1) CR2032 button cell battery (included) into the battery compartment.
... battery compartment door. Make sure that you match the + and - www.insigniaproducts.com 11 Make sure that the + symbol on the battery with the + and - Insignia NS-CLW01 Weatherband Clock Radio 3 Insert one (1) CR2032 button cell battery (included) into the battery compartment.
User Manual (English)
Page 12
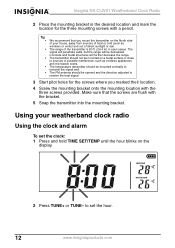
... transmitter should be mounted on the display. 2 Press TUNE+ or TUNE- Tip • We recommend that the screws are flush with the three screws provided. Insignia NS-CLW01 Weatherband Clock Radio 2 Place the mounting bracket in open space.
... transmitter should be mounted on the display. 2 Press TUNE+ or TUNE- Tip • We recommend that the screws are flush with the three screws provided. Insignia NS-CLW01 Weatherband Clock Radio 2 Place the mounting bracket in open space.
User Manual (English)
Page 13
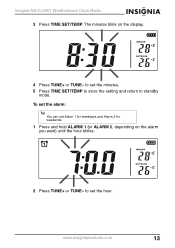
to set the minutes. 5 Press TIME SET/TEMP to store the setting and return to set the hour. The minutes blink on the alarm you want) until the hour blinks. 2 Press TUNE+ or TUNE- www.insigniaproducts.com 13 Insignia NS-CLW01 Weatherband Clock Radio 3 Press TIME SET/TEMP. to standby mode. To set the alarm: Tip You can set Alarm 1 for weekdays and Alarm 2 for weekends. 1 Press and hold ALARM 1 (or ALARM 2, depending on the display. 4 Press TUNE+ or TUNE-
to set the minutes. 5 Press TIME SET/TEMP to store the setting and return to set the hour. The minutes blink on the alarm you want) until the hour blinks. 2 Press TUNE+ or TUNE- www.insigniaproducts.com 13 Insignia NS-CLW01 Weatherband Clock Radio 3 Press TIME SET/TEMP. to standby mode. To set the alarm: Tip You can set Alarm 1 for weekdays and Alarm 2 for weekends. 1 Press and hold ALARM 1 (or ALARM 2, depending on the display. 4 Press TUNE+ or TUNE-
User Manual (English)
Page 14
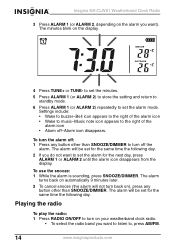
... be set for the same time the following day. 2 If you do not want to set the alarm for the same time the following day. Insignia NS-CLW01 Weatherband Clock Radio 3 Press ALARM 1 (or ALARM 2, depending on ), press any button other than SNOOZE/DIMMER to turn back on the alarm you want ). To...
... be set for the same time the following day. 2 If you do not want to set the alarm for the same time the following day. Insignia NS-CLW01 Weatherband Clock Radio 3 Press ALARM 1 (or ALARM 2, depending on ), press any button other than SNOOZE/DIMMER to turn back on the alarm you want ). To...
User Manual (English)
Page 15
Insignia NS-CLW01 Weatherband Clock Radio • To tune the radio up or down and select the station you want , press TUNE+ or TUNE-. • To auto search ...
Insignia NS-CLW01 Weatherband Clock Radio • To tune the radio up or down and select the station you want , press TUNE+ or TUNE-. • To auto search ...

User Manual (English)
Page 16
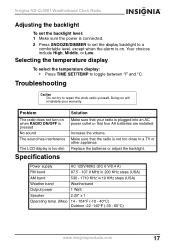
... display, and "90" appears (blinking) on . to change weather channels manually. 3 Press RADIO ON/OFF to turn off the weather channel. 16 www.insigniaproducts.com Insignia NS-CLW01 Weatherband Clock Radio Setting the sleep timer To set the sleep timer: 1 Press SLEEP once when the radio is on the display and your weatherband...
... display, and "90" appears (blinking) on . to change weather channels manually. 3 Press RADIO ON/OFF to turn off the weather channel. 16 www.insigniaproducts.com Insignia NS-CLW01 Weatherband Clock Radio Setting the sleep timer To set the sleep timer: 1 Press SLEEP once when the radio is on the display and your weatherband...
User Manual (English)
Page 17
... the backlight. Problem The radio does not turn on . Make sure that the radio is plugged into an AC power outlet or that your warranty. Insignia NS-CLW01 Weatherband Clock Radio Adjusting the backlight To set the backlight level: 1 Make sure the power is connected. 2 Press SNOOZE/DIMMER to set the display backlight...
... the backlight. Problem The radio does not turn on . Make sure that the radio is plugged into an AC power outlet or that your warranty. Insignia NS-CLW01 Weatherband Clock Radio Adjusting the backlight To set the backlight level: 1 Make sure the power is connected. 2 Press SNOOZE/DIMMER to set the display backlight...

User Manual (English)
Page 18
... equipment has been tested and found to radio communications. Energy Star® As an Energy Star Partner, Insignia has determined that interference will not occur in accordance with Part 15 of the FCC Rules. Insignia NS-CLW01 Weatherband Clock Radio Legal notices FCC warning Changes or modifications not expressly approved by the party responsible...
... equipment has been tested and found to radio communications. Energy Star® As an Energy Star Partner, Insignia has determined that interference will not occur in accordance with Part 15 of the FCC Rules. Insignia NS-CLW01 Weatherband Clock Radio Legal notices FCC warning Changes or modifications not expressly approved by the party responsible...
User Manual (English)
Page 19
...States, Canada, and Mexico. This warranty is printed on the web site. Insignia NS-CLW01 Weatherband Clock Radio 90-day limited warranty Insignia Products ("Insignia") warrants to you, the original purchaser of this new NS-CLW01 ("Product"), that the Product shall be free of defects in its original ... Period, if the original manufacture of the material or workmanship of a defect covered by an authorized Insignia repair center or store personnel, Insignia will have an Insignia-approved repair person dispatched to you. This warranty lasts as long as the original packaging. Call agents...
...States, Canada, and Mexico. This warranty is printed on the web site. Insignia NS-CLW01 Weatherband Clock Radio 90-day limited warranty Insignia Products ("Insignia") warrants to you, the original purchaser of this new NS-CLW01 ("Product"), that the Product shall be free of defects in its original ... Period, if the original manufacture of the material or workmanship of a defect covered by an authorized Insignia repair center or store personnel, Insignia will have an Insignia-approved repair person dispatched to you. This warranty lasts as long as the original packaging. Call agents...
User Manual (English)
Page 20
... YOU SPECIFIC LEGAL RIGHTS, AND YOU MAY ALSO HAVE OTHER RIGHTS, WHICH VARY FROM STATE TO STATE OR PROVINCE TO PROVINCE. Contact Insignia: For customer service please call 1-877-467-4289 www.insigniaproducts.com Distributed by Best Buy Purchasing, LLC 7601 Penn Avenue South, Richfield... voltage supply • Attempted repair by anyone other products and brand names are trademarks of their respective owners. 20 www.insigniaproducts.com Insignia NS-CLW01 Weatherband Clock Radio • Modification of any part of the Product, including the antenna • Plasma display panel damaged by static...
... YOU SPECIFIC LEGAL RIGHTS, AND YOU MAY ALSO HAVE OTHER RIGHTS, WHICH VARY FROM STATE TO STATE OR PROVINCE TO PROVINCE. Contact Insignia: For customer service please call 1-877-467-4289 www.insigniaproducts.com Distributed by Best Buy Purchasing, LLC 7601 Penn Avenue South, Richfield... voltage supply • Attempted repair by anyone other products and brand names are trademarks of their respective owners. 20 www.insigniaproducts.com Insignia NS-CLW01 Weatherband Clock Radio • Modification of any part of the Product, including the antenna • Plasma display panel damaged by static...


