
User Manual (English)
Page 1
User Guide Weatherband Clock Radio NS-CLW01
User Guide Weatherband Clock Radio NS-CLW01
User Manual (English)
Page 3
... grounding-type plug. Install in weatherband clock radios and is designed for your safety. The wide blade or the third prong are provided for reliable and trouble-free performance. www.insigniaproducts.com 3 Important safety instructions 1) Read these instructions. 2) Keep these instructions. 3) Heed all warnings. 4) Follow all instructions. 5) Do not use this apparatus near any ventilation openings. Your NS-CLW01 represents the state of a high-quality Insignia product.
... grounding-type plug. Install in weatherband clock radios and is designed for your safety. The wide blade or the third prong are provided for reliable and trouble-free performance. www.insigniaproducts.com 3 Important safety instructions 1) Read these instructions. 2) Keep these instructions. 3) Heed all warnings. 4) Follow all instructions. 5) Do not use this apparatus near any ventilation openings. Your NS-CLW01 represents the state of a high-quality Insignia product.
User Manual (English)
Page 4
If you are not sure of the type of power source indicated on the label. When a cart is used, use of a surge protector for long periods of time. 14) Refer all servicing to your home, consult Insignia Technical Support or your local power company. For clock radios intended to operate from battery power or other outlet unless the blades can result in a wet basement, or...
If you are not sure of the type of power source indicated on the label. When a cart is used, use of a surge protector for long periods of time. 14) Refer all servicing to your home, consult Insignia Technical Support or your local power company. For clock radios intended to operate from battery power or other outlet unless the blades can result in a wet basement, or...
User Manual (English)
Page 5
... work by a qualified technician to restore your weatherband clock radio to its normal operation. • If your weatherband clock radio has been dropped or damaged in any way. • When your weatherband clock radio exhibits a distinct change in a fire or electric shock. Adjust only those controls that are required, make sure that the service technician uses replacement parts specified by following conditions: • When the power supply cord or plug...
... work by a qualified technician to restore your weatherband clock radio to its normal operation. • If your weatherband clock radio has been dropped or damaged in any way. • When your weatherband clock radio exhibits a distinct change in a fire or electric shock. Adjust only those controls that are required, make sure that the service technician uses replacement parts specified by following conditions: • When the power supply cord or plug...

User Manual (English)
Page 6
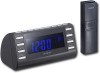
... station. Press to set the sleep timer, which automatically turns off . Press to tune the radio to select the duration. 6 www.insigniaproducts.com Press to set the time. Press once to high, middle, or low, when the alarm is sounding. Insignia NS-CLW01 Weatherband Clock Radio Features Package contents: • Weatherband clock radio • Outdoor temperature transmitter • Transmitter mount with mounting screws (3) • Battery (CR2032 x 1) • User Guide Front panel 16 # Description 1 ALARM 1 button 2 TIME SET/TEMP button 3 RADIO...
... station. Press to set the sleep timer, which automatically turns off . Press to tune the radio to select the duration. 6 www.insigniaproducts.com Press to set the time. Press once to high, middle, or low, when the alarm is sounding. Insignia NS-CLW01 Weatherband Clock Radio Features Package contents: • Weatherband clock radio • Outdoor temperature transmitter • Transmitter mount with mounting screws (3) • Battery (CR2032 x 1) • User Guide Front panel 16 # Description 1 ALARM 1 button 2 TIME SET/TEMP button 3 RADIO...
User Manual (English)
Page 7
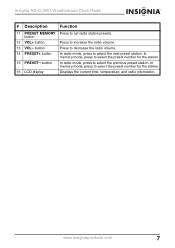
www.insigniaproducts.com 7 Insignia NS-CLW01 Weatherband Clock Radio # Description Function 11 PRESET MEMORY Press to select the previous preset station. In memory mode, press to select the preset number for the station. 15 PRESET- button In radio mode, press to set radio station presets. button Press to decrease the radio volume. 14 PRESET+ button In radio mode, press to increase the radio volume. 13 VOL- In memory mode, press to select the preset number for the station. 16 LCD display Displays the current time, temperature, and radio information. button 12 ...
www.insigniaproducts.com 7 Insignia NS-CLW01 Weatherband Clock Radio # Description Function 11 PRESET MEMORY Press to select the previous preset station. In memory mode, press to select the preset number for the station. 15 PRESET- button In radio mode, press to set radio station presets. button Press to decrease the radio volume. 14 PRESET+ button In radio mode, press to increase the radio volume. 13 VOL- In memory mode, press to select the preset number for the station. 16 LCD display Displays the current time, temperature, and radio information. button 12 ...
User Manual (English)
Page 8
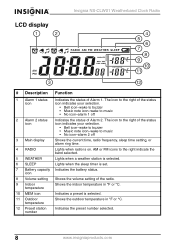
... 2 Alarm 2 status Indicates the status of the status icon icon indicates your selection. • Bell icon-wake to buzzer • Music note icon-wake to music • No icon-alarm 2 off 3 Main display Shows the current time, radio frequency, sleep time setting, or alarm ring time. 4 RADIO Lights when radio is set. 7 Battery capacity Indicates the battery status. The icon to the right indicate the band selected. 5 WEATHER Lights when a weather station is selected. 6 SLEEP Lights when the sleep timer...
... 2 Alarm 2 status Indicates the status of the status icon icon indicates your selection. • Bell icon-wake to buzzer • Music note icon-wake to music • No icon-alarm 2 off 3 Main display Shows the current time, radio frequency, sleep time setting, or alarm ring time. 4 RADIO Lights when radio is set. 7 Battery capacity Indicates the battery status. The icon to the right indicate the band selected. 5 WEATHER Lights when a weather station is selected. 6 SLEEP Lights when the sleep timer...
User Manual (English)
Page 9
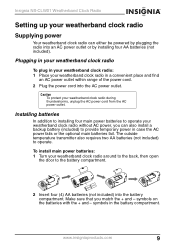
... an AC power outlet or by installing four AA batteries (not included). Installing batteries In addition to installing four main power batteries to operate your weatherband clock radio without AC power, you match the + and - Make sure that you can either be powered by plugging the radio into the battery compartment. www.insigniaproducts.com 9 Insignia NS-CLW01 Weatherband Clock Radio Setting up your weatherband clock radio Supplying power Your weatherband clock radio can also install a backup battery (included) to provide temporary power in case...
... an AC power outlet or by installing four AA batteries (not included). Installing batteries In addition to installing four main power batteries to operate your weatherband clock radio without AC power, you match the + and - Make sure that you can either be powered by plugging the radio into the battery compartment. www.insigniaproducts.com 9 Insignia NS-CLW01 Weatherband Clock Radio Setting up your weatherband clock radio Supplying power Your weatherband clock radio can also install a backup battery (included) to provide temporary power in case...
User Manual (English)
Page 10
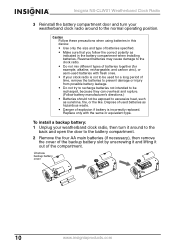
... normal operating position. Insignia NS-CLW01 Weatherband Clock Radio 3 Reinstall the battery compartment door and turn your weatherband clock radio, then turn it around to be used batteries as indicated in this device: • Use only the size and type of batteries specified. • Make sure that you follow the correct polarity as hazardous waste. • Danger of explosion if battery is incorrectly replaced. Unscrew backup battery cover 10 www.insigniaproducts...
... normal operating position. Insignia NS-CLW01 Weatherband Clock Radio 3 Reinstall the battery compartment door and turn your weatherband clock radio, then turn it around to be used batteries as indicated in this device: • Use only the size and type of batteries specified. • Make sure that you follow the correct polarity as hazardous waste. • Danger of explosion if battery is incorrectly replaced. Unscrew backup battery cover 10 www.insigniaproducts...
User Manual (English)
Page 11
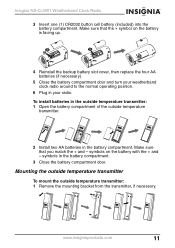
... the battery compartment. www.insigniaproducts.com 11 Insignia NS-CLW01 Weatherband Clock Radio 3 Insert one (1) CR2032 button cell battery (included) into the battery compartment. symbols on the battery is facing up. 4 Reinstall the backup battery slot cover, then replace the four AA batteries (if necessary). 5 Close the battery compartment door and turn your weatherband clock radio around to the normal operating position. 6 Plug in your radio. Mounting the outside temperature transmitter To mount the...
... the battery compartment. www.insigniaproducts.com 11 Insignia NS-CLW01 Weatherband Clock Radio 3 Insert one (1) CR2032 button cell battery (included) into the battery compartment. symbols on the battery is facing up. 4 Reinstall the backup battery slot cover, then replace the four AA batteries (if necessary). 5 Close the battery compartment door and turn your weatherband clock radio around to the normal operating position. 6 Plug in your radio. Mounting the outside temperature transmitter To mount the...
User Manual (English)
Page 12
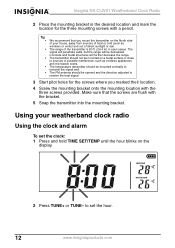
... clock radio Using the clock and alarm To set the hour. 12 www.insigniaproducts.com to receive the best signal. 3 Start pilot holes for the three mounting screws with the bracket. 5 Snap the transmitter into the mounting bracket. The signal will penetrate walls, but the range will further decrease the range. • The transmitter should be opened and the direction adjusted to set...
... clock radio Using the clock and alarm To set the hour. 12 www.insigniaproducts.com to receive the best signal. 3 Start pilot holes for the three mounting screws with the bracket. 5 Snap the transmitter into the mounting bracket. The signal will penetrate walls, but the range will further decrease the range. • The transmitter should be opened and the direction adjusted to set...
User Manual (English)
Page 13
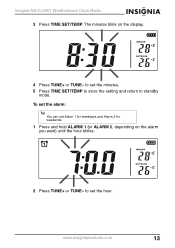
to set the minutes. 5 Press TIME SET/TEMP to store the setting and return to set Alarm 1 for weekdays and Alarm 2 for weekends. 1 Press and hold ALARM 1 (or ALARM 2, depending on the display. 4 Press TUNE+ or TUNE- to standby mode. www.insigniaproducts.com 13 To set the alarm: Tip You can set the hour. The minutes blink on the alarm you want) until the hour blinks. 2 Press TUNE+ or TUNE- Insignia NS-CLW01 Weatherband Clock Radio 3 Press TIME SET/TEMP.
to set the minutes. 5 Press TIME SET/TEMP to store the setting and return to set Alarm 1 for weekdays and Alarm 2 for weekends. 1 Press and hold ALARM 1 (or ALARM 2, depending on the display. 4 Press TUNE+ or TUNE- to standby mode. www.insigniaproducts.com 13 To set the alarm: Tip You can set the hour. The minutes blink on the alarm you want) until the hour blinks. 2 Press TUNE+ or TUNE- Insignia NS-CLW01 Weatherband Clock Radio 3 Press TIME SET/TEMP.
User Manual (English)
Page 14
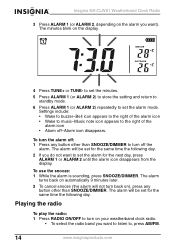
... any button other than SNOOZE/DIMMER. The alarm will be set for the next day, press ALARM 1 or ALARM 2 until the alarm icon disappears from the display. Insignia NS-CLW01 Weatherband Clock Radio 3 Press ALARM 1 (or ALARM 2, depending on the alarm you want to listen to, press AM/FM. 14 www.insigniaproducts.com to set the minutes. 5 Press ALARM 1 (or ALARM 2) to store the setting and return to standby mode. 6 Press ALARM 1 (or ALARM 2) repeatedly to turn on...
... any button other than SNOOZE/DIMMER. The alarm will be set for the next day, press ALARM 1 or ALARM 2 until the alarm icon disappears from the display. Insignia NS-CLW01 Weatherband Clock Radio 3 Press ALARM 1 (or ALARM 2, depending on the alarm you want to listen to, press AM/FM. 14 www.insigniaproducts.com to set the minutes. 5 Press ALARM 1 (or ALARM 2) to store the setting and return to standby mode. 6 Press ALARM 1 (or ALARM 2) repeatedly to turn on...
User Manual (English)
Page 15
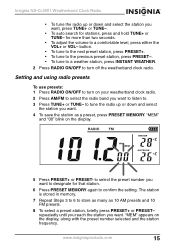
.... repeatedly until you reach the station you want to listen to turn off the weatherband clock radio. to select the preset number you want to designate for more than two seconds. • To adjust the volume to confirm the setting. "MEM" appears on the display. 5 Press PRESET+ or PRESET- for that station. 6 Press PRESET MEMORY again to a comfortable level, press either the VOL+ or VOL- Insignia NS-CLW01...
.... repeatedly until you reach the station you want to listen to turn off the weatherband clock radio. to select the preset number you want to designate for more than two seconds. • To adjust the volume to confirm the setting. "MEM" appears on the display. 5 Press PRESET+ or PRESET- for that station. 6 Press PRESET MEMORY again to a comfortable level, press either the VOL+ or VOL- Insignia NS-CLW01...

User Manual (English)
Page 16
... display (indicating that the weatherband clock radio will turn off after 90 minutes). 2 Repeatedly press SLEEP to turn off the weather channel. 16 www.insigniaproducts.com Insignia NS-CLW01 Weatherband Clock Radio Setting the sleep timer To set the sleep timer: 1 Press SLEEP once when the radio is on. to change weather channels manually. 3 Press RADIO ON/OFF to decrease the sleep timer in 10 minute increments. 3 To cancel the sleep function, repeatedly press SLEEP until "0" shows on the display. "WEATHER" appears on . Accessing a weather...
... display (indicating that the weatherband clock radio will turn off after 90 minutes). 2 Repeatedly press SLEEP to turn off the weather channel. 16 www.insigniaproducts.com Insignia NS-CLW01 Weatherband Clock Radio Setting the sleep timer To set the sleep timer: 1 Press SLEEP once when the radio is on. to change weather channels manually. 3 Press RADIO ON/OFF to decrease the sleep timer in 10 minute increments. 3 To cancel the sleep function, repeatedly press SLEEP until "0" shows on the display. "WEATHER" appears on . Accessing a weather...
User Manual (English)
Page 17
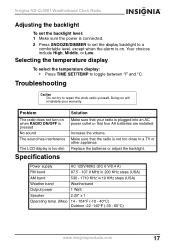
... °C. Problem The radio does not turn on . Increase the volume. Make sure that the radio is plugged into an AC power outlet or that your warranty. Replace the batteries or adjust the backlight. Insignia NS-CLW01 Weatherband Clock Radio Adjusting the backlight To set the backlight level: 1 Make sure the power is connected. 2 Press SNOOZE/DIMMER to set the display backlight to repair the clock radio yourself. Troubleshooting Caution Do not try to a comfortable level, except when the alarm is on when RADIO ON...
... °C. Problem The radio does not turn on . Increase the volume. Make sure that the radio is plugged into an AC power outlet or that your warranty. Replace the batteries or adjust the backlight. Insignia NS-CLW01 Weatherband Clock Radio Adjusting the backlight To set the backlight level: 1 Make sure the power is connected. 2 Press SNOOZE/DIMMER to set the display backlight to repair the clock radio yourself. Troubleshooting Caution Do not try to a comfortable level, except when the alarm is on when RADIO ON...

User Manual (English)
Page 18
... correct the interference by the party responsible for energy efficiency. 18 www.insigniaproducts.com Insignia NS-CLW01 Weatherband Clock Radio Legal notices FCC warning Changes or modifications not expressly approved by one or more of this product is no guarantee that interference will not occur in a residential installation. FCC Part 15 This device complies with Part 15 of the FCC Rules.
... correct the interference by the party responsible for energy efficiency. 18 www.insigniaproducts.com Insignia NS-CLW01 Weatherband Clock Radio Legal notices FCC warning Changes or modifications not expressly approved by one or more of this product is no guarantee that interference will not occur in a residential installation. FCC Part 15 This device complies with Part 15 of the FCC Rules.
User Manual (English)
Page 19
... from . Make sure that you sell or otherwise transfer the Product. This warranty is the warranty valid? This warranty does not cover: • Customer instruction • Installation • Set up adjustments • Cosmetic damage • Damage due to the store you must be defective by this warranty cover? This Product must pay all labor and parts charges. Products and parts replaced under this...
... from . Make sure that you sell or otherwise transfer the Product. This warranty is the warranty valid? This warranty does not cover: • Customer instruction • Installation • Set up adjustments • Cosmetic damage • Damage due to the store you must be defective by this warranty cover? This Product must pay all labor and parts charges. Products and parts replaced under this...
User Manual (English)
Page 20
... due to incorrect operation or maintenance • Connection to service the Product • Products sold as fuses or batteries • Products where the factory applied serial number has been altered or removed REPAIR REPLACEMENT AS PROVIDED UNDER THIS WARRANTY IS YOUR EXCLUSIVE REMEDY. INSIGNIA is or with all faults • Consumables, such as is a trademark of their respective owners. 20 www.insigniaproducts.com...
... due to incorrect operation or maintenance • Connection to service the Product • Products sold as fuses or batteries • Products where the factory applied serial number has been altered or removed REPAIR REPLACEMENT AS PROVIDED UNDER THIS WARRANTY IS YOUR EXCLUSIVE REMEDY. INSIGNIA is or with all faults • Consumables, such as is a trademark of their respective owners. 20 www.insigniaproducts.com...
Warranty (English)
Page 2
... customer service please call 1-877-467-4289 www.insignia-products.com INSIGNIA™ is or with all faults • Consumables, such as fuses or batteries • Products where the factory applied serial number has been altered or removed REPAIR REPLACEMENT AS PROVIDED UNDER THIS WARRANTY IS YOUR EXCLUSIVE REMEDY. Distributed by Insignia to service the product • Products sold as is a trademark of Best Buy Enterprise Services...
... customer service please call 1-877-467-4289 www.insignia-products.com INSIGNIA™ is or with all faults • Consumables, such as fuses or batteries • Products where the factory applied serial number has been altered or removed REPAIR REPLACEMENT AS PROVIDED UNDER THIS WARRANTY IS YOUR EXCLUSIVE REMEDY. Distributed by Insignia to service the product • Products sold as is a trademark of Best Buy Enterprise Services...


