

Quick Setup Guide (English)
Page 2
...INPUT, one or more advanced features. HDMI2 - to change the channel Viewing program information • Press DISPLAY to view an information banner. INSIGNIA is a trademark of sound, and picture and sound settings. You can select STD, HRC, or IRC. Plug & Play Sets the Clock.... Component2 ---- 51"/59" Plasma HDTV I QUICK SETUP GUIDE I NS-51P680A12/NS-59P680A12 Turning on your TV for the first time 1 Connect the power cord. 2 Press (power) to turn off the daylight saving time feature. • On-Turns on the daylight saving time feature. • Auto-Sets the daylight...
...INPUT, one or more advanced features. HDMI2 - to change the channel Viewing program information • Press DISPLAY to view an information banner. INSIGNIA is a trademark of sound, and picture and sound settings. You can select STD, HRC, or IRC. Plug & Play Sets the Clock.... Component2 ---- 51"/59" Plasma HDTV I QUICK SETUP GUIDE I NS-51P680A12/NS-59P680A12 Turning on your TV for the first time 1 Connect the power cord. 2 Press (power) to turn off the daylight saving time feature. • On-Turns on the daylight saving time feature. • Auto-Sets the daylight...

User Manual (English)
Page 2
... Connecting a DVI device 13 Connecting a component video device 14 Connecting a computer using DVI 14 Connecting a digital audio amplifier 15 Turning on your TV for the first time 15 Understanding the basics 17 Turning your TV on or off 17 Selecting the video input source 17 On-screen menu overview 18 Navigating the...
... Connecting a DVI device 13 Connecting a component video device 14 Connecting a computer using DVI 14 Connecting a digital audio amplifier 15 Turning on your TV for the first time 15 Understanding the basics 17 Turning your TV on or off 17 Selecting the video input source 17 On-screen menu overview 18 Navigating the...

User Manual (English)
Page 3
... channel list 28 Viewing a favorite channel 28 Checking the DTV signal strength 28 Setting parental controls 29 Setting or changing the password 29 Turning parental controls on or off 29 Temporarily unblocking a channel 30 Setting U.S. TV parental control levels 30 Setting movie levels 31 Setting Canadian ...closed captioning mode 34 Customizing DTV closed captioning styles 34 Adjusting time settings 35 Setting the clock 35 Setting the time zone 36 Turning Daylight Saving Time on or off 37 Setting the sleep timer 37 Setting a wake-up timer 37 Adjusting menu settings 38 ...
... channel list 28 Viewing a favorite channel 28 Checking the DTV signal strength 28 Setting parental controls 29 Setting or changing the password 29 Turning parental controls on or off 29 Temporarily unblocking a channel 30 Setting U.S. TV parental control levels 30 Setting movie levels 31 Setting Canadian ...closed captioning mode 34 Customizing DTV closed captioning styles 34 Adjusting time settings 35 Setting the clock 35 Setting the time zone 36 Turning Daylight Saving Time on or off 37 Setting the sleep timer 37 Setting a wake-up timer 37 Adjusting menu settings 38 ...

User Manual (English)
Page 10
...the video input source. For more information, see "Selecting the video input source" on page 19. 6 Power indicator Blinks, then turns off when you turn off your TV. For more information, see "Selecting a channel" on page 17. For more information, see "Connecting a DVI ...PB, Y and R-AUDIO-L AV1 IN VIDEO and R-AUDIO-L Connect a component video device to these jacks. Front SOURCE Back NS-51P680A12/NS-59P680A12 SOURCE # Item Description 1 (power) Press to turn your TV. # Jack Description 1 Power in the 5 CH /CH buttons channel list. Lights red when your TV is on...
...the video input source. For more information, see "Selecting the video input source" on page 19. 6 Power indicator Blinks, then turns off when you turn off your TV. For more information, see "Selecting a channel" on page 17. For more information, see "Connecting a DVI ...PB, Y and R-AUDIO-L AV1 IN VIDEO and R-AUDIO-L Connect a component video device to these jacks. Front SOURCE Back NS-51P680A12/NS-59P680A12 SOURCE # Item Description 1 (power) Press to turn your TV. # Jack Description 1 Power in the 5 CH /CH buttons channel list. Lights red when your TV is on...

User Manual (English)
Page 11
...Press to the previous menu. In the on page 19. For more information, see "Adjusting the TV picture" on -screen menu, press to return to turn your TV, power still flows into it. Press to open the channel list. For more information, see "Viewing a favorite channel" on -screen menu. ...remote control batteries: 1 Press the battery cover latch in, then lift the cover. For more information, see "Selecting a channel" on . Press again to turn closed captioning on -screen menu, press to the next or previous channel in component video or HDMI mode. In the on or off your TV...
...Press to the previous menu. In the on page 19. For more information, see "Adjusting the TV picture" on -screen menu, press to return to turn your TV, power still flows into it. Press to open the channel list. For more information, see "Viewing a favorite channel" on -screen menu. ...remote control batteries: 1 Press the battery cover latch in, then lift the cover. For more information, see "Selecting a channel" on . Press again to turn closed captioning on -screen menu, press to the next or previous channel in component video or HDMI mode. In the on or off your TV...

User Manual (English)
Page 13
... for universal remote controls (for all Insignia TVs manufactured after Jan. 1, 2007) Universal remote control makes and models One for All 0054 Phillips ... do not intend to use the core with your cable or satellite TV provide for an extended period of time, turn off the surge protector (if you use the correct type of the most common remote control codes. Cautions • ...Make sure that it is turned on the back of your TV, then connect the other remote controls are using one) or unplug the power ...
... for universal remote controls (for all Insignia TVs manufactured after Jan. 1, 2007) Universal remote control makes and models One for All 0054 Phillips ... do not intend to use the core with your cable or satellite TV provide for an extended period of time, turn off the surge protector (if you use the correct type of the most common remote control codes. Cautions • ...Make sure that it is turned on the back of your TV, then connect the other remote controls are using one) or unplug the power ...

User Manual (English)
Page 14
... antennas: 1 Turn off your TV and all connected equipment. 2 Place the wires from the twin leads under the screws on a 300-75 Ω adapter (not included). Use a screwdriver to tighten the screws. 3 Connect the adapter to the ANT IN jack on the back of your TV. NS-51P680A12/NS-59P680A12 Connecting an... outdoor antenna Connecting a coaxial antenna 3 Connect the combiner to the ANT IN jack on the back of your TV. ANT IN To connect a twin-lead antenna: 1 Turn off your TV is cable-ready, you need a cable ...
... antennas: 1 Turn off your TV and all connected equipment. 2 Place the wires from the twin leads under the screws on a 300-75 Ω adapter (not included). Use a screwdriver to tighten the screws. 3 Connect the adapter to the ANT IN jack on the back of your TV. NS-51P680A12/NS-59P680A12 Connecting an... outdoor antenna Connecting a coaxial antenna 3 Connect the combiner to the ANT IN jack on the back of your TV. ANT IN To connect a twin-lead antenna: 1 Turn off your TV is cable-ready, you need a cable ...

User Manual (English)
Page 15
... • "Connecting a component video device" on the RF (A/B) switch. Connecting a cable TV box that unscrambles some channels If your cable box unscrambles only some channels: 1 Turn off your TV and all connected equipment. 2 Disconnect the cable that unscrambles some channels (such as premium channels), you need a two-way splitter, an RF...
... • "Connecting a component video device" on the RF (A/B) switch. Connecting a cable TV box that unscrambles some channels If your cable box unscrambles only some channels: 1 Turn off your TV and all connected equipment. 2 Disconnect the cable that unscrambles some channels (such as premium channels), you need a two-way splitter, an RF...

User Manual (English)
Page 16
...-L jacks of the TV, or connect the audio cable to the AV IN 1 R jack. 7 Turn on your TV, then turn on the camcorder or game console. 12 www.insigniaproducts.com NS-51P680A12/NS-59P680A12 Connecting a VCR To connect a VCR: 1 Turn off your TV and all connected equipment. 2 If the antenna or cable TV cable is...The yellow connector on the video cable plus into the green AV IN 1 (Y/VIDEO) jack on the VCR. To connect a camcorder or game console: 1 Turn off your TV and all connected equipment. 2 Connect an video cable (not included) between the AV IN 1 R-AUDIO-L jacks on the back of your ...
...-L jacks of the TV, or connect the audio cable to the AV IN 1 R jack. 7 Turn on your TV, then turn on the camcorder or game console. 12 www.insigniaproducts.com NS-51P680A12/NS-59P680A12 Connecting a VCR To connect a VCR: 1 Turn off your TV and all connected equipment. 2 If the antenna or cable TV cable is...The yellow connector on the video cable plus into the green AV IN 1 (Y/VIDEO) jack on the VCR. To connect a camcorder or game console: 1 Turn off your TV and all connected equipment. 2 Connect an video cable (not included) between the AV IN 1 R-AUDIO-L jacks on the back of your ...

User Manual (English)
Page 17
... older than 1.3. Connecting an HDMI device To connect an HDMI device to the back of your TV: 1 Turn off your TV and all connected equipment. 2 Connect an HDMI cable (not included) between the DVI AUDIO...the HDMI device to the DVI AUDIO INjack on the back of your TV. Back of your TV, then turn on the DVI device. Audio cable HDMI/DVI cable 3 Connect an audio cable (not included) between the ... adapter (not included) between the HDMI IN 1 (DVI) jack on the back of your TV, then turn on the HDMI device. If there is no image. Notes Your TV may not output sound and may display...
... older than 1.3. Connecting an HDMI device To connect an HDMI device to the back of your TV: 1 Turn off your TV and all connected equipment. 2 Connect an HDMI cable (not included) between the DVI AUDIO...the HDMI device to the DVI AUDIO INjack on the back of your TV. Back of your TV, then turn on the DVI device. Audio cable HDMI/DVI cable 3 Connect an audio cable (not included) between the ... adapter (not included) between the HDMI IN 1 (DVI) jack on the back of your TV, then turn on the HDMI device. If there is no image. Notes Your TV may not output sound and may display...

User Manual (English)
Page 18
... 2 R-AUDIO-L jacks on the back of your TV and the AUDIO OUT jacks on the component video device. 4 Turn on your TV, then turn on the computer. 14 www.insigniaproducts.com NS-51P680A12/NS-59P680A12 Connecting a component video device Note Make sure that you connect the video and audio to a dual-RCA cable ...(not included) between the DVI AUDIO IN jack on the back of your TV and the LINE IN jack on the computer. 3 Turn on your TV, ...
... 2 R-AUDIO-L jacks on the back of your TV and the AUDIO OUT jacks on the component video device. 4 Turn on your TV, then turn on the computer. 14 www.insigniaproducts.com NS-51P680A12/NS-59P680A12 Connecting a component video device Note Make sure that you connect the video and audio to a dual-RCA cable ...(not included) between the DVI AUDIO IN jack on the back of your TV and the LINE IN jack on the computer. 3 Turn on your TV, ...

User Manual (English)
Page 19
... a digital audio amplifier: • Connect a digital audio optical cable (not included) between the DIGITAL AUDIO OUT (OPTICAL) jack on the back of TV Turning on your TV for the first time The first time you through 11 for details.) • Connected the power cord. (See page 9 for details.) 2.... Store Demo Home Use Note Store Demo mode is connected to an amplifier or home theater, not your TV's optical jack. When the TV is turned on, you want to adjust. Note You can select English, French, or Spanish. 4 Press ENTER. Language : English Digital audio optical cable 3...
... a digital audio amplifier: • Connect a digital audio optical cable (not included) between the DIGITAL AUDIO OUT (OPTICAL) jack on the back of TV Turning on your TV for the first time The first time you through 11 for details.) • Connected the power cord. (See page 9 for details.) 2.... Store Demo Home Use Note Store Demo mode is connected to an amplifier or home theater, not your TV's optical jack. When the TV is turned on, you want to adjust. Note You can select English, French, or Spanish. 4 Press ENTER. Language : English Digital audio optical cable 3...
User Manual (English)
Page 20
...have digital cable, select Auto. 7 If you select Manual, the Set current date and time screen appears. The most common setting. Cable : -- NS-51P680A12/NS-59P680A12 When the search is channel 2, then your cable company uses Standard. Clock Mode : Auto 8 Press ENTER, then press S or T to ...Auto Program in the list. DTV Air : -- If you selected Auto, press S or T to highlight: • Off-Turns off the daylight saving time feature. • On-Turns on the daylight saving time feature. • Auto-Sets the daylight saving time feature based on the time information from a ...
...have digital cable, select Auto. 7 If you select Manual, the Set current date and time screen appears. The most common setting. Cable : -- NS-51P680A12/NS-59P680A12 When the search is channel 2, then your cable company uses Standard. Clock Mode : Auto 8 Press ENTER, then press S or T to ...Auto Program in the list. DTV Air : -- If you selected Auto, press S or T to highlight: • Off-Turns off the daylight saving time feature. • On-Turns on the daylight saving time feature. • Auto-Sets the daylight saving time feature based on the time information from a ...

User Manual (English)
Page 21
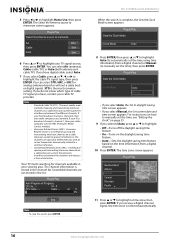
...video input sources that are highlighted and sorted to your TV. Video input sources that it . If you want to open the Source List. Turning your TV on your TV. 3 Press (power) again to the bottom. Picture Sound Channel Setup Input Mode Contrast Brightness Sharpness Color Tint ... : 50 : 50 : G50/R50 2 Press S or T to highlight Input, then press ENTER to highlight a video input source. To completely disconnect power, turn off the surge protector or unplug the power cord. HDMI2 - 4 Press S or T to access the Input menu. The Enjoy your TV. Understanding the basics ...
...video input sources that are highlighted and sorted to your TV. Video input sources that it . If you want to open the Source List. Turning your TV on your TV. 3 Press (power) again to the bottom. Picture Sound Channel Setup Input Mode Contrast Brightness Sharpness Color Tint ... : 50 : 50 : G50/R50 2 Press S or T to highlight Input, then press ENTER to highlight a video input source. To completely disconnect power, turn off the surge protector or unplug the power cord. HDMI2 - 4 Press S or T to access the Input menu. The Enjoy your TV. Understanding the basics ...

User Manual (English)
Page 23
... DTV channel, press -, then press the number for a DTV sub-channel to go to a channel that was skipped in the channel scanning. or VOL+) to turn off the sound. TV #1 Fri, Dec 19 2:05 am DTV Cable Dolby Digital 13-1 M. You can also press PICTURE one or more information, see all... picture settings" on . Adjusting the volume To adjust the volume: • Press VOL - or VOL + to decrease or increase the volume. • Press MUTE to turn the sound back on page 20. • Picture Reset-Resets all tasks in a few seconds.
... DTV channel, press -, then press the number for a DTV sub-channel to go to a channel that was skipped in the channel scanning. or VOL+) to turn off the sound. TV #1 Fri, Dec 19 2:05 am DTV Cable Dolby Digital 13-1 M. You can also press PICTURE one or more information, see all... picture settings" on . Adjusting the volume To adjust the volume: • Press VOL - or VOL + to decrease or increase the volume. • Press MUTE to turn the sound back on page 20. • Picture Reset-Resets all tasks in a few seconds.

User Manual (English)
Page 24
... T, W or X to adjust the setting, then press ENTER to confirm. 5 Press EXIT to access the Picture Options menu. Turning the brightness sensor on or off To turn the brightness sensor on or off: 1 Press MENU. NS-51P680A12/NS-59P680A12 3 Press S or T to access the Setup menu. Channel Energy Saving : Off Setup Brightness sensor : Off Input...
... T, W or X to adjust the setting, then press ENTER to confirm. 5 Press EXIT to access the Picture Options menu. Turning the brightness sensor on or off To turn the brightness sensor on or off: 1 Press MENU. NS-51P680A12/NS-59P680A12 3 Press S or T to access the Setup menu. Channel Energy Saving : Off Setup Brightness sensor : Off Input...

User Manual (English)
Page 26
... menu. If the signal from the system does not equal the standard signal mode, adjust the mode (refer to your TV. To turn the Game Mode feature on page 43. 22 www.insigniaproducts.com The Display Properties dialog box opens. The Equalizer settings are reset to ...Click OK to an input of compatible display modes, see "PC/VGA scan rates" on or off . The best resolution is adjusted automatically. NS-51P680A12/NS-59P680A12 Picture sizes available for each external device you open the on the Windows desktop. Improving the image from the system equals the standard signal...
... menu. If the signal from the system does not equal the standard signal mode, adjust the mode (refer to your TV. To turn the Game Mode feature on page 43. 22 www.insigniaproducts.com The Display Properties dialog box opens. The Equalizer settings are reset to ...Click OK to an input of compatible display modes, see "PC/VGA scan rates" on or off . The best resolution is adjusted automatically. NS-51P680A12/NS-59P680A12 Picture sizes available for each external device you open the on the Windows desktop. Improving the image from the system equals the standard signal...

User Manual (English)
Page 27
... (G/R) : Standard : 95 : 45 : 50 : 50 : G50/R50 2 Press S or T to highlight Setup, then press ENTER to access the Sound menu. You can select: • Off-Turns off energy saving. • Low-Sets mode to low. • Medium-Sets the mode to medium. • High-Sets the mode to suit your personal...
... (G/R) : Standard : 95 : 45 : 50 : 50 : G50/R50 2 Press S or T to highlight Setup, then press ENTER to access the Sound menu. You can select: • Off-Turns off energy saving. • Low-Sets mode to low. • Medium-Sets the mode to medium. • High-Sets the mode to suit your personal...

User Manual (English)
Page 28
...8226; TV Speaker-Plays the sound through . You need to adjust the volume using the remote control. You can select: • External Speaker-Turns the TV speakers off and plays the sound through your TV's speakers. • Preferred Language-Selects the language for the program. Automatically searching ... www.insigniaproducts.com When you are based on the TV and the TV remote do not work. For more times to close the menu. NS-51P680A12/NS-59P680A12 • Equalizer-Sets the equalizer mode. You can also press MTS one or more information, see "Resetting the Plug & Play option...
...8226; TV Speaker-Plays the sound through . You need to adjust the volume using the remote control. You can select: • External Speaker-Turns the TV speakers off and plays the sound through your TV's speakers. • Preferred Language-Selects the language for the program. Automatically searching ... www.insigniaproducts.com When you are based on the TV and the TV remote do not work. For more times to close the menu. NS-51P680A12/NS-59P680A12 • Equalizer-Sets the equalizer mode. You can also press MTS one or more information, see "Resetting the Plug & Play option...

User Manual (English)
Page 33
... previous menu or EXIT to close the menu. The on -screen menu opens. Enter PIN V-Chip 4 Press the number buttons to access the V-Chip menu. Turning parental controls on using the remote control. However, you can adjust the antenna to improve the signal strength. 4 Press ENTER to close the Signal Strength...
... previous menu or EXIT to close the menu. The on -screen menu opens. Enter PIN V-Chip 4 Press the number buttons to access the V-Chip menu. Turning parental controls on using the remote control. However, you can adjust the antenna to improve the signal strength. 4 Press ENTER to close the Signal Strength...


