User Manual (English)
Page 8
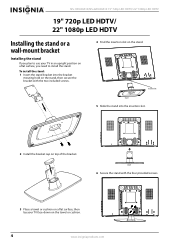
... the stand with the two included screws. 4 Find the insertion slot on the towel or cushion. 4 www.insigniaproducts.com NS-19E430A10/NS-22E430A10 19" 720p LED HDTV/ 22" 1080p LED HDTV 19" 720p LED HDTV/ 22" 1080p LED HDTV Installing the stand or a wall-mount bracket Installing the stand If you need to install the stand. Insertion...
... the stand with the two included screws. 4 Find the insertion slot on the towel or cushion. 4 www.insigniaproducts.com NS-19E430A10/NS-22E430A10 19" 720p LED HDTV/ 22" 1080p LED HDTV 19" 720p LED HDTV/ 22" 1080p LED HDTV Installing the stand or a wall-mount bracket Installing the stand If you need to install the stand. Insertion...
User Manual (English)
Page 9
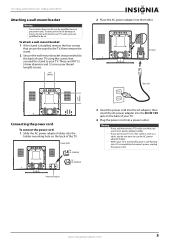
... wall-mount bracket: 1 If the stand is still flowing into it. To completely disconnect power, unplug the power cord. 19" 720p LED HDTV/ 22" 1080p LED HDTV Attaching a wall-mount bracket Warning These instructions are for use the AC power adapter holder. • When your TV unless you ... 3.937" (100 mm) 2 Place the AC power adapter into the holder mounting hole on the back of your TV. Adapter holder For NS-19E430A10 For NS-22E430A10 Holder mounting hole 3 Insert the power cord into the AC adapter, then insert the AC power adapter into a power outlet. www.insigniaproducts.com...
... wall-mount bracket: 1 If the stand is still flowing into it. To completely disconnect power, unplug the power cord. 19" 720p LED HDTV/ 22" 1080p LED HDTV Attaching a wall-mount bracket Warning These instructions are for use the AC power adapter holder. • When your TV unless you ... 3.937" (100 mm) 2 Place the AC power adapter into the holder mounting hole on the back of your TV. Adapter holder For NS-19E430A10 For NS-22E430A10 Holder mounting hole 3 Insert the power cord into the AC adapter, then insert the AC power adapter into a power outlet. www.insigniaproducts.com...
User Manual (English)
Page 10
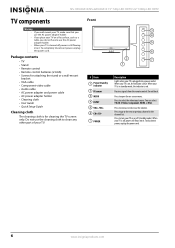
... or previous channel in standby mode, the indicator is plugged into it . To disconnect power, unplug the power cord. 6 www.insigniaproducts.com NS-19E430A10/NS-22E430A10 19" 720p LED HDTV/ 22" 1080p LED HDTV TV components Warning • If you wall mount your TV, make sure that you use the AC power adapter holder. •...
... or previous channel in standby mode, the indicator is plugged into it . To disconnect power, unplug the power cord. 6 www.insigniaproducts.com NS-19E430A10/NS-22E430A10 19" 720p LED HDTV/ 22" 1080p LED HDTV TV components Warning • If you wall mount your TV, make sure that you use the AC power adapter holder. •...
User Manual (English)
Page 11
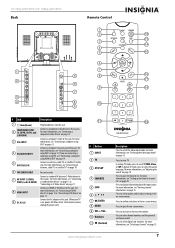
... open the favorite list. When your TV is on page 14. Connect an antenna, cable TV, or satellite TV to these jacks. 19" 720p LED HDTV/ 22" 1080p LED HDTV Back Remote Control 1 2 12 13 3 14 4 5 15 6 1 7 5 8 16 2 17 6 9 18 7 3 4 8 10 9 # Jack 1 (headphone) COMPONENT INPUT 2 (Y, CB/PB, CR/PR, and L/R AUDIO) 3 VGA...
... open the favorite list. When your TV is on page 14. Connect an antenna, cable TV, or satellite TV to these jacks. 19" 720p LED HDTV/ 22" 1080p LED HDTV Back Remote Control 1 2 12 13 3 14 4 5 15 6 1 7 5 8 16 2 17 6 9 18 7 3 4 8 10 9 # Jack 1 (headphone) COMPONENT INPUT 2 (Y, CB/PB, CR/PR, and L/R AUDIO) 3 VGA...
User Manual (English)
Page 12
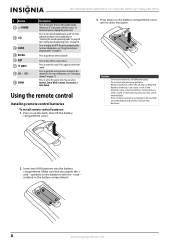
... to mute the sound. Press to go the last viewed channel. If the batteries leak, clean the battery compartment with the + and - NS-19E430A10/NS-22E430A10 19" 720p LED HDTV/ 22" 1080p LED HDTV # Button 12 POWER 13 CCD 14 GUIDE 15 RECALL 16 EXIT 17 MUTE 18 CH /CH 19 ZOOM Description Press to...
... to mute the sound. Press to go the last viewed channel. If the batteries leak, clean the battery compartment with the + and - NS-19E430A10/NS-22E430A10 19" 720p LED HDTV/ 22" 1080p LED HDTV # Button 12 POWER 13 CCD 14 GUIDE 15 RECALL 16 EXIT 17 MUTE 18 CH /CH 19 ZOOM Description Press to...

User Manual (English)
Page 13
... a universal remote control to work with your TV You can manually program it . See your universal remote control's instructions for details. 3 If all Insignia TVs manufactured after Jan. 1, 2007) Universal remote control manufacturers and models Philips PHDVD5, PH5DSS, PMDVR8, PDVR8 RCA RCU807 One for details. • If...the market. For more help, call technical support for other compatible models are available online at 1-877-467-4289. 19" 720p LED HDTV/ 22" 1080p LED HDTV Aiming the remote control To use the numbered code to program your remote control to work with your...
... a universal remote control to work with your TV You can manually program it . See your universal remote control's instructions for details. 3 If all Insignia TVs manufactured after Jan. 1, 2007) Universal remote control manufacturers and models Philips PHDVD5, PH5DSS, PMDVR8, PDVR8 RCA RCU807 One for details. • If...the market. For more help, call technical support for other compatible models are available online at 1-877-467-4289. 19" 720p LED HDTV/ 22" 1080p LED HDTV Aiming the remote control To use the numbered code to program your remote control to work with your...
User Manual (English)
Page 14
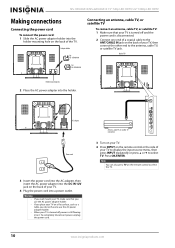
... power adapter holder. • When your TV is turned off and the power cord is still flowing into it. Press OK/ENTER. NS-19E430A10/NS-22E430A10 19" 720p LED HDTV/ 22" 1080p LED HDTV Making connections Connecting the power cord To connect the power cord: 1 Slide the AC power adapter holder into the holder mounting... to use the AC power adapter holder. • If you do not have to the ANT/CABLE IN jack on the back of TV For NS-22E430A10 Holder mounting hole 2 Place the AC power adapter into a power outlet.
... power adapter holder. • When your TV is turned off and the power cord is still flowing into it. Press OK/ENTER. NS-19E430A10/NS-22E430A10 19" 720p LED HDTV/ 22" 1080p LED HDTV Making connections Connecting the power cord To connect the power cord: 1 Slide the AC power adapter holder into the holder mounting... to use the AC power adapter holder. • If you do not have to the ANT/CABLE IN jack on the back of TV For NS-22E430A10 Holder mounting hole 2 Place the AC power adapter into a power outlet.

User Manual (English)
Page 15
19" 720p LED HDTV/ 22" 1080p LED HDTV Connecting a standard video device To connect a standard video device: 1 Make sure that your TV is turned off and the power cord is disconnected. 2 Connect ...
19" 720p LED HDTV/ 22" 1080p LED HDTV Connecting a standard video device To connect a standard video device: 1 Make sure that your TV is turned off and the power cord is disconnected. 2 Connect ...
User Manual (English)
Page 16
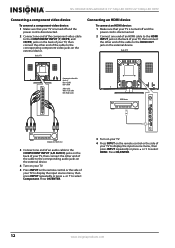
... side of your TV, then connect the other end of the cable to the corresponding component video jacks on the external device. NS-19E430A10/NS-22E430A10 19" 720p LED HDTV/ 22" 1080p LED HDTV Connecting a component video device To connect a component video device: 1 Make sure that your TV is turned off and the power cord...
... side of your TV, then connect the other end of the cable to the corresponding component video jacks on the external device. NS-19E430A10/NS-22E430A10 19" 720p LED HDTV/ 22" 1080p LED HDTV Connecting a component video device To connect a component video device: 1 Make sure that your TV is turned off and the power cord...

User Manual (English)
Page 17
....com 13 Back of your TV to display the input source menu, then press INPUT repeatedly or press or to select HDMI. 19" 720p LED HDTV/ 22" 1080p LED HDTV Connecting a DVI device To connect a DVI device: 1 Make sure that your TV is turned off and the power cord is disconnected. 2 Connect...
....com 13 Back of your TV to display the input source menu, then press INPUT repeatedly or press or to select HDMI. 19" 720p LED HDTV/ 22" 1080p LED HDTV Connecting a DVI device To connect a DVI device: 1 Make sure that your TV is turned off and the power cord is disconnected. 2 Connect...
User Manual (English)
Page 18
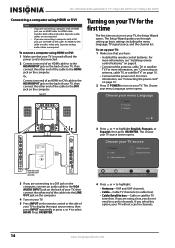
..., your TV will not scan for the first time The first time you turn on page 10. 2 Press POWER to -DVI cable. NS-19E430A10/NS-22E430A10 19" 720p LED HDTV/ 22" 1080p LED HDTV Connecting a computer using HDMI or DVI Note • If you are conncting a computer with a DVI jack, use an HDMI cable. An...
..., your TV will not scan for the first time The first time you turn on page 10. 2 Press POWER to -DVI cable. NS-19E430A10/NS-22E430A10 19" 720p LED HDTV/ 22" 1080p LED HDTV Connecting a computer using HDMI or DVI Note • If you are conncting a computer with a DVI jack, use an HDMI cable. An...
User Manual (English)
Page 19
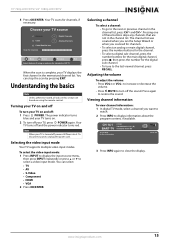
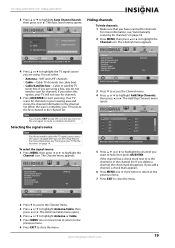
... TV supports multiple video input modes. to increase or decrease the volume. • Press MUTE to the last viewed channel, press RECALL. 19" 720p LED HDTV/ 22" 1080p LED HDTV 5 Press OK/ENTER. The power indicator turns blue and your TV, press POWER again. Your TV turns off the sound. Selecting a channel...
... TV supports multiple video input modes. to increase or decrease the volume. • Press MUTE to the last viewed channel, press RECALL. 19" 720p LED HDTV/ 22" 1080p LED HDTV 5 Press OK/ENTER. The power indicator turns blue and your TV, press POWER again. Your TV turns off the sound. Selecting a channel...
User Manual (English)
Page 20
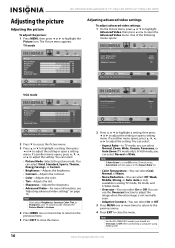
...close the menu. Auto is not normally seen. • Adaptive Contrast-You can select Off, Weak, Middle, Strong, or Auto. Note For the NS-22E430A10 model, you adjust Brightness, Contrast, Color, Tint, or Sharpness, your TV automatically changes the Picture Mode to Custom. 4 Press MENU one or ... to the previous menu. 4 Press EXIT to Off when connecting a computer using HDMI or DVI. 16 www.insigniaproducts.com NS-19E430A10/NS-22E430A10 19" 720p LED HDTV/ 22" 1080p LED HDTV Adjusting the picture Adjusting the picture To adjust the picture: 1 Press MENU, then press or to open the Advanced ...
...close the menu. Auto is not normally seen. • Adaptive Contrast-You can select Off, Weak, Middle, Strong, or Auto. Note For the NS-22E430A10 model, you adjust Brightness, Contrast, Color, Tint, or Sharpness, your TV automatically changes the Picture Mode to Custom. 4 Press MENU one or ... to the previous menu. 4 Press EXIT to Off when connecting a computer using HDMI or DVI. 16 www.insigniaproducts.com NS-19E430A10/NS-22E430A10 19" 720p LED HDTV/ 22" 1080p LED HDTV Adjusting the picture Adjusting the picture To adjust the picture: 1 Press MENU, then press or to open the Advanced ...

User Manual (English)
Page 21
... select: • Auto Adjust-Automatically adjusts the PC to highlight the Settings icon. 19" 720p LED HDTV/ 22" 1080p LED HDTV Adjusting VGA settings To adjust VGA settings: 1 Press MENU, then press or to the best settings. NS-19E430A10 Format VGA SVGA XGA WXGA Resolution 640 × 480 720 × 400 800 ×...; 600 800 × 600 1024 × 768 1280 × 768 1360 × 768 Frequency (Hz) 60 70 60 72 60 60 60 NS-22E430A10 Format VGA SVGA XGA SXGA WXGA WUXGA Resolution 640 × 480 720 × 400 Frequency (Hz) 60 70 800 × 600 60 1024 × 768...
... select: • Auto Adjust-Automatically adjusts the PC to highlight the Settings icon. 19" 720p LED HDTV/ 22" 1080p LED HDTV Adjusting VGA settings To adjust VGA settings: 1 Press MENU, then press or to the best settings. NS-19E430A10 Format VGA SVGA XGA WXGA Resolution 640 × 480 720 × 400 800 ×...; 600 800 × 600 1024 × 768 1280 × 768 1360 × 768 Frequency (Hz) 60 70 60 72 60 60 60 NS-22E430A10 Format VGA SVGA XGA SXGA WXGA WUXGA Resolution 640 × 480 720 × 400 Frequency (Hz) 60 70 800 × 600 60 1024 × 768...
User Manual (English)
Page 22
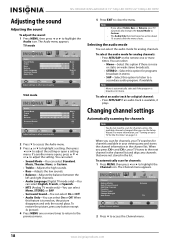
... for analog channels. When you adjust Treble, Bass, or Balance, your viewing area and stores the channel information in the channel list. NS-19E430A10/NS-22E430A10 19" 720p LED HDTV/ 22" 1080p LED HDTV Adjusting the sound Adjusting the sound To adjust the sound: 1 Press MENU, then press or to the next channel in the...
... for analog channels. When you adjust Treble, Bass, or Balance, your viewing area and stores the channel information in the channel list. NS-19E430A10/NS-22E430A10 19" 720p LED HDTV/ 22" 1080p LED HDTV Adjusting the sound Adjusting the sound To adjust the sound: 1 Press MENU, then press or to the next channel in the...
User Manual (English)
Page 23
19" 720p LED HDTV/ 22" 1080p LED HDTV 3 Press or to highlight Antenna/Cable, then press or . You can press EXIT to close the menu. For more times to return to the ...
19" 720p LED HDTV/ 22" 1080p LED HDTV 3 Press or to highlight Antenna/Cable, then press or . You can press EXIT to close the menu. For more times to return to the ...
User Manual (English)
Page 24
... you have added a label to a channel, the channel label appears next to the channel number in the list and cannot be selected. NS-19E430A10/NS-22E430A10 19" 720p LED HDTV/ 22" 1080p LED HDTV Setting up the favorite channel list: 1 Press MENU, then press or to highlight the Channel icon. If the list has more...
... you have added a label to a channel, the channel label appears next to the channel number in the list and cannot be selected. NS-19E430A10/NS-22E430A10 19" 720p LED HDTV/ 22" 1080p LED HDTV Setting up the favorite channel list: 1 Press MENU, then press or to highlight the Channel icon. If the list has more...

User Manual (English)
Page 25
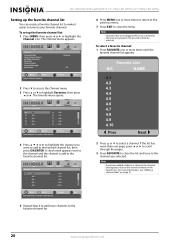
...; Move OK Select ENTER MENU Previous Add channels to 7 characters. Channel • Channel Label Picture Audio Channel Settings CH 4.1 Save Name? 19" 720p LED HDTV/ 22" 1080p LED HDTV Deleting a channel from the favorite channel list To delete a channel from the list. 5 Press MENU one or more times to return to the...
...; Move OK Select ENTER MENU Previous Add channels to 7 characters. Channel • Channel Label Picture Audio Channel Settings CH 4.1 Save Name? 19" 720p LED HDTV/ 22" 1080p LED HDTV Deleting a channel from the favorite channel list To delete a channel from the list. 5 Press MENU one or more times to return to the...
User Manual (English)
Page 26
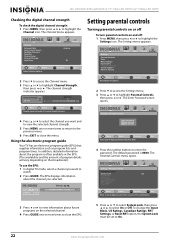
... Reset RRT option, the System Lock must be set to Factory Picture Audio Channel Settings Move OK Select ENTER Set various TV options. NS-19E430A10/NS-22E430A10 19" 720p LED HDTV/ 22" 1080p LED HDTV Checking the digital channel strength To check the digital channel strength: 1 Press MENU, then press or to watch. 2 Press GUIDE...
... Reset RRT option, the System Lock must be set to Factory Picture Audio Channel Settings Move OK Select ENTER Set various TV options. NS-19E430A10/NS-22E430A10 19" 720p LED HDTV/ 22" 1080p LED HDTV Checking the digital channel strength To check the digital channel strength: 1 Press MENU, then press or to watch. 2 Press GUIDE...

User Manual (English)
Page 27
... one or more times to return to the previous menu. 9 Press EXIT to close the menu. TV programs U.S. www.insigniaproducts.com 23 19" 720p LED HDTV/ 22" 1080p LED HDTV 6 Press MENU one or more times to return to the previous menu. 7 Press EXIT to close the menu. Default is blocked!" When...
... one or more times to return to the previous menu. 9 Press EXIT to close the menu. TV programs U.S. www.insigniaproducts.com 23 19" 720p LED HDTV/ 22" 1080p LED HDTV 6 Press MENU one or more times to return to the previous menu. 7 Press EXIT to close the menu. Default is blocked!" When...

