Firmware Installation Guide (English)
Page 1
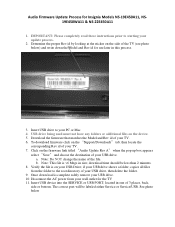
...drive being used must not have any folders or additional files on the "Support/Downloads" tab; Note: Do NOT change the name of your TV. 6. Download the firmware that matches the Model and Rev id of the file. IMPORTANT: Please completely read these instructions prior to your update ...process. 2. b. then locate the corresponding Rev id of your TV. 7. Click on the side of the TV (see photo below) and write down the Model and Rev id for Insignia Models NS‐19E450A11, NS‐ 19E450WA11 & NS‐22E450A11 1. Note: This file is Determine the proper Rev id ...
...drive being used must not have any folders or additional files on the "Support/Downloads" tab; Note: Do NOT change the name of your TV. 6. Download the firmware that matches the Model and Rev id of the file. IMPORTANT: Please completely read these instructions prior to your update ...process. 2. b. then locate the corresponding Rev id of your TV. 7. Click on the side of the TV (see photo below) and write down the Model and Rev id for Insignia Models NS‐19E450A11, NS‐ 19E450WA11 & NS‐22E450A11 1. Note: This file is Determine the proper Rev id ...

Firmware Installation Guide (English)
Page 2
... here 12. During the upgrade process, the power indicator will display "Please Wait" while the upgrade is now complete. the flickering of the TV. Note: this may display a message such as run channel scan. 15. Please remove the USB drive from the USB drive and repeat the ... process takes more than 5 minutes, that means the upgrade failed. If the upgrade fails again contact Insignia at 1-877-467-4289. The TV will display blue. Wait 15 seconds and power off the TV. b. The process is processing. 13. Reconnect the power cord to redo your remote control or by...
... here 12. During the upgrade process, the power indicator will display "Please Wait" while the upgrade is now complete. the flickering of the TV. Note: this may display a message such as run channel scan. 15. Please remove the USB drive from the USB drive and repeat the ... process takes more than 5 minutes, that means the upgrade failed. If the upgrade fails again contact Insignia at 1-877-467-4289. The TV will display blue. Wait 15 seconds and power off the TV. b. The process is processing. 13. Reconnect the power cord to redo your remote control or by...

User Manual (English)
Page 2
...Cautions 3 Introduction 4 Install the stand or wall-mount bracket 5 Installing the stand 5 Adjusting the viewing angle 5 Installing a wall-mount bracket 5 TV components 5 Accessories 5 Front 5 Back 6 Remote control 7 Using the remote control 7 Installing remote control batteries 7 Aiming the remote control 8 ...Using the remote control holder 8 Programming your existing universal remote control to work with your TV 8 Making connections 9 Connecting power 9 Connecting an antenna or cable TV without a cable box 9 Connecting a cable or satellite box 10 Connecting an HDMI device...
...Cautions 3 Introduction 4 Install the stand or wall-mount bracket 5 Installing the stand 5 Adjusting the viewing angle 5 Installing a wall-mount bracket 5 TV components 5 Accessories 5 Front 5 Back 6 Remote control 7 Using the remote control 7 Installing remote control batteries 7 Aiming the remote control 8 ...Using the remote control holder 8 Programming your existing universal remote control to work with your TV 8 Making connections 9 Connecting power 9 Connecting an antenna or cable TV without a cable box 9 Connecting a cable or satellite box 10 Connecting an HDMI device...
User Manual (English)
Page 3
Contents Adjusting sound settings 18 Selecting the audio mode 19 Playing TV audio only 19 Changing channel settings 20 Automatically scanning for channels 20 Hiding channels 20 Setting up a favorite channel list 21 Viewing a favorite channel 21 ... a channel label 22 Checking the digital signal strength 22 Setting parental controls 23 Setting or changing the password 23 Locking control buttons 23 Blocking unrated TV 24 Setting parental control levels 25 Downloading rating information 26 Using closed captioning 27 Turning closed captioning on or off 27 Selecting the analog closed...
Contents Adjusting sound settings 18 Selecting the audio mode 19 Playing TV audio only 19 Changing channel settings 20 Automatically scanning for channels 20 Hiding channels 20 Setting up a favorite channel list 21 Viewing a favorite channel 21 ... a channel label 22 Checking the digital signal strength 22 Setting parental controls 23 Setting or changing the password 23 Locking control buttons 23 Blocking unrated TV 24 Setting parental control levels 25 Downloading rating information 26 Using closed captioning 27 Turning closed captioning on or off 27 Selecting the analog closed...

User Manual (English)
Page 5
...tips in this product. • Don't let children climb on or play with steel studs or cinder blocks. TVs that are not always supported on a "larger-than-life" TV. However, TVs are inappropriately placed on dressers, bookcases, shelves, desks, speakers, chests, or carts may fall over , or knocked... listed by curious children. Wall mounting If you decide to walls backed with entertainment system furniture and TVs. • Don't place TVs on furniture that you place or install the TV where it cannot be pushed, pulled over and cause injury. f CHILD SAFETY It makes a difference...
...tips in this product. • Don't let children climb on or play with steel studs or cinder blocks. TVs that are not always supported on a "larger-than-life" TV. However, TVs are inappropriately placed on dressers, bookcases, shelves, desks, speakers, chests, or carts may fall over , or knocked... listed by curious children. Wall mounting If you decide to walls backed with entertainment system furniture and TVs. • Don't place TVs on furniture that you place or install the TV where it cannot be pushed, pulled over and cause injury. f CHILD SAFETY It makes a difference...
User Manual (English)
Page 6
...with three-prong, grounding-type plug is present within your safety. NS-19E450A11/NS-19E450WA11/NS-22E450A11/NS-22E455C11 Important safety instructions CAUTION RISK OF ELECTRIC SHOCK DO NOT OPEN This symbol indicates that your TV is in clean water. A polarized plug has two blades with ...shock is a Class I apparatus to a grounding-type, three-prong outlet. 17 Remote control batteries should be located in the literature accompanying your TV. 1 Read these instructions. 2 Keep these instructions. 3 Heed all warnings. 4 Follow all servicing to rain or moisture, does not operate...
...with three-prong, grounding-type plug is present within your safety. NS-19E450A11/NS-19E450WA11/NS-22E450A11/NS-22E455C11 Important safety instructions CAUTION RISK OF ELECTRIC SHOCK DO NOT OPEN This symbol indicates that your TV is in clean water. A polarized plug has two blades with ...shock is a Class I apparatus to a grounding-type, three-prong outlet. 17 Remote control batteries should be located in the literature accompanying your TV. 1 Read these instructions. 2 Keep these instructions. 3 Heed all warnings. 4 Follow all servicing to rain or moisture, does not operate...
User Manual (English)
Page 7
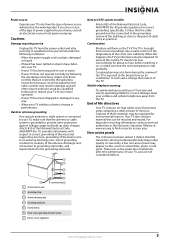
... discharge unit 4 Grounding conductors 5 Ground clamps 6 Power service grounding electrode system 7 Electric service equipment Note to the breeze from the TV. Non-active pixels The LCD panel contains almost 3 million thin film transistors, which provide exceptionally sharp video quality. For disposal or recycling...of the mast and supporting structure, grounding of the lead-in wire to your home, consult an electrician or your TV, and are covered by the operating instructions because incorrect adjustment of these materials may be regulated for environmental reasons. ...
... discharge unit 4 Grounding conductors 5 Ground clamps 6 Power service grounding electrode system 7 Electric service equipment Note to the breeze from the TV. Non-active pixels The LCD panel contains almost 3 million thin film transistors, which provide exceptionally sharp video quality. For disposal or recycling...of the mast and supporting structure, grounding of the lead-in wire to your home, consult an electrician or your TV, and are covered by the operating instructions because incorrect adjustment of these materials may be regulated for environmental reasons. ...
User Manual (English)
Page 8
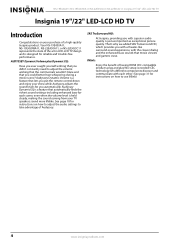
... you put the remote control down and enjoy your purchase of having HDMI CEC compatible products plug and play! NS-19E450A11/NS-19E450WA11/NS-22E450A11/NS-22E455C11 Insignia 19"/22" LED-LCD HD TV Insignia 19"/22" LED-LCD HD TV Introduction Congratulations on your show while Audyssey adjusts the sound levels for reliable and trouble-free performance. Audyssey...
... you put the remote control down and enjoy your purchase of having HDMI CEC compatible products plug and play! NS-19E450A11/NS-19E450WA11/NS-22E450A11/NS-22E455C11 Insignia 19"/22" LED-LCD HD TV Insignia 19"/22" LED-LCD HD TV Introduction Congratulations on your show while Audyssey adjusts the sound levels for reliable and trouble-free performance. Audyssey...
User Manual (English)
Page 9
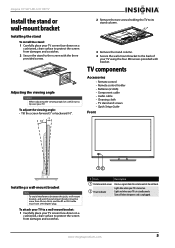
...; Remote control • Remote control holder • Batteries (2 AAA) • Component cable • Audio cable • Cleaning cloth • TV stand and screws • Quick Setup Guide Front Installing a wall-mount bracket Note To avoid interference between the jacks, wall-mount bracket, and wall,... the wall-mount bracket must have a 90-degree plug. www.insigniaproducts.com 5 Insignia 19"/22" LED-LCD HD TV Install the stand or wall-mount bracket Installing the stand To install the stand: 1 Carefully place your...
...; Remote control • Remote control holder • Batteries (2 AAA) • Component cable • Audio cable • Cleaning cloth • TV stand and screws • Quick Setup Guide Front Installing a wall-mount bracket Note To avoid interference between the jacks, wall-mount bracket, and wall,... the wall-mount bracket must have a 90-degree plug. www.insigniaproducts.com 5 Insignia 19"/22" LED-LCD HD TV Install the stand or wall-mount bracket Installing the stand To install the stand: 1 Carefully place your...
User Manual (English)
Page 10
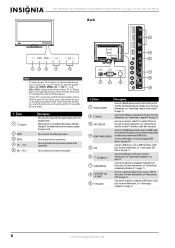
... Connect a digital optical sound system to this jack to make 4 HDMI1/HDMI2/HDMI3 an audio connection for a computer or DVI device to turn on your TV, press . For more information, see "Connecting an HDMI device" on page 10. 5 USB Connect a USB device, such as a VCR, to this ... 11. 9 PC IN AUDIO Connect the audio for an HDMI device. NS-19E450A11/NS-19E450WA11/NS-22E450A11/NS-22E455C11 Insignia 19"/22" LED-LCD HD TV Back INPUT MENU CH VOL + INPUT MENU CH VOL + Note To turn on your TV. If your TV is in standby mode. Press again to this jack. For more information,...
... Connect a digital optical sound system to this jack to make 4 HDMI1/HDMI2/HDMI3 an audio connection for a computer or DVI device to turn on your TV, press . For more information, see "Connecting an HDMI device" on page 10. 5 USB Connect a USB device, such as a VCR, to this ... 11. 9 PC IN AUDIO Connect the audio for an HDMI device. NS-19E450A11/NS-19E450WA11/NS-22E450A11/NS-22E455C11 Insignia 19"/22" LED-LCD HD TV Back INPUT MENU CH VOL + INPUT MENU CH VOL + Note To turn on your TV. If your TV is in standby mode. Press again to this jack. For more information,...

User Manual (English)
Page 11
...on page 29. For more information, see "Selecting a channel" on -screen menus. For more information, see "Setting the sleep timer" on -screen menu. Insignia 19"/22" LED-LCD HD TV Remote control # Button 1 (power) 2 COMP/AV 3 Numbers 4 5 MUTE 6 VOL+/VOL- 7 CH-LIST 8 INPUT 9 MENU 10 ENTER Description ... on page 31. For more information, see "Selecting the audio mode" on page 15. For more information, see "Using INlink" on your TV. For more information, see "Selecting a channel" on page 17. Press twice to select the device connected to the previous or next channel in...
...on page 29. For more information, see "Selecting a channel" on -screen menus. For more information, see "Setting the sleep timer" on -screen menu. Insignia 19"/22" LED-LCD HD TV Remote control # Button 1 (power) 2 COMP/AV 3 Numbers 4 5 MUTE 6 VOL+/VOL- 7 CH-LIST 8 INPUT 9 MENU 10 ENTER Description ... on page 31. For more information, see "Selecting the audio mode" on page 15. For more information, see "Using INlink" on your TV. For more information, see "Selecting a channel" on page 17. Press twice to select the device connected to the previous or next channel in...
User Manual (English)
Page 12
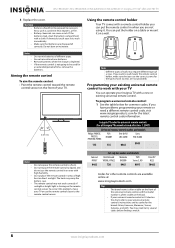
...To aim the remote control: • Point the remote control toward the remote control sensor on a wall. Insignia TV codes for universal remote controls (for all Insignia TVs manufactured after Jan. 1, 2007) Universal remote control makes and models Philips PHDVD5, PH5DSS, PMDVR8, PDVR8 RCA ... heat registers, or fire. • Battery chemicals can put the holder on a table or mount it . NS-19E450A11/NS-19E450WA11/NS-22E450A11/NS-22E455C11 Insignia 19"/22" LED-LCD HD TV 3 Replace the cover. Notes Do not mix batteries of time, remove the batteries. The remote control may warp...
...To aim the remote control: • Point the remote control toward the remote control sensor on a wall. Insignia TV codes for universal remote controls (for all Insignia TVs manufactured after Jan. 1, 2007) Universal remote control makes and models Philips PHDVD5, PH5DSS, PMDVR8, PDVR8 RCA ... heat registers, or fire. • Battery chemicals can put the holder on a table or mount it . NS-19E450A11/NS-19E450WA11/NS-22E450A11/NS-22E455C11 Insignia 19"/22" LED-LCD HD TV 3 Replace the cover. Notes Do not mix batteries of time, remove the batteries. The remote control may warp...

User Manual (English)
Page 13
... cord or other compatible models are tight and secure. • The external audio/video equipment shown may be using the Insignia TV remote to correct the problem. Insignia 19"/22" LED-LCD HD TV 2 Follow your equipment. Making connections Cautions • Check the jacks for an extended period of time. Notes • • •...
... cord or other compatible models are tight and secure. • The external audio/video equipment shown may be using the Insignia TV remote to correct the problem. Insignia 19"/22" LED-LCD HD TV 2 Follow your equipment. Making connections Cautions • Check the jacks for an extended period of time. Notes • • •...
User Manual (English)
Page 14
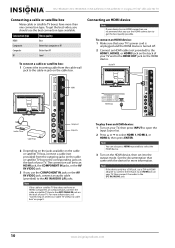
NS-19E450A11/NS-19E450WA11/NS-22E450A11/NS-22E455C11 Insignia 19"/22" LED-LCD HD TV Connecting a cable or satellite box Many cable or satellite TV boxes have an HDMI, component, or composite jack, connect the cable or satellite TV box to the ANT/CABLE IN jack on the back of your TV. To get the best video, you ...best connection type available. The connection can also press HDMI repeatedly to the cable-in jack on page 9. Note If the cable or satellite TV box does not have more information. See the documentation that came with the device for more than RF RF Good To connect a cable ...
NS-19E450A11/NS-19E450WA11/NS-22E450A11/NS-22E455C11 Insignia 19"/22" LED-LCD HD TV Connecting a cable or satellite box Many cable or satellite TV boxes have an HDMI, component, or composite jack, connect the cable or satellite TV box to the ANT/CABLE IN jack on the back of your TV. To get the best video, you ...best connection type available. The connection can also press HDMI repeatedly to the cable-in jack on page 9. Note If the cable or satellite TV box does not have more information. See the documentation that came with the device for more than RF RF Good To connect a cable ...
User Manual (English)
Page 15
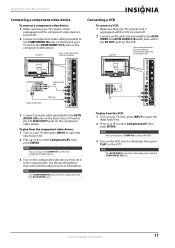
...more information. Note You can also press COMP/AV to select the component video device. 3 Turn on the component video device. Back of TV Cables are often color-coded to match color-coded jacks. Note The AV IN VIDEO jack shares the audio jacks with the COMPONENT IN ...OUT jacks on the VCR. Connect yellow to yellow, red to red, and white to white. Insignia 19"/22" LED-LCD HD TV Connecting a component video device To connect a component video device: 1 Make sure that your TV's power cord is unplugged and the component video device is turned off . 2 Connect a component...
...more information. Note You can also press COMP/AV to select the component video device. 3 Turn on the component video device. Back of TV Cables are often color-coded to match color-coded jacks. Note The AV IN VIDEO jack shares the audio jacks with the COMPONENT IN ...OUT jacks on the VCR. Connect yellow to yellow, red to red, and white to white. Insignia 19"/22" LED-LCD HD TV Connecting a component video device To connect a component video device: 1 Make sure that your TV's power cord is unplugged and the component video device is turned off . 2 Connect a component...
User Manual (English)
Page 16
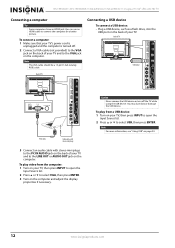
... drive, into the USB port on page 34. 12 www.insigniaproducts.com You may lose data or damage the USB device. NS-19E450A11/NS-19E450WA11/NS-22E450A11/NS-22E455C11 Insignia 19"/22" LED-LCD HD TV Connecting a computer Tip Some computers have an HDMI jack. Note For more information, see "Using USB" on the back of your...
... drive, into the USB port on page 34. 12 www.insigniaproducts.com You may lose data or damage the USB device. NS-19E450A11/NS-19E450WA11/NS-22E450A11/NS-22E455C11 Insignia 19"/22" LED-LCD HD TV Connecting a computer Tip Some computers have an HDMI jack. Note For more information, see "Using USB" on the back of your...
User Manual (English)
Page 17
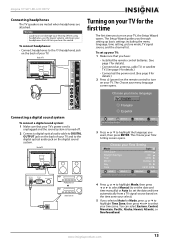
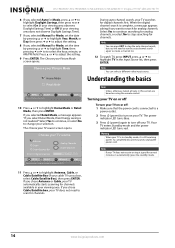
...zone. The Choose your TV. Connecting a digital sound system To connect a digital sound system: 1 Make sure that still lets you turn on your Time Setting screen opens. www.insigniaproducts.com 13 Insignia 19"/22" LED-LCD HD TV Connecting headphones The TV speakers are muted when ...headphones are automatically set by TV source EXIT EXIT Audio processor OR Sound system 4 Press or to highlight Mode...
...zone. The Choose your TV. Connecting a digital sound system To connect a digital sound system: 1 Make sure that still lets you turn on your Time Setting screen opens. www.insigniaproducts.com 13 Insignia 19"/22" LED-LCD HD TV Connecting headphones The TV speakers are muted when ...headphones are automatically set by TV source EXIT EXIT Audio processor OR Sound system 4 Press or to highlight Mode...
User Manual (English)
Page 18
... will need to scan for channels. 14 www.insigniaproducts.com The power indicator LED turns blue. 3 Press (power) again to turn on your TV. To completely disconnect power, unplug the power cord. If you want to search for analog channels. Choose your Picture Mode Home Mode Retail Mode ... that the power cord is in the Input Source list, then press ENTER. The Choose your Picture Mode screen opens. NS-19E450A11/NS-19E450WA11/NS-22E450A11/NS-22E455C11 Insignia 19"/22" LED-LCD HD TV 6 If you selected Auto for Mode, press or to highlight Daylight Savings, then press or to select On (if ...
... will need to scan for channels. 14 www.insigniaproducts.com The power indicator LED turns blue. 3 Press (power) again to turn on your TV. To completely disconnect power, unplug the power cord. If you want to search for analog channels. Choose your Picture Mode Home Mode Retail Mode ... that the power cord is in the Input Source list, then press ENTER. The Choose your Picture Mode screen opens. NS-19E450A11/NS-19E450WA11/NS-22E450A11/NS-22E455C11 Insignia 19"/22" LED-LCD HD TV 6 If you selected Auto for Mode, press or to highlight Daylight Savings, then press or to select On (if ...

User Manual (English)
Page 19
... SETTINGS USB Custom 70 40 60 0 40 MOVE OK ENTER SELECT Adjust settings to affect picture quality MENU PREVIOUS EXIT EXIT AUDIO menu (TV mode) AUDIO PICTURE AUDIO CHANNELS SETTINGS USB Audyssey Dynamic Volume™ SRS TruSurround HD™ Treble Bass Balance Advanced Audio Light Off 50 ... 1. The following menus are grayed out. The Input Source list opens. Press three times to select HDMI 3. The screens shown in TV mode, unless otherwise indicated. Insignia 19"/22" LED-LCD HD TV Selecting the video input source To select the video input source: 1 Turn on your screen.
... SETTINGS USB Custom 70 40 60 0 40 MOVE OK ENTER SELECT Adjust settings to affect picture quality MENU PREVIOUS EXIT EXIT AUDIO menu (TV mode) AUDIO PICTURE AUDIO CHANNELS SETTINGS USB Audyssey Dynamic Volume™ SRS TruSurround HD™ Treble Bass Balance Advanced Audio Light Off 50 ... 1. The following menus are grayed out. The Input Source list opens. Press three times to select HDMI 3. The screens shown in TV mode, unless otherwise indicated. Insignia 19"/22" LED-LCD HD TV Selecting the video input source To select the video input source: 1 Turn on your screen.
User Manual (English)
Page 20
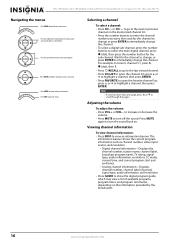
..., video input source, and resolution. • Digital channel information-Displays the channel number, station name, channel label, broadcast program name, TV rating, signal type, audio information, resolution, CC mode, current time, and current program start and end times. • Analog channel information... FAVORITE to open the on-screen menu Press the right or left arrow to move the cursor on . NS-19E450A11/NS-19E450WA11/NS-22E450A11/NS-22E455C11 Insignia 19"/22" LED-LCD HD TV Navigating the menus Press MENU to open the favorite channel list, press or to highlight a channel, then...
..., video input source, and resolution. • Digital channel information-Displays the channel number, station name, channel label, broadcast program name, TV rating, signal type, audio information, resolution, CC mode, current time, and current program start and end times. • Analog channel information... FAVORITE to open the on-screen menu Press the right or left arrow to move the cursor on . NS-19E450A11/NS-19E450WA11/NS-22E450A11/NS-22E455C11 Insignia 19"/22" LED-LCD HD TV Navigating the menus Press MENU to open the favorite channel list, press or to highlight a channel, then...


