User Manual (English)
Page 8
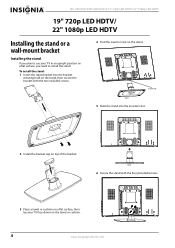
NS-19E430A10/NS-22E430A10 19" 720p LED HDTV/ 22" 1080p LED HDTV 19" 720p LED HDTV/ 22" 1080p LED HDTV Installing the stand or a wall-mount bracket Installing the stand If you need to use your TV face-down ...
NS-19E430A10/NS-22E430A10 19" 720p LED HDTV/ 22" 1080p LED HDTV 19" 720p LED HDTV/ 22" 1080p LED HDTV Installing the stand or a wall-mount bracket Installing the stand If you need to use your TV face-down ...
User Manual (English)
Page 9
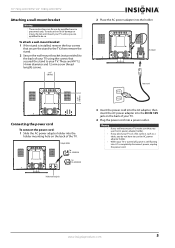
19" 720p LED HDTV/ 22" 1080p LED HDTV Attaching a wall-mount bracket Warning These instructions are M4*12 (4 mm diameter and 12 mm screw thread length) screws. 3.... cord 3.937" (100 mm) Connecting the power cord To connect the power cord: 1 Slide the AC power adapter holder into it. Adapter holder For NS-19E430A10 For NS-22E430A10 Holder mounting hole 3 Insert the power cord into the AC adapter, then insert the AC power adapter into a power outlet. These are for use...
19" 720p LED HDTV/ 22" 1080p LED HDTV Attaching a wall-mount bracket Warning These instructions are M4*12 (4 mm diameter and 12 mm screw thread length) screws. 3.... cord 3.937" (100 mm) Connecting the power cord To connect the power cord: 1 Slide the AC power adapter holder into it. Adapter holder For NS-19E430A10 For NS-22E430A10 Holder mounting hole 3 Insert the power cord into the AC adapter, then insert the AC power adapter into a power outlet. These are for use...
User Manual (English)
Page 10
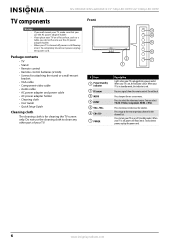
... batteries (2 AAA) • Screws for cleaning the TV screen only. When your TV is plugged into it . Press to select the video input source. NS-19E430A10/NS-22E430A10 19" 720p LED HDTV/ 22" 1080p LED HDTV TV components Warning • If you wall mount your TV, make sure that you use the AC power adapter...
... batteries (2 AAA) • Screws for cleaning the TV screen only. When your TV is plugged into it . Press to select the video input source. NS-19E430A10/NS-22E430A10 19" 720p LED HDTV/ 22" 1080p LED HDTV TV components Warning • If you wall mount your TV, make sure that you use the AC power adapter...

User Manual (English)
Page 11
... cord. 11 # Button 1 INPUT 2 TV 3 MTS/SAP 4 FAVORITE 5 INFO 6 7 OK/ENTER 8 MENU 9 VOL +/VOL- 10 Numbers 11 (decimal) 19 Description Press to increase or decrease the volume. For more information, see "Connecting a component video device" on page 20. Press to select the video input... jacks. Press to confirm selections in the on page 15. Press to open the on page 13. Press to this jack. Press to view TV. 19" 720p LED HDTV/ 22" 1080p LED HDTV Back Remote Control 1 2 12 13 3 14 4 5 15 6 1 7 5 8 16 2 17 6 9 18 7 3 4 8 10 9 # Jack 1 (headphone) ...
... cord. 11 # Button 1 INPUT 2 TV 3 MTS/SAP 4 FAVORITE 5 INFO 6 7 OK/ENTER 8 MENU 9 VOL +/VOL- 10 Numbers 11 (decimal) 19 Description Press to increase or decrease the volume. For more information, see "Connecting a component video device" on page 20. Press to select the video input... jacks. Press to confirm selections in the on page 15. Press to open the on page 13. Press to this jack. Press to view TV. 19" 720p LED HDTV/ 22" 1080p LED HDTV Back Remote Control 1 2 12 13 3 14 4 5 15 6 1 7 5 8 16 2 17 6 9 18 7 3 4 8 10 9 # Jack 1 (headphone) ...
User Manual (English)
Page 12
... chemicals can select Normal, Zoom, Wide, Cinema, Panorama, or Auto Zoom. For more information, see "Selecting a channel" on page 15. Press to restore the sound. NS-19E430A10/NS-22E430A10 19" 720p LED HDTV/ 22" 1080p LED HDTV # Button 12 POWER 13 CCD 14 GUIDE 15 RECALL 16 EXIT 17 MUTE 18 CH /CH... 19 ZOOM Description Press to turn closed captioning styles" on page 28. When your TV on or off , power still flows into place. Press to mute ...
... chemicals can select Normal, Zoom, Wide, Cinema, Panorama, or Auto Zoom. For more information, see "Selecting a channel" on page 15. Press to restore the sound. NS-19E430A10/NS-22E430A10 19" 720p LED HDTV/ 22" 1080p LED HDTV # Button 12 POWER 13 CCD 14 GUIDE 15 RECALL 16 EXIT 17 MUTE 18 CH /CH... 19 ZOOM Description Press to turn closed captioning styles" on page 28. When your TV on or off , power still flows into place. Press to mute ...
User Manual (English)
Page 13
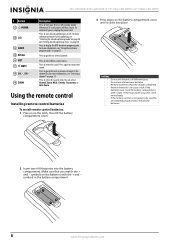
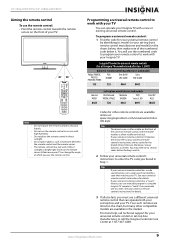
...for details. • If your universal remote control has a "Learn" feature, you found in the market. Codes for details. 3 If all Insignia TVs manufactured after Jan. 1, 2007) Universal remote control manufacturers and models Philips PHDVD5, PH5DSS, PMDVR8, PDVR8 RCA RCU807 One for your universal remote ..., Sansui, Sylvania, or Zenith. You may not work if direct sunlight or bright light shines on the remote sensor. www.insigniaproducts.com 9 19" 720p LED HDTV/ 22" 1080p LED HDTV Aiming the remote control To use the remote control: • Point the remote control towards the remote ...
...for details. • If your universal remote control has a "Learn" feature, you found in the market. Codes for details. 3 If all Insignia TVs manufactured after Jan. 1, 2007) Universal remote control manufacturers and models Philips PHDVD5, PH5DSS, PMDVR8, PDVR8 RCA RCU807 One for your universal remote ..., Sansui, Sylvania, or Zenith. You may not work if direct sunlight or bright light shines on the remote sensor. www.insigniaproducts.com 9 19" 720p LED HDTV/ 22" 1080p LED HDTV Aiming the remote control To use the remote control: • Point the remote control towards the remote ...
User Manual (English)
Page 14
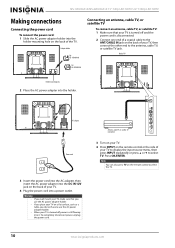
... Holder mounting hole 2 Place the AC power adapter into the holder. Press OK/ENTER. Adapter holder For NS-19E430A10 Connecting an antenna, cable TV, or satellite TV To connect an antenna, cable TV, or satellite TV: 1 Make sure that you use the AC power ... power cord into a power outlet. Antenna, cable TV, or satellite TV connection 3 Turn on your TV. 4 Press INPUT on the back of the TV. NS-19E430A10/NS-22E430A10 19" 720p LED HDTV/ 22" 1080p LED HDTV Making connections Connecting the power cord To connect the power cord: 1 Slide the AC power adapter holder into the...
... Holder mounting hole 2 Place the AC power adapter into the holder. Press OK/ENTER. Adapter holder For NS-19E430A10 Connecting an antenna, cable TV, or satellite TV To connect an antenna, cable TV, or satellite TV: 1 Make sure that you use the AC power ... power cord into a power outlet. Antenna, cable TV, or satellite TV connection 3 Turn on your TV. 4 Press INPUT on the back of the TV. NS-19E430A10/NS-22E430A10 19" 720p LED HDTV/ 22" 1080p LED HDTV Making connections Connecting the power cord To connect the power cord: 1 Slide the AC power adapter holder into the...
User Manual (English)
Page 15
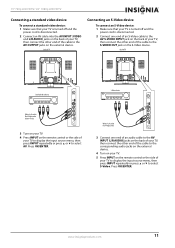
... INPUT jack on the back of your TV, then connect the other end of the cable to the S-VIDEO OUT jack on the S-Video device. 19" 720p LED HDTV/ 22" 1080p LED HDTV Connecting a standard video device To connect a standard video device: 1 Make sure that your TV is turned off and the...
... INPUT jack on the back of your TV, then connect the other end of the cable to the S-VIDEO OUT jack on the S-Video device. 19" 720p LED HDTV/ 22" 1080p LED HDTV Connecting a standard video device To connect a standard video device: 1 Make sure that your TV is turned off and the...

User Manual (English)
Page 16
... the remote control or the side of your TV to display the input source menu, then press INPUT repeatedly or press or to select Component. NS-19E430A10/NS-22E430A10 19" 720p LED HDTV/ 22" 1080p LED HDTV Connecting a component video device To connect a component video device: 1 Make sure that your TV is turned off and...
... the remote control or the side of your TV to display the input source menu, then press INPUT repeatedly or press or to select Component. NS-19E430A10/NS-22E430A10 19" 720p LED HDTV/ 22" 1080p LED HDTV Connecting a component video device To connect a component video device: 1 Make sure that your TV is turned off and...

User Manual (English)
Page 17
... to select VGA. Separate analog audio cables are required. 4 Turn on your TV. 5 Press INPUT on page 14. Press OK/ENTER. www.insigniaproducts.com 13 19" 720p LED HDTV/ 22" 1080p LED HDTV Connecting a DVI device To connect a DVI device: 1 Make sure that your TV is turned off and the power cord...
... to select VGA. Separate analog audio cables are required. 4 Turn on your TV. 5 Press INPUT on page 14. Press OK/ENTER. www.insigniaproducts.com 13 19" 720p LED HDTV/ 22" 1080p LED HDTV Connecting a DVI device To connect a DVI device: 1 Make sure that your TV is turned off and the power cord...
User Manual (English)
Page 18
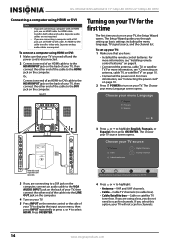
... Select ENTER MENU Previous EXIT Exit Select Antenna if using an antenna for standard or HD TV. 4 Press or to -DVI cable transfers video only. NS-19E430A10/NS-22E430A10 19" 720p LED HDTV/ 22" 1080p LED HDTV Connecting a computer using HDMI or DVI Note • If you are using a box, you do not need to...
... Select ENTER MENU Previous EXIT Exit Select Antenna if using an antenna for standard or HD TV. 4 Press or to -DVI cable transfers video only. NS-19E430A10/NS-22E430A10 19" 720p LED HDTV/ 22" 1080p LED HDTV Connecting a computer using HDMI or DVI Note • If you are using a box, you do not need to...

User Manual (English)
Page 19
... the last viewed channel, press RECALL. When the scan is turned off your TV source Antenna 0 Cable 0 Cable/Satellite box Scan for channels, if necessary. 19" 720p LED HDTV/ 22" 1080p LED HDTV 5 Press OK/ENTER. Your TV turns off : 1 Press POWER. The power indicator turns blue and your TV turns on...
... the last viewed channel, press RECALL. When the scan is turned off your TV source Antenna 0 Cable 0 Cable/Satellite box Scan for channels, if necessary. 19" 720p LED HDTV/ 22" 1080p LED HDTV 5 Press OK/ENTER. Your TV turns off : 1 Press POWER. The power indicator turns blue and your TV turns on...

User Manual (English)
Page 20
... in the Aspect Ratio list. • Color Temperature-You can select Cool, Normal, or Warm. • Noise Reduction-You can select Normal or Wide. NS-19E430A10/NS-22E430A10 19" 720p LED HDTV/ 22" 1080p LED HDTV Adjusting the picture Adjusting the picture To adjust the picture: 1 Press MENU, then press or to open the Advanced...
... in the Aspect Ratio list. • Color Temperature-You can select Cool, Normal, or Warm. • Noise Reduction-You can select Normal or Wide. NS-19E430A10/NS-22E430A10 19" 720p LED HDTV/ 22" 1080p LED HDTV Adjusting the picture Adjusting the picture To adjust the picture: 1 Press MENU, then press or to open the Advanced...
User Manual (English)
Page 21
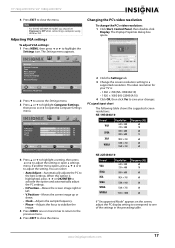
... can select: • Auto Adjust-Automatically adjusts the PC to save your changes. When this option is : • 1360 × 768 (NS-19E430A10) • 1920 × 1080 (NS-22E430A10) 4 Click OK, then click Yes to the best settings. EXIT Exit 4 Press or to highlight a setting, then press or to adjust... screen, adjust the PC display setting to correspond to one or more times to return to the previous menu. 6 Press EXIT to close the menu. 19" 720p LED HDTV/ 22" 1080p LED HDTV 4 Press EXIT to close the menu. 2 Click the Settings tab. 3 Change the screen resolution setting to a...
... can select: • Auto Adjust-Automatically adjusts the PC to save your changes. When this option is : • 1360 × 768 (NS-19E430A10) • 1920 × 1080 (NS-22E430A10) 4 Click OK, then click Yes to the best settings. EXIT Exit 4 Press or to highlight a setting, then press or to adjust... screen, adjust the PC display setting to correspond to one or more times to return to the previous menu. 6 Press EXIT to close the menu. 19" 720p LED HDTV/ 22" 1080p LED HDTV 4 Press EXIT to close the menu. 2 Click the Settings tab. 3 Change the screen resolution setting to a...
User Manual (English)
Page 22
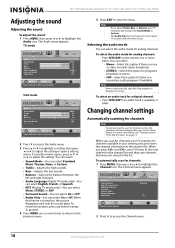
...; Press MTS/SAP on the remote one or more times to return to the previous menu. 5 Press EXIT to a secondary audio program, if available. NS-19E430A10/NS-22E430A10 19" 720p LED HDTV/ 22" 1080p LED HDTV Adjusting the sound Adjusting the sound To adjust the sound: 1 Press MENU, then press or to highlight the Channel...
...; Press MTS/SAP on the remote one or more times to return to the previous menu. 5 Press EXIT to a secondary audio program, if available. NS-19E430A10/NS-22E430A10 19" 720p LED HDTV/ 22" 1080p LED HDTV Adjusting the sound Adjusting the sound To adjust the sound: 1 Press MENU, then press or to highlight the Channel...

User Manual (English)
Page 23
..., see "Automatically scanning for standard or HD TV. 4 Press or to stop the scan, but you delete a channel, the check mark disappears. www.insigniaproducts.com 19 MENU Previous EXIT Exit 3 Press to access the Channel menu. 4 Press or to highlight Auto Channel Search, then press or . When the scan is in... the TV signal source unless the source changed after you select this option, your viewing area and stores the channel information in the channel list. 19" 720p LED HDTV/ 22" 1080p LED HDTV 3 Press or to highlight Add/Skip Channels, then press or .
..., see "Automatically scanning for standard or HD TV. 4 Press or to stop the scan, but you delete a channel, the check mark disappears. www.insigniaproducts.com 19 MENU Previous EXIT Exit 3 Press to access the Channel menu. 4 Press or to highlight Auto Channel Search, then press or . When the scan is in... the TV signal source unless the source changed after you select this option, your viewing area and stores the channel information in the channel list. 19" 720p LED HDTV/ 22" 1080p LED HDTV 3 Press or to highlight Add/Skip Channels, then press or .

User Manual (English)
Page 24
NS-19E430A10/NS-22E430A10 19" 720p LED HDTV/ 22" 1080p LED HDTV Setting up the favorite channel list: 1 Press MENU, then press or to create a favorite list. The Favorite menu opens. A ...
NS-19E430A10/NS-22E430A10 19" 720p LED HDTV/ 22" 1080p LED HDTV Setting up the favorite channel list: 1 Press MENU, then press or to create a favorite list. The Favorite menu opens. A ...

User Manual (English)
Page 25
... from the list, then press OK/ENTER. Yes No Move OK Select ENTER MENU Previous Create labels for channels, up to highlight the Channel icon. 19" 720p LED HDTV/ 22" 1080p LED HDTV Deleting a channel from the favorite channel list To delete a channel from the favorite channel list: 1 Press MENU, then press...
... from the list, then press OK/ENTER. Yes No Move OK Select ENTER MENU Previous Create labels for channels, up to highlight the Channel icon. 19" 720p LED HDTV/ 22" 1080p LED HDTV Deleting a channel from the favorite channel list To delete a channel from the favorite channel list: 1 Press MENU, then press...

User Manual (English)
Page 26
NS-19E430A10/NS-22E430A10 19" 720p LED HDTV/ 22" 1080p LED HDTV Checking the digital channel strength To check the digital channel strength: 1 Press MENU, then press or to highlight Parental ...
NS-19E430A10/NS-22E430A10 19" 720p LED HDTV/ 22" 1080p LED HDTV Checking the digital channel strength To check the digital channel strength: 1 Press MENU, then press or to highlight Parental ...

User Manual (English)
Page 27
... of age General audiences Parental guidance suggested Parents strongly cautioned Mature audiences only Some of the age-based TV ratings also have content-based ratings. 19" 720p LED HDTV/ 22" 1080p LED HDTV 6 Press MENU one or more times to return to the previous menu. 7 Press EXIT to block, then press OK...
... of age General audiences Parental guidance suggested Parents strongly cautioned Mature audiences only Some of the age-based TV ratings also have content-based ratings. 19" 720p LED HDTV/ 22" 1080p LED HDTV 6 Press MENU one or more times to return to the previous menu. 7 Press EXIT to block, then press OK...


