
User Manual (English)
Page 3
...38 Setting parental controls 39 Setting or changing the password 39 Locking control buttons 40 Blocking unrated TV 41 Setting parental control levels 42 Downloading rating information 43 Using closed captioning 44 Turning closed captioning on or off 44 Selecting the analog closed captioning mode 45 Customizing digital closed captioning styles 45 Adjusting time settings 46 Setting the clock 46 Setting the sleep timer 47 Adjusting menu settings 48 Selecting the menu language 48 Turning Auto Input Sensing on or off 48 Labeling an input source 49 Restoring settings to the defaults...
...38 Setting parental controls 39 Setting or changing the password 39 Locking control buttons 40 Blocking unrated TV 41 Setting parental control levels 42 Downloading rating information 43 Using closed captioning 44 Turning closed captioning on or off 44 Selecting the analog closed captioning mode 45 Customizing digital closed captioning styles 45 Adjusting time settings 46 Setting the clock 46 Setting the sleep timer 47 Adjusting menu settings 48 Selecting the menu language 48 Turning Auto Input Sensing on or off 48 Labeling an input source 49 Restoring settings to the defaults...
User Manual (English)
Page 5
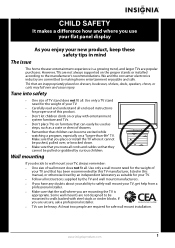
... supported on the proper stands or installed according to making home entertainment enjoyable and safe. Tune into safety • One size of TV stand does not fit all . Use only a wall mount rated for proper use your flat panel display As you enjoy your new product, keep these safety tips in this manual, or otherwise listed by this TV manufacturer, listed in mind The issue The home...
... supported on the proper stands or installed according to making home entertainment enjoyable and safe. Tune into safety • One size of TV stand does not fit all . Use only a wall mount rated for proper use your flat panel display As you enjoy your new product, keep these safety tips in this manual, or otherwise listed by this TV manufacturer, listed in mind The issue The home...
User Manual (English)
Page 15
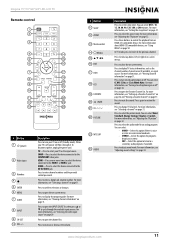
..., see "Adjusting the TV picture" on -screen menu. For more information, see "Setting the sleep timer" on When Mute. VIDEO-Press to select the device connected to control the playback from an HDMI-CEC compatible device. Press these buttons to the AV IN-VIDEO jack. For more information, see "Turning closed captioning on page 50. Press to select the aspect ratio. To disconnect power, unplug the power cord. Press to select the picture mode. Press to a secondary audio program, if...
..., see "Adjusting the TV picture" on -screen menu. For more information, see "Setting the sleep timer" on When Mute. VIDEO-Press to select the device connected to control the playback from an HDMI-CEC compatible device. Press these buttons to the AV IN-VIDEO jack. For more information, see "Turning closed captioning on page 50. Press to select the aspect ratio. To disconnect power, unplug the power cord. Press to select the picture mode. Press to a secondary audio program, if...

User Manual (English)
Page 21
... player 22-inch and 24-inch models USB Coaxial cable ARC HDMI 2 L AUDIO R AV IN VIDEO D I G I TA L OUTPUT HDMI 1 AUDIO VGA PC IN Y PB PR L AUDIO R COMPONENT IN ANT/CABLE IN DVD or Blu-ray player L AUDIO R AUDIO OUT 3 Plug your TV's power cord into a power outlet, turn on page 28. Note You can also press HDMI repeatedly to eliminate interference and noise from radio waves. Insignia 15"/19"/22"/24" LED-LCD TV Connecting an antenna or cable TV (no box) To connect an antenna...
... player 22-inch and 24-inch models USB Coaxial cable ARC HDMI 2 L AUDIO R AV IN VIDEO D I G I TA L OUTPUT HDMI 1 AUDIO VGA PC IN Y PB PR L AUDIO R COMPONENT IN ANT/CABLE IN DVD or Blu-ray player L AUDIO R AUDIO OUT 3 Plug your TV's power cord into a power outlet, turn on page 28. Note You can also press HDMI repeatedly to eliminate interference and noise from radio waves. Insignia 15"/19"/22"/24" LED-LCD TV Connecting an antenna or cable TV (no box) To connect an antenna...
User Manual (English)
Page 28
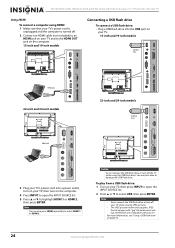
... the INPUT SOURCE list. 2 Press S or T to the HDMI OUT jack on the computer. 15-inch and 19-inch models Connecting a USB flash drive To connect a USB flash drive: • Plug a USB flash drive into the USB port on your TV. 15-inch and 19-inch models USB flash drive USB L AUDIO R AUDIO OUT USB VGA L AUDIO R AUDIO OUT PC IN AUDIO HDMI 1 VGA PC IN ARC ANT/CABLE IN HDMI 2 AUDIO HDMI 1 HDMI cable 22-inch and 24-inch models ARC ANT/CABLE IN HDMI 2 22-inch and 24-inch models USB flash drive USB ARC HDMI 2 L AUDIO R USB AV IN VIDEO HDMI cable ARC HDMI 2 L AUDIO R AUDIO OUT...
... the INPUT SOURCE list. 2 Press S or T to the HDMI OUT jack on the computer. 15-inch and 19-inch models Connecting a USB flash drive To connect a USB flash drive: • Plug a USB flash drive into the USB port on your TV. 15-inch and 19-inch models USB flash drive USB L AUDIO R AUDIO OUT USB VGA L AUDIO R AUDIO OUT PC IN AUDIO HDMI 1 VGA PC IN ARC ANT/CABLE IN HDMI 2 AUDIO HDMI 1 HDMI cable 22-inch and 24-inch models ARC ANT/CABLE IN HDMI 2 22-inch and 24-inch models USB flash drive USB ARC HDMI 2 L AUDIO R USB AV IN VIDEO HDMI cable ARC HDMI 2 L AUDIO R AUDIO OUT...

User Manual (English)
Page 29
...-inch and 24-inch models USB Home theater system L AUDIO R AUDIO OUT VGA PC IN AUDIO HDMI 1 ARC ANT/CABLE IN HDMI 2 22-inch and 24-inch models Digital audio cable D I G I TA L OUTPUT HDMI 1 AUDIO VGA PC IN Y PB PR L AUDIO R COMPONENT IN ANT/CABLE IN USB ARC HDMI 2 L AUDIO R AV IN VIDEO L AUDIO R AUDIO OUT www.insigniaproducts.com 25 When using digital audio output: 1 Make sure that your TV's power cord is unplugged and the home theater system is turned off. 2 Connect a digital optical audio cable to the DIGITAL OUTPUT jack on your TV and to the (headphone) jack...
...-inch and 24-inch models USB Home theater system L AUDIO R AUDIO OUT VGA PC IN AUDIO HDMI 1 ARC ANT/CABLE IN HDMI 2 22-inch and 24-inch models Digital audio cable D I G I TA L OUTPUT HDMI 1 AUDIO VGA PC IN Y PB PR L AUDIO R COMPONENT IN ANT/CABLE IN USB ARC HDMI 2 L AUDIO R AV IN VIDEO L AUDIO R AUDIO OUT www.insigniaproducts.com 25 When using digital audio output: 1 Make sure that your TV's power cord is unplugged and the home theater system is turned off. 2 Connect a digital optical audio cable to the DIGITAL OUTPUT jack on your TV and to the (headphone) jack...
User Manual (English)
Page 30
... 24-inch models Analog audio cable ARC HDMI 2 ARC ANT/CABLE IN HDMI 2 AUDIO VGA USB HDMI 1 PC IN AV receiver Game console or camera USB flash drive Computer Antenna or cable TV connected directly to the wall jack The connections you watch a program through an antenna or cable TV connected to the ANT/CABLE IN jack. NS-15E720A12/NS-19E720A12/NS-22E730A12/NS-24E730A12 Insignia 15"/19"/22"/24" LED-LCD TV Using analog audio output To connect a basic home theater system using analog audio output: 1 Make sure that your TV's power cord is unplugged and the home system is turned...
... 24-inch models Analog audio cable ARC HDMI 2 ARC ANT/CABLE IN HDMI 2 AUDIO VGA USB HDMI 1 PC IN AV receiver Game console or camera USB flash drive Computer Antenna or cable TV connected directly to the wall jack The connections you watch a program through an antenna or cable TV connected to the ANT/CABLE IN jack. NS-15E720A12/NS-19E720A12/NS-22E730A12/NS-24E730A12 Insignia 15"/19"/22"/24" LED-LCD TV Using analog audio output To connect a basic home theater system using analog audio output: 1 Make sure that your TV's power cord is unplugged and the home system is turned...
User Manual (English)
Page 32
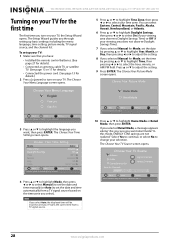
... set up basic settings including the menu language, time setting, picture mode, TV signal source, and the channel list. NS-15E720A12/NS-19E720A12/NS-22E730A12/NS-24E730A12 Insignia 15"/19"/22"/24" LED-LCD TV Turning on your TV for the first time The first time you have: • Installed the remote control batteries. (See page 27 for details). • Connected an antenna, cable TV, or satellite TV. (See page 13 or 17 for details.) • Connected the power cord...
... set up basic settings including the menu language, time setting, picture mode, TV signal source, and the channel list. NS-15E720A12/NS-19E720A12/NS-22E730A12/NS-24E730A12 Insignia 15"/19"/22"/24" LED-LCD TV Turning on your TV for the first time The first time you have: • Installed the remote control batteries. (See page 27 for details). • Connected an antenna, cable TV, or satellite TV. (See page 13 or 17 for details.) • Connected the power cord...
User Manual (English)
Page 34
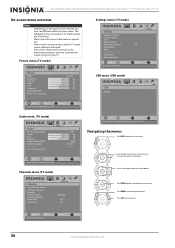
... Settings menu (TV mode) Settings Parental Controls Closed Caption T ime Menu Settings Auto Input Sensing Input Labels INlink Computer Settings System Info Reset to Default Picture Audio Channels Settings USB Off Move OK E NTE R Selec t Set various TV options MENU Previous EXIT Exit USB menu (USB mode) USB Photos Picture Audio Channels Settings USB Move OK E NTE R Select MENU Previous Adjust settings to affect picture quality EXIT Exit Audio menu (TV mode) Audio SRS TruSurround HD Treble Bass Balance Digital Audio/SPDIF Audio Language MTS/SAP R es et Audio Settings Picture...
... Settings menu (TV mode) Settings Parental Controls Closed Caption T ime Menu Settings Auto Input Sensing Input Labels INlink Computer Settings System Info Reset to Default Picture Audio Channels Settings USB Off Move OK E NTE R Selec t Set various TV options MENU Previous EXIT Exit USB menu (USB mode) USB Photos Picture Audio Channels Settings USB Move OK E NTE R Select MENU Previous Adjust settings to affect picture quality EXIT Exit Audio menu (TV mode) Audio SRS TruSurround HD Treble Bass Balance Digital Audio/SPDIF Audio Language MTS/SAP R es et Audio Settings Picture...
User Manual (English)
Page 35
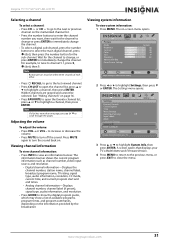
... to turn the sound back on page 36. • Press FAVORITE to open the channel list, press S or T to highlight a channel, then press ENTER. The information banner shows the current program information such as channel number, video input source, and resolution. • Digital channel information-Displays the channel number, station name, channel label, broadcast program name, TV rating, signal type, audio information, resolution, CC mode, current time, and current program start and end times. • Analog channel information-Displays channel number, channel...
... to turn the sound back on page 36. • Press FAVORITE to open the channel list, press S or T to highlight a channel, then press ENTER. The information banner shows the current program information such as channel number, video input source, and resolution. • Digital channel information-Displays the channel number, station name, channel label, broadcast program name, TV rating, signal type, audio information, resolution, CC mode, current time, and current program start and end times. • Analog channel information-Displays channel number, channel...
User Manual (English)
Page 36
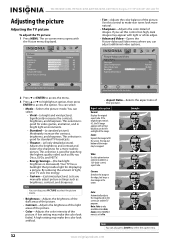
... and vivid picture). NS-15E720A12/NS-19E720A12/NS-22E730A12/NS-24E730A12 Insignia 15"/19"/22"/24" LED-LCD TV Adjusting the picture Adjusting the TV picture To adjust the TV picture: 1 Press MENU. If you set to select the aspect ratio. 32 www.insigniaproducts.com Aspect ratio option Normal: Displays the original aspect ratio. The on-screen menu opens with vertical black bars on the screen size and the TV program. Picture Picture-Advanced Video Aspect Ratio Overscan Color T emperature Noise Reduction Backlight Advanced Contrast Audio Channels Settings USB Auto On Normal...
... and vivid picture). NS-15E720A12/NS-19E720A12/NS-22E730A12/NS-24E730A12 Insignia 15"/19"/22"/24" LED-LCD TV Adjusting the picture Adjusting the TV picture To adjust the TV picture: 1 Press MENU. If you set to select the aspect ratio. 32 www.insigniaproducts.com Aspect ratio option Normal: Displays the original aspect ratio. The on-screen menu opens with vertical black bars on the screen size and the TV program. Picture Picture-Advanced Video Aspect Ratio Overscan Color T emperature Noise Reduction Backlight Advanced Contrast Audio Channels Settings USB Auto On Normal...
User Manual (English)
Page 37
... the contrast ratio between light and dark areas of the picture. For more information, see "Selecting the video input source" on -screen menu opens. The Settings menu opens. Settings Parental Controls Closed Caption T ime Menu Settings Auto Input Sensing Input Labels INlink Computer Settings System Info Reset to Default Picture Audio Channels Settings USB Antenna PBS-HD Off On Move OK E NTE R S elec t MENU Previous Set options for when a computer is in VGA mode. Picture Audio Channels Settings USB Settings-Computer Settings Auto Adjust H. Insignia 15"/19"/22"/24" LED-LCD TV...
... the contrast ratio between light and dark areas of the picture. For more information, see "Selecting the video input source" on -screen menu opens. The Settings menu opens. Settings Parental Controls Closed Caption T ime Menu Settings Auto Input Sensing Input Labels INlink Computer Settings System Info Reset to Default Picture Audio Channels Settings USB Antenna PBS-HD Off On Move OK E NTE R S elec t MENU Previous Set options for when a computer is in VGA mode. Picture Audio Channels Settings USB Settings-Computer Settings Auto Adjust H. Insignia 15"/19"/22"/24" LED-LCD TV...
User Manual (English)
Page 38
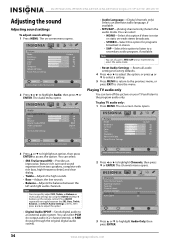
..., Balance, and Reset Audio Settings screens, then press W or X to adjust the option. • Digital Audio/SPDIF-Sends digital audio to an external audio system. NS-15E720A12/NS-19E720A12/NS-22E730A12/NS-24E730A12 Insignia 15"/19"/22"/24" LED-LCD TV Adjusting the sound Adjusting sound settings To adjust sound settings: 1 Press MENU. You can also press MTS/SAP one or more times to close the menu. The Channels menu opens. The on -screen menu opens. Note You can select PCM (to output audio in stereo. • SAP-Select this option...
..., Balance, and Reset Audio Settings screens, then press W or X to adjust the option. • Digital Audio/SPDIF-Sends digital audio to an external audio system. NS-15E720A12/NS-19E720A12/NS-22E730A12/NS-24E730A12 Insignia 15"/19"/22"/24" LED-LCD TV Adjusting the sound Adjusting sound settings To adjust sound settings: 1 Press MENU. You can also press MTS/SAP one or more times to close the menu. The Channels menu opens. The on -screen menu opens. Note You can select PCM (to output audio in stereo. • SAP-Select this option...

User Manual (English)
Page 48
...then press ENTER. The Settings menu opens. Settings Parental Controls Closed Caption T ime Menu Settings Auto Input Sensing Input Labels INlink Computer Settings System Info Reset to Default Picture Audio Channels Settings USB Off Move OK E NTE R Select Adjust Closed Captioning settings MENU Previous EXIT Exit 3 Press S or T to highlight Settings, then press T or ENTER. If the program is broadcast with RRT5 rating information, the information is 0000. Closed Caption CC Mode Analog Caption Digital Caption Digital CC Settings Audio Channels Settings USB CC Off CC1 CS1 Move...
...then press ENTER. The Settings menu opens. Settings Parental Controls Closed Caption T ime Menu Settings Auto Input Sensing Input Labels INlink Computer Settings System Info Reset to Default Picture Audio Channels Settings USB Off Move OK E NTE R Select Adjust Closed Captioning settings MENU Previous EXIT Exit 3 Press S or T to highlight Settings, then press T or ENTER. If the program is broadcast with RRT5 rating information, the information is 0000. Closed Caption CC Mode Analog Caption Digital Caption Digital CC Settings Audio Channels Settings USB CC Off CC1 CS1 Move...

User Manual (English)
Page 49
.... Settings Parental Controls Closed Caption T ime Menu Settings Auto Input Sensing Input Labels INlink Computer Settings System Info Reset to Default Picture Audio Channels Settings USB Off Move OK E NTE R Select Adjust Closed Captioning settings MENU Previous EXIT Exit 3 Press S or T to affect picture quality EXIT Exit www.insigniaproducts.com 45 Picture Settings -Closed Caption CC Mode Analog Caption Digital Caption Digital CC Settings Audio Channels Settings USB CC Off CC1 CS1 Move OK E NTE R Select MENU Previous Set Closed Caption for standard (analog) programs EXIT...
.... Settings Parental Controls Closed Caption T ime Menu Settings Auto Input Sensing Input Labels INlink Computer Settings System Info Reset to Default Picture Audio Channels Settings USB Off Move OK E NTE R Select Adjust Closed Captioning settings MENU Previous EXIT Exit 3 Press S or T to affect picture quality EXIT Exit www.insigniaproducts.com 45 Picture Settings -Closed Caption CC Mode Analog Caption Digital Caption Digital CC Settings Audio Channels Settings USB CC Off CC1 CS1 Move OK E NTE R Select MENU Previous Set Closed Caption for standard (analog) programs EXIT...

User Manual (English)
Page 50
...The Settings menu opens. Picture Picture Mode Brightness Contrast Color T int Sharpness Advanced Video R es et Picture S ettings Audio Channels Settings USB Custom 60 60 60 0 50 Move OK E NTE R Select MENU Previous Adjust settings to affect picture quality EXIT Exit 2 Press W or X to highlight an option, then press ENTER. Settings Parental Controls Closed Caption T ime Menu Settings Auto Input Sensing Input Labels INlink Computer Settings System Info Reset to Default Picture Audio Channels Settings USB Off Move OK E NTE R Select Set Date/Time and Sleep Timer MENU Previous...
...The Settings menu opens. Picture Picture Mode Brightness Contrast Color T int Sharpness Advanced Video R es et Picture S ettings Audio Channels Settings USB Custom 60 60 60 0 50 Move OK E NTE R Select MENU Previous Adjust settings to affect picture quality EXIT Exit 2 Press W or X to highlight an option, then press ENTER. Settings Parental Controls Closed Caption T ime Menu Settings Auto Input Sensing Input Labels INlink Computer Settings System Info Reset to Default Picture Audio Channels Settings USB Off Move OK E NTE R Select Set Date/Time and Sleep Timer MENU Previous...

User Manual (English)
Page 63
..." LED-LCD TV Maintaining • Do not use your TV. • Make sure that the antenna or cable TV is connected correctly and securely. Use a clean cloth to repair your TV. • The video cable(s) you are using an antenna, the digital channel signal may be bad. Contact authorized service personnel. An increasing amount of digital TV and movies are black bars around the picture. • Change the aspect ratio. Some TEXT modes...
..." LED-LCD TV Maintaining • Do not use your TV. • Make sure that the antenna or cable TV is connected correctly and securely. Use a clean cloth to repair your TV. • The video cable(s) you are using an antenna, the digital channel signal may be bad. Contact authorized service personnel. An increasing amount of digital TV and movies are black bars around the picture. • Change the aspect ratio. Some TEXT modes...
User Manual (English)
Page 64
... • Adjust the audio balance. Trouble programming your warranty. See "Installing remote control batteries" on page 38. • The audio cable(s) you have the correct input selected to view channels from one device at a time to change . Try a new set. • Other devices (for the device or service you are trying to your TV. Once you have determined which device is not too bright. To check the digital channel signal strength...
... • Adjust the audio balance. Trouble programming your warranty. See "Installing remote control batteries" on page 38. • The audio cable(s) you have the correct input selected to view channels from one device at a time to change . Try a new set. • Other devices (for the device or service you are trying to your TV. Once you have determined which device is not too bright. To check the digital channel signal strength...

User Manual (English)
Page 65
... time NS-15E720A12: 15.6 in . See "Locking control buttons" on page 40. • Unplug the power cord, wait a few seconds, then plug the cord back in . (583 × 419 × 160 mm) 10.58 lbs (4.8 kg) Screen size measured diagonally Display type Panel 60 Hz vs.120 Hz Display resolution Panel resolution Aspect ratio Contrast ratio (typical)-panel Dynamic contrast ratio- LCD (all models) 60Hz (all models) NS-15E720A12: 720p NS-19E720A12: 720p NS-22E730A12: 1080p NS-24E730A12: 1080p NS-15E720A12: 1366 (H) × 768 (V) NS...
... time NS-15E720A12: 15.6 in . See "Locking control buttons" on page 40. • Unplug the power cord, wait a few seconds, then plug the cord back in . (583 × 419 × 160 mm) 10.58 lbs (4.8 kg) Screen size measured diagonally Display type Panel 60 Hz vs.120 Hz Display resolution Panel resolution Aspect ratio Contrast ratio (typical)-panel Dynamic contrast ratio- LCD (all models) 60Hz (all models) NS-15E720A12: 720p NS-19E720A12: 720p NS-22E730A12: 1080p NS-24E730A12: 1080p NS-15E720A12: 1366 (H) × 768 (V) NS...
Quick Setup Guide (English)
Page 2
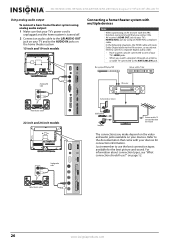
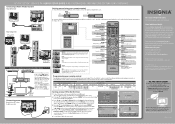
...:9 (wide-screen) aspect ratio. Quick Launch Inputs Selects another source connected to On. INFO Opens a TV status banner. FAVORITE Opens the Favorite Channel List. The power indicator turns on and the Choose your menu language screen opens. 2 Press ▲ or ▼ to remove the battery compartment cover. 15"/19"/22"/24" LED-LCD TV I QUICK SETUP GUIDE I NS-15E720A12/NS-19E720A12/NS-22E730A12/NS-24E730A12 Connecting a Home Theater System Using Digital audio 22" and 24" model only Setting up and using your remote control...
...:9 (wide-screen) aspect ratio. Quick Launch Inputs Selects another source connected to On. INFO Opens a TV status banner. FAVORITE Opens the Favorite Channel List. The power indicator turns on and the Choose your menu language screen opens. 2 Press ▲ or ▼ to remove the battery compartment cover. 15"/19"/22"/24" LED-LCD TV I QUICK SETUP GUIDE I NS-15E720A12/NS-19E720A12/NS-22E730A12/NS-24E730A12 Connecting a Home Theater System Using Digital audio 22" and 24" model only Setting up and using your remote control...


