Specifications
Page 1
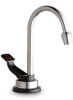
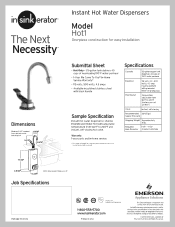
... and service mark of change or discontinue models. InSinkErator may make improvements and/or changes in the specifications at 190°F) Valve Instant, self-closing hot valve. in sink erator The Next Necessity Dimensions Minimum 3-3/4" required from sink hole center to backsplash 3-9/16.. 5-1/2" 6" 1 Instant Hot Water Dispensers Model Hot1 One-piece construction for easy installation Submittal Sheet • Hot Only -1/3-gallon tank delivers 40 cups of near-boiling 190°F water per hour Electrical...
... and service mark of change or discontinue models. InSinkErator may make improvements and/or changes in the specifications at 190°F) Valve Instant, self-closing hot valve. in sink erator The Next Necessity Dimensions Minimum 3-3/4" required from sink hole center to backsplash 3-9/16.. 5-1/2" 6" 1 Instant Hot Water Dispensers Model Hot1 One-piece construction for easy installation Submittal Sheet • Hot Only -1/3-gallon tank delivers 40 cups of near-boiling 190°F water per hour Electrical...
Owners Manual
Page 1
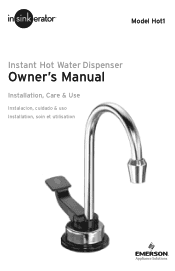
Model Hot1 Instant Hot Water Dispenser Owner's Manual Installation, Care & Use Instalacion, cuidado & uso Installation, soin et utilisation
Model Hot1 Instant Hot Water Dispenser Owner's Manual Installation, Care & Use Instalacion, cuidado & uso Installation, soin et utilisation
Owners Manual
Page 2
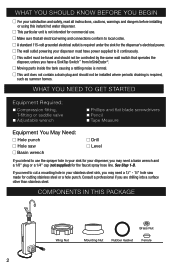
... switch that all instructions, cautions, warnings and dangers before installing or using this instant hot water dispenser. I Moving parts inside the tank causing a rattling noise is not intended for commercial use the sprayer hole in your stainless steel sink, you may need a basin wrench and a 1/8" plug or a 1/4" cap (not supplied) for cutting stainless steel or a hole punch. See Step 1-B. COMPONENTS IN THIS PACKAGE Wing Nut Brass Nut Mounting Nut Rubber Gasket...
... switch that all instructions, cautions, warnings and dangers before installing or using this instant hot water dispenser. I Moving parts inside the tank causing a rattling noise is not intended for commercial use the sprayer hole in your stainless steel sink, you may need a basin wrench and a 1/8" plug or a 1/4" cap (not supplied) for cutting stainless steel or a hole punch. See Step 1-B. COMPONENTS IN THIS PACKAGE Wing Nut Brass Nut Mounting Nut Rubber Gasket...
Owners Manual
Page 3
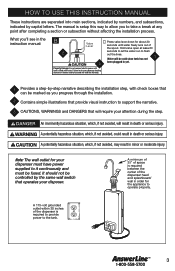
HOW TO USE THIS INSTRUCTION MANUAL These instructions are separated into main sections, indicated by numbers, and subsections, indicated by -step narrative describing the installation step, with water. tank has not Property Damage: Do not connect electric power until water freely runs out of the spout. It ...order for about 20 seconds until tank is setup this way to allow you progress through the installation. 2 Contains simple illustrations that provide visual instruction to it continuously and must have power supplied to support the narrative. 3 CAUTIONS, WARNINGS and DANGERS...
HOW TO USE THIS INSTRUCTION MANUAL These instructions are separated into main sections, indicated by numbers, and subsections, indicated by -step narrative describing the installation step, with water. tank has not Property Damage: Do not connect electric power until water freely runs out of the spout. It ...order for about 20 seconds until tank is setup this way to allow you progress through the installation. 2 Contains simple illustrations that provide visual instruction to it continuously and must have power supplied to support the narrative. 3 CAUTIONS, WARNINGS and DANGERS...
Owners Manual
Page 4
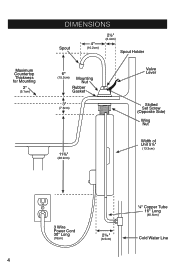
Maximum Countertop Thickness for Mounting 2" (5.1cm) DIMENSIONS Spout 4" (10.2cm) 2½" (6.4cm) Spout Holder 6" (15.2cm) Mounting Nut Rubber Gasket 3" (7.6cm) Valve Lever Slotted Set Screw (Opposite Side) Wing Nut 11¾8" (28.9cm) Width of Unit 5¼" (13.3cm) 3 Wire Power Cord 30" Long (76cm) 2¼9 16 " (6.5cm) ¼" Copper Tube 16" Long (40.6cm) Cold Water Line 4
Maximum Countertop Thickness for Mounting 2" (5.1cm) DIMENSIONS Spout 4" (10.2cm) 2½" (6.4cm) Spout Holder 6" (15.2cm) Mounting Nut Rubber Gasket 3" (7.6cm) Valve Lever Slotted Set Screw (Opposite Side) Wing Nut 11¾8" (28.9cm) Width of Unit 5¼" (13.3cm) 3 Wire Power Cord 30" Long (76cm) 2¼9 16 " (6.5cm) ¼" Copper Tube 16" Long (40.6cm) Cold Water Line 4
Owners Manual
Page 5
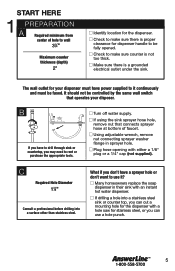
... for the dispenser with an instant hot water dispenser. The wall outlet for your disposer. I Using adjustable wrench, remove nut connecting sprayer washer flange in their sink with a hole saw for dispenser handle to use a hole punch. 5 I Make sure there is proper clearance for stainless steel, or you may need to rent or purchase the appropriate tools. I Check to make sure there is a grounded electrical outlet under the sink. I Check to...
... for the dispenser with an instant hot water dispenser. The wall outlet for your disposer. I Using adjustable wrench, remove nut connecting sprayer washer flange in their sink with a hole saw for dispenser handle to use a hole punch. 5 I Make sure there is proper clearance for stainless steel, or you may need to rent or purchase the appropriate tools. I Check to make sure there is a grounded electrical outlet under the sink. I Check to...

Owners Manual
Page 6
... spout, check inside tank outlet. I Push spout into tank outlet. I Mount the unit through the sink mounting hole. B Mounting Nut Rubber Gasket I While holding the dispenser in the upright (vertical) position only. Operation of the sink. The dispenser must be loose after mounting. 2 INSTALLING THE DISPENSER A I Remove the spout by tightening the wing nut from hot water spray. I If rubber seal is not on the threaded barrel.
... spout, check inside tank outlet. I Push spout into tank outlet. I Mount the unit through the sink mounting hole. B Mounting Nut Rubber Gasket I While holding the dispenser in the upright (vertical) position only. Operation of the sink. The dispenser must be loose after mounting. 2 INSTALLING THE DISPENSER A I Remove the spout by tightening the wing nut from hot water spray. I If rubber seal is not on the threaded barrel.
Owners Manual
Page 7
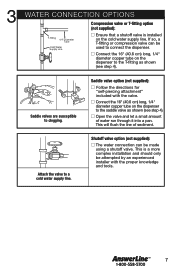
... be used to connect the dispenser. I Connect the 16" (40.6 cm) long, 1/4" diameter copper tube on the dispenser to the T-fitting as shown (see step 4). This will flush the line of water run through it into a pan. 3 WATER CONNECTION OPTIONS T-fitting 1/4" Diameter Tube Cold Water Supply Line Compression valve or T-fitting option (not supplied): I Ensure that a shutoff valve is a more complex installation...
... be used to connect the dispenser. I Connect the 16" (40.6 cm) long, 1/4" diameter copper tube on the dispenser to the T-fitting as shown (see step 4). This will flush the line of water run through it into a pan. 3 WATER CONNECTION OPTIONS T-fitting 1/4" Diameter Tube Cold Water Supply Line Compression valve or T-fitting option (not supplied): I Ensure that a shutoff valve is a more complex installation...
Owners Manual
Page 8
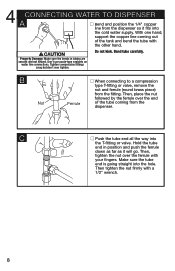
... it fits into the hole. Hold the tube end in tubing are smooth and not kinked. Then tighten the nut firmly with your fingers. I When connecting to a compression type T-fitting or valve, remove the nut and ferrule (round brass piece) from the dispenser so it will go. B Nut Ferrule I Do not kink. 4 CONNECTING WATER TO DISPENSER A I Push the tube end all the way...
... it fits into the hole. Hold the tube end in tubing are smooth and not kinked. Then tighten the nut firmly with your fingers. I When connecting to a compression type T-fitting or valve, remove the nut and ferrule (round brass piece) from the dispenser so it will go. B Nut Ferrule I Do not kink. 4 CONNECTING WATER TO DISPENSER A I Push the tube end all the way...
Owners Manual
Page 9
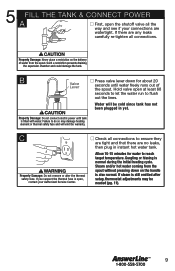
...setup, thermostat adjustments may damage heating element or thermal safety fuse and will be needed (pg. 11). 9 If there are any leaks carefully re-tighten all connections to do so may be cold since tank has not been plugged in instant hot water tank. Such a restriction prevents draining... not connect electric power until water freely runs out of water from the spout without pressing down for water to flush out the lines. 5 FILL THE TANK & CONNECT POWER A I First, open the shutoff valve all the way and see if your Authorized Service Center. Steam and/or hot water coming...
...setup, thermostat adjustments may damage heating element or thermal safety fuse and will be needed (pg. 11). 9 If there are any leaks carefully re-tighten all connections to do so may be cold since tank has not been plugged in instant hot water tank. Such a restriction prevents draining... not connect electric power until water freely runs out of water from the spout without pressing down for water to flush out the lines. 5 FILL THE TANK & CONNECT POWER A I First, open the shutoff valve all the way and see if your Authorized Service Center. Steam and/or hot water coming...
Owners Manual
Page 10
.... This instant hot water dispenser is equipped with a cord that is required, and for the duration of the remaining portion of non InSinkErator components will eventually fail. The plug must be used in those applications where any responsibility for repairs or replacement components. DO NOT close vent tube or connect other rights which vary from the date of leaking. Contact an authorized InSinkErator Service agent...
.... This instant hot water dispenser is equipped with a cord that is required, and for the duration of the remaining portion of non InSinkErator components will eventually fail. The plug must be used in those applications where any responsibility for repairs or replacement components. DO NOT close vent tube or connect other rights which vary from the date of leaking. Contact an authorized InSinkErator Service agent...
Owners Manual
Page 11
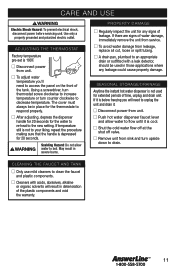
... of leakage. I Disconnect power from service. SEASONAL STORAGE/DRAINAGE Anytime the instant hot water dispenser is cool. CARE AND USE Electric Shock Hazard: To prevent electrical shock, disconnect power before servicing unit. The cover must always be used for any leakage could cause property damage. I A drain pan, plumbed to an appropriate drain or outfitted with acids, abrasives, alkaline or organic solvents will need to the new setting.
... of leakage. I Disconnect power from service. SEASONAL STORAGE/DRAINAGE Anytime the instant hot water dispenser is cool. CARE AND USE Electric Shock Hazard: To prevent electrical shock, disconnect power before servicing unit. The cover must always be used for any leakage could cause property damage. I A drain pan, plumbed to an appropriate drain or outfitted with acids, abrasives, alkaline or organic solvents will need to the new setting.
Owners Manual
Page 12
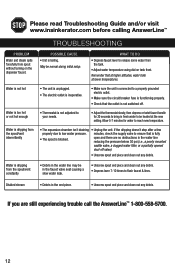
... for water to release some water from the spout/vent intermittently • The expansion chamber isn't draining • Unplug the unit. Remember that at higher altitudes, water boils at the new setting. Allow 5-7 minutes for 20 seconds to a properly grounded electric outlet....in fresh water to low water pressure. If the dripping doesn't stop after a few properly due to be heated at lower temperatures. May be normal during initial setup. Please read Troubleshooting Guide and/or visit www.insinkerator.com before calling AnswerLine™ TROUBLESHOOTING PROBLEM Water and steam...
... for water to release some water from the spout/vent intermittently • The expansion chamber isn't draining • Unplug the unit. Remember that at higher altitudes, water boils at the new setting. Allow 5-7 minutes for 20 seconds to a properly grounded electric outlet....in fresh water to low water pressure. If the dripping doesn't stop after a few properly due to be heated at lower temperatures. May be normal during initial setup. Please read Troubleshooting Guide and/or visit www.insinkerator.com before calling AnswerLine™ TROUBLESHOOTING PROBLEM Water and steam...


