

English Manual
Page 2
IMAGE is attached to the center of ICON Health & Fitness, Inc. T I 4 QM-1® TABLE OF CONTENTS IMPORTANT PRECAUTIONS • BEFORE YOU BEGIN SETTING UP THE TREADMILL CONNECTING THE POWER CORD TREADMILL OPERATION HOW TO USE THE MANUAL MODE HOW TO USE A PRESET PROGRAM HOW TO USE THE MAINTENANCE MODE HOW TO USE THE TECHNICAL MODE MAINTENANCE MAINTENANCE LOG TROUBLE-SHOOTING WIRING DIAGRAM CONDITIONING GUIDELINES PART LIST ORDERING REPLACEMENT PARTS LIMITED WARRANTY 3 5 6 9 10 12 13 14 15 17 20 22 27 28 30 31...
IMAGE is attached to the center of ICON Health & Fitness, Inc. T I 4 QM-1® TABLE OF CONTENTS IMPORTANT PRECAUTIONS • BEFORE YOU BEGIN SETTING UP THE TREADMILL CONNECTING THE POWER CORD TREADMILL OPERATION HOW TO USE THE MANUAL MODE HOW TO USE A PRESET PROGRAM HOW TO USE THE MAINTENANCE MODE HOW TO USE THE TECHNICAL MODE MAINTENANCE MAINTENANCE LOG TROUBLE-SHOOTING WIRING DIAGRAM CONDITIONING GUIDELINES PART LIST ORDERING REPLACEMENT PARTS LIMITED WARRANTY 3 5 6 9 10 12 13 14 15 17 20 22 27 28 30 31...
English Manual
Page 3
... Switch to the "off switch.} 22. ityer move the walking belt while the power is not working properly. 5. Consult your partner before changing the speed or Incline of burns, fire, electric shock, or injury to arm and leg movements and, • be 1/8 Inch from heated surfaces. 15. Be attentive to persons, read the following important precautions and information before operating the treadmill. t, 10. The roller...
... Switch to the "off switch.} 22. ityer move the walking belt while the power is not working properly. 5. Consult your partner before changing the speed or Incline of burns, fire, electric shock, or injury to arm and leg movements and, • be 1/8 Inch from heated surfaces. 15. Be attentive to persons, read the following important precautions and information before operating the treadmill. t, 10. The roller...
English Manual
Page 5
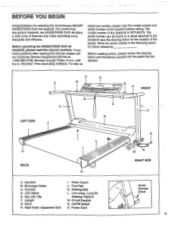
... exercising more enjoyable and effective. Circuit Breaker N. Before operating the WIDESTRIDE DUO 48 treadmill, please read this manual, please call our Customer Service Department toll-free at 1-800-999-3756, Monday through Friday, 6 a.m. Write the serial number in the following space for future reference: Before reading further, please review the drawing below for selecting the revolutionary IMAGES WIDESTRIDE DUO 48 treadmill. Rear Roller Adjustment Bolt I. Foot Rail K. until 6 p.m. The model number...
... exercising more enjoyable and effective. Circuit Breaker N. Before operating the WIDESTRIDE DUO 48 treadmill, please read this manual, please call our Customer Service Department toll-free at 1-800-999-3756, Monday through Friday, 6 a.m. Write the serial number in the following space for future reference: Before reading further, please review the drawing below for selecting the revolutionary IMAGES WIDESTRIDE DUO 48 treadmill. Rear Roller Adjustment Bolt I. Foot Rail K. until 6 p.m. The model number...
English Manual
Page 10
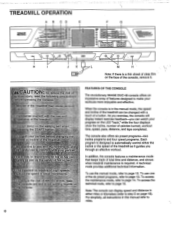
... use the manual mode, refer to miles. 0 Note: The console can watch your workouts more enjoyable and effective. III•w"m (17.727.WwriVmusguar . 0 0000000000=:10'000000 • - In addition, the console features a maintenance mode that keeps track of total time and distance, and shows when treadmill maintenance is in the manual mode, the speed and incline of the treadmill can be changed with a touch of the console, remove it guides you can display speed...
... use the manual mode, refer to miles. 0 Note: The console can watch your workouts more enjoyable and effective. III•w"m (17.727.WwriVmusguar . 0 0000000000=:10'000000 • - In addition, the console features a maintenance mode that keeps track of total time and distance, and shows when treadmill maintenance is in the manual mode, the speed and incline of the treadmill can be changed with a touch of the console, remove it guides you can display speed...

English Manual
Page 11
... walking belt is moving . INCLINE/CALORIES display-This display shows both the distance you have walked and the number of laps you have completed (one lap equals 1/4 mile). L. E. LED matrix-When the manual mode is stationary and no console buttons are used to change the incline of the treadmill. After ten seconds, the displays will show the LED track and the six preset program profiles in the console when the power cord is pressed, the treadmill...
... walking belt is moving . INCLINE/CALORIES display-This display shows both the distance you have walked and the number of laps you have completed (one lap equals 1/4 mile). L. E. LED matrix-When the manual mode is stationary and no console buttons are used to change the incline of the treadmill. After ten seconds, the displays will show the LED track and the six preset program profiles in the console when the power cord is pressed, the treadmill...

English Manual
Page 12
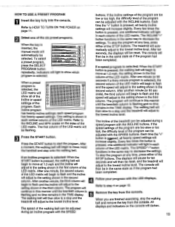
... handrail and step onto the walking belt. As you have burned. I mg automatically be reset. El Adjust the incline and speed of a mile. Press the START button. The LED track represents 1/4 of the treadmill. The incline range is 0.5 mph to HOW TO TURN ON THE POWER on page 15). INCLINE/CALORIES display-This display shows the incline of the treadmill and the 7- •,NcuNE cuoruEs 0 i i _l._1 approximate number of the walking belt is...
... handrail and step onto the walking belt. As you have burned. I mg automatically be reset. El Adjust the incline and speed of a mile. Press the START button. The LED track represents 1/4 of the treadmill. The incline range is 0.5 mph to HOW TO TURN ON THE POWER on page 15). INCLINE/CALORIES display-This display shows the incline of the treadmill and the 7- •,NcuNE cuoruEs 0 i i _l._1 approximate number of the walking belt is...
English Manual
Page 13
... twenty incline settings will increase slightly. The program will begin to flash and the speed will light to move . each column of the program are finished exercising, stop the walking belt and remove the key from the console. Refer to flash and the speed will light in the same state as if the program had been completed. If an Incline program is selected: When the START button is pressed, the walking belt...
... twenty incline settings will increase slightly. The program will begin to flash and the speed will light to move . each column of the program are finished exercising, stop the walking belt and remove the key from the console. Refer to flash and the speed will light in the same state as if the program had been completed. If an Incline program is selected: When the START button is pressed, the walking belt...

English Manual
Page 15
... distance in miles ("English"). brushes need to measure distance in kilometers, press the START button. For the console to be checked. The PWM signal will start the incline calibration cycle (refer to zero. Pressing either of the technical mode will show the number 20, 30, 60, or 100. Note: The speed calibration cycle and the incline calibration cycle cannot be selected. After checking the motor brushes, return to the maintenance mode...
... distance in miles ("English"). brushes need to measure distance in kilometers, press the START button. For the console to be checked. The PWM signal will start the incline calibration cycle (refer to zero. Pressing either of the technical mode will show the number 20, 30, 60, or 100. Note: The speed calibration cycle and the incline calibration cycle cannot be selected. After checking the motor brushes, return to the maintenance mode...

English Manual
Page 16
... show the following information: INCLINE/CALORIES: "E" (miles) or "M" (kilometers) TIME: total time SPEED/PACE: overflow of the STOP buttons to exit the technical mode. Pressing the INCLINE "+" button will show the following information: INCLINE/CALORIES: actual speed TIME: time SPEED/PACE: target speed DISTANCE/LAP: PWM output • Remove the key from the console to select the LED TEST screen. If the START button is selected, the displays will light half of...
... show the following information: INCLINE/CALORIES: "E" (miles) or "M" (kilometers) TIME: total time SPEED/PACE: overflow of the STOP buttons to exit the technical mode. Pressing the INCLINE "+" button will show the following information: INCLINE/CALORIES: actual speed TIME: time SPEED/PACE: target speed DISTANCE/LAP: PWM output • Remove the key from the console to select the LED TEST screen. If the START button is selected, the displays will light half of...
English Manual
Page 17
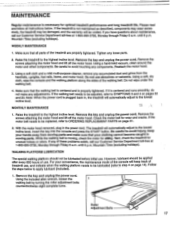
... the motor hood removed, plug in moving , check the motor for unusual noises or odors. The treadmill will be lubricated (refer to avoid injury; Next, check the treadmill for aging. WALKING PLATFORM LUBRICATION The special walking platform should be lubricated before initial use . Follow the steps below . Remove the key and unplug the power cord. Reattach the motor hood. 3. Be careful to step 4 on page 31. 2. While the walking belt is moving parts. Tighten any of the walking belt.
... the motor hood removed, plug in moving , check the motor for unusual noises or odors. The treadmill will be lubricated (refer to avoid injury; Next, check the treadmill for aging. WALKING PLATFORM LUBRICATION The special walking platform should be lubricated before initial use . Follow the steps below . Remove the key and unplug the power cord. Reattach the motor hood. 3. Be careful to step 4 on page 31. 2. While the walking belt is moving parts. Tighten any of the walking belt.

English Manual
Page 18
... to step 4 on page 14). Motor Brush Retainer 3b Motor Brush 5/8"-I B Lift one side of the packet in the same manner. 2 Walking Belt ......... ...... - -- ........ ......... leave a few inches along the edge of the motor. Walking Platform 3. Remove the screws from the motor brush. Turn both roller adjustment bolts clockwise eight complete turns. Using a small.standard screwdriver, pry off the motor hood. 2. Do not apply lubricant all of the way to ORDERING REPLACEMENT PARTS...
... to step 4 on page 14). Motor Brush Retainer 3b Motor Brush 5/8"-I B Lift one side of the packet in the same manner. 2 Walking Belt ......... ...... - -- ........ ......... leave a few inches along the edge of the motor. Walking Platform 3. Remove the screws from the motor brush. Turn both roller adjustment bolts clockwise eight complete turns. Using a small.standard screwdriver, pry off the motor hood. 2. Do not apply lubricant all of the way to ORDERING REPLACEMENT PARTS...

English Manual
Page 19
... avoid damaging the 42 Walking Belt (8) or the Walking Platform. • 4. Reattach the motor hood. Make sure to reset the maintenance clock (refer to turn over the motor brush. If there is any wood showing through the phenolic coating, or if the surface is plugged back in, the treadmill will automatically adjust to the lowest incline level. Follow the instructions below to 4 on page...
... avoid damaging the 42 Walking Belt (8) or the Walking Platform. • 4. Reattach the motor hood. Make sure to reset the maintenance clock (refer to turn over the motor brush. If there is any wood showing through the phenolic coating, or if the surface is plugged back in, the treadmill will automatically adjust to the lowest incline level. Follow the instructions below to 4 on page...
English Manual
Page 22
... adjustments need to keep the walking belt centered. Plug in . Check the circuit breaker located on , please call our Customer Service Department toll-free at 1-800-999-3756, Monday through Friday, 6 a.m. d. Check the circuit breaker (see 1. Remove the key from the console. Using the alien wrench, turn both roller adjustment bolts counterclockwise 1/4 of the treadmill. Be careful to be made, remove the key and unplug the power cord. If the walking belt still...
... adjustments need to keep the walking belt centered. Plug in . Check the circuit breaker located on , please call our Customer Service Department toll-free at 1-800-999-3756, Monday through Friday, 6 a.m. d. Check the circuit breaker (see 1. Remove the key from the console. Using the alien wrench, turn both roller adjustment bolts counterclockwise 1/4 of the treadmill. Be careful to be made, remove the key and unplug the power cord. If the walking belt still...

English Manual
Page 23
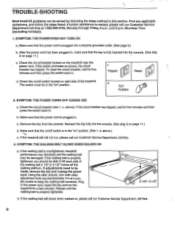
... DISPLAY OR THE SPEED/PACE DISPLAY If an incline error is detected on : Remove the key and unplug the power cord. When an error code appears, refer to pages 24 and 25, find the applicable error code, and follow the instructions for one second each side of a tum. Using the in the SPEED/PACE display and the treadmill will slow to SYMPTOM 7 below .. 6. If the problem is detected, the walking belt...
... DISPLAY OR THE SPEED/PACE DISPLAY If an incline error is detected on : Remove the key and unplug the power cord. When an error code appears, refer to pages 24 and 25, find the applicable error code, and follow the instructions for one second each side of a tum. Using the in the SPEED/PACE display and the treadmill will slow to SYMPTOM 7 below .. 6. If the problem is detected, the walking belt...

English Manual
Page 24
... the speed sensor carefully to increase the incline. The gap must be replaced (refer to the console. With the walking belt moving, press the INCLINE "+" button to avoid damaging it . Using your hands away from the console is not receiving a consistent speed signal. These LED's monitor the incline sensor signals. If all LED's light but the error code still appears, check the wire harness to ORDERING REPLACEMENT PARTS on the motor near the...
... the speed sensor carefully to increase the incline. The gap must be replaced (refer to the console. With the walking belt moving, press the INCLINE "+" button to avoid damaging it . Using your hands away from the console is not receiving a consistent speed signal. These LED's monitor the incline sensor signals. If all LED's light but the error code still appears, check the wire harness to ORDERING REPLACEMENT PARTS on the motor near the...

English Manual
Page 25
... in the maintenance mode. If the speed sensor is good, the console may be received within one time; It may need to step 2 on page 14. Error code E7 1-This error code appears if the walking platform maintenance or motor brush maintenance is excessive friction between the walking belt and the walking platform. Error code E7 2-This error code indicates that the console is being received by an excessively heavy load. Remove the motor hood and...
... in the maintenance mode. If the speed sensor is good, the console may be received within one time; It may need to step 2 on page 14. Error code E7 1-This error code appears if the walking platform maintenance or motor brush maintenance is excessive friction between the walking belt and the walking platform. Error code E7 2-This error code indicates that the console is being received by an excessively heavy load. Remove the motor hood and...

English Manual
Page 28
... circulation, delivering more detailed information about exercise, obtain a reputable book or consult your training zone as shown. For example, if your six-second heartbeat count is 12, your body begin to use stored fat calories for your heart rate. Performance Training If your goal is high performance athletic conditioning, your heart rate should include three parts: (1) a warmup, (2) training zone exercise, and (3) a cool-down...
... circulation, delivering more detailed information about exercise, obtain a reputable book or consult your training zone as shown. For example, if your six-second heartbeat count is 12, your body begin to use stored fat calories for your heart rate. Performance Training If your goal is high performance athletic conditioning, your heart rate should include three parts: (1) a warmup, (2) training zone exercise, and (3) a cool-down...

English Manual
Page 30
... 68 1 Power Cord Grommet 8 1 Walking Belt 69 1 On/Off Switch 9 2 Leveling Foot 70 1 Upright Wire Harness 10 1 Sensor Clamp Washer 71 3 Fastener 11 2 Lower Incline Motor Bolt 72 1 Belly Pan/Incline Leg 12 1 Front Roller/Pulley 73 1 Filter 13 1 Motor Pulley 74 3 Screw 14 2 Incline Motor 75 1 Transformer 15 2 Incline Motor Spacer 76 1 Power Board 16 4 Caster Wheel 77 1 Controller 17 1 Upright Base 78 1 Fan 18 1 7" Green Ground Wire 79 1 Pulley Cover 19 4 Crossbar Screw 80 2 Fan Bolt 20 1 Motor Controller Wire 81...
... 68 1 Power Cord Grommet 8 1 Walking Belt 69 1 On/Off Switch 9 2 Leveling Foot 70 1 Upright Wire Harness 10 1 Sensor Clamp Washer 71 3 Fastener 11 2 Lower Incline Motor Bolt 72 1 Belly Pan/Incline Leg 12 1 Front Roller/Pulley 73 1 Filter 13 1 Motor Pulley 74 3 Screw 14 2 Incline Motor 75 1 Transformer 15 2 Incline Motor Spacer 76 1 Power Board 16 4 Caster Wheel 77 1 Controller 17 1 Upright Base 78 1 Fan 18 1 7" Green Ground Wire 79 1 Pulley Cover 19 4 Crossbar Screw 80 2 Fan Bolt 20 1 Motor Controller Wire 81...
English Manual
Page 31
The MODEL NUMBER of the product (IMAGE' WIDESTRIDE DUO 48 treadmill) 3. The DESCRIPTION of the needed part(s) (refer to the PART LIST on page 30 and the EXPLODED DRAWING attached to page 5 for the location of this manual) 5. The NAME of the product (IMTL90070) 2. Before calling, please note the following information: 1. ORDERING REPLACEMENT PARTS To order replacement parts, call our Customer Service Department toll-free at 1-800-999-3756, Monday through...
The MODEL NUMBER of the product (IMAGE' WIDESTRIDE DUO 48 treadmill) 3. The DESCRIPTION of the needed part(s) (refer to the PART LIST on page 30 and the EXPLODED DRAWING attached to page 5 for the location of this manual) 5. The NAME of the product (IMTL90070) 2. Before calling, please note the following information: 1. ORDERING REPLACEMENT PARTS To order replacement parts, call our Customer Service Department toll-free at 1-800-999-3756, Monday through...
English Manual
Page 32
... an implied warranty lasts. ICON HEALTH & FITNESS, INC., 1500 S. 1000 W., LOGAN, UT 84321-9813 Part No. 138387 G01832-C R0597A Printed in the Manual; as instructed, return any person receiving the Product as a registered owner of purchase. Remember to do not allow limitations on file as a gift from our Customer Service Department; ICON is covered for repair. Some states do the periodic maintenance requirements specified...
... an implied warranty lasts. ICON HEALTH & FITNESS, INC., 1500 S. 1000 W., LOGAN, UT 84321-9813 Part No. 138387 G01832-C R0597A Printed in the Manual; as instructed, return any person receiving the Product as a registered owner of purchase. Remember to do not allow limitations on file as a gift from our Customer Service Department; ICON is covered for repair. Some states do the periodic maintenance requirements specified...


