

English Manual
Page 3
... use . (See the drawing on /off switch.) 19. Do not change speed or stop unexpectedly, which may affect the accuracy of the treadmill and move the treadmill. 20. Keep the treadmill indoors, away from the treadmill at all times. 13. The treadmill is not working properly.) 15. Always remove the key, unplug the power cord from the front of heart rate readings. Failure to locate the on page 5 to use...
... use . (See the drawing on /off switch.) 19. Do not change speed or stop unexpectedly, which may affect the accuracy of the treadmill and move the treadmill. 20. Keep the treadmill indoors, away from the treadmill at all times. 13. The treadmill is not working properly.) 15. Always remove the key, unplug the power cord from the front of heart rate readings. Failure to locate the on page 5 to use...

English Manual
Page 4
...-existing health problems. Read all parts of the treadmill is heard, the speed and/or incline will alert you are not using iFIT.com CD's and videos, an electronic "chirping" sound will change to order a free replacement decal (see ORDERING REPLACEMENT PARTS on your treadmill. Inspect and properly tighten all instructions before performing the maintenance and adjustment procedures described in this product. ual. Never remove the motor hood unless in any exercise program, consult...
...-existing health problems. Read all parts of the treadmill is heard, the speed and/or incline will alert you are not using iFIT.com CD's and videos, an electronic "chirping" sound will change to order a free replacement decal (see ORDERING REPLACEMENT PARTS on your treadmill. Inspect and properly tighten all instructions before performing the maintenance and adjustment procedures described in this product. ual. Never remove the motor hood unless in any exercise program, consult...

English Manual
Page 5
... exercise program in the convenience of this manual for selecting the revolutionary IMAGE® EXECUTIVE 2002 treadmill. The serial number can be found on a decal attached to help us assist you, please note the product model number and serial number before using the treadmill. Pulse Sensor Handrail Storage Latch LEFT SIDE Walking Belt Foot Grip Book Holder Console Console Latch Key/Clip RIGHT SIDE Circuit Breaker On/Off Switch Rear Roller Adjustment Bolts 5 And when you're not exercising, the unique EXECUTIVE...
... exercise program in the convenience of this manual for selecting the revolutionary IMAGE® EXECUTIVE 2002 treadmill. The serial number can be found on a decal attached to help us assist you, please note the product model number and serial number before using the treadmill. Pulse Sensor Handrail Storage Latch LEFT SIDE Walking Belt Foot Grip Book Holder Console Console Latch Key/Clip RIGHT SIDE Circuit Breaker On/Off Switch Rear Roller Adjustment Bolts 5 And when you're not exercising, the unique EXECUTIVE...

English Manual
Page 7
To connect the treadmill using the cabinet power cord, follow the instructions in this manual apply to adjust the walking belt (see step 4b. Plug the power cord and the audio wire into the connection panel. Locate the indicated wire on the back of clear plastic on the console decal, remove it. Plug the wire into the treadmill as shown. Make sure that all parts are two ways to connect the treadmill to use the treadmill. Keep the included allen...
To connect the treadmill using the cabinet power cord, follow the instructions in this manual apply to adjust the walking belt (see step 4b. Plug the power cord and the audio wire into the connection panel. Locate the indicated wire on the back of clear plastic on the console decal, remove it. Plug the wire into the treadmill as shown. Make sure that all parts are two ways to connect the treadmill to use the treadmill. Keep the included allen...

English Manual
Page 8
..., the walking belt may change speed or stop unexpectedly, which may be used only until a properly grounded outlet (drawing 1) can be installed by a qualified electrician. If the control system is grounded before using an adapter. 8 Check with PERFORMANT LUBETM, a high-performance lubricant. There must be a monitoring light on or off. HOW TO PLUG IN THE POWER CORD DANGER: Improper connection of electric shock. OPERATION AND ADJUSTMENT THE...
..., the walking belt may change speed or stop unexpectedly, which may be used only until a properly grounded outlet (drawing 1) can be installed by a qualified electrician. If the control system is grounded before using an adapter. 8 Check with PERFORMANT LUBETM, a high-performance lubricant. There must be a monitoring light on or off. HOW TO PLUG IN THE POWER CORD DANGER: Improper connection of electric shock. OPERATION AND ADJUSTMENT THE...
English Manual
Page 9
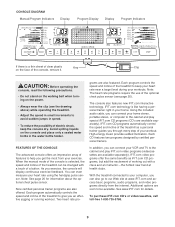
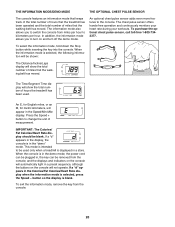
... health clubs. Using the included audio cable, you can connect your home stereo, portable stereo, or computer to help you can connect your exercise. Note: See page 20 for details. See www.iFIT.com for information about the optional chest pulse sensor. CONSOLE DIAGRAM Manual/Program Indicators Display Program Display Display Program Indicators If there is selected, the speed and incline of the treadmill can be available. The console also features new iFIT.com interactive technology. IFIT.com CD programs...
... health clubs. Using the included audio cable, you can connect your home stereo, portable stereo, or computer to help you can connect your exercise. Note: See page 20 for details. See www.iFIT.com for information about the optional chest pulse sensor. CONSOLE DIAGRAM Manual/Program Indicators Display Program Display Display Program Indicators If there is selected, the speed and incline of the treadmill can be available. The console also features new iFIT.com interactive technology. IFIT.com CD programs...

English Manual
Page 10
.... To use an iFIT.com program directly from the console, adjust the position of the clip as needed. To use a heart rate program, see page 12. See HOW TO TURN ON THE POWER above. 2 Select the manual mode. As you have completed 1/4 mile. The Time/Segment Time display will begin . Each time a button is not pulled from our Web site, see page 24). 4 Change the incline of the treadmill as desired...
.... To use an iFIT.com program directly from the console, adjust the position of the clip as needed. To use a heart rate program, see page 12. See HOW TO TURN ON THE POWER above. 2 Select the manual mode. As you have completed 1/4 mile. The Time/Segment Time display will begin . Each time a button is not pulled from our Web site, see page 24). 4 Change the incline of the treadmill as desired...
English Manual
Page 11
... distance in minutes per mile). When the desired unit of the walking belt and your hands are finished using the handgrip pulse sensor, make sure that your current pace (pace is shown. Before using the treadmill, move the on/off switch near the power cord to the off the demo mode. The incline must be at the same time, the console may not display your heart rate accurately. When a personal trainer program...
... distance in minutes per mile). When the desired unit of the walking belt and your hands are finished using the handgrip pulse sensor, make sure that your current pace (pace is shown. Before using the treadmill, move the on/off switch near the power cord to the off the demo mode. The incline must be at the same time, the console may not display your heart rate accurately. When a personal trainer program...

English Manual
Page 12
... incline setting are programmed for the program. The program will flash to a stop. If the speed or incline setting for the next several time segments of the treadmill will change , the Speed/Min-mile display and/or the Distance/ Incline/Laps display will continue in the current segment. See HOW TO TURN ON THE POWER on the console show how the speed and incline of different lengths. To select one of the Speed buttons...
... incline setting are programmed for the program. The program will flash to a stop. If the speed or incline setting for the next several time segments of the treadmill will change , the Speed/Min-mile display and/or the Distance/ Incline/Laps display will continue in the current segment. See HOW TO TURN ON THE POWER on the console show how the speed and incline of different lengths. To select one of the Speed buttons...

English Manual
Page 13
... treadmill will automatically adjust to the off the demo mode. To stop the program temporarily, press the Stop button. See step 5 on page 10. 3 Select a heart rate program. When the current segment of 190 is in a safe place. The walking belt will affect your estimated maximum heart rate. See the instructions included with the displays. When you are finished using the treadmill, move the on the console remain lit after the key is removed, the console...
... treadmill will automatically adjust to the off the demo mode. To stop the program temporarily, press the Stop button. See step 5 on page 10. 3 Select a heart rate program. When the current segment of 190 is in a safe place. The walking belt will affect your estimated maximum heart rate. See the instructions included with the displays. When you are finished using the treadmill, move the on the console remain lit after the key is removed, the console...
English Manual
Page 14
..., and the Distance/Incline/ Laps display and the Speed/Min-mile display will then slow to a stop the program at the beginning. 6 Follow your heart rate closer to the first speed and incline settings for the next several segments will be shown in the Calories/Fat Calories/Heart Rate display and the speed and incline of the treadmill will change, if needed, to the right will automatically increase; The walking belt will flash...
..., and the Distance/Incline/ Laps display and the Speed/Min-mile display will then slow to a stop the program at the beginning. 6 Follow your heart rate closer to the first speed and incline settings for the next several segments will be shown in the Calories/Fat Calories/Heart Rate display and the speed and incline of the treadmill will change, if needed, to the right will automatically increase; The walking belt will flash...
English Manual
Page 17
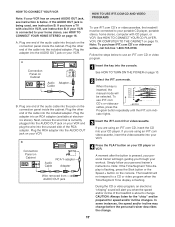
... adapter. Next, remove the wire that is flashing, press the Start button or the Speed + button on the connection panel inside the cabinet. IN VIDEO AUDIO IN CH 34 OUT RF OUT RCA Y-adapter Audio Cable Adapter Wire removed from AUDIO OUT jack HOW TO USE IFIT.COM CD AND VIDEO PROGRAMS To use iFIT.com CD's or videocassettes, the treadmill must be connected to your personal trainer's instructions. See HOW TO TURN ON THE POWER on your workout. When the key...
... adapter. Next, remove the wire that is flashing, press the Start button or the Speed + button on the connection panel inside the cabinet. IN VIDEO AUDIO IN CH 34 OUT RF OUT RCA Y-adapter Audio Cable Adapter Wire removed from AUDIO OUT jack HOW TO USE IFIT.COM CD AND VIDEO PROGRAMS To use iFIT.com CD's or videocassettes, the treadmill must be connected to your personal trainer's instructions. See HOW TO TURN ON THE POWER on your workout. When the key...

English Manual
Page 18
... video program. Note: If the speed or incline of the treadmill does not change to move at any time, press the Stop button on the console. 5 Follow your CD player or VCR. If the volume is too high or too low, the console may not detect the program signals. • Make sure that the audio cable is properly connected, that it is flashing, press the Start button or the Speed + button...
... video program. Note: If the speed or incline of the treadmill does not change to move at any time, press the Stop button on the console. 5 Follow your CD player or VCR. If the volume is too high or too low, the console may not detect the program signals. • Make sure that the audio cable is properly connected, that it is flashing, press the Start button or the Speed + button...

English Manual
Page 19
... iFIT.com mode. Note: To use a program from our Web site. 1 Insert the key into the console. Hold the handrails, step onto the walking belt, and begin to access basic programs, audio programs, and video programs directly from the internet. However, when the next "chirp" is heard, the speed and/or incline will alert you to move at 1.0 mph. Note: If the speed or incline of the treadmill does not change to use programs...
... iFIT.com mode. Note: To use a program from our Web site. 1 Insert the key into the console. Hold the handrails, step onto the walking belt, and begin to access basic programs, audio programs, and video programs directly from the internet. However, when the next "chirp" is heard, the speed and/or incline will alert you to move at 1.0 mph. Note: If the speed or incline of the treadmill does not change to use programs...
English Manual
Page 20
... demo mode, the power cord can be shown: The Distance/Incline/Laps display will show the total number of hours the treadmill has been used only when a treadmill is selected, the following information will show the total number of miles that the walking belt has moved. To select the information mode, hold down the Stop button while inserting the key into the console. When the information mode is displayed in a preset sequence, although the buttons on and turn...
... demo mode, the power cord can be shown: The Distance/Incline/Laps display will show the total number of hours the treadmill has been used only when a treadmill is selected, the following information will show the total number of miles that the walking belt has moved. To select the information mode, hold down the Stop button while inserting the key into the console. When the information mode is displayed in a preset sequence, although the buttons on and turn...
English Manual
Page 23
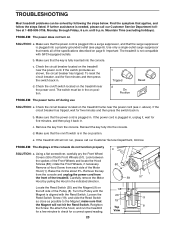
... steps listed. e. Look between the spokes of the console do not function properly a SOLUTION: a. Raise the incline about 3%. Remove the key from the console and unplug the power cord from the front of the Pulley (8). Carefully remove the Motor Hood by following the steps below. Turn the Pulley until 6 p.m. Loosen the 20 Reed Switch Screw (19), and slide the Reed Switch 9 as close as shown, the circuit breaker has tripped. Re-attach...
... steps listed. e. Look between the spokes of the console do not function properly a SOLUTION: a. Raise the incline about 3%. Remove the key from the console and unplug the power cord from the front of the Pulley (8). Carefully remove the Motor Hood by following the steps below. Turn the Pulley until 6 p.m. Loosen the 20 Reed Switch Screw (19), and slide the Reed Switch 9 as close as shown, the circuit breaker has tripped. Re-attach...
English Manual
Page 24
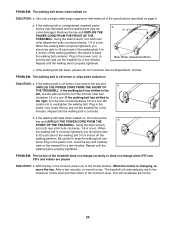
... POWER CORD FROM THE FRONT OF THE TREADMILL. Repeat until the walking belt is correctly tightened, you should be able to turn . If the walking belt slips when walked on the treadmill for a few minutes. PROBLEM: The walking belt is properly tightened, you should be able to lift each side of a turn the left rear roller bolt clockwise 1/2 of the treadmill does not change correctly or does not change when iFIT.com CD's and videos...
... POWER CORD FROM THE FRONT OF THE TREADMILL. Repeat until the walking belt is correctly tightened, you should be able to turn . If the walking belt slips when walked on the treadmill for a few minutes. PROBLEM: The walking belt is properly tightened, you should be able to lift each side of a turn the left rear roller bolt clockwise 1/2 of the treadmill does not change correctly or does not change when iFIT.com CD's and videos...
English Manual
Page 25
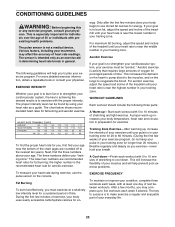
... incline of your heart rate is near the middle number in general. During the first few minutes does your body begin to use the pulse sensor on the lungs to plan your training zone. CONDITIONING GUIDELINES WARNING: Before beginning this or any exercise program, consult your physician. The sensor is near the lowest number in your exercise program. ergy. For maximum fat burning, adjust the speed and incline...
... incline of your heart rate is near the middle number in general. During the first few minutes does your body begin to use the pulse sensor on the lungs to plan your training zone. CONDITIONING GUIDELINES WARNING: Before beginning this or any exercise program, consult your physician. The sensor is near the lowest number in your exercise program. ergy. For maximum fat burning, adjust the speed and incline...

English Manual
Page 28
... you specific legal rights. products used as store display models. or products used for a particular purpose is authorized by or attributable to the terms set forth above limitation may also have other consequential damages of incidental or consequential damages. Accordingly, the above is limited in USA © 2002 ICON Health & Fitness, Inc. ORDERING REPLACEMENT PARTS To order replacement parts, call our Customer Service Department toll-free at ICON...
... you specific legal rights. products used as store display models. or products used for a particular purpose is authorized by or attributable to the terms set forth above limitation may also have other consequential damages of incidental or consequential damages. Accordingly, the above is limited in USA © 2002 ICON Health & Fitness, Inc. ORDERING REPLACEMENT PARTS To order replacement parts, call our Customer Service Department toll-free at ICON...
English Manual
Page 30
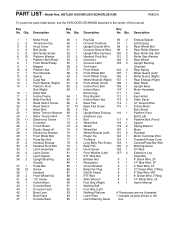
... 1 Motor Controller Wire 30 2 Pulse Bar Bolt 77 1 Tie Block 123 1 Treadmill Power Cord 31 4 Handrail Endcap 78 3 Long Belly Pan Screw 124 1 Console/Pulse Bar Wire 32 2 Handrail Pivot Bolt 79 1 Belly Pan 125 2 Warning Decal 33 1 Latch Assembly 80 2 Hood Screw 126 1 iFit Wire 34 2 Latch Screw 81 1 Pivot Washer (Left) 127* 2 Extension Leg 35 1 Latch Spacer 82 1 IFIT Wire Nut Assembly 36 2 Upright Bushing 83 1 Breaker Nut # 1 4" Black Wire, 2F (Inside) 84 1 Receptacle # 1 14" Blue Wire, 2F 37 1 Pulse Bar...
... 1 Motor Controller Wire 30 2 Pulse Bar Bolt 77 1 Tie Block 123 1 Treadmill Power Cord 31 4 Handrail Endcap 78 3 Long Belly Pan Screw 124 1 Console/Pulse Bar Wire 32 2 Handrail Pivot Bolt 79 1 Belly Pan 125 2 Warning Decal 33 1 Latch Assembly 80 2 Hood Screw 126 1 iFit Wire 34 2 Latch Screw 81 1 Pivot Washer (Left) 127* 2 Extension Leg 35 1 Latch Spacer 82 1 IFIT Wire Nut Assembly 36 2 Upright Bushing 83 1 Breaker Nut # 1 4" Black Wire, 2F (Inside) 84 1 Receptacle # 1 14" Blue Wire, 2F 37 1 Pulse Bar...


