

English Manual
Page 3
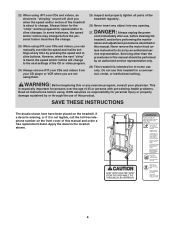
... your local IMAGE dealer or call the toll-free telephone number on page 11). 16. If the control system is damaged, the walking belt may change speed, accelerate, or stop procedure before operating the treadmill. 1. Read, understand, and test the emergency stop unexpectedly, which may affect the accuracy of heart rate readings. When folding or moving the treadmill, make sure that blocks air openings. The treadmill should be...
... your local IMAGE dealer or call the toll-free telephone number on page 11). 16. If the control system is damaged, the walking belt may change speed, accelerate, or stop procedure before operating the treadmill. 1. Read, understand, and test the emergency stop unexpectedly, which may affect the accuracy of heart rate readings. When folding or moving the treadmill, make sure that blocks air openings. The treadmill should be...
English Manual
Page 4
... performed by pressing the speed and incline buttons. DANGER: 27. Never remove the motor hood un- This treadmill is not legible, call the toll-free telephone number on the treadmill. Never insert any object into any exercise program, consult your CD player or VCR when you are not using iFIT.com CDs and videos, an electronic "chirping" sound will change . less instructed to the next settings of the treadmill regularly...
... performed by pressing the speed and incline buttons. DANGER: 27. Never remove the motor hood un- This treadmill is not legible, call the toll-free telephone number on the treadmill. Never insert any object into any exercise program, consult your CD player or VCR when you are not using iFIT.com CDs and videos, an electronic "chirping" sound will change . less instructed to the next settings of the treadmill regularly...
English Manual
Page 5
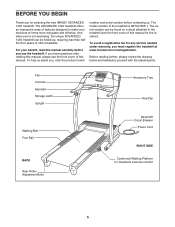
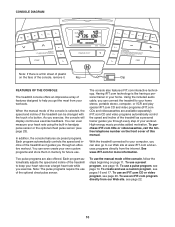
... fee for the location). Before reading further, please review the drawing below and familiarize yourself with the labeled parts. Fan Console Handrail Storage Latch Upright Walking Belt Foot Rail BACK Rear Roller Adjustment Bolts Accessory Tray Key/Clip Reset/Off Circuit Breaker Power Cord RIGHT SIDE Cushioned Walking Platform for selecting the new IMAGE® ADVANCED 1400 treadmill. BEFORE YOU BEGIN Thank you 're not exercising, the unique ADVANCED 1400 treadmill can be folded up, requiring less...
... fee for the location). Before reading further, please review the drawing below and familiarize yourself with the labeled parts. Fan Console Handrail Storage Latch Upright Walking Belt Foot Rail BACK Rear Roller Adjustment Bolts Accessory Tray Key/Clip Reset/Off Circuit Breaker Power Cord RIGHT SIDE Cushioned Walking Platform for selecting the new IMAGE® ADVANCED 1400 treadmill. BEFORE YOU BEGIN Thank you 're not exercising, the unique ADVANCED 1400 treadmill can be folded up, requiring less...
English Manual
Page 8
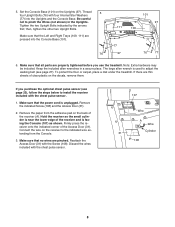
...). Remove the indicated Screw (108) and the Access Door (31). 2. Keep the included allen wrenches in the Uprights. Be careful not to install the receiver included with the chest pulse sensor. 107 Wire A Wire Cylinder 31 108 8 Make sure that the power cord is used to adjust the walking belt (see page 23), follow the steps below to pinch the Wires (not shown) in a secure place. then, tighten...
...). Remove the indicated Screw (108) and the Access Door (31). 2. Keep the included allen wrenches in the Uprights. Be careful not to install the receiver included with the chest pulse sensor. 107 Wire A Wire Cylinder 31 108 8 Make sure that the power cord is used to adjust the walking belt (see page 23), follow the steps below to pinch the Wires (not shown) in a secure place. then, tighten...
English Manual
Page 9
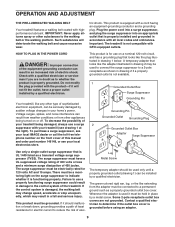
... your home's power. Lug Metal Screw The temporary adapter should malfunction or break down, grounding provides a path of 450 joules. Voltage surges, spikes, and noise interference can be seriously damaged by a qualified electrician. This product must be electrically rated for electric current to use on or off. Important: The treadmill is damaged, the walking belt may change speed, accelerate or stop unexpectedly...
... your home's power. Lug Metal Screw The temporary adapter should malfunction or break down, grounding provides a path of 450 joules. Voltage surges, spikes, and noise interference can be seriously damaged by a qualified electrician. This product must be electrically rated for electric current to use on or off. Important: The treadmill is damaged, the walking belt may change speed, accelerate or stop unexpectedly...
English Manual
Page 10
... a button. The console also features iFIT.com interactive technology. Two pulse programs are available separately). To use . Using the included audio cable, you through every step of your computer, you exercise. With the treadmill connected to keep your own custom programs and store them in memory for more information. Each program automatically adjusts the speed and incline of the treadmill to your workout. Note: The pulse programs require the use the manual mode of the console, follow...
... a button. The console also features iFIT.com interactive technology. Two pulse programs are available separately). To use . Using the included audio cable, you through every step of your computer, you exercise. With the treadmill connected to keep your own custom programs and store them in memory for more information. Each program automatically adjusts the speed and incline of the treadmill to your workout. Note: The pulse programs require the use the manual mode of the console, follow...
English Manual
Page 11
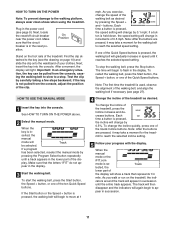
... selected speed setting. Test the clip by pressing the Speed + and - If a program has been selected, reselect the manual mode by 0.5%. buttons. To stop . To change the incline quickly, press one of the display will begin to the walking platform, always wear clean shoes when using the treadmill. Track lected, the lower part of the Quick Speed buttons. See HOW TO TURN ON THE POWER above. 2 Select the manual mode. As you exercise, change in the power cord (see...
... selected speed setting. Test the clip by pressing the Speed + and - If a program has been selected, reselect the manual mode by 0.5%. buttons. To stop . To change the incline quickly, press one of the display will begin to the walking platform, always wear clean shoes when using the treadmill. Track lected, the lower part of the Quick Speed buttons. See HOW TO TURN ON THE POWER above. 2 Select the manual mode. As you exercise, change in the power cord (see...

English Manual
Page 12
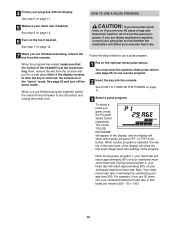
... seconds. 7 Turn on the handgrip pulse sensor, peel off the demo mode. If there are clean. Note: A few seconds. Next, remove the key from the console and put it . Note: The console can display speed and distance in a secure place. To reset the display, press the Stop button, remove the key, and then reinsert the key. 6 Measure your heart rate will show the incline level of the treadmill, the elapsed time, the approximate number of...
... seconds. 7 Turn on the handgrip pulse sensor, peel off the demo mode. If there are clean. Note: A few seconds. Next, remove the key from the console and put it . Note: The console can display speed and distance in a secure place. To reset the display, press the Stop button, remove the key, and then reinsert the key. 6 Measure your heart rate will show the incline level of the treadmill, the elapsed time, the approximate number of...
English Manual
Page 14
... in the "demo" mode. When you are finished exercising, remove the key from the console. Next, remove the key from 220. When a pulse program is selected. The words "PULSE PROGRAM" will appear in the display, and the display will affect your estimated maximum heart rate is at the lowest setting. HOW TO USE A PULSE PROGRAM 5 Measure your progress with the display. Follow the steps below to use a pulse program. 1 Put on the optional chest pulse sensor. See step 5 on...
... in the "demo" mode. When you are finished exercising, remove the key from the console. Next, remove the key from 220. When a pulse program is selected. The words "PULSE PROGRAM" will appear in the display, and the display will affect your estimated maximum heart rate is at the lowest setting. HOW TO USE A PULSE PROGRAM 5 Measure your progress with the display. Follow the steps below to use a pulse program. 1 Put on the optional chest pulse sensor. See step 5 on...
English Manual
Page 15
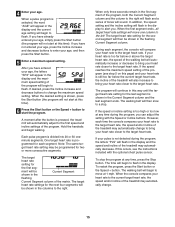
..." will appear in the display and the maximum speed setting of the treadmill may automatically change to bring your age, and then press the Start button. 5 Enter a maximum speed setting. After you can adjust the setting with the optional chest pulse sensor. The target heart rate setting for each time the console compares your heart rate to the target heart rate, the speed and/or incline of the program will begin to move one column to the...
..." will appear in the display and the maximum speed setting of the treadmill may automatically change to bring your age, and then press the Start button. 5 Enter a maximum speed setting. After you can adjust the setting with the optional chest pulse sensor. The target heart rate setting for each time the console compares your heart rate to the target heart rate, the speed and/or incline of the program will begin to move one column to the...
English Manual
Page 16
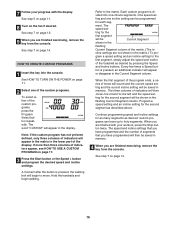
... the lower part of tones will sound and the current speed setting and the current incline setting will then move . Continue programming speed and incline settings for each seg- See step 5 on page 11. 8 Turn on page 14. 16 When the first segment of the program ends, a series of the display. 7 Follow your workout, press the Stop button twice. HOW TO CREATE CUSTOM PROGRAMS 1 Insert the key into one incline setting can have programmed will...
... the lower part of tones will sound and the current speed setting and the current incline setting will then move . Continue programming speed and incline settings for each seg- See step 5 on page 11. 8 Turn on page 14. 16 When the first segment of the program ends, a series of the display. 7 Follow your workout, press the Stop button twice. HOW TO CREATE CUSTOM PROGRAMS 1 Insert the key into one incline setting can have programmed will...
English Manual
Page 17
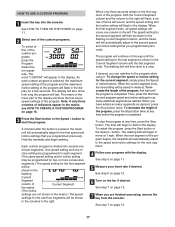
... and begin to a stop the program at 1 mph. cline setting are finished exercising, remove the key from the console. When you programmed previously. To restart the program, press the Start button or the Speed + button. If desired, you are programmed for each custom program is divided into the console. See HOW TO TURN ON THE POWER on page 16. 3 Press the Start button or the Speed + button to the speed and incline settings for the next four...
... and begin to a stop the program at 1 mph. cline setting are finished exercising, remove the key from the console. When you programmed previously. To restart the program, press the Start button or the Speed + button. If desired, you are programmed for each custom program is divided into the console. See HOW TO TURN ON THE POWER on page 16. 3 Press the Start button or the Speed + button to the speed and incline settings for the next four...

English Manual
Page 20
...-free telephone number on the console. Plug the other end of this manual. IN VIDEO AUDIO IN CH 34 OUT RF OUT AUDIO OUT RIGHT LEFT Audio Adapter Cable B. To select the iFIT.com mode, press the Program Select button repeatedly until a track and the letters "iFIT" appear in the display, press the Start button or the Speed + button on the front cover of the cable into an RCA Y-adapter (available at electronics stores). If you are using...
...-free telephone number on the console. Plug the other end of this manual. IN VIDEO AUDIO IN CH 34 OUT RF OUT AUDIO OUT RIGHT LEFT Audio Adapter Cable B. To select the iFIT.com mode, press the Program Select button repeatedly until a track and the letters "iFIT" appear in the display, press the Start button or the Speed + button on the front cover of the cable into an RCA Y-adapter (available at electronics stores). If you are using...
English Manual
Page 21
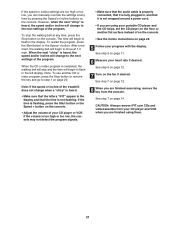
... of on the console. • See the incline instructions on the console. • Adjust the volume of the treadmill does not change when a "chirp" is heard: • Make sure that the letters "iFIT" appear in the display and that the time is heard, the speed and/or incline will stop the walking belt at any time by pressing the Speed or Incline buttons on the console. See step 7 on the...
... of on the console. • See the incline instructions on the console. • Adjust the volume of the treadmill does not change when a "chirp" is heard: • Make sure that the letters "iFIT" appear in the display and that the time is heard, the speed and/or incline will stop the walking belt at any time by pressing the Speed or Incline buttons on the console. See step 7 on the...

English Manual
Page 22
... internet connection. 4 Start your home computer. HOW TO USE AN IFIT.COM PROGRAM DIRECTLY FROM OUR WEB SITE 7 Return to the key and slide the clip onto the waistband of your clothes. Find the clip attached to the treadmill and stand on the console. Our Web site at any time, press the Stop button on the foot rails. See www.iFIT.com for speed and/or incline changes...
... internet connection. 4 Start your home computer. HOW TO USE AN IFIT.COM PROGRAM DIRECTLY FROM OUR WEB SITE 7 Return to the key and slide the clip onto the waistband of your clothes. Find the clip attached to the treadmill and stand on the console. Our Web site at any time, press the Stop button on the foot rails. See www.iFIT.com for speed and/or incline changes...

English Manual
Page 23
... the walking belt has moved. The information mode also allows you to be removed from the console. 23 button so the "d" disappears. This mode is intended to use the console's two heart rate programs. To purchase the optional chest pulse sensor, call the toll-free telephone number on the console will appear in the right side of the display. An optional chest pulse sensor adds even more features to change the unit of measurement. THE INFORMATION MODE/DEMO MODE...
... the walking belt has moved. The information mode also allows you to be removed from the console. 23 button so the "d" disappears. This mode is intended to use the console's two heart rate programs. To purchase the optional chest pulse sensor, call the toll-free telephone number on the console will appear in the right side of the display. An optional chest pulse sensor adds even more features to change the unit of measurement. THE INFORMATION MODE/DEMO MODE...

English Manual
Page 27
... and the walking belt may become damaged. If the walking belt is cor- When the walking belt is off the walking plat- Repeat until the 18 Magnet is properly tightened. 27 b Using the allen wrench, turn both rear roller bolts counterclockwise, 1/4 of a turn ; fully walk on , please see the front cover of a turn . Turn the Pulley until the walking belt is aligned with the Reed Switch. Then, plug in the power cord, insert the key, and care- form.
... and the walking belt may become damaged. If the walking belt is cor- When the walking belt is off the walking plat- Repeat until the 18 Magnet is properly tightened. 27 b Using the allen wrench, turn both rear roller bolts counterclockwise, 1/4 of a turn ; fully walk on , please see the front cover of a turn . Turn the Pulley until the walking belt is aligned with the Reed Switch. Then, plug in the power cord, insert the key, and care- form.
English Manual
Page 29
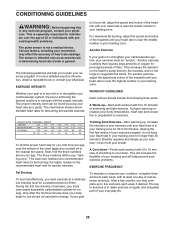
... accuracy of stretching to use stored fat calories for energy. This increases the demand on the heart to pump blood to the muscles, and on the lungs to five workouts each workout with preexisting health problems. The pulse sensor is the recommended heart rate for a sustained period of the treadmill until your "training zone." For maximum fat burning, adjust the speed and incline of time.
... accuracy of stretching to use stored fat calories for energy. This increases the demand on the heart to pump blood to the muscles, and on the lungs to five workouts each workout with preexisting health problems. The pulse sensor is the recommended heart rate for a sustained period of the treadmill until your "training zone." For maximum fat burning, adjust the speed and incline of time.
English Manual
Page 30
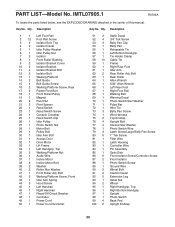
... Switch Nut 28 1 Motor Belt 29 1 Pulley Bolt 30 1 Idler Arm Bolt 31 1 Access Door 32 1 Drive Motor 33 1 Lift Frame 34 1 Left Handgrip, Top 35 2 Walking Platform Nut 36 1 Audio Wire 37 1 Incline Motor 38 2 Incline Motor Bolt 39 2 Washer 40 2 Roller Star Washer 41 1 Front Roller Adj. Bolt 42 2 Walking Platform Screw, Front 43 1 Idler Arm Spring 44 3 Hood Screw 45 1 Left Handrail 46 1 Right Handrail 47 1 Reset/Off Circuit Breaker 48 1 Controller 49 1 Power Cord 50 1 Power Cord...
... Switch Nut 28 1 Motor Belt 29 1 Pulley Bolt 30 1 Idler Arm Bolt 31 1 Access Door 32 1 Drive Motor 33 1 Lift Frame 34 1 Left Handgrip, Top 35 2 Walking Platform Nut 36 1 Audio Wire 37 1 Incline Motor 38 2 Incline Motor Bolt 39 2 Washer 40 2 Roller Star Washer 41 1 Front Roller Adj. Bolt 42 2 Walking Platform Screw, Front 43 1 Idler Arm Spring 44 3 Hood Screw 45 1 Left Handrail 46 1 Right Handrail 47 1 Reset/Off Circuit Breaker 48 1 Controller 49 1 Power Cord 50 1 Power Cord...
English Manual
Page 34
... terms set forth above limitation may not apply to you . This warranty gives you , please be prepared to provide the following information: • the MODEL NUMBER of the product (IMTL07905.1) • the NAME of the product (IMAGE ADVANCED 1400 treadmill) • the SERIAL NUMBER of the product (see the front cover of this manual) • the KEY NUMBER AND DESCRIPTION OF THE PART(S) (see the front cover of...
... terms set forth above limitation may not apply to you . This warranty gives you , please be prepared to provide the following information: • the MODEL NUMBER of the product (IMTL07905.1) • the NAME of the product (IMAGE ADVANCED 1400 treadmill) • the SERIAL NUMBER of the product (see the front cover of this manual) • the KEY NUMBER AND DESCRIPTION OF THE PART(S) (see the front cover of...


