
English Manual
Page 1
...: 1-800-999-3756 Mon.-Fri., 6 a.m.-6 p.m. MST AWARNING! Serial Number Decal 11 1 QUESTIONS? Read all safety precautions and instructions in this manual carefully before using this manual for future reference. OWNER'S MANUAL As a manufacturer, we are missing or damaged parts, we will provide immediate assistance, free of charge to providing you complete satisfaction through direct assistance from our factory. Save this equipment...
...: 1-800-999-3756 Mon.-Fri., 6 a.m.-6 p.m. MST AWARNING! Serial Number Decal 11 1 QUESTIONS? Read all safety precautions and instructions in this manual carefully before using this manual for future reference. OWNER'S MANUAL As a manufacturer, we are missing or damaged parts, we will provide immediate assistance, free of charge to providing you complete satisfaction through direct assistance from our factory. Save this equipment...
English Manual
Page 2
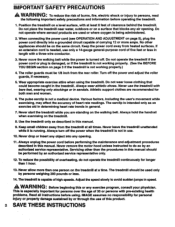
... the treadmill is not working properly.) 4. If an extension cord is especially important for both men and women. 6. Never remove the motor hood unless instructed to avoid sudden jumps in this manual should be on page 5), plug the power cord directly into any air opening . 11. Keep the power cord away from the rear roller. Never move the walking belt while the power is being administered. 2. Always hold the handrail when exercising...
... the treadmill is not working properly.) 4. If an extension cord is especially important for both men and women. 6. Never remove the motor hood unless instructed to avoid sudden jumps in this manual should be on page 5), plug the power cord directly into any air opening . 11. Keep the power cord away from the rear roller. Never move the walking belt while the power is being administered. 2. Always hold the handrail when exercising...
English Manual
Page 3
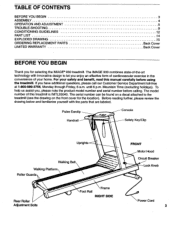
...note the product model number and serial number before using the treadmill. Power Cord 3 until 6 p.m. Safety Key/Clip Uprights Walking Belt Walking Platform Roller Guards Rear Roller Adjustment Bolts Foot Rail Frame RIGHT SIDE FRONT Motor Hood Circuit Breaker Lock Knob ef. Mountain Time (excluding holidays). Pulse Earclip Handrail Console :Amp. TABLE OF CONTENTS BEFORE YOU BEGIN ASSEMBLY OPERATION AND ADJUSTMENT TROUBLE-SHOOTING CONDITIONING GUIDELINES PART LIST EXPLODED DRAWING ORDERING REPLACEMENT PARTS LIMITED WARRANTY 3 4 5 9 12 14 15 Back Cover Back Cover BEFORE YOU...
...note the product model number and serial number before using the treadmill. Power Cord 3 until 6 p.m. Safety Key/Clip Uprights Walking Belt Walking Platform Roller Guards Rear Roller Adjustment Bolts Foot Rail Frame RIGHT SIDE FRONT Motor Hood Circuit Breaker Lock Knob ef. Mountain Time (excluding holidays). Pulse Earclip Handrail Console :Amp. TABLE OF CONTENTS BEFORE YOU BEGIN ASSEMBLY OPERATION AND ADJUSTMENT TROUBLE-SHOOTING CONDITIONING GUIDELINES PART LIST EXPLODED DRAWING ORDERING REPLACEMENT PARTS LIMITED WARRANTY 3 4 5 9 12 14 15 Back Cover Back Cover BEFORE YOU...
English Manual
Page 4
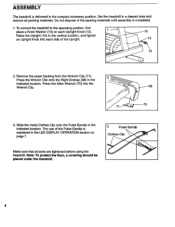
... location. Press the Allen Wrench (70) into each Upright Knob (12). 1 Raise the Upright (10) to the vertical position, and tighten an Upright Knob into the Wrench Clip. 71 )ge 68 70 3. The use of the Pulse Earclip is explained in the LED DISPLAY OPERATION section on each side of the packing materials until assembly is delivered in a cleared area and remove all parts...
... location. Press the Allen Wrench (70) into each Upright Knob (12). 1 Raise the Upright (10) to the vertical position, and tighten an Upright Knob into the Wrench Clip. 71 )ge 68 70 3. The use of the Pulse Earclip is explained in the LED DISPLAY OPERATION section on each side of the packing materials until assembly is delivered in a cleared area and remove all parts...
English Manual
Page 5
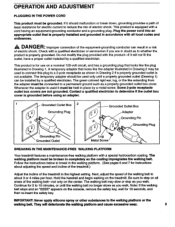
... the safety key. Note: If the walking belt stops and an "EEEE" appears on the treadmill. This product is used it must be connected to determine if the outlet box cover is grounded before using an adapter. 1 Grounded Outlet Box 2 0,0 • 0 Grounding Plug Grounded Outlet Box Adapter • 0 Grounding Pin Grounding Plug Grounding Pin Grounded Outlet Lug Metal Screw BREAKING IN THE MAINTENANCE-FREE WALKING PLATFORM Your treadmill features a maintenance-free walking platform...
... the safety key. Note: If the walking belt stops and an "EEEE" appears on the treadmill. This product is used it must be connected to determine if the outlet box cover is grounded before using an adapter. 1 Grounded Outlet Box 2 0,0 • 0 Grounding Plug Grounded Outlet Box Adapter • 0 Grounding Pin Grounding Plug Grounding Pin Grounded Outlet Lug Metal Screw BREAKING IN THE MAINTENANCE-FREE WALKING PLATFORM Your treadmill features a maintenance-free walking platform...
English Manual
Page 6
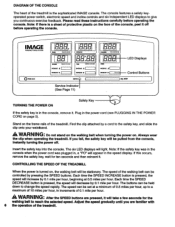
... the console. The buttons can be stationary. DIAGRAM OF THE CONSOLE The heart of protective plastic on , the walking belt will be controlled by 0.1 mile per hour, in the speed display. The console features a safety keyoperated power switch, electronic speed and incline controls and six independent LED displays to a maximum of the treadmill. A WARNING: After the SPEED buttons are familiar with 6 the operation of 0.1 mile per hour. Find the clip attached by 0.1 mile per...
... the console. The buttons can be stationary. DIAGRAM OF THE CONSOLE The heart of protective plastic on , the walking belt will be controlled by 0.1 mile per hour, in the speed display. The console features a safety keyoperated power switch, electronic speed and incline controls and six independent LED displays to a maximum of the treadmill. A WARNING: After the SPEED buttons are familiar with 6 the operation of 0.1 mile per hour. Find the clip attached by 0.1 mile per...
English Manual
Page 7
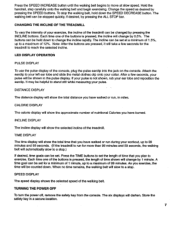
... slow to a maximum of 12%. TURNING THE POWER OFF To turn the power off, remove the safety key from the console. The buttons can be held down to a stop the walking belt, hold down . Store the safety key in miles. CHANGING THE INCLINE OF THE TREADMILL To vary the intensity of your collar. CALORIE DISPLAY The calorie display will show the total distance you have burned. If your ear...
... slow to a maximum of 12%. TURNING THE POWER OFF To turn the power off, remove the safety key from the console. The buttons can be held down to a stop the walking belt, hold down . Store the safety key in miles. CHANGING THE INCLINE OF THE TREADMILL To vary the intensity of your collar. CALORIE DISPLAY The calorie display will show the total distance you have burned. If your ear...

English Manual
Page 8
...,999 miles. While the trip time and distance are displayed, they can be reset to let you keep track of trip time and distance, as well as the total time and distance that the treadmill does not require routine maintenance. To view the total time and distance, press the TIME INCREASE button. To exit the information mode, remove the safety key from the console. 8 a. The distance and pulse displays together...
...,999 miles. While the trip time and distance are displayed, they can be reset to let you keep track of trip time and distance, as well as the total time and distance that the treadmill does not require routine maintenance. To view the total time and distance, press the TIME INCREASE button. To exit the information mode, remove the safety key from the console. 8 a. The distance and pulse displays together...
English Manual
Page 9
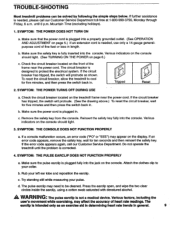
... Key is needed , please call our Customer Service Department. Rub your pulse. until the problem is plugged fully into the jack on the front of heart rate readings. If the circuit breaker has tripped, the switch will protrude. (See the drawing above.) To reset the circuit breaker, wait for ten seconds and then reinsert the safety key. c. If a console malfunction occurs, an error code...
... Key is needed , please call our Customer Service Department. Rub your pulse. until the problem is plugged fully into the jack on the front of heart rate readings. If the circuit breaker has tripped, the switch will protrude. (See the drawing above.) To reset the circuit breaker, wait for ten seconds and then reinsert the safety key. c. If a console malfunction occurs, an error code...

English Manual
Page 10
... the walking belt. Using the allen wrench, turn the left rear roller adjustment bolt clockwise, and the right bolt counterclockwise, 1/4 of a turn . c. Be careful to break in the walking platform. Remove the safety key and UNPLUG THE POWER CORD. Plug in the power cord, insert the safety key and run the treadmill for a few minutes. b. Plug in the power cord, insert the safety key and run the treadmill for a few minutes. If the walking belt slips when walked on...
... the walking belt. Using the allen wrench, turn the left rear roller adjustment bolt clockwise, and the right bolt counterclockwise, 1/4 of a turn . c. Be careful to break in the walking platform. Remove the safety key and UNPLUG THE POWER CORD. Plug in the power cord, insert the safety key and run the treadmill for a few minutes. b. Plug in the power cord, insert the safety key and run the treadmill for a few minutes. If the walking belt slips when walked on...
English Manual
Page 11
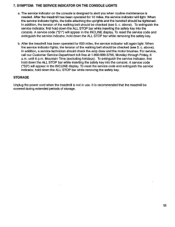
... lights, the bolts attaching the uprights and the handrail should be covered during extended periods of the walking belt should check the amp draw and the motor brushes. To extinguish the service indicator, first hold down the ALL STOP bar while inserting the safety key into the console. until 6 p.m.;Mountain Time (excluding holidays). STORAGE Unplug the power cord when the treadmill is needed. When the service indicator lights...
... lights, the bolts attaching the uprights and the handrail should be covered during extended periods of the walking belt should check the amp draw and the motor brushes. To extinguish the service indicator, first hold down the ALL STOP bar while inserting the safety key into the console. until 6 p.m.;Mountain Time (excluding holidays). STORAGE Unplug the power cord when the treadmill is needed. When the service indicator lights...
English Manual
Page 12
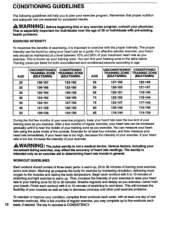
... and adequate rest are listed for exercise by using the pulse mode of the console. Finish each 12 week, if desired. Exercise for successful results. Begin each workout with 5 to 10 minutes of stretching to cool down . AWARNING: Before beginning this or any exercise program, consult your training zone. For effective aerobic exercise, your heart rate should consist of three basic parts: a warm-up . AGE...
... and adequate rest are listed for exercise by using the pulse mode of the console. Finish each 12 week, if desired. Exercise for successful results. Begin each workout with 5 to 10 minutes of stretching to cool down . AWARNING: Before beginning this or any exercise program, consult your training zone. For effective aerobic exercise, your heart rate should consist of three basic parts: a warm-up . AGE...

English Manual
Page 13
... far as possible. Stretches: Hamstrings, lower back and groin. HAMSTRING STRETCH Sit with your other , reach forward and place your hands against the inner thigh of knees and back. Move slowly as you reach down . Correct form for balance, reach back and grasp one foot with one leg in the drawings below. Bring your...
... far as possible. Stretches: Hamstrings, lower back and groin. HAMSTRING STRETCH Sit with your other , reach forward and place your hands against the inner thigh of knees and back. Move slowly as you reach down . Correct form for balance, reach back and grasp one foot with one leg in the drawings below. Bring your...

English Manual
Page 14
... Incline Motor Spacer 8" Cable Tie Plastic Standoff Short Incline Motor Spacer Right Foot Rail Bracket Frame Platform Bolt Speed Encoder Safety Cover Swivel Bolt Swivel Nut Front Roller/Pulley Walking Belt Walking Platform Rear Leg Endcap Right Endcap Rear Roller Adjustment Bolt Allen Wrench Wrench Clip Roller Guard Left Endcap Left Foot Rail Front Wheel Rear Roller Fan Pushnut Silver Screw 4" Cable Tie Power Board Screw Power Board Nut 20" Photo Switch Wire 20" Black Jumper Wire, 2 Female 8" Ground Wire 8" Cable Loom 12" Cable...
... Incline Motor Spacer 8" Cable Tie Plastic Standoff Short Incline Motor Spacer Right Foot Rail Bracket Frame Platform Bolt Speed Encoder Safety Cover Swivel Bolt Swivel Nut Front Roller/Pulley Walking Belt Walking Platform Rear Leg Endcap Right Endcap Rear Roller Adjustment Bolt Allen Wrench Wrench Clip Roller Guard Left Endcap Left Foot Rail Front Wheel Rear Roller Fan Pushnut Silver Screw 4" Cable Tie Power Board Screw Power Board Nut 20" Photo Switch Wire 20" Black Jumper Wire, 2 Female 8" Ground Wire 8" Cable Loom 12" Cable...
English Manual
Page 16
... MODEL NUMBER of the product (IMAGE® 930 treadmill). 3. The SERIAL NUMBER of the product (see the front cover of this manual. This warranty extends only to give the following information: 1. This warranty does not extend to any product or damage to a product caused by or attributable to freight damage, abuse, misuse, improper or abnormal usage or repairs not provided by an IMAGE authorized service...
... MODEL NUMBER of the product (IMAGE® 930 treadmill). 3. The SERIAL NUMBER of the product (see the front cover of this manual. This warranty extends only to give the following information: 1. This warranty does not extend to any product or damage to a product caused by or attributable to freight damage, abuse, misuse, improper or abnormal usage or repairs not provided by an IMAGE authorized service...


