

Owners Manual
Page 1
... damagedparts, we are committed to you complete satisfaction through direct assistance from our factory. - tion. tance, free of charge to providing you complete customer satisfac- CAUTION: Read all safety precautions andInstructionsIn this manual carefully before using this manual for future reference. I vf MK VIII MG 910 PERSONAL FITNESS SYSTEM Model No. As a manufacturer, we will provide immediate assis...
... damagedparts, we are committed to you complete satisfaction through direct assistance from our factory. - tion. tance, free of charge to providing you complete customer satisfac- CAUTION: Read all safety precautions andInstructionsIn this manual carefully before using this manual for future reference. I vf MK VIII MG 910 PERSONAL FITNESS SYSTEM Model No. As a manufacturer, we will provide immediate assis...

Owners Manual
Page 2
... received by IMAGE at one of its authorized service centers. No other warranty beyond that specifically set forth above is limited to replacing or repairing, at IMAGE's option, the product at one of its authorized service centers with all freight and other rights which warranty claim is made must be pre-authorized by an IMAGE authorized service center or for products used for commercial...
... received by IMAGE at one of its authorized service centers. No other warranty beyond that specifically set forth above is limited to replacing or repairing, at IMAGE's option, the product at one of its authorized service centers with all freight and other rights which warranty claim is made must be pre-authorized by an IMAGE authorized service center or for products used for commercial...

Owners Manual
Page 3
)1 IVIHANL E '910 PERSONAL FITNESS SYSTEM TABLE OF CONTENTS Limited Warranty Important Safety Precautions Before You Begin Assembly Operation and Adjustment Maintenance and Trouble-Shooting Conditioning Guidelines Part List Exploded Drawing Ordering Replacement Parts 2 4 5 6 7 10 12 14 15 Back Cover WARNING: Before beginning this product. 3 Image assumes no responsibility for individuals over the age of this or any exercise program, consult your physician. This is especially Important for...
)1 IVIHANL E '910 PERSONAL FITNESS SYSTEM TABLE OF CONTENTS Limited Warranty Important Safety Precautions Before You Begin Assembly Operation and Adjustment Maintenance and Trouble-Shooting Conditioning Guidelines Part List Exploded Drawing Ordering Replacement Parts 2 4 5 6 7 10 12 14 15 Back Cover WARNING: Before beginning this product. 3 Image assumes no responsibility for individuals over the age of this or any exercise program, consult your physician. This is especially Important for...
Owners Manual
Page 4
... precautions and information before performing the maintenance and adjustment procedures described in this manual. Plug the power cord directly into any object into a grounded circuit carrying 12 or more than the procedures described in this manual should be performed by an authorized service representative. Always hold the handrail when exercising on thick carpet, near water or outdoors. Never use . 8. Never start the treadmill while...
... precautions and information before performing the maintenance and adjustment procedures described in this manual. Plug the power cord directly into any object into a grounded circuit carrying 12 or more than the procedures described in this manual should be performed by an authorized service representative. Always hold the handrail when exercising on thick carpet, near water or outdoors. Never use . 8. Never start the treadmill while...
Owners Manual
Page 5
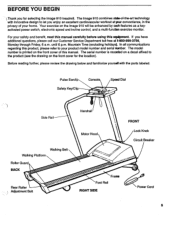
..., 6 a.m. Before reading further, please review the drawing below and familiarize yourself with innovative design to let you have additional questions, please call our Customer Service Department toll-free at your home. Mountain Time (excluding holidays). Pulse Earclip Safety Key/Clip Console Speed Dial Side Rail Walking Belt Walking Platform Roller Guard BACK Rear Roller Adjustment Bolt Handrail Motor Hood FRONT Lock Knob Circuit Breaker Frame Foot Rail RIGHT SIDE Power Cord 5
..., 6 a.m. Before reading further, please review the drawing below and familiarize yourself with innovative design to let you have additional questions, please call our Customer Service Department toll-free at your home. Mountain Time (excluding holidays). Pulse Earclip Safety Key/Clip Console Speed Dial Side Rail Walking Belt Walking Platform Roller Guard BACK Rear Roller Adjustment Bolt Handrail Motor Hood FRONT Lock Knob Circuit Breaker Frame Foot Rail RIGHT SIDE Power Cord 5
Owners Manual
Page 6
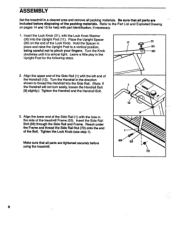
... the Handrail (12). ASSEMBLY Set the treadmill in a cleared area and remove all parts are tightened securely before disposing of the Side Rail (1) with the Lock Knob Washer (30) into the Side Rail. (Note: If the Handrail will not turn easily, loosen the Handrail Bolt [9] slightly.) Tighten the Handrail and the Handrail Bolt. 3. Leave a little play in the Upright Post for help...
... the Handrail (12). ASSEMBLY Set the treadmill in a cleared area and remove all parts are tightened securely before disposing of the Side Rail (1) with the Lock Knob Washer (30) into the Side Rail. (Note: If the Handrail will not turn easily, loosen the Handrail Bolt [9] slightly.) Tighten the Handrail and the Handrail Bolt. 3. Leave a little play in the Upright Post for help...
Owners Manual
Page 7
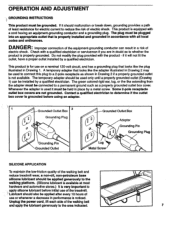
... a proper outlet installed by a metal screw. Contact a qualified electrician to determine if the outlet box cover is grounded before using an adapter. 1 Grounded Outlet Box 2 0 0 Grounding Plug 0•° Grounding Pin Grounded Outlet Grounded Outlet Box 0° Adapter Grounding Pin /0 0 Grounding Plug 0° • • Lug Metal Screw SILICONE APPLICATION To maintain the low-friction quality of the walking belt and reduce treadmill wear...
... a proper outlet installed by a metal screw. Contact a qualified electrician to determine if the outlet box cover is grounded before using an adapter. 1 Grounded Outlet Box 2 0 0 Grounding Plug 0•° Grounding Pin Grounded Outlet Grounded Outlet Box 0° Adapter Grounding Pin /0 0 Grounding Plug 0° • • Lug Metal Screw SILICONE APPLICATION To maintain the low-friction quality of the walking belt and reduce treadmill wear...

Owners Manual
Page 8
.../SET OM SPEED - The mode indicators will flash when the console is used to enter your weight into the slot in the front of your clothing. Step carefully onto the walking belt and begin These buttons are used to the reset position. TURNING ON THE POWER Stand on the safety key to set time and distance goals. Attach the clip on the foot rails of the treadmill. If you . INCLINE ADJUSTMENT...
.../SET OM SPEED - The mode indicators will flash when the console is used to enter your weight into the slot in the front of your clothing. Step carefully onto the walking belt and begin These buttons are used to the reset position. TURNING ON THE POWER Stand on the safety key to set time and distance goals. Attach the clip on the foot rails of the treadmill. If you . INCLINE ADJUSTMENT...

Owners Manual
Page 9
... heart rate is worn (see PULSE below : SCAN: This mode automatically displays all be displayed in pounds. When no time remains, the console and the walking belt will stapthe console. To set a distance goal, first select the DISTANCE mode. (A goal cannotbe set while the SCAN mode is pressed, the time displayed will change by 0.1 mile. CALORIES: This mode displays the number of the buttons is stopped, the speed dial must be turned to the reset position before the walking belt...
... heart rate is worn (see PULSE below : SCAN: This mode automatically displays all be displayed in pounds. When no time remains, the console and the walking belt will stapthe console. To set a distance goal, first select the DISTANCE mode. (A goal cannotbe set while the SCAN mode is pressed, the time displayed will change by 0.1 mile. CALORIES: This mode displays the number of the buttons is stopped, the speed dial must be turned to the reset position before the walking belt...
Owners Manual
Page 10
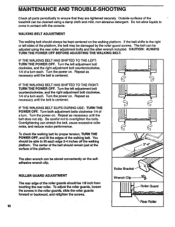
... motor performance. Repeat as necessary until the belt is centered. . 0 IF THE WALKING BELT HAS SHIFTED TO THE RIGHT: TURN THE POWER OFF. CAUTION: ALWAYS TURN THE POWER OFF BEFORE ADJUSTING THE WALKING BELT. IF THE WALKING BELT SLIPS DURING USE: TURN THE POWER OFF. To adjust the roller guards, loosen the screws in contact with the console. Be careful not to ensure that they are tightened securely. MAINTENANCE AND TROUBLE-SHOOTING Check all parts...
... motor performance. Repeat as necessary until the belt is centered. . 0 IF THE WALKING BELT HAS SHIFTED TO THE RIGHT: TURN THE POWER OFF. CAUTION: ALWAYS TURN THE POWER OFF BEFORE ADJUSTING THE WALKING BELT. IF THE WALKING BELT SLIPS DURING USE: TURN THE POWER OFF. To adjust the roller guards, loosen the screws in contact with the console. Be careful not to ensure that they are tightened securely. MAINTENANCE AND TROUBLE-SHOOTING Check all parts...
Owners Manual
Page 11
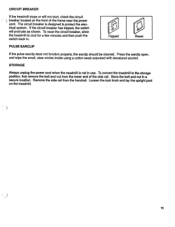
... to the storage position, first remove the bolt and nut from the handrail. Remove the side rail from the lower end of the frame near the power cord. The circuit breaker is not in use. If the circuit breaker has tripped, the switch will not start, check the circuit breaker located on the treadmill. 11 Loosen the lock knob and lay the upright post...
... to the storage position, first remove the bolt and nut from the handrail. Remove the side rail from the lower end of the frame near the power cord. The circuit breaker is not in use. If the circuit breaker has tripped, the switch will not start, check the circuit breaker located on the treadmill. 11 Loosen the lock knob and lay the upright post...
Owners Manual
Page 12
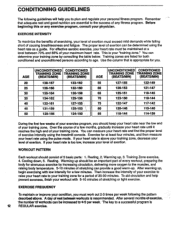
... good nutrition are listed for a period of your level of exertion must work out 2-3 times per week. You can be an important part of every workout, preparing the body for a few weeks of your condition, you . Training Zone exercise, 4. After warming up , 3. A day of exercise intensity using the pulse mode. Over the course of a few months, gradually increase your heart rate until it...
... good nutrition are listed for a period of your level of exertion must work out 2-3 times per week. You can be an important part of every workout, preparing the body for a few weeks of your condition, you . Training Zone exercise, 4. After warming up , 3. A day of exercise intensity using the pulse mode. Over the course of a few months, gradually increase your heart rate until it...

Owners Manual
Page 13
Bring the sole of the opposite foot toward your toe as far as you can and hold for 15 counts, then relax. Stretches: Hamstrings, lower back and groin. Hold for 15 counts, then relax. Allow your back and shoulders to your toes. Go as far as possible, hold for ...flat on the other , and arms forward, lean against the extended leg's inner thigh. INNER THIGH STRETCH Sit with the soles of the achilles tendons, bend back leg as possible. Repeat three times. Repeat three times. Bring your knees bent slightly, slowly bend forward from the hips. Move slowly as you stretch-never ...
Bring the sole of the opposite foot toward your toe as far as you can and hold for 15 counts, then relax. Stretches: Hamstrings, lower back and groin. Hold for 15 counts, then relax. Allow your back and shoulders to your toes. Go as far as possible, hold for ...flat on the other , and arms forward, lean against the extended leg's inner thigh. INNER THIGH STRETCH Sit with the soles of the achilles tendons, bend back leg as possible. Repeat three times. Repeat three times. Bring your knees bent slightly, slowly bend forward from the hips. Move slowly as you stretch-never ...
Owners Manual
Page 14
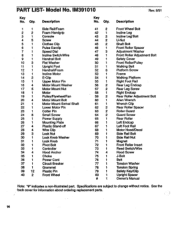
... Wheel Bolt Incline Leg Incline Leg'Bolt U-Nut Shaft Bolt Front Roller Spacer Adjustment Washer Front Roller Adjustment Bolt Safety Cover Front Roller/Pulley Walking Belt Platform Screw Frame Walking Platform Right Foot Rail Rear Leg Endcap Rear Leg Screw Right Endcap Rear Roller Adjustment Bolt Allen Wrench Wrench Clip Rear Roller Spacer Roller Guard Guard Screw Rear Roller Left Endcap Left Foot Rail Motor Hood/Decal Side Rail Bolt Side Rail Nut Magnet Front Roller Insert Reed Switch/Wire Hood Screw J-Bolt Belt Tension Washer Tension Spring Safety Key/Clip Upright Spacer Owner's Manual Note...
... Wheel Bolt Incline Leg Incline Leg'Bolt U-Nut Shaft Bolt Front Roller Spacer Adjustment Washer Front Roller Adjustment Bolt Safety Cover Front Roller/Pulley Walking Belt Platform Screw Frame Walking Platform Right Foot Rail Rear Leg Endcap Rear Leg Screw Right Endcap Rear Roller Adjustment Bolt Allen Wrench Wrench Clip Rear Roller Spacer Roller Guard Guard Screw Rear Roller Left Endcap Left Foot Rail Motor Hood/Decal Side Rail Bolt Side Rail Nut Magnet Front Roller Insert Reed Switch/Wire Hood Screw J-Bolt Belt Tension Washer Tension Spring Safety Key/Clip Upright Spacer Owner's Manual Note...

Owners Manual
Page 15
... 15 I i80 27 ! 11) !(' 28 24 • 34 24 38 35 • e 48 • 50 51 4 9 / 52-I . 74 4 ; ! -' .)176. 72 Al. IM391011R Rev. 8/91 ' Specifications are subject to change without notice. 2 • 19 . . ...-......, 18 17 16 3 1\ C $- 4 5 7 6 s- 8 re, 15 14 17 16 • • 20 • 21 22- -rk. 23 79 12 11...
... 15 I i80 27 ! 11) !(' 28 24 • 34 24 38 35 • e 48 • 50 51 4 9 / 52-I . 74 4 ; ! -' .)176. 72 Al. IM391011R Rev. 8/91 ' Specifications are subject to change without notice. 2 • 19 . . ...-......, 18 17 16 3 1\ C $- 4 5 7 6 s- 8 re, 15 14 17 16 • • 20 • 21 22- -rk. 23 79 12 11...
Owners Manual
Page 16
... MODEL NUMBER of the product (Image 910 treadmill). 3. The DESCRIPTION of the part(s) from page 14 of this manual. 5. The NAME of the product (IM391010). 2. Pin No. 105701 8/91 © 1991 Image, Inc. The SERIAL NUMBER of the product (see the front cover of this manual). 4. ORDERING REPLACEMENT PARTS Replacement parts can be prepared to give the following information: 1. Friday, 6 a.m. - 6 p.m. The KEY NUMBER of the part(s) from page 14 of this manual...
... MODEL NUMBER of the product (Image 910 treadmill). 3. The DESCRIPTION of the part(s) from page 14 of this manual. 5. The NAME of the product (IM391010). 2. Pin No. 105701 8/91 © 1991 Image, Inc. The SERIAL NUMBER of the product (see the front cover of this manual). 4. ORDERING REPLACEMENT PARTS Replacement parts can be prepared to give the following information: 1. Friday, 6 a.m. - 6 p.m. The KEY NUMBER of the part(s) from page 14 of this manual...


