
English Manual
Page 1
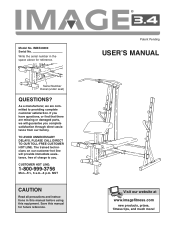
... and instructions in the space above for future reference. ¨ Patent Pending USERÕS MANUAL Visit our website at www.imagefitness.com new products, prizes, fitness tips, and much more! Save this equipment. Write the serial number in this manual before using this manual for reference. TO AVOID UNNECESSARY DELAYS, PLEASE CALL DIRECT TO OUR TOLL-FREE CUSTOMER HOT LINE. Model No. IMBE40890 Serial...
... and instructions in the space above for future reference. ¨ Patent Pending USERÕS MANUAL Visit our website at www.imagefitness.com new products, prizes, fitness tips, and much more! Save this equipment. Write the serial number in this manual before using this manual for reference. TO AVOID UNNECESSARY DELAYS, PLEASE CALL DIRECT TO OUR TOLL-FREE CUSTOMER HOT LINE. Model No. IMBE40890 Serial...

English Manual
Page 2
... Contents Warning Decal Placement 2 Important Precautions 3 Before You Begin 4 Part Identification Chart 5 Assembly 6 Adjusting the Weight Bench 13 Ordering Replacement Parts Back Cover Limited Warranty Back Cover Note: A Part List/Exploded Drawing is missing, or ! Remove the Part List/Exploded Drawing before beginning assembly. Mountain Time, to order a replacement decal. until 6 p.m. Table of this manual. If the decal is attached in the location shown. 2 Warning Decal Placement The decal shown at 1-800...
... Contents Warning Decal Placement 2 Important Precautions 3 Before You Begin 4 Part Identification Chart 5 Assembly 6 Adjusting the Weight Bench 13 Ordering Replacement Parts Back Cover Limited Warranty Back Cover Note: A Part List/Exploded Drawing is missing, or ! Remove the Part List/Exploded Drawing before beginning assembly. Mountain Time, to order a replacement decal. until 6 p.m. Table of this manual. If the decal is attached in the location shown. 2 Warning Decal Placement The decal shown at 1-800...

English Manual
Page 3
.... 3. See assembly step 12 on the leg lever for cable tightening instructions. 14. Do not place more than 150 pounds on page 10 for normal use the lat bar. 17. When you use of serious injury, read the following important precautions before using . ICON assumes no responsibility for protection. 5. Always disconnect the lat bar from moving parts. 8. Inspect and tighten all times. Always exercise with the included weight clips...
.... 3. See assembly step 12 on the leg lever for cable tightening instructions. 14. Do not place more than 150 pounds on page 10 for normal use the lat bar. 17. When you use of serious injury, read the following important precautions before using . ICON assumes no responsibility for protection. 5. Always disconnect the lat bar from moving parts. 8. Inspect and tighten all times. Always exercise with the included weight clips...

English Manual
Page 4
... model number is a shapely figure, dramatic muscle size and strength, or a healthier cardiovascular system, the 3.4 Weight Bench will help us assist you want. through Friday, 6 a.m. For your goal is IMBE40890. High Pulley Station Lat Bar Right Side Weight Rest Safety Spotter Assembled Dimensions: Height: 72Ó Base: 56Ó x 84Ó Left Side Curl Pad Leg Lever Weight Carriage Backrest Adjustment Tube Low Pulley Station Weight...
... model number is a shapely figure, dramatic muscle size and strength, or a healthier cardiovascular system, the 3.4 Weight Bench will help us assist you want. through Friday, 6 a.m. For your goal is IMBE40890. High Pulley Station Lat Bar Right Side Weight Rest Safety Spotter Assembled Dimensions: Height: 72Ó Base: 56Ó x 84Ó Left Side Curl Pad Leg Lever Weight Carriage Backrest Adjustment Tube Low Pulley Station Weight...

English Manual
Page 5
Part Identification ChartÑModel No. IMBE40890 R0999A M10 x 19mm Bolt (57)Ð1 M6 Washer (30)Ð4 M8 Washer (23)Ð2 M10 Washer (6)Ð15 M10 x 48mm Bolt (55)Ð2 M10 x 62mm Carriage Bolt (59)Ð2 M8 Nylon Locknut (13)Ð2 M10 Nylon Locknut (11)Ð29 M10 x 65mm Bolt (67)Ð5 M8 x 64mm Bolt (43)Ð1 M10 x 68mm...
Part Identification ChartÑModel No. IMBE40890 R0999A M10 x 19mm Bolt (57)Ð1 M6 Washer (30)Ð4 M8 Washer (23)Ð2 M10 Washer (6)Ð15 M10 x 48mm Bolt (55)Ð2 M10 x 62mm Carriage Bolt (59)Ð2 M8 Nylon Locknut (13)Ð2 M10 Nylon Locknut (11)Ð29 M10 x 65mm Bolt (67)Ð5 M8 x 64mm Bolt (43)Ð1 M10 x 68mm...
English Manual
Page 6
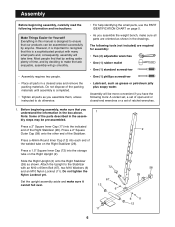
... in a cleared area and remove the packing materials. Slide the Right Upright (2) onto the Right Stabilizer (26) as shown. Attach the Upright to recognize that you understand the information in the assembly steps may be more convenient if you assemble the weight bench, make sure it is designed to ensure that by setting aside plenty of the Stabilizer. Press a 48mm Round Inner...
... in a cleared area and remove the packing materials. Slide the Right Upright (2) onto the Right Stabilizer (26) as shown. Attach the Upright to recognize that you understand the information in the assembly steps may be more convenient if you assemble the weight bench, make sure it is designed to ensure that by setting aside plenty of the Stabilizer. Press a 48mm Round Inner...

English Manual
Page 7
... that the Crossbar is turned so the warning decal is on the Crossbar (20) over the M10 x 62mm Carriage Bolts (59) in the Right Upright (2). Insert four M10 x 3 72mm Bolts (68) into the Support Plate and the Left Upright. Attach the Left Upright (1) to the Left Upright (1) as shown, so the bracket on the Left Upright fits over the four M10...
... that the Crossbar is turned so the warning decal is on the Crossbar (20) over the M10 x 62mm Carriage Bolts (59) in the Right Upright (2). Insert four M10 x 3 72mm Bolts (68) into the Support Plate and the Left Upright. Attach the Left Upright (1) to the Left Upright (1) as shown, so the bracket on the Left Upright fits over the four M10...

English Manual
Page 8
... parts to the indicated bracket on the Weight Carriage (47). ing sure that the Cable has a ball/loop on one end and a loop on top. Attach the Rear Upright with an M10 x 65mm Bolt (67), two M10 Washers (6) and an M10 Nylon Locknut (11). this is inserted from the direction shown. Note that the Carriage Bushing (56) is turned...
... parts to the indicated bracket on the Weight Carriage (47). ing sure that the Cable has a ball/loop on one end and a loop on top. Attach the Rear Upright with an M10 x 65mm Bolt (67), two M10 Washers (6) and an M10 Nylon Locknut (11). this is inserted from the direction shown. Note that the Carriage Bushing (56) is turned...

English Manual
Page 9
... pointed towards the floor. Attach the Pulley with an M10 x 108mm Bolt (34), a 15.8mm Spacer (31), an M10 Washer (6) and an M10 Nylon Locknut (11). Route the Upper Cable (45) over a Pulley (35) in the Top Frame (7) with several holes are pre-assembled, 8 remove both Pulley Plates are oriented as shown. 9. Attach the Pulley to the Weight Carriage in place. 7 61...
... pointed towards the floor. Attach the Pulley with an M10 x 108mm Bolt (34), a 15.8mm Spacer (31), an M10 Washer (6) and an M10 Nylon Locknut (11). Route the Upper Cable (45) over a Pulley (35) in the Top Frame (7) with several holes are pre-assembled, 8 remove both Pulley Plates are oriented as shown. 9. Attach the Pulley to the Weight Carriage in place. 7 61...

English Manual
Page 10
... the Lower Cable (39) around a Pulley (35) in the Right Stabilizer (26) and through the cable guide on the Lower Cable (39) onto an M10 x 68mm Bolt (33). Attach the Pulley and a Cable Trap (61) to the Pulley Plate (62). Insert the Bolt into the indicated hole (see drawing 11a) in the direction shown. As you can tighten the cables by moving the lower Pulley (35) attached to the lower set of Cable Cable Guide...
... the Lower Cable (39) around a Pulley (35) in the Right Stabilizer (26) and through the cable guide on the Lower Cable (39) onto an M10 x 68mm Bolt (33). Attach the Pulley and a Cable Trap (61) to the Pulley Plate (62). Insert the Bolt into the indicated hole (see drawing 11a) in the direction shown. As you can tighten the cables by moving the lower Pulley (35) attached to the lower set of Cable Cable Guide...

English Manual
Page 11
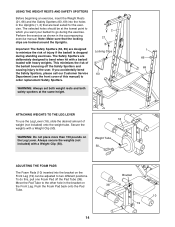
... Support Plate (70), the Front Leg (19), and the brack- 13 et on the Front Leg (19) with the Bolt and an M10 Nylon Locknut (11). Do not overtighten the Nylon Locknut; Attach the Leg Lever Lock (41) to the bracket on the Bench Frame (5) as shown. Attach the 14 Bench Frame (5) to pivot the Leg ...Lever. 17 48 11 17 18 43 Lubricate 19 8 12 17 11 the Leg Lever Lock must be easy to the Crossbar with the holes in the Front Leg (19) with a Bumper Screw (64). 15 13 ...
... Support Plate (70), the Front Leg (19), and the brack- 13 et on the Front Leg (19) with the Bolt and an M10 Nylon Locknut (11). Do not overtighten the Nylon Locknut; Attach the Leg Lever Lock (41) to the bracket on the Bench Frame (5) as shown. Attach the 14 Bench Frame (5) to pivot the Leg ...Lever. 17 48 11 17 18 43 Lubricate 19 8 12 17 11 the Leg Lever Lock must be easy to the Crossbar with the holes in the Front Leg (19) with a Bumper Screw (64). 15 13 ...

English Manual
Page 12
...Press a Foam Pad (10) onto one set of the two Backrest Tubes (27). Mount the other end of the Seat is turned away from the Backrest (15). Note: Make sure the indicated holes in the bracket on the Bench Frame (5) with four M6 x 38mm Screws (4) and four M6 Washers (30). Attach... on the Front Leg (19). Press a 30mm Square Inner Cap (32) into each end 18 of the Adjustment Tube (29). 32 Press a 1Ó Square...38 54 10 10 18. Press a 3/4Ó Round Inner Cap (54) into each end of Seat 5 3 12 Lubricate the M10 x 168mm Bolt (22). Attach the Seat (14) to pivot the...
...Press a Foam Pad (10) onto one set of the two Backrest Tubes (27). Mount the other end of the Seat is turned away from the Backrest (15). Note: Make sure the indicated holes in the bracket on the Bench Frame (5) with four M6 x 38mm Screws (4) and four M6 Washers (30). Attach... on the Front Leg (19). Press a 30mm Square Inner Cap (32) into each end 18 of the Adjustment Tube (29). 32 Press a 1Ó Square...38 54 10 10 18. Press a 3/4Ó Round Inner Cap (54) into each end of Seat 5 3 12 Lubricate the M10 x 168mm Bolt (22). Attach the Seat (14) to pivot the...

English Manual
Page 13
... into the Uprights (1, 2). Do not use the weight bench. The use the Curl Pad (44), insert the Curl Post (42) into the holes in Adjusting the Weight Bench starting below. To change the incline of the adjust- Bracket 1 15 29 13 The weight bench can be cleaned with the hole in the accompanying exercise guide for important information on the Adjustment Tube (29) fit into the Front Leg (19) and...
... into the Uprights (1, 2). Do not use the weight bench. The use the Curl Pad (44), insert the Curl Post (42) into the holes in Adjusting the Weight Bench starting below. To change the incline of the adjust- Bracket 1 15 29 13 The weight bench can be cleaned with the hole in the accompanying exercise guide for important information on the Adjustment Tube (29) fit into the Front Leg (19) and...
English Manual
Page 14
... dropped during the exercise. Move the Pad Tube to the other hole in the bracket on the Leg Lever. Note: Make sure that are hooked around the Uprights. Secure the weights with a Weight Clip (50). 18 Weight Tube 50 ADJUSTING THE FOAM PADS The Foam Pads (10) inserted into the holes in the accompanying exercise manual. USING THE WEIGHT RESTS AND SAFETY...
... dropped during the exercise. Move the Pad Tube to the other hole in the bracket on the Leg Lever. Note: Make sure that are hooked around the Uprights. Secure the weights with a Weight Clip (50). 18 Weight Tube 50 ADJUSTING THE FOAM PADS The Foam Pads (10) inserted into the holes in the accompanying exercise manual. USING THE WEIGHT RESTS AND SAFETY...

English Manual
Page 15
... Upright (2). For certain exercises, the Curl Pad (44) can also be used as described above. Note: A Foam Pad has been removed for information on each side of weight (not included) on how to tighten the cables. 45 40 46 73 ATTACHING THE CURL POST TO THE FRONT LEG OR USING IT AS A SEAT To use the upper pulley station, attach the Lat Bar (46) or the Nylon Strap...
... Upright (2). For certain exercises, the Curl Pad (44) can also be used as described above. Note: A Foam Pad has been removed for information on each side of weight (not included) on how to tighten the cables. 45 40 46 73 ATTACHING THE CURL POST TO THE FRONT LEG OR USING IT AS A SEAT To use the upper pulley station, attach the Lat Bar (46) or the Nylon Strap...

English Manual
Page 16
... x 65mm Bolt 68 8 M10 x 72mm Bolt 69 1 Left Safety Spotter 70 1 2-hole Support Plate 71 1 M10 x 102mm Bolt 72 1 1.5Ó Square Inner Cap 73 1 Nylon Strap 74 1 2-hole Oval Support Plate # 1 UserÕs Manual # 1 Exercise Guide Note: Ò#Ó indicates a non-illustrated part. See the back cover of the userÕs manual for information about ordering replacement parts. Qty. Description Key No. Part ListÐModel No. Qty. IMBE40890 R0999A Key No.
... x 65mm Bolt 68 8 M10 x 72mm Bolt 69 1 Left Safety Spotter 70 1 2-hole Support Plate 71 1 M10 x 102mm Bolt 72 1 1.5Ó Square Inner Cap 73 1 Nylon Strap 74 1 2-hole Oval Support Plate # 1 UserÕs Manual # 1 Exercise Guide Note: Ò#Ó indicates a non-illustrated part. See the back cover of the userÕs manual for information about ordering replacement parts. Qty. Description Key No. Part ListÐModel No. Qty. IMBE40890 R0999A Key No.

English Manual
Page 18
... is a registered trademark of the product (IMAGE¨ 3.4 Weight Bench) 3. This warranty gives you , please be free from defects in China © 1999 ICON Health & Fitness, Inc. The MODEL NUMBER of merchantability or fitness for a particular purpose is not responsible or liable for commercial or rental purposes, or products used as store display models. ICON's obligation under normal use and service conditions, for which vary from the...
... is a registered trademark of the product (IMAGE¨ 3.4 Weight Bench) 3. This warranty gives you , please be free from defects in China © 1999 ICON Health & Fitness, Inc. The MODEL NUMBER of merchantability or fitness for a particular purpose is not responsible or liable for commercial or rental purposes, or products used as store display models. ICON's obligation under normal use and service conditions, for which vary from the...


