

Canadian English Manual
Page 1
... a manufacturer, we will provide immediate assistance, free of charge to you have questions, or if there are missing or damaged parts, we are committed to providing complete customer satisfaction. The trained technicians on our customer hot line will guarantee complete satisfaction through direct assistance from our factory. Model No. Serial Number Decal QUESTIONS? Keep this equipment. CUSTOMER...
... a manufacturer, we will provide immediate assistance, free of charge to you have questions, or if there are missing or damaged parts, we are committed to providing complete customer satisfaction. The trained technicians on our customer hot line will guarantee complete satisfaction through direct assistance from our factory. Model No. Serial Number Decal QUESTIONS? Keep this equipment. CUSTOMER...
Canadian English Manual
Page 2
...-home use the exercise bike in a commercial, rental, or institutional setting. 12. ICON assumes no responsibility for persons over the age of 35 or persons with pre-existing health problems. Read all parts regularly. TABLE OF CONTENTS IMPORTANT PRECAUTIONS 2 BEFORE YOU BEGIN 3 ASSEMBLY 4 HOW TO OPERATE THE RECUMBENT CYCLE 8 MAINTENANCE AND TROUBLE-SHOOTING 12 EXERCISE GUIDELINES 13 PART LIST 14 EXPLODED DRAWING 15 HOW TO ORDER REPLACEMENT PARTS...
...-home use the exercise bike in a commercial, rental, or institutional setting. 12. ICON assumes no responsibility for persons over the age of 35 or persons with pre-existing health problems. Read all parts regularly. TABLE OF CONTENTS IMPORTANT PRECAUTIONS 2 BEFORE YOU BEGIN 3 ASSEMBLY 4 HOW TO OPERATE THE RECUMBENT CYCLE 8 MAINTENANCE AND TROUBLE-SHOOTING 12 EXERCISE GUIDELINES 13 PART LIST 14 EXPLODED DRAWING 15 HOW TO ORDER REPLACEMENT PARTS...
Canadian English Manual
Page 3
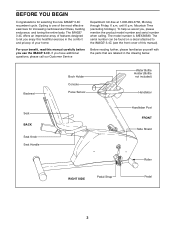
... our Customer Service Before reading further, please familiarize yourself with the parts that are labeled in the comfort and privacy of your benefit, read this manual carefully before you enjoy this manual). The serial number can be found on a decal attached to let you use the IMAGE¨ 3.4C. For your home. Mountain Time (excluding holidays). Backrest Book Holder Console Pulse Sensor Water...
... our Customer Service Before reading further, please familiarize yourself with the parts that are labeled in the comfort and privacy of your benefit, read this manual carefully before you enjoy this manual). The serial number can be found on a decal attached to let you use the IMAGE¨ 3.4C. For your home. Mountain Time (excluding holidays). Backrest Book Holder Console Pulse Sensor Water...
Canadian English Manual
Page 4
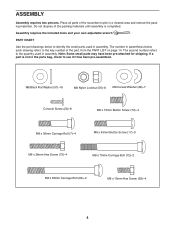
... quantity used in a cleared area and remove the packing materials. Do not dispose of the recumbent cycle in assembly. Note: Some small parts may have been pre-attached for shipping. Assembly requires the included tools and your own adjustable wrench . M8 Black Flat Washer (57)Ð16 M8 Nylon Locknut (56)Ð8 M8 Curved Washer (28)Ð7 Console Screw (20...
... quantity used in a cleared area and remove the packing materials. Do not dispose of the recumbent cycle in assembly. Note: Some small parts may have been pre-attached for shipping. Assembly requires the included tools and your own adjustable wrench . M8 Black Flat Washer (57)Ð16 M8 Nylon Locknut (56)Ð8 M8 Curved Washer (28)Ð7 Console Screw (20...

Canadian English Manual
Page 5
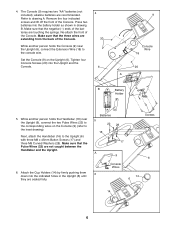
... be turned as shown 5 Be careful to the Lower Wire Harness (44). 1. Make sure that the Upright is not touching the floor. 1 72 2 75 28 56 2. While a second person holds the Upright (6) near the Frame (1), connect the Extension Wire (18) to avoid pinching the wires. Attach the Rear Stabilizer (3) to the front of the Frame (1) with two M8 x 80mm Carriage Bolts...
... be turned as shown 5 Be careful to the Lower Wire Harness (44). 1. Make sure that the Upright is not touching the floor. 1 72 2 75 28 56 2. While a second person holds the Upright (6) near the Frame (1), connect the Extension Wire (18) to avoid pinching the wires. Attach the Rear Stabilizer (3) to the front of the Frame (1) with two M8 x 80mm Carriage Bolts...
Canadian English Manual
Page 6
... Console. 4 20 6 9 Console Wire 18 20 A B Battery Holder 5. Remove the four indicated screws and lift off the front of the Console. Make sure that the three wires are recommended. Tighten four Console Screws (20) into the indicated holes in drawing B. 4. Batteries 5 22 28 16 17 Screws A 9 6 Console Wires 6 14 6 14 6 Set the Console (9) on the Console (9) (refer to the corresponding wires on the Upright (6). Make sure that the Pulse Wires (22) are seated...
... Console. 4 20 6 9 Console Wire 18 20 A B Battery Holder 5. Remove the four indicated screws and lift off the front of the Console. Make sure that the three wires are recommended. Tighten four Console Screws (20) into the indicated holes in drawing B. 4. Batteries 5 22 28 16 17 Screws A 9 6 Console Wires 6 14 6 14 6 Set the Console (9) on the Console (9) (refer to the corresponding wires on the Upright (6). Make sure that the Pulse Wires (22) are seated...

Canadian English Manual
Page 7
Attach the Backrest (13) to the Seat Frame (27) with four M6 x 15mm Hex Screws (29) and four M8 Black Flat Washers (57). 11 57 56 8 12 27 57 56 9. Attach the Seat (12) to the Seat Frame 7 (27) using four M8 x 35mm Carriage Bolts (7), four M8 Black Flat Washers (57), and four M8 Nylon 7 Locknuts (56). 8. Attach the Seat Carriage (11) to the Seat Frame (27) with four M6 x 38mm Hex Screws (73) and four M8 Black Flat Washers (57). 57 9 13 7 27 57 29 27 57 73 57 73 7.
Attach the Backrest (13) to the Seat Frame (27) with four M6 x 15mm Hex Screws (29) and four M8 Black Flat Washers (57). 11 57 56 8 12 27 57 56 9. Attach the Seat (12) to the Seat Frame 7 (27) using four M8 x 35mm Carriage Bolts (7), four M8 Black Flat Washers (57), and four M8 Nylon 7 Locknuts (56). 8. Attach the Seat Carriage (11) to the Seat Frame (27) with four M6 x 38mm Hex Screws (73) and four M8 Black Flat Washers (57). 57 9 13 7 27 57 29 27 57 73 57 73 7.

Canadian English Manual
Page 8
Then, turn the Seat Knob clockwise to the desired position and release the Seat Knob. Using an adjustable wrench, tighten the Left Pedal counterclockwise into the right Crank Arm (not shown). 54 30 11 41 8 11 34 Adjust the Pedal Strap (41) on the Left Pedal (40) to the desired position, and release the seat knob. tion. To adjust the seat, first turn the seat knob clockwise to move the seat back and forth slightly...
Then, turn the Seat Knob clockwise to the desired position and release the Seat Knob. Using an adjustable wrench, tighten the Left Pedal counterclockwise into the right Crank Arm (not shown). 54 30 11 41 8 11 34 Adjust the Pedal Strap (41) on the Left Pedal (40) to the desired position, and release the seat knob. tion. To adjust the seat, first turn the seat knob clockwise to move the seat back and forth slightly...
Canadian English Manual
Page 9
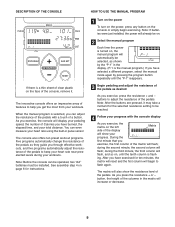
... THE CONSOLE HOW TO USE THE MANUAL PROGRAM If there is the manual program.) If you have selected a different program, select the manual mode again by the ÒP-1Ó in pulse sensor. See assembly step 4 on page 6 for the selected resistance setting to be selected, as they guide you through effective workouts, and five programs automatically adjust the resistance of the pedals to adjust the resistance of the pedals. Note: After the buttons are pressed, it...
... THE CONSOLE HOW TO USE THE MANUAL PROGRAM If there is the manual program.) If you have selected a different program, select the manual mode again by the ÒP-1Ó in pulse sensor. See assembly step 4 on page 6 for the selected resistance setting to be selected, as they guide you through effective workouts, and five programs automatically adjust the resistance of the pedals to adjust the resistance of the pedals. Note: After the buttons are pressed, it...
Canadian English Manual
Page 10
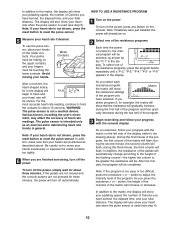
... reset button to reset the pulse sensor. 5 Measure your heart rate if desired To use the pulse sensor, place your hands on the left side of the display (refer to the drawing above . Various factors, including the user's movement, may affect the accuracy of the resistance programs Each time the power is not shown, press the reset button to reset the pulse sensor. If the pedals are not moved and the console buttons are not pressed...
... reset button to reset the pulse sensor. 5 Measure your heart rate if desired To use the pulse sensor, place your hands on the left side of the display (refer to the drawing above . Various factors, including the user's movement, may affect the accuracy of the resistance programs Each time the power is not shown, press the reset button to reset the pulse sensor. If the pedals are not moved and the console buttons are not pressed...
Canadian English Manual
Page 11
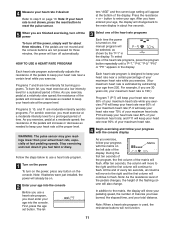
... keep your heart rate near a certain level while you must exercise at fast pedaling speeds. HOW TO USE A HEART RATE PROGRAM Each heart rate program automatically adjusts the resistance of the display. WARNING: The pulse sensor may give readings lower than your actual heart rate, especially at a moderate intensity level for three minutes, the power will be on. 2 Enter your age into the console. If the pedals are not moved and the console buttons are low...
... keep your heart rate near a certain level while you must exercise at fast pedaling speeds. HOW TO USE A HEART RATE PROGRAM Each heart rate program automatically adjusts the resistance of the display. WARNING: The pulse sensor may give readings lower than your actual heart rate, especially at a moderate intensity level for three minutes, the power will be on. 2 Enter your age into the console. If the pedals are not moved and the console buttons are low...
Canadian English Manual
Page 12
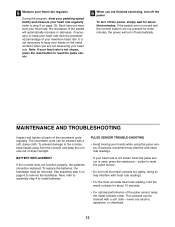
... used, press the resistance Ð button to the console, keep liquids away from the console and keep the metal contacts clean. BATTERY REPLACEMENT If the console does not function properly, the batteries should be removed. doing so may interfere with heart rate readings. ¥ For the most accurate heart rate reading, hold the metal contacts too tightly; MAINTENANCE AND TROUBLESHOOTING Inspect and tighten all parts of the pulse sensor, keep the console...
... used, press the resistance Ð button to the console, keep liquids away from the console and keep the metal contacts clean. BATTERY REPLACEMENT If the console does not function properly, the batteries should be removed. doing so may interfere with heart rate readings. ¥ For the most accurate heart rate reading, hold the metal contacts too tightly; MAINTENANCE AND TROUBLESHOOTING Inspect and tighten all parts of the pulse sensor, keep the console...
Canadian English Manual
Page 13
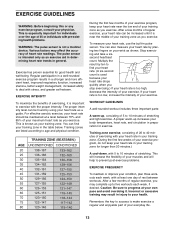
... warm-up to deal with pre-existing health problems. WARNING: The pulse sensor is used because your heart rate drops quickly when you exercise. Stop exercising and take a sixsecond heartbeat count. Remember, the key to your body temperature, heart rate, and circulation in a stronger and more efficient heart, improved respiratory function, increased stamina, better weight management, increased ability to five workouts each week, with 5 to 10 minutes...
... warm-up to deal with pre-existing health problems. WARNING: The pulse sensor is used because your heart rate drops quickly when you exercise. Stop exercising and take a sixsecond heartbeat count. Remember, the key to your body temperature, heart rate, and circulation in a stronger and more efficient heart, improved respiratory function, increased stamina, better weight management, increased ability to five workouts each week, with 5 to 10 minutes...
Canadian English Manual
Page 14
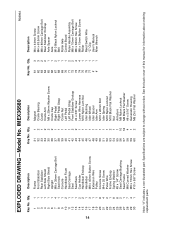
... x 44mm Screw M4 x 63.5mm Screw M8 x 80mm Carriage Bolt Rear Stabilizer Endcap Axle Spacer Axle M10 Black Nylon Locknut Belt Roller Axle Control Board Pulse Handle Assembly M8 x 70mm Carriage Bolt M6 x 38mm Hex Screw M8 x 15mm Button Screw Roller Reed Switch Wire ÒCÓ Clip UserÕs Manual Allen Wrench 14 Note: Ò#Ó indicates a non-illustrated part. See the back cover of this manual for information about ordering replacement parts. Qty. 31...
... x 44mm Screw M4 x 63.5mm Screw M8 x 80mm Carriage Bolt Rear Stabilizer Endcap Axle Spacer Axle M10 Black Nylon Locknut Belt Roller Axle Control Board Pulse Handle Assembly M8 x 70mm Carriage Bolt M6 x 38mm Hex Screw M8 x 15mm Button Screw Roller Reed Switch Wire ÒCÓ Clip UserÕs Manual Allen Wrench 14 Note: Ò#Ó indicates a non-illustrated part. See the back cover of this manual for information about ordering replacement parts. Qty. 31...
Canadian English Manual
Page 16
...; The SERIAL NUMBER of the product (see the front cover of this product to be prepared to you specific legal rights. HOW TO ORDER REPLACEMENT PARTS To order replacement parts, simply call our Customer Service Department toll-free at ICON's option, the product through Friday, 6 a.m. until 6 p.m. IMAGE¨ is not responsible or liable for commercial or rental purposes, or products used as store display models...
...; The SERIAL NUMBER of the product (see the front cover of this product to be prepared to you specific legal rights. HOW TO ORDER REPLACEMENT PARTS To order replacement parts, simply call our Customer Service Department toll-free at ICON's option, the product through Friday, 6 a.m. until 6 p.m. IMAGE¨ is not responsible or liable for commercial or rental purposes, or products used as store display models...


