

Owners Manual
Page 1
...; TM 0-8 mph • 2.0 hp • direct pulse interface • fat burn guide Model No. CUSTOMER HOT LINE: 1-800-999-3756 Mon.-Fri., 6 a.m.-6 p.m. Serial Number Decal QUESTIONS? The trained technicians on our Customer Hot Line will guarantee you complete satisfaction through direct assistance from our factory. As a manufacturer, we will provide immediate assistance, free of charge to providing you . If...
...; TM 0-8 mph • 2.0 hp • direct pulse interface • fat burn guide Model No. CUSTOMER HOT LINE: 1-800-999-3756 Mon.-Fri., 6 a.m.-6 p.m. Serial Number Decal QUESTIONS? The trained technicians on our Customer Hot Line will guarantee you complete satisfaction through direct assistance from our factory. As a manufacturer, we will provide immediate assistance, free of charge to providing you . If...

Owners Manual
Page 2
LIMITED WARRANTY ICON Health & Fitness, Inc. ("ICON"), warrants this warranty is limited to replacing or repairing, at ICON's option, the product at one of its authorized service centers with all freight and other transportation charges prepaid, accompanied by sufficient proof of purchase, excepting the pulse sensor which vary from the date of purchase. All products for commercial or rental purposes. SOME STATES DO NOT ALLOW...
LIMITED WARRANTY ICON Health & Fitness, Inc. ("ICON"), warrants this warranty is limited to replacing or repairing, at ICON's option, the product at one of its authorized service centers with all freight and other transportation charges prepaid, accompanied by sufficient proof of purchase, excepting the pulse sensor which vary from the date of purchase. All products for commercial or rental purposes. SOME STATES DO NOT ALLOW...

Owners Manual
Page 3
... pre-existing health problems. Read all instructions before using. ICON assumes no responsibility for persons over the age of this or any exercise program, consult your physician. IIVIAGE10.2 0-8 mph • 2.0 hp • direct pulse interface • fat burn guide TABLE OF CONTENTS IMPORTANT PRECAUTIONS BEFORE YOU BEGIN ASSEMBLY HOW TO USE THE PULSE SENSOR OPERATION AND ADJUSTMENT TROUBLE-SHOOTING AND STORAGE CONDITIONING GUIDELINES PART LIST EXPLODED DRAWING ORDERING REPLACEMENT PARTS 4 5 6 8 9 14...
... pre-existing health problems. Read all instructions before using. ICON assumes no responsibility for persons over the age of this or any exercise program, consult your physician. IIVIAGE10.2 0-8 mph • 2.0 hp • direct pulse interface • fat burn guide TABLE OF CONTENTS IMPORTANT PRECAUTIONS BEFORE YOU BEGIN ASSEMBLY HOW TO USE THE PULSE SENSOR OPERATION AND ADJUSTMENT TROUBLE-SHOOTING AND STORAGE CONDITIONING GUIDELINES PART LIST EXPLODED DRAWING ORDERING REPLACEMENT PARTS 4 5 6 8 9 14...

Owners Manual
Page 4
... service representative only. Never move the walking belt while the power is turned off the power when the treadmill is not in this manual. 12. Wear appropriate exercise clothing when using the treadmill; Never remove the safety cover unless instructed to do not wear loose clothing that blocks an air opening . 10. No other than one person on page 9), plug the power cord directly into any opening . If an extension cord is not working...
... service representative only. Never move the walking belt while the power is turned off the power when the treadmill is not in this manual. 12. Wear appropriate exercise clothing when using the treadmill; Never remove the safety cover unless instructed to do not wear loose clothing that blocks an air opening . 10. No other than one person on page 9), plug the power cord directly into any opening . If an extension cord is not working...

Owners Manual
Page 5
... call our Customer Service Department toll-free at 1-800999-3756, Monday through Friday, 6 a.m. Handrail Console Safety Key/Clip Pulse Sensor Console Knob Walking Belt Foot Rails N Belt Tool BACK Rear Roller Adjustment Bolt Uprights FRONT Circuit Breaker On/Off Switch Power Cord RIGHT SIDE Cushion Knob 5 The model number of this manual carefully before calling. If you enjoy an excellent form of cardiovascular exercise in the convenience and privacy of your home. The IMAGE 10.2 treadmill blends advanced technology...
... call our Customer Service Department toll-free at 1-800999-3756, Monday through Friday, 6 a.m. Handrail Console Safety Key/Clip Pulse Sensor Console Knob Walking Belt Foot Rails N Belt Tool BACK Rear Roller Adjustment Bolt Uprights FRONT Circuit Breaker On/Off Switch Power Cord RIGHT SIDE Cushion Knob 5 The model number of this manual carefully before calling. If you enjoy an excellent form of cardiovascular exercise in the convenience and privacy of your home. The IMAGE 10.2 treadmill blends advanced technology...
Owners Manual
Page 6
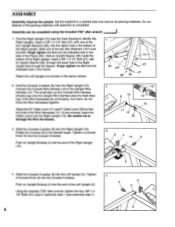
... assembly is completed. do not fit easily, turn them; Push an Upright Endcap (4) into the Console Crossbar. Insert a 3/8" x 3 1/2" Bolt (27), with an Upright Washer (26), through the lower hole in the bottom of the Wire Harnesses (10, 12) are covered. Tighten 4 a Console Knob (3) into the end of the four Upright Washers (26), into the Right Upright (15). Slide one of the Right Upright (15). 3 9 4 15 3 6 4. Adjust the 24" Cable...
... assembly is completed. do not fit easily, turn them; Push an Upright Endcap (4) into the Console Crossbar. Insert a 3/8" x 3 1/2" Bolt (27), with an Upright Washer (26), through the lower hole in the bottom of the Wire Harnesses (10, 12) are covered. Tighten 4 a Console Knob (3) into the end of the four Upright Washers (26), into the Right Upright (15). Slide one of the Right Upright (15). 3 9 4 15 3 6 4. Adjust the 24" Cable...
Owners Manual
Page 7
... the Upright Wire Harness (12) into the Clothes Clip. Make sure that all parts are tightened before using the treadmill. Be careful not to center the walking belt 6 (see the inset drawing). Note: In order to protect the floor, a covering should snap onto the 20" Wire Harness (see the lower inset drawing). do not fit easily, turn them; Plug the lower end of the Wire Harnesses...
... the Upright Wire Harness (12) into the Clothes Clip. Make sure that all parts are tightened before using the treadmill. Be careful not to center the walking belt 6 (see the inset drawing). Note: In order to protect the floor, a covering should snap onto the 20" Wire Harness (see the lower inset drawing). do not fit easily, turn them; Plug the lower end of the Wire Harnesses...

Owners Manual
Page 8
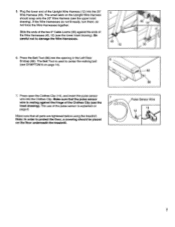
...; Because your pulse constantly changes, the pulse sensor will minimize movement of your forehead, it off the adjustment tab on your pulse from the pulse sensor. Hand wash the headband in the headband. The headband should be wiped clean with the sensor window centered on the pulse sensor. If the headband is fully plugged into the console. To adjust the headband, slip it may not...
...; Because your pulse constantly changes, the pulse sensor will minimize movement of your forehead, it off the adjustment tab on your pulse from the pulse sensor. Hand wash the headband in the headband. The headband should be wiped clean with the sensor window centered on the pulse sensor. If the headband is fully plugged into the console. To adjust the headband, slip it may not...

Owners Manual
Page 9
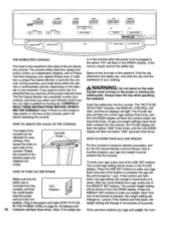
... a firmer cushion level, turn the cushion knob counterclockwise (see the drawing below . Metal Screw equipment-grounding conductor can result in Drawing 2 if a properly grounded outlet is equipped with PERFORMANT LUBETM, a highperformance lubricant. OPERATION AND ADJUSTMENT MAINTENANCE-FREE WALKING BELT Your treadmill features a maintenance-free walking belt coated with a cord having an equipment-grounding conductor and a grounding plug. The white powder is grounded before using an adapter. 1 0 1J Grounded...
... a firmer cushion level, turn the cushion knob counterclockwise (see the drawing below . Metal Screw equipment-grounding conductor can result in Drawing 2 if a properly grounded outlet is equipped with PERFORMANT LUBETM, a highperformance lubricant. OPERATION AND ADJUSTMENT MAINTENANCE-FREE WALKING BELT Your treadmill features a maintenance-free walking belt coated with a cord having an equipment-grounding conductor and a grounding plug. The white powder is grounded before using an adapter. 1 0 1J Grounded...
Owners Manual
Page 10
... ENTER YOUR AGE AND WEIGHT loosen the knob on " change in the console when the power cord is essential that Position will flash the current weight set - IN THE POWER CORD on the power or starting the walking belt. The console offers electronic speed and incline control, six independent displays, and a Fitness Stand on /off before operating the console. If your goal is to burn fat, it off switch WEIGHT SET buttons to enter your...
... ENTER YOUR AGE AND WEIGHT loosen the knob on " change in the console when the power cord is essential that Position will flash the current weight set - IN THE POWER CORD on the power or starting the walking belt. The console offers electronic speed and incline control, six independent displays, and a Fitness Stand on /off before operating the console. If your goal is to burn fat, it off switch WEIGHT SET buttons to enter your...
Owners Manual
Page 11
... the total distance that the walking belt has been moving. The CALORIES display will take several seconds before an accurate pulse is 1% to change by pressing the AGE SET or WEIGHT SET buttons. The display will show the incline level that has been selected. Plug the pulse sensor wire into the console. Hold the handrails, step carefully onto the walking belt, and begin exercising. SPEED DISPLAY OPERATION HOW TO MANUALLY CONTROL THE INCLINE The SPEED display will be reset to operate...
... the total distance that the walking belt has been moving. The CALORIES display will take several seconds before an accurate pulse is 1% to change by pressing the AGE SET or WEIGHT SET buttons. The display will show the incline level that has been selected. Plug the pulse sensor wire into the console. Hold the handrails, step carefully onto the walking belt, and begin exercising. SPEED DISPLAY OPERATION HOW TO MANUALLY CONTROL THE INCLINE The SPEED display will be reset to operate...
Owners Manual
Page 12
... Fitness Test. To turn off the power, remove the safety key from the console. Note: While the Fitness WEIGHT SET DECREASE button. activated, one of the five indicators in this manner until HOW TO USE THE FITNESS TEST your pulse reaches 70% of the seventh segment, the speed will increase CONTROL mode. at the beginning of the fifth segment, the incline will increase to and distance that an error...
... Fitness Test. To turn off the power, remove the safety key from the console. Note: While the Fitness WEIGHT SET DECREASE button. activated, one of the five indicators in this manner until HOW TO USE THE FITNESS TEST your pulse reaches 70% of the seventh segment, the speed will increase CONTROL mode. at the beginning of the fifth segment, the incline will increase to and distance that an error...

Owners Manual
Page 13
The total distance will be reset to zero. The letter 'T' in the SPEED display will begin again at zero). To exit the information mode, remove the safety key. 13 The total time will be shown in the TIME display, up to 9,999 hours. The total time and distance cannot be shown in the DISTANCE display, up to 999 miles (if the total distance exceeds 999 miles, the display will darken. To view total time and distance, press the FITNESS TEST button.
The total distance will be reset to zero. The letter 'T' in the SPEED display will begin again at zero). To exit the information mode, remove the safety key. 13 The total time will be shown in the TIME display, up to 9,999 hours. The total time and distance cannot be shown in the DISTANCE display, up to 999 miles (if the total distance exceeds 999 miles, the display will darken. To view total time and distance, press the FITNESS TEST button.
Owners Manual
Page 14
... simple steps below. SYMPTOM: THE POWER TURNS OFF DURING USE On Position a. Check the circuit breaker located on the treadmill near the power cord. c. Remove the safety key from the console. Check to the left, first remove the safety a key and UNPLUG THE POWER CORD. SYMPTOM: THE PULSE SENSOR DOES NOT FUNCTION PROPERLY a. If an error code appears, remove the safety key, wait for a few minutes. SYMPTOM: THE WALKING BELT SLOWS WHEN WALKED ON...
... simple steps below. SYMPTOM: THE POWER TURNS OFF DURING USE On Position a. Check the circuit breaker located on the treadmill near the power cord. c. Remove the safety key from the console. Check to the left, first remove the safety a key and UNPLUG THE POWER CORD. SYMPTOM: THE PULSE SENSOR DOES NOT FUNCTION PROPERLY a. If an error code appears, remove the safety key, wait for a few minutes. SYMPTOM: THE WALKING BELT SLOWS WHEN WALKED ON...

Owners Manual
Page 15
Using the belt tool, turn the rear roller adjustment bolt counterclockwise 1/4 of storage. Keep the bolts and washers in the power cord, insert the safety key and run the treadmill for a few minutes. It is centered. Carefully lay the console on each upright. b. Remove one bolt, washer and upright spacer from the lower end of each side. Plug in a secure location. Repeat until the walking belt is recommended that the treadmill be covered during extended periods...
Using the belt tool, turn the rear roller adjustment bolt counterclockwise 1/4 of storage. Keep the bolts and washers in the power cord, insert the safety key and run the treadmill for a few minutes. It is centered. Carefully lay the console on each upright. b. Remove one bolt, washer and upright spacer from the lower end of each side. Plug in a secure location. Repeat until the walking belt is recommended that the treadmill be covered during extended periods...

Owners Manual
Page 16
... workout with 5 to 10 minutes of stretching and light exercise to cool down . AWARNING: Before beginning this or any exercise program, consult your movement during exercise, may complete up , 20 to exercise with the proper intensity. A WARNING: The pulse sensor is important to 30 minutes of training zone exercise, and a cool-down . Then, increase the intensity of your exercise to raise your heart rate...
... workout with 5 to 10 minutes of stretching and light exercise to cool down . AWARNING: Before beginning this or any exercise program, consult your movement during exercise, may complete up , 20 to exercise with the proper intensity. A WARNING: The pulse sensor is important to 30 minutes of training zone exercise, and a cool-down . Then, increase the intensity of your exercise to raise your heart rate...

Owners Manual
Page 17
... With one hand against a wall for both legs. Hold for 15 counts, then relax. Pull your feet toward your hips toward the wall. Move slowly as you and rest it against a wall...balance, reach back and grasp one leg extended. INNER THIGH STRETCH Sit with your knees bent slightly and slowly bend forward from your hips. Correct form for 15 counts, then relax. Bring...flat on the floor. Repeat 3 times for 15 counts, then relax. Hold for both legs. Stretches: Hamstrings, lower back and groin. Repeat 3 times. SUGGESTED STRETCHES The following stretches can provide a good...
... With one hand against a wall for both legs. Hold for 15 counts, then relax. Pull your feet toward your hips toward the wall. Move slowly as you and rest it against a wall...balance, reach back and grasp one leg extended. INNER THIGH STRETCH Sit with your knees bent slightly and slowly bend forward from your hips. Correct form for 15 counts, then relax. Bring...flat on the floor. Repeat 3 times for 15 counts, then relax. Hold for both legs. Stretches: Hamstrings, lower back and groin. Repeat 3 times. SUGGESTED STRETCHES The following stretches can provide a good...
Owners Manual
Page 18
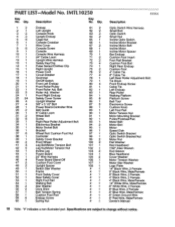
... Left Upright Console Knob Upright Endcap Cage Nut Console Crossbar Wire Cover Console Screw Console Console Wire Harness 24" Cable Loom Upright Wire Harness Safety Key/Clip Pulse Sensor/Clothes Clip Right Upright Power Cord Circuit Breaker Grommet On/Off Switch Front Left Endcap Front Roller/Pulley Front Roller Adj. Bolt Roller Adj. Qty. Description Key No. Washer Front Right Endcap Safety Cover Screw Upright Washer 3/8" x 3 1/2" Bolt Power Board-Controller Wire Belt Guide 6" Cable Loom Wheel Bolt Screw Right Rear Roller Adjustment Bolt Electronics Bracket Motor Swivel Bolt Bracket...
... Left Upright Console Knob Upright Endcap Cage Nut Console Crossbar Wire Cover Console Screw Console Console Wire Harness 24" Cable Loom Upright Wire Harness Safety Key/Clip Pulse Sensor/Clothes Clip Right Upright Power Cord Circuit Breaker Grommet On/Off Switch Front Left Endcap Front Roller/Pulley Front Roller Adj. Bolt Roller Adj. Qty. Description Key No. Washer Front Right Endcap Safety Cover Screw Upright Washer 3/8" x 3 1/2" Bolt Power Board-Controller Wire Belt Guide 6" Cable Loom Wheel Bolt Screw Right Rear Roller Adjustment Bolt Electronics Bracket Motor Swivel Bolt Bracket...
Owners Manual
Page 19
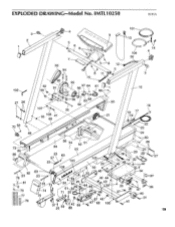
EXPLODED DRAWING Model No. IMTL10250 R395A 3 411 4 2 5 6 101 9 13 14 4 104 30 7 93 8 12 94 8 11 3 10 92 95 42 91 97 64 96 61 15 102 90 80 27 26 107 106 41 55 89 9 9 62 5 5 • 20 21 16 19 17 118 22 23 48 24 72 85 86 82 78 23 81 * - -79 77 76 56 54 52 51 84 / 53 23 60 57 \ e" 23 103 105 25 108 50 83 23 74 25 47 58., 25 O 59,' 63 61 6249 4 0 71 25 46 (4) 42 44 14 4, 43 32 66 75 7 4' 67 42 37 It 5 TO 42 9 25 88 67 68 100 80 26 30 29 12 32 4 -,48 32 34 27 87 39 37 8 87 36 40 X31 41 19
EXPLODED DRAWING Model No. IMTL10250 R395A 3 411 4 2 5 6 101 9 13 14 4 104 30 7 93 8 12 94 8 11 3 10 92 95 42 91 97 64 96 61 15 102 90 80 27 26 107 106 41 55 89 9 9 62 5 5 • 20 21 16 19 17 118 22 23 48 24 72 85 86 82 78 23 81 * - -79 77 76 56 54 52 51 84 / 53 23 60 57 \ e" 23 103 105 25 108 50 83 23 74 25 47 58., 25 O 59,' 63 61 6249 4 0 71 25 46 (4) 42 44 14 4, 43 32 66 75 7 4' 67 42 37 It 5 TO 42 9 25 88 67 68 100 80 26 30 29 12 32 4 -,48 32 34 27 87 39 37 8 87 36 40 X31 41 19
Owners Manual
Page 20
... in USA © 1995 ICON Health & Fitness, Inc. When ordering parts, please be prepared to give the following information: • The MODEL NUMBER of the product (IMTL10250). • The NAME of the product (IMAGE 10.271'4 treadmill). • The SERIAL NUMBER of the product (see the front cover of this manual). • The KEY NUMBER of the part(s) (see page 18 of this manual). • The DESCRIPTION of...
... in USA © 1995 ICON Health & Fitness, Inc. When ordering parts, please be prepared to give the following information: • The MODEL NUMBER of the product (IMTL10250). • The NAME of the product (IMAGE 10.271'4 treadmill). • The SERIAL NUMBER of the product (see the front cover of this manual). • The KEY NUMBER of the part(s) (see page 18 of this manual). • The DESCRIPTION of...


