Instruction Manual
Page 7
... name 80 Memory name indication 82 11 SCAN OPERATION 83-89 Scan types 83 Scan start/stop 84 Programming scan edge channels 85 Skip channel setting 88 Scan resume condition 89 12PRIORITY WATCH 90-91 Priority watch types 90 Priority watch operation 90 13POCKET ...
... name 80 Memory name indication 82 11 SCAN OPERATION 83-89 Scan types 83 Scan start/stop 84 Programming scan edge channels 85 Skip channel setting 88 Scan resume condition 89 12PRIORITY WATCH 90-91 Priority watch types 90 Priority watch operation 90 13POCKET ...
Instruction Manual
Page 12
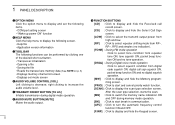
... code squelch ON, digital call sign squelch ON, pocket beep function ON and no digital squelch operation. [MW] : Click to display and hide the Memory programming screen. [PRIO] : Click to start break-in communication. [AFC] : Click to turn the automatic frequency control function ON and OFF. [F.INP] : Click to decrease; After...
... code squelch ON, digital call sign squelch ON, pocket beep function ON and no digital squelch operation. [MW] : Click to display and hide the Memory programming screen. [PRIO] : Click to start break-in communication. [AFC] : Click to turn the automatic frequency control function ON and OFF. [F.INP] : Click to decrease; After...
Instruction Manual
Page 13
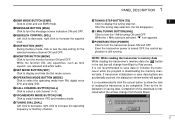
... ON and OFF. While the 1 MHz tuning is downloading the memory channel data. If transceiver initialization or save data or initialize the transceiver while the program is selected, "Z" icon appears. @2 POWER BUTTON [POWER] Click to allow the task of the download is still running. Completion of reading the transceiver to Red...
... ON and OFF. While the 1 MHz tuning is downloading the memory channel data. If transceiver initialization or save data or initialize the transceiver while the program is selected, "Z" icon appears. @2 POWER BUTTON [POWER] Click to allow the task of the download is still running. Completion of reading the transceiver to Red...
Instruction Manual
Page 14
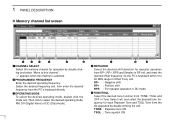
... from the PC's keyboard directly. 1 PANEL DESCRIPTION D Memory channel list screen q we r t y q CHANNEL SELECT Select the memory channel for operation by double clicking the cell. w PROGRAMMED FREQUENCY Enter the desired operating frequency.
... from the PC's keyboard directly. 1 PANEL DESCRIPTION D Memory channel list screen q we r t y q CHANNEL SELECT Select the memory channel for operation by double clicking the cell. w PROGRAMMED FREQUENCY Enter the desired operating frequency.
Instruction Manual
Page 39
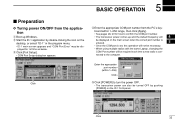
...the power OFF. • The transceiver power can also be turned OFF by double clicking the icon on the desktop, or select "ID-1" in the program menu. • ID-1 main screen appears and "COM Port Error" may be required each time a new radio is con- played for how to con&#... transceiver power comes up Windows. rEnter the appropriate COM port number from the application q Boot up and the default frequency will 4 be displayed on the ID-1 front panel. Click 32 board within 1-256) Click t Click [POWER] to the computer. Click Enter the appropriate port number (within 1-256 range, ...
...the power OFF. • The transceiver power can also be turned OFF by double clicking the icon on the desktop, or select "ID-1" in the program menu. • ID-1 main screen appears and "COM Port Error" may be required each time a new radio is con- played for how to con&#... transceiver power comes up Windows. rEnter the appropriate COM port number from the application q Boot up and the default frequency will 4 be displayed on the ID-1 front panel. Click 32 board within 1-256) Click t Click [POWER] to the computer. Click Enter the appropriate port number (within 1-256 range, ...

Instruction Manual
Page 46
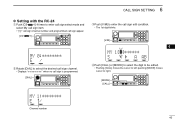
6 CALL SIGN SETTING Your call sign setting Your call sign must be programmed. r Click [OK] for both Digital voice and data modes communications. Click either [Y]/[Z] button for "MY" to select the call signs for your group members can be programmed for "MY" to 5 call sign channel. Up to program. Click Click wClick either button. 39 eSelect "MY" text box then type your call sign from the PC's keyboard. D Setting with the application qClick [CS]. • Select Call Sign screen appears. Type your call sign here.
6 CALL SIGN SETTING Your call sign setting Your call sign must be programmed. r Click [OK] for both Digital voice and data modes communications. Click either [Y]/[Z] button for "MY" to select the call signs for your group members can be programmed for "MY" to 5 call sign channel. Up to program. Click Click wClick either button. 39 eSelect "MY" text box then type your call sign from the PC's keyboard. D Setting with the application qClick [CS]. • Select Call Sign screen appears. Type your call sign here.
Instruction Manual
Page 47
...8226; •1] 4 times to enter call sign select mode and select My call sign item. • "MY" call sign channel number and programmed call sign appear. [CS• •1] MY 0:******** E/ w Rotate [DIAL] to select the desired call sign channel. • Displays "********" when no... call sign is programmed. [DIAL] e Push [V/M] to enter the call sign edit condition. • The 1st digit blinks. [V/M] 6 MY 1:******** S ç å A AB rPush [CALL...
...8226; •1] 4 times to enter call sign select mode and select My call sign item. • "MY" call sign channel number and programmed call sign appear. [CS• •1] MY 0:******** E/ w Rotate [DIAL] to select the desired call sign channel. • Displays "********" when no... call sign is programmed. [DIAL] e Push [V/M] to enter the call sign edit condition. • The 1st digit blinks. [V/M] 6 MY 1:******** S ç å A AB rPush [CALL...
Instruction Manual
Page 49
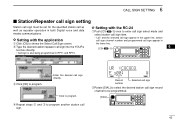
...call sign appear in the upper line, station call sign channel number and programmed call as well as repeater operation in both Digital voice and data modes communications. rRepeat steps w and e to program another station call sign record channel to be set for the specified... Enter the desired call sign into the YOUR's text box directly. • Call sign is also being programmed in the lower line. [CS• •1] 6 e Click [OK] to program. wType the desired station/repeater call sign directly. CALL SIGN SETTING 6 Station/Repeater call sign setting Station call...
...call sign appear in the upper line, station call sign channel number and programmed call as well as repeater operation in both Digital voice and data modes communications. rRepeat steps w and e to program another station call sign record channel to be set for the specified... Enter the desired call sign into the YOUR's text box directly. • Call sign is also being programmed in the lower line. [CS• •1] 6 e Click [OK] to program. wType the desired station/repeater call sign directly. CALL SIGN SETTING 6 Station/Repeater call sign setting Station call...
Instruction Manual
Page 51
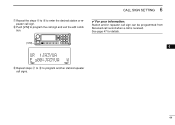
CALL SIGN SETTING 6 uRepeat the steps r to y to enter the desired station or repeater call signs. 44 See page 47 for details. [V/M] 6 UR :JA3YUA E s00:JA3YUA W oRepeat steps w to i to program the call sign and exit the edit condition. ✔ For your information: Station and/or repeater call sign can be programmed from Received call record when a call is received. iPush [V/M] to program another station/repeater call sign.
CALL SIGN SETTING 6 uRepeat the steps r to y to enter the desired station or repeater call signs. 44 See page 47 for details. [V/M] 6 UR :JA3YUA E s00:JA3YUA W oRepeat steps w to i to program the call sign and exit the edit condition. ✔ For your information: Station and/or repeater call sign can be programmed from Received call record when a call is received. iPush [V/M] to program another station/repeater call sign.

Instruction Manual
Page 53
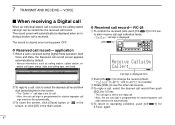
... the squelch does not function, changing the squelch setting or pressing the moni button will be received. • Up to select the desired call sign (programmed) ; Click [OK]. Push [CS• •1]. - Rotate [DIAL] to 10 received call signs can be stored into the received call record automatically... the desired call sign into the microphone at normal voice level. • Transmit indicator appears and the RF meter shows the output power. • The programmed your ("MY") call sign (see pgs. 42-44), then push [SQL] for details. RC-24 - y Release [PTT] to return to receive. &#...
... the squelch does not function, changing the squelch setting or pressing the moni button will be received. • Up to select the desired call sign (programmed) ; Click [OK]. Push [CS• •1]. - Rotate [DIAL] to 10 received call signs can be stored into the received call record automatically... the desired call sign into the microphone at normal voice level. • Transmit indicator appears and the RF meter shows the output power. • The programmed your ("MY") call sign (see pgs. 42-44), then push [SQL] for details. RC-24 - y Release [PTT] to return to receive. &#...
Instruction Manual
Page 54
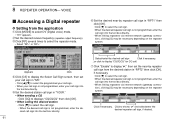
... sign indication mode. • "Caller" call record- D Received call sign is displayed. [CS• •1] Receive Callsign Caller: Call sign is programmed for station/repeater call record- The record is programmed for station/repeater call records. application qWhen a call is received. RC-24 qTo confirm the received calls, push [CS...
... sign indication mode. • "Caller" call record- D Received call sign is displayed. [CS• •1] Receive Callsign Caller: Call sign is programmed for station/repeater call record- The record is programmed for station/repeater call records. application qWhen a call is received. RC-24 qTo confirm the received calls, push [CS...

Instruction Manual
Page 57
..., etc., in advance. • "TX Message" appears. [TXinh• ] Ch1 OFF: TX Message TR wRotate [DIAL] to select the desired message channel. • Ch1 to program the call sign.
..., etc., in advance. • "TX Message" appears. [TXinh• ] Ch1 OFF: TX Message TR wRotate [DIAL] to select the desired message channel. • Ch1 to program the call sign.
Instruction Manual
Page 68
...station in "RPT1" then click [OK]. • Click [Z] to select the call sign. • When the desired repeater call sign is not programmed, enter the call sign, if desired. w Set the desired receive frequency (repeater output frequency). ySet the desired near -by repeater call sign in..." then click [OK], if necessary. • Click [Z] to select the call sign. • When the desired repeater call sign is not programmed, enter the call sign into the text box directly. • When linking repeaters via internet network (gateway connection), clicking [G] may be necessary depending...
...station in "RPT1" then click [OK]. • Click [Z] to select the call sign. • When the desired repeater call sign is not programmed, enter the call sign, if desired. w Set the desired receive frequency (repeater output frequency). ySet the desired near -by repeater call sign in..." then click [OK], if necessary. • Click [Z] to select the call sign. • When the desired repeater call sign is not programmed, enter the call sign into the text box directly. • When linking repeaters via internet network (gateway connection), clicking [G] may be necessary depending...

Instruction Manual
Page 70
... repeaters via internet network (gateway connection), pushing [ ] for call sign setting when the desired call sign is not programmed. • Push [CS• •1] one more times again to exit call sign is not programmed. w Set the desired receive frequency (repeater output frequency). 8 REPEATER OPERATION- tPush [CS• •1] one more time...
... repeaters via internet network (gateway connection), pushing [ ] for call sign setting when the desired call sign is not programmed. • Push [CS• •1] one more times again to exit call sign is not programmed. w Set the desired receive frequency (repeater output frequency). 8 REPEATER OPERATION- tPush [CS• •1] one more time...

Instruction Manual
Page 72
... call sign.* Set the gateway Set the gateway repeater call sign.* repeater call sign. *See Note below NOTE: When the near -by repeater is not programmed, enter your call sign into the text box directly. • When the gateway repeater require the "G" setting, click [G]. e Click [RP] several times... call sign into the text box directly. tSet the gateway repeater call sign in "YOUR" then click [OK]. • Click [Z] to select the programmed your call sign. • When your call sign is gateway repeater, set your call sign into the text box directly. w Set the near -by...
... call sign.* Set the gateway Set the gateway repeater call sign.* repeater call sign. *See Note below NOTE: When the near -by repeater is not programmed, enter your call sign into the text box directly. • When the gateway repeater require the "G" setting, click [G]. e Click [RP] several times... call sign into the text box directly. tSet the gateway repeater call sign in "YOUR" then click [OK]. • Click [Z] to select the programmed your call sign. • When your call sign is gateway repeater, set your call sign into the text box directly. w Set the near -by...
Instruction Manual
Page 74
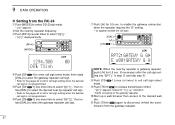
...;1] once (or twice) to select the desired near -by repeater is gateway repeater, push [ ] for call sign setting when the desired call sign is not programmed. e Push [RP•4] several times to select "RPS." • "RPS" displayed briefly. [RP•4] [MODE] 1294.500 DD TXinh LOW 00 rPush [CS•...
...;1] once (or twice) to select the desired near -by repeater is gateway repeater, push [ ] for call sign setting when the desired call sign is not programmed. e Push [RP•4] several times to select "RPS." • "RPS" displayed briefly. [RP•4] [MODE] 1294.500 DD TXinh LOW 00 rPush [CS•...
Instruction Manual
Page 75
...call sign into the text box directly. uSet the gateway repeater call sign in "MY" then click [OK]. • Click [Y]/[Z] to select the programmed your call sign. • When your call sign is gateway repeater, set your call sign in "RPT2," then [OK], if desired. •.... • Click [Z] to display the Select Call Sign screen, set the call sign into the text box directly. For direct data transferring between ID-1s. w Set the desired frequency. Click if necessary. o Open "Network Computers." • The shared folder of the desired station appears. •...
...call sign into the text box directly. uSet the gateway repeater call sign in "MY" then click [OK]. • Click [Y]/[Z] to select the programmed your call sign. • When your call sign is gateway repeater, set your call sign in "RPT2," then [OK], if desired. •.... • Click [Z] to display the Select Call Sign screen, set the call sign into the text box directly. For direct data transferring between ID-1s. w Set the desired frequency. Click if necessary. o Open "Network Computers." • The shared folder of the desired station appears. •...

Instruction Manual
Page 76
...the "G" setting. • "G" appears beside the call sign, if desired. uPush [ ] for call sign setting when the desired call sign is not programmed. to select the gateway repeater call sign. ing the PC through repeater/s. • "RPS" displayed briefly. NOTE: When the near -by repeater is... Set the desired frequency. ePush [RP•4] several times to select DD (Data) mode. • "DD" appears. For direct data transferring between ID-1s, go to exit call sign setting into "RPT1" in step t and skip step y. iPush [CS• •1] once (or twice) to step i.
...the "G" setting. • "G" appears beside the call sign, if desired. uPush [ ] for call sign setting when the desired call sign is not programmed. to select the gateway repeater call sign. ing the PC through repeater/s. • "RPS" displayed briefly. NOTE: When the near -by repeater is... Set the desired frequency. ePush [RP•4] several times to select DD (Data) mode. • "DD" appears. For direct data transferring between ID-1s, go to exit call sign setting into "RPT1" in step t and skip step y. iPush [CS• •1] once (or twice) to step i.

Instruction Manual
Page 78
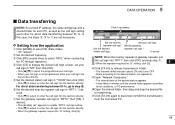
...Appears 71 • Dial selection wLeft click or right click on [DIAL] to increase or decrease the memory channel number. • The programmed memories can only be selected. • Direct channel number input w Click on the PC keyboard. in tool bar. - Each of these... channels can also be individually programmed with the application q Click [V/M] to display keypad screen. Click " " in View menu. - eDouble click, or right click the desired channel's "Select"...
...Appears 71 • Dial selection wLeft click or right click on [DIAL] to increase or decrease the memory channel number. • The programmed memories can only be selected. • Direct channel number input w Click on the PC keyboard. in tool bar. - Each of these... channels can also be individually programmed with the application q Click [V/M] to display keypad screen. Click " " in View menu. - eDouble click, or right click the desired channel's "Select"...
Instruction Manual
Page 79
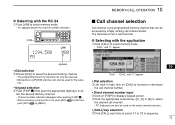
... used for the direct channel selection. • [CALL] key selection w Click [CALL] each time to select C1 to select the desired memory channel. • The programmed memory channels can only be selected. • Microphone's [UP]/[DN] switches can be used for the selec- MEMORY/CALL OPERATION 10 D Selecting with the application...
... used for the direct channel selection. • [CALL] key selection w Click [CALL] each time to select C1 to select the desired memory channel. • The programmed memory channels can only be selected. • Microphone's [UP]/[DN] switches can be used for the selec- MEMORY/CALL OPERATION 10 D Selecting with the application...


