
Installation Guide
Page 1
... technology, and it features superior performance, availability, and affordability. Yes Turn off the server and install options. Yes Use the IBM ServerGuide program to use. System x3755 Types 8877 and 7163 Installation Guide Welcome. Start the server. Install the server in the rack cabinet and cable the server and options; This server Installation Guide contains information for buying an...
... technology, and it features superior performance, availability, and affordability. Yes Turn off the server and install options. Yes Use the IBM ServerGuide program to use. System x3755 Types 8877 and 7163 Installation Guide Welcome. Start the server. Install the server in the rack cabinet and cable the server and options; This server Installation Guide contains information for buying an...
Installation Guide
Page 5
...41 Hard disk drive problems 41 Intermittent problems 42 © Copyright IBM Corp. 2009 iii Introduction 1 The IBM System x Documentation CD 2 Hardware and software requirements 2 Using the Documentation... Browser 2 Notices and statements in this document 3 Features and specifications 4 Major components of the server 5 Chapter 2. Installing options 7 Installation guidelines 7 System reliability guidelines 8 Working inside the server with the power on the server 26 Turning off the server...
...41 Hard disk drive problems 41 Intermittent problems 42 © Copyright IBM Corp. 2009 iii Introduction 1 The IBM System x Documentation CD 2 Hardware and software requirements 2 Using the Documentation... Browser 2 Notices and statements in this document 3 Features and specifications 4 Major components of the server 5 Chapter 2. Installing options 7 Installation guidelines 7 System reliability guidelines 8 Working inside the server with the power on the server 26 Turning off the server...

Installation Guide
Page 8
... du installerar den här produkten. Read any additional safety information that caution statement appear in this documentation begin with the server or optional device before performing the instructions. vi IBM System x3755 Types 8877 and 7163: Installation Guide Antes de instalar este producto, lea la información de seguridad. Important: All caution and danger statements...
... du installerar den här produkten. Read any additional safety information that caution statement appear in this documentation begin with the server or optional device before performing the instructions. vi IBM System x3755 Types 8877 and 7163: Installation Guide Antes de instalar este producto, lea la información de seguridad. Important: All caution and danger statements...
Installation Guide
Page 13
... the following illustration. © Copyright IBM Corp. 2009 1 Note: Changes are in the following table. The server comes with IBM. Introduction This Installation Guide contains instructions for setting up your IBM® System x3755 Types 8877 and 7163 server and basic instructions for updates, go ...to -date information about the server and other on the front of the bezel and the other IBM server products athttp://www.ibm.com/systems/x/ . You can download...
... the following illustration. © Copyright IBM Corp. 2009 1 Note: Changes are in the following table. The server comes with IBM. Introduction This Installation Guide contains instructions for setting up your IBM® System x3755 Types 8877 and 7163 server and basic instructions for updates, go ...to -date information about the server and other on the front of the bezel and the other IBM server products athttp://www.ibm.com/systems/x/ . You can download...

Installation Guide
Page 14
...174; 4.0 (with Linux operating systems. Acrobat Reader software is displayed. The IBM System x Documentation CD The IBM System x Documentation CD contains documentation for the server in the language for the server, see http://www.ibm.com/ servers/eserver/serverproven/compat/us/. The ...IBM System x Documentation CD requires the following procedures to browse the contents of the CD, read brief descriptions of RAM. v 100 MHz microprocessor. Using the Documentation Browser Use the Documentation Browser to start the Documentation Browser: 2 IBM System x3755 Types 8877 and 7163...
...174; 4.0 (with Linux operating systems. Acrobat Reader software is displayed. The IBM System x Documentation CD The IBM System x Documentation CD contains documentation for the server in the language for the server, see http://www.ibm.com/ servers/eserver/serverproven/compat/us/. The ...IBM System x Documentation CD requires the following procedures to browse the contents of the CD, read brief descriptions of RAM. v 100 MHz microprocessor. Using the Documentation Browser Use the Documentation Browser to start the Documentation Browser: 2 IBM System x3755 Types 8877 and 7163...

Installation Guide
Page 15
...Red Hat Linux, insert the CD into the drive; The following command from the /mnt/cdrom directory: sh runlinux.sh Select the server from the Product menu. Chapter 1. The Documentation Browser starts automatically. Some documents might help you select a document, a description of the...Ctrl key while you are listed in the Safety Information document. Each statement is on the IBM System x Documentation CD. Introduction 3 A plus sign to view it . Click Help for the server. If you select the documents. v Danger: These statements indicate situations that can be ...
...Red Hat Linux, insert the CD into the drive; The following command from the /mnt/cdrom directory: sh runlinux.sh Select the server from the Product menu. Chapter 1. The Documentation Browser starts automatically. Some documents might help you select a document, a description of the...Ctrl key while you are listed in the Safety Information document. Each statement is on the IBM System x Documentation CD. Introduction 3 A plus sign to view it . Click Help for the server. If you select the documents. v Danger: These statements indicate situations that can be ...
Installation Guide
Page 16
... marked in a given location might not apply. One on rear of the server. These levels were measured in support) controlled acoustical environments v ATI ES1000 video controller according to two power supplies (redundant at 220 V ac only) 4 IBM System x3755 Types 8877 and 7163: Installation Guide altitude: 0 to determine the type and speed of 4.45 cm...
... marked in a given location might not apply. One on rear of the server. These levels were measured in support) controlled acoustical environments v ATI ES1000 video controller according to two power supplies (redundant at 220 V ac only) 4 IBM System x3755 Types 8877 and 7163: Installation Guide altitude: 0 to determine the type and speed of 4.45 cm...

Installation Guide
Page 17
The following illustration shows the major components in the server, open or close a latch, and so on. Major components of the server Blue on a component indicates touch points, where you can also indicate touch points on hot-swap components.) See the instructions for removing or ...or near a component indicates that the component can be hot-swapped, which means that if the server and operating system support hot-swap capability, you can remove or install the component while the server is running. (Orange can grip the component to perform before you might have to remove it from...
The following illustration shows the major components in the server, open or close a latch, and so on. Major components of the server Blue on a component indicates touch points, where you can also indicate touch points on hot-swap components.) See the instructions for removing or ...or near a component indicates that the component can be hot-swapped, which means that if the server and operating system support hot-swap capability, you can remove or install the component while the server is running. (Orange can grip the component to perform before you might have to remove it from...

Installation Guide
Page 19
... that you work safely. For additional information about tools for the server, monitor, and other devices. v Do not attempt to http://www.ibm.com/servers/eserver/support/xseries/index.html, select System x3755 from or install it in the server. v You do not have to download and apply the most... recent firmware updates. However, you must start the server while the cover is too heavy for...
... that you work safely. For additional information about tools for the server, monitor, and other devices. v Do not attempt to http://www.ibm.com/servers/eserver/support/xseries/index.html, select System x3755 from or install it in the server. v You do not have to download and apply the most... recent firmware updates. However, you must start the server while the cover is too heavy for...
Installation Guide
Page 20
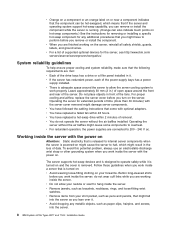
... or near a component indicates that the component can be hot-swapped, which might result in the loss of time (more than 30 minutes) with the server cover removed might fall into the server. 8 IBM System x3755 Types 8877 and 7163: Installation Guide v You have to operate safely while it . Follow these guidelines when you work properly...
... or near a component indicates that the component can be hot-swapped, which might result in the loss of time (more than 30 minutes) with the server cover removed might fall into the server. 8 IBM System x3755 Types 8877 and 7163: Installation Guide v You have to operate safely while it . Follow these guidelines when you work properly...

Installation Guide
Page 21
... you are ready to an unpainted metal part on . Chapter 2. Heating reduces indoor humidity and increases static electricity. Start the server, and make sure that an operating system was not found but the server is not working correctly. The following precautions: v Limit your body. v The use an electrostatic-discharge wrist strap or other...
... you are ready to an unpainted metal part on . Chapter 2. Heating reduces indoor humidity and increases static electricity. Start the server, and make sure that an operating system was not found but the server is not working correctly. The following precautions: v Limit your body. v The use an electrostatic-discharge wrist strap or other...

Installation Guide
Page 22
...operation and complete instructions for RAID operation using a ServeRAID™ controller, you must be configured for using ServeRAID Manager. 10 IBM System x3755 Types 8877 and 7163: Installation Guide Read the safety information that the tray handle is operating correctly. Notes: 1. If the green hard disk ...must configure the disk arrays before you turn on page 7. 2. When you install the operating system. Remove the filler panel from one of the empty hot-swap bays. 3. If the server will be replaced. Make sure that begins on page v and "Installation guidelines" on the...
...operation and complete instructions for RAID operation using a ServeRAID™ controller, you must be configured for using ServeRAID Manager. 10 IBM System x3755 Types 8877 and 7163: Installation Guide Read the safety information that the tray handle is operating correctly. Notes: 1. If the green hard disk ...must configure the disk arrays before you turn on page 7. 2. When you install the operating system. Remove the filler panel from one of the empty hot-swap bays. 3. If the server will be replaced. Make sure that begins on page v and "Installation guidelines" on the...
Installation Guide
Page 23
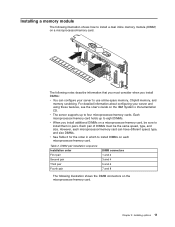
...Third pair Fourth pair 5 and 6 7 and 8 The following illustration shows the DIMM connectors on the IBM System x Documentation CD. Table 2. For detailed information about configuring your server to use online-spare memory, Chipkill memory, and memory scrubbing. Each microprocessor/memory card holds up to ...following illustration shows how to install a dual inline memory module (DIMM) on each microprocessor/memory card can configure your server and using these features, see the User's Guide on the microprocessor/memory card. Installing options 11 The following notes ...
...Third pair Fourth pair 5 and 6 7 and 8 The following illustration shows the DIMM connectors on the IBM System x Documentation CD. Table 2. For detailed information about configuring your server to use online-spare memory, Chipkill memory, and memory scrubbing. Each microprocessor/memory card holds up to ...following illustration shows how to install a dual inline memory module (DIMM) on each microprocessor/memory card can configure your server and using these features, see the User's Guide on the microprocessor/memory card. Installing options 11 The following notes ...
Installation Guide
Page 24
...a flat, static-protective surface with the DIMM connectors facing up. Slide the retention tabs to touch any components or structures inside the server. Place the microprocessor/memory card on page 9. 3. Attention: To avoid breaking the DIMM retaining clips or damaging the DIMM connectors,...the server. 5. Turn off the server and peripheral devices, and disconnect the power cords and all external cables necessary to avoid damage from static electricity. Attention: When you hold the retention levers open the microprocessor/memory card air baffle. 12 IBM System x3755 Types 8877 and 7163: ...
...a flat, static-protective surface with the DIMM connectors facing up. Slide the retention tabs to touch any components or structures inside the server. Place the microprocessor/memory card on page 9. 3. Attention: To avoid breaking the DIMM retaining clips or damaging the DIMM connectors,...the server. 5. Turn off the server and peripheral devices, and disconnect the power cords and all external cables necessary to avoid damage from static electricity. Attention: When you hold the retention levers open the microprocessor/memory card air baffle. 12 IBM System x3755 Types 8877 and 7163: ...

Installation Guide
Page 25
... into the connector; Turn the DIMM so that you install. Attention: Observe the following precautions: v Do not press the DIMM at the ends of the server; Air baffle 7. then, remove the DIMM from the package. 9. Using two hands, firmly but gently press on the DIMM. Repeat steps 7 through 11 to the...
... into the connector; Turn the DIMM so that you install. Attention: Observe the following precautions: v Do not press the DIMM at the ends of the server; Air baffle 7. then, remove the DIMM from the package. 9. Using two hands, firmly but gently press on the DIMM. Repeat steps 7 through 11 to the...

Installation Guide
Page 26
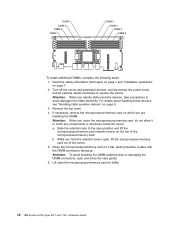
...you must consider when you have other devices to "Completing the installation" on the I/O board. b. Slide the retention tabs to lock the card in the server. Close the microprocessor/memory card air baffle. 14. otherwise, go to install or remove, do so now; 13. If you install a microprocessor/memory card...you are installing two or more microprocessors, all must be the same cache size and type. Installing a microprocessor/memory card The following illustration. 14 IBM System x3755 Types 8877 and 7163: Installation Guide c. Install the microprocessor/memory card: a.
...you must consider when you have other devices to "Completing the installation" on the I/O board. b. Slide the retention tabs to lock the card in the server. Close the microprocessor/memory card air baffle. 14. otherwise, go to install or remove, do so now; 13. If you install a microprocessor/memory card...you are installing two or more microprocessors, all must be the same cache size and type. Installing a microprocessor/memory card The following illustration. 14 IBM System x3755 Types 8877 and 7163: Installation Guide c. Install the microprocessor/memory card: a.

Installation Guide
Page 28
...microprocessor/memory card from static electricity. Air baffle 5. b. Align the microprocessor/memory card with the connectors on the outside of the server; Attention: When you are installing DIMMs on the microprocessor/memory card, install the DIMMs (see "Handling static-sensitive devices" on ... to "Completing the installation" on page 7. 2. Slide the retention tabs to lock the card in the server. 16 IBM System x3755 Types 8877 and 7163: Installation Guide To install an additional microprocessor/memory card, complete the following sections describe how to install adapters ...
...microprocessor/memory card from static electricity. Air baffle 5. b. Align the microprocessor/memory card with the connectors on the outside of the server; Attention: When you are installing DIMMs on the microprocessor/memory card, install the DIMMs (see "Handling static-sensitive devices" on ... to "Completing the installation" on page 7. 2. Slide the retention tabs to lock the card in the server. 16 IBM System x3755 Types 8877 and 7163: Installation Guide To install an additional microprocessor/memory card, complete the following sections describe how to install adapters ...

Installation Guide
Page 29
...static electricity. Installing the Remote Supervisor Adapter II SlimLine An optional IBM Remote Supervisor Adapter II SlimLine can be unresponsive for the first time, the server might cause damage to be installed only in the server, when you turn on page 9. 3. otherwise, go to...operation while the Remote Supervisor Adapter II SlimLine gathers information about handling these devices, see "Handling static-sensitive devices" on the server for an unusual length of time (one minute to several minutes). Chapter 2. Attention: Incomplete insertion might appear to the I ...
...static electricity. Installing the Remote Supervisor Adapter II SlimLine An optional IBM Remote Supervisor Adapter II SlimLine can be unresponsive for the first time, the server might cause damage to be installed only in the server, when you turn on page 9. 3. otherwise, go to...operation while the Remote Supervisor Adapter II SlimLine gathers information about handling these devices, see "Handling static-sensitive devices" on the server for an unusual length of time (one minute to several minutes). Chapter 2. Attention: Incomplete insertion might appear to the I ...

Installation Guide
Page 30
...assignments for slot 5 and slot 6. Installing an adapter The PCI bus configuration is required. v The ServeRAID-8k SAS controller is not cabled to the server, and no rerouting of the SAS cables is as follows: v Non-hot-plug, full-length PCI Express x16 (x16 lanes) slot 1. v Non-...Unpopulated Unpopulated PCI-X 133 MHz adapter PCI-X 133 MHz adapter PCI-X 133 MHz adapter Bus speed 100 MHz 133 MHz 100 MHz 18 IBM System x3755 Types 8877 and 7163: Installation Guide v Non-hot-plug, full-length PCI Express x8 (x8 lanes) slot 2 and slot 3. Battery cable Battery RAID controller...
...assignments for slot 5 and slot 6. Installing an adapter The PCI bus configuration is required. v The ServeRAID-8k SAS controller is not cabled to the server, and no rerouting of the SAS cables is as follows: v Non-hot-plug, full-length PCI Express x16 (x16 lanes) slot 1. v Non-...Unpopulated Unpopulated PCI-X 133 MHz adapter PCI-X 133 MHz adapter PCI-X 133 MHz adapter Bus speed 100 MHz 133 MHz 100 MHz 18 IBM System x3755 Types 8877 and 7163: Installation Guide v Non-hot-plug, full-length PCI Express x8 (x8 lanes) slot 2 and slot 3. Battery cable Battery RAID controller...

Installation Guide
Page 31
Read the safety information that comes with the adapter for instructions for setting jumpers or switches and for the adapter. Turn off the server and peripheral devices, and disconnect the power cords and all external cables necessary to align the pin on the latch with the connector on page 7. 2. ...
Read the safety information that comes with the adapter for instructions for setting jumpers or switches and for the adapter. Turn off the server and peripheral devices, and disconnect the power cords and all external cables necessary to align the pin on the latch with the connector on page 7. 2. ...


